คุณต้องการเสียงเรียกเข้าส่วนตัวของคุณเอง ไม่ใช่เสียงที่มาจากที่ไหนก็ได้ แต่เป็นเสียงที่คุณสร้างขึ้นเองสำหรับใช้ในการโทรและเสียงแจ้งเตือน
เราอยู่ที่นี่เพื่อช่วยเหลือคุณในเรื่องนั้น เราจะแสดงวิธีการต่างๆ ให้คุณดู บันทึกริงโทน บนระบบต่างๆ เราจะแชร์เคล็ดลับง่ายๆ เพื่อผลลัพธ์ที่ดีขึ้นด้วย ดังนั้น เตรียมเสียงของคุณให้พร้อมสำหรับริงโทนแบบกำหนดเอง
ส่วนที่ 1 วิธีการบันทึกริงโทนบน iPhone
1. แปลงบันทึกเสียงเป็นเสียงเรียกเข้า (วิธีที่ง่ายที่สุด)
แอป Voice Memos บันทึกเสียงและแปลงเป็นเสียงเรียกเข้าแบบกำหนดเองที่ใช้งานได้ทันที พร้อมเครื่องมือตัดแต่งพื้นฐาน และส่วนนี้จะสอนวิธีการแปลงการบันทึกเสียงเป็นเสียงเรียกเข้าบน iPhone อย่างละเอียด
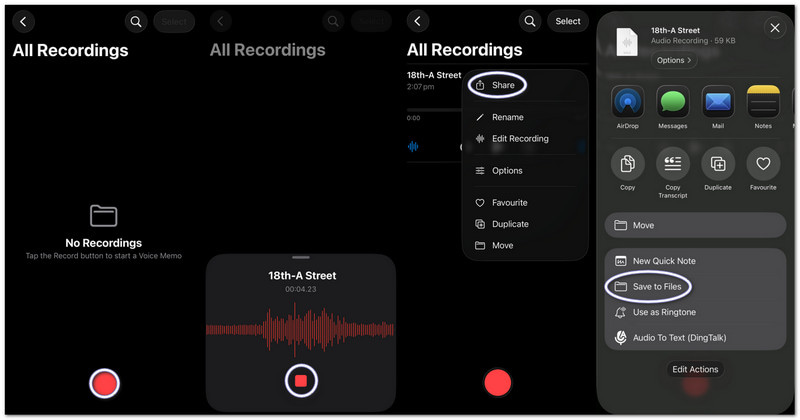
ขั้นตอนที่ 1เปิดใช้งานแอปบันทึกเสียงบน iPhone ของคุณ
ขั้นตอนที่ 2แตะสีแดง บันทึก กดปุ่มเพื่อพูดหรือเล่นไฟล์เสียงของคุณ
ขั้นตอนที่ 3แตะ หยุด เมื่อคุณทำเสร็จแล้ว
ขั้นตอนที่ 4แตะ จุดสามจุด (...) ในการบันทึกของคุณ
ขั้นตอนที่ 5เลือก บันทึกลงในไฟล์ เพื่อจัดเก็บไฟล์เสียงของคุณและนำไปใช้เป็นเสียงเรียกเข้าในภายหลัง
2. แปลงไฟล์เสียงใดๆ (MP3/M4A) เป็นริงโทน
สามารถเลือกไฟล์เสียง MP3 หรือ M4A ที่บันทึกไว้จากการดาวน์โหลดหรือแอปเพลงต่างๆ มาตั้งเป็นเสียงเรียกเข้าบน iPhone ได้
ขั้นตอนที่ 1ดาวน์โหลดไฟล์ MP3 หรือ M4A ของคุณแล้วบันทึกไว้ใน ไฟล์ แอป.
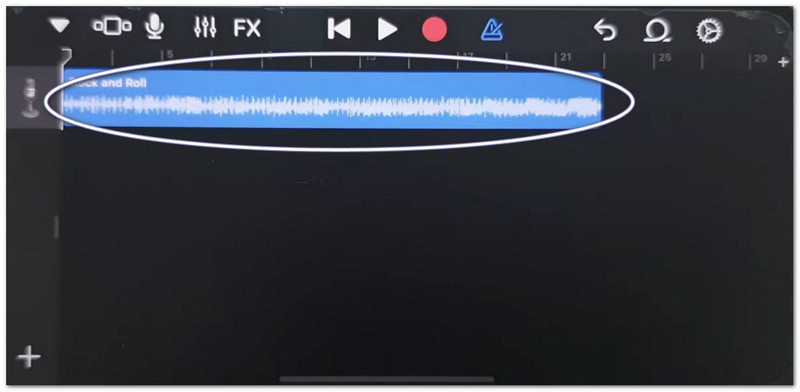
ขั้นตอนที่ 2วิ่ง การาจแบนด์ และเลือก บันทึกเสียง.
ขั้นตอนที่ 3ค้นหาไฟล์เสียงของคุณใน ไฟล์จากนั้นลากไปที่ไทม์ไลน์
ขั้นตอนที่ 4ไปที่ ไฟล์ค้นหาไฟล์เสียงของคุณ แล้วลากไปที่ไทม์ไลน์
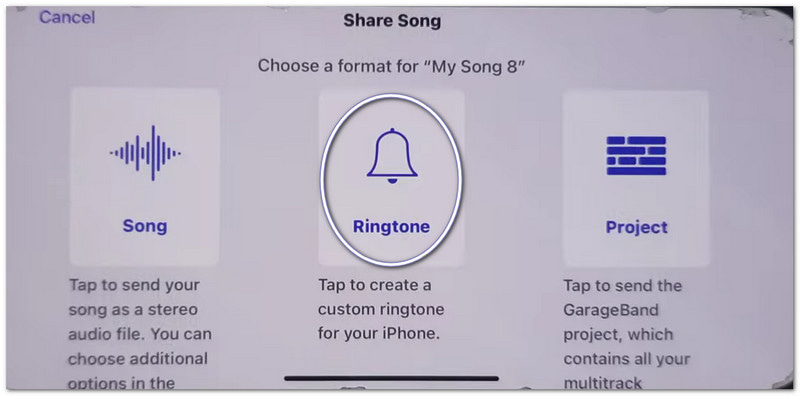
ขั้นตอนที่ 5ตัดให้เหลือต่ำกว่า 30 วินาที แล้วแตะ แบ่งปัน > ริงโทน > ส่งออก.
3. การใช้งาน GarageBand (สำหรับ iOS เวอร์ชันเก่า)
GarageBand เป็นโปรแกรมตัดต่อคลิปเสียงที่มีการควบคุมที่แม่นยำ ช่วยให้ผู้ใช้สามารถตัดต่อ จัดเรียง และส่งออกริงโทนแบบกำหนดเองได้อย่างง่ายดาย ทำให้เข้าใจได้ง่ายว่าวิธีการตั้งค่าการบันทึกเสียงเป็นริงโทนบน iPhone นั้นทำอย่างไร
ขั้นตอนที่ 1เปิด การาจแบนด์ และเลือก บันทึกเสียง.
ขั้นตอนที่ 2แตะ มุมมองเส้นทางจากนั้นเปิด ลูปเบราว์เซอร์.
ขั้นตอนที่ 3นำเข้าไฟล์เสียงหรือไฟล์บันทึกเสียงที่คุณบันทึกไว้
ขั้นตอนที่ 4ลากคลิปไปที่ไทม์ไลน์แล้วตัดให้เหลือความยาวไม่เกิน 30 วินาที
ขั้นตอนที่ 5แตะ เพลงของฉัน, แล้ว แบ่งปัน > ริงโทน > ส่งออก.
การแก้ไขปัญหา "การแชร์บันทึกบน iPhone ไม่ทำงาน"
หากหน้าต่างแชร์ไฟล์ค้าง ขัดข้อง หรือไม่แสดงแอปเมื่อแชร์ไฟล์บันทึกเสียงหรือไฟล์ GarageBand ให้ลองแก้ไขปัญหาตามวิธีเหล่านี้
วิธีแก้ไขด่วน:
- บังคับรีสตาร์ท: กด เพิ่มระดับเสียง และ ลดระดับเสียงจากนั้น กดปุ่มเปิด/ปิดค้างไว้จนกว่าสัญลักษณ์แอปเปิลจะปรากฏขึ้น
- อัปเดต iOS: ไปที่ การตั้งค่า > ทั่วไป > อัพเดตซอฟต์แวร์ติดตั้งการอัปเดตทั้งหมด เพื่อแก้ไขข้อผิดพลาดของระบบ
- สลับการใช้งาน AirDrop: เปิด ศูนย์กลางการควบคุม หากต้องการปิด AirDrop ให้ปิด AirDrop แล้วเปิดใหม่ การแชร์จะได้รับการอัปเดตอีกครั้ง
การแก้ไขระบบ
- เพิ่มพื้นที่จัดเก็บข้อมูล: ควรมีพื้นที่ว่างอย่างน้อย 2 กิกะไบต์ ลบไฟล์หรือวิดีโอที่ไม่ใช้งานแล้ว พื้นที่จัดเก็บข้อมูลเหลือน้อยอาจทำให้โปรแกรม Share Sheet ใช้งานไม่ได้
แก้ไขขั้นสุดท้าย
- รีเซ็ตการตั้งค่าทั้งหมด: ไปที่ การตั้งค่า > ทั่วไป > โอนย้าย หรือ รีเซ็ต iPhone > รีเซ็ตการตั้งค่าทั้งหมดการดำเนินการนี้จะไม่ลบข้อมูลของคุณ แต่จะรีเซ็ตการตั้งค่าระบบและสามารถแก้ไขปัญหาเกี่ยวกับแผ่นแชร์ได้
ส่วนที่ 2 วิธีการบันทึกริงโทนบนแอนดรอยด์
1. การใช้แอปสร้างริงโทน (วิธีที่แนะนำมากที่สุด)
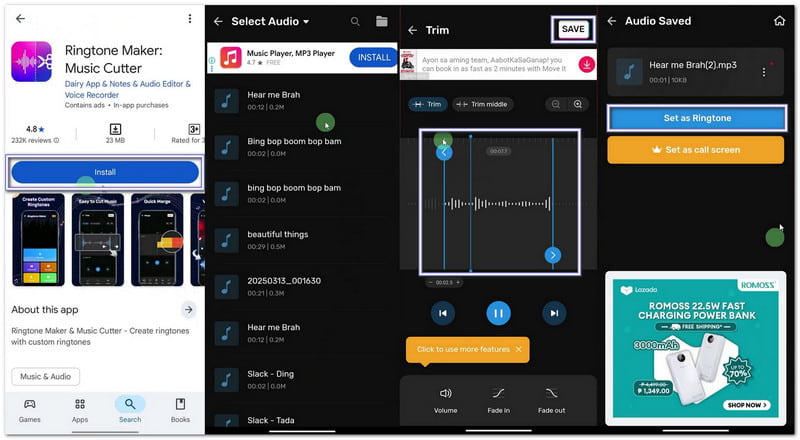
หากคุณต้องการเรียนรู้วิธีบันทึกริงโทนของคุณเอง คุณสามารถใช้แอป Maker: Music Cutter จาก Google Play Store ได้ แอปนี้มีจุดประสงค์หลักเพื่อช่วยคุณตัดแต่งเพลง ตัดส่วนเสียงที่ต้องการ และตั้งค่าเป็นริงโทนแบบกำหนดเองบนโทรศัพท์ Android ได้ทันที
ขั้นตอนที่ 1เปิด Google Play Store ค้นหา โปรแกรมสร้างริงโทน: โปรแกรมตัดเพลงติดตั้ง จากนั้นกด เปิด.
ขั้นตอนที่ 2แตะ เริ่ม. เลือก ทริม ออดิโออนุญาตสิทธิ์เพื่อให้แอปสามารถเข้าถึงไฟล์ของคุณได้
ขั้นตอนที่ 3เลือกเพลงหรือไฟล์เสียงจากโทรศัพท์ของคุณ เลื่อนแถบเลื่อนเพื่อเลือกส่วนเริ่มต้นและส่วนสิ้นสุดของเสียงเรียกเข้า
ขั้นตอนที่ 4 แตะ ตัด หรือ บันทึกเลือกความคมชัดหากต้องการ กด ยืนยัน- จากนั้นคลิก ตั้งเป็นเสียงเรียกเข้าอนุญาตให้ระบบเข้าถึงการตั้งค่า และเลือกเสียงเรียกเข้าเริ่มต้น
2. การตั้งค่าในตัว (สำหรับไฟล์เสียงที่ดาวน์โหลด)
การตั้งค่าของ Android อนุญาตให้เลือกไฟล์เสียงที่บันทึกไว้โดยตรงและกำหนดให้เป็นเสียงเรียกเข้าได้โดยไม่ต้องใช้แอปหรือเครื่องมือเพิ่มเติม
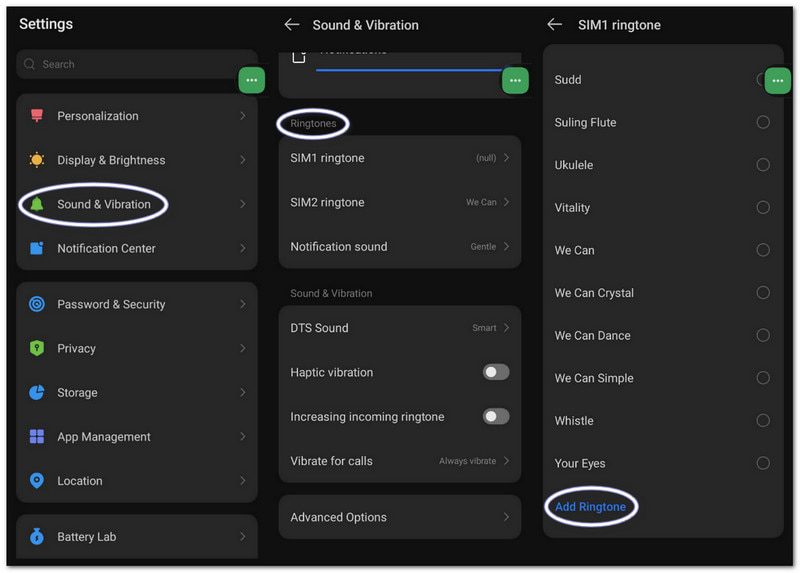
ขั้นตอนที่ 1ไปที่การตั้งค่าของโทรศัพท์ แตะ เสียงและการสั่นสะเทือน หรือ เสียง.
ขั้นตอนที่ 2แตะ เสียงเรียกเข้าโทรศัพท์ เพื่อดูตัวเลือกที่มีอยู่
ขั้นตอนที่ 3แตะ พลัส ปุ่มหรือ เพิ่มริงโทน ปุ่มที่ด้านบน
ขั้นตอนที่ 4เรียกดูไฟล์เสียงในที่เก็บข้อมูลของคุณ เลือกไฟล์เสียงของคุณ แล้วแตะ เสร็จแล้วจากนั้น ยืนยันการตั้งค่าให้เป็นเสียงเรียกเข้าเริ่มต้นของคุณ
ส่วนที่ 3 วิธีแปลงการบันทึกหน้าจอเป็นเสียงเรียกเข้า
นอกจากนี้ คุณยังสามารถแปลงการบันทึกหน้าจอเป็นเสียงเรียกเข้าบนคอมพิวเตอร์ Windows หรือ Mac ได้โดยใช้ โปรแกรมบันทึกหน้าจอ AVAideมีโหมดบันทึกเสียงที่สามารถบันทึกเสียงจากระบบและเสียงของคุณ ทำให้บันทึกริงโทนได้ง่าย
นอกจากนี้ยังมีฟังก์ชั่นการตั้งค่าเสียง เช่น การลดหรือเพิ่มระดับเสียง เปิดใช้งานการตัดเสียงรบกวน และแสดงคำเตือนเมื่อตรวจไม่พบเสียง แน่นอนว่าคุณสามารถส่งออกริงโทนในรูปแบบที่รองรับ เช่น MP3 และ M4A ซึ่งใช้งานได้ดีกับอุปกรณ์พกพา
ขั้นตอนที่ 1ดาวน์โหลดและติดตั้งโปรแกรม AVAide Screen Recorder บนคอมพิวเตอร์ Windows หรือ Mac ของคุณ

ดาวน์โหลดฟรี สำหรับ Windows 7 หรือใหม่กว่า
 ดาวน์โหลดอย่างปลอดภัย
ดาวน์โหลดฟรี สำหรับ Mac OS X 10.13 หรือใหม่กว่า
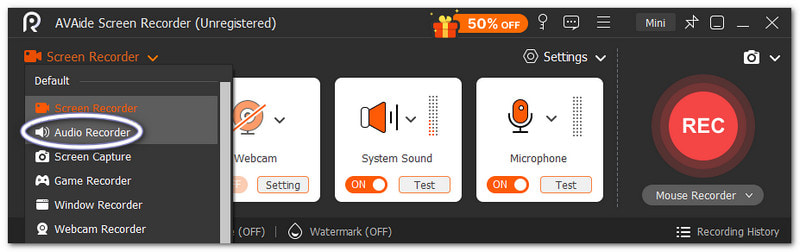
ดาวน์โหลดอย่างปลอดภัยขั้นตอนที่ 2โปรแกรมจะเริ่มต้นในโหมดบันทึกหน้าจอ คลิกที่เมนูแบบเลื่อนลง เลือก บันทึกเสียง เพื่อการบันทึกเสียงที่ดีขึ้น
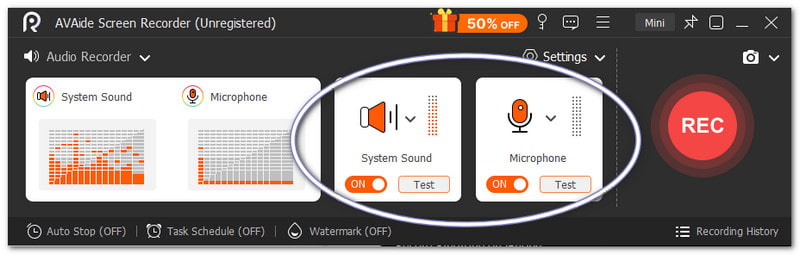
ขั้นตอนที่ 3เปิด ระบบเสียง เพื่อบันทึกเสียงภายใน เปิดใช้งาน ไมโครโฟน หากคุณต้องการเพิ่มเสียงของคุณ คุณยังสามารถปรับระดับเสียงได้ตามต้องการ
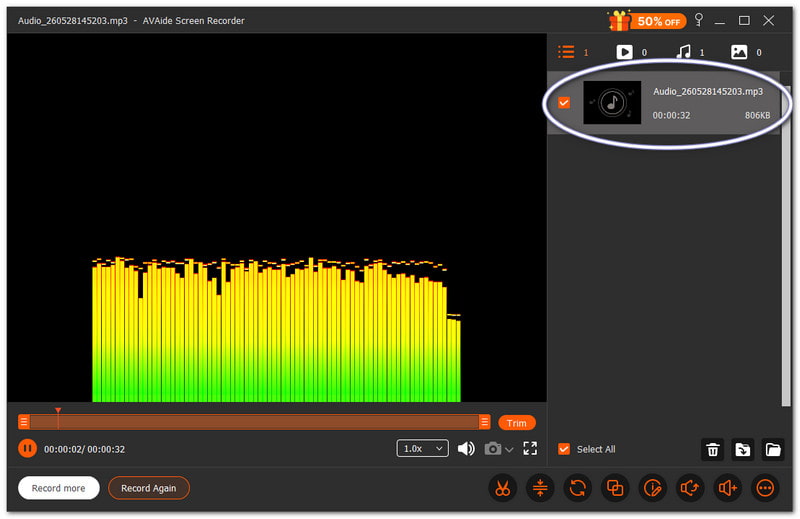
ขั้นตอนที่ 4ตี REC เพื่อเริ่มต้น โปรดรอการนับถอยหลัง เมื่อเริ่มแล้ว ให้เล่นเสียงที่คุณต้องการ กดปุ่ม หยุด กดปุ่มเมื่อเสร็จแล้ว ไฟล์จะบันทึกโดยอัตโนมัติ แต่คุณสามารถตัดแต่งหรือแก้ไขก่อนนำไปใช้เป็นริงโทนได้
ไม่ต้องสงสัยเลยว่า Mac เครื่องนี้และ เครื่องบันทึกเสียงของ Windows สามารถช่วยคุณสร้างริงโทนที่คุณชื่นชอบและต้องการสำหรับอุปกรณ์ของคุณ
ส่วนที่ 4 ขั้นตอนเฉพาะของซัมซุง
1. การใช้โปรแกรมบันทึกหน้าจอในตัว
Samsung Screen Recorder สามารถบันทึกเสียงจากวิดีโอและช่วยแปลงเสียงที่บันทึกไว้ให้เป็นริงโทนที่ใช้งานได้
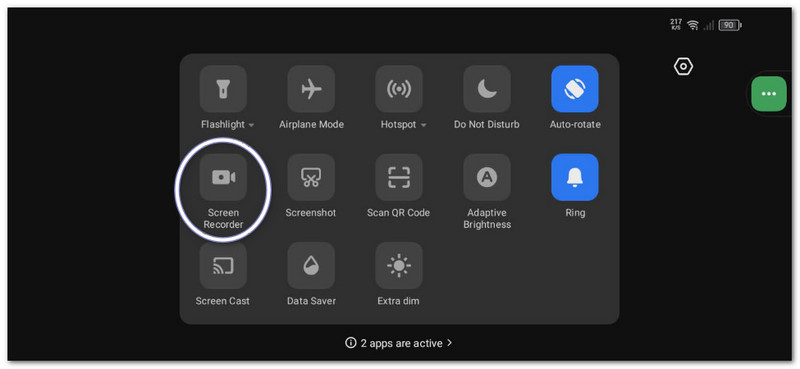
ขั้นตอนที่ 1ใน แผงควบคุมด่วนเลื่อนลง กดปุ่ม บันทึกหน้าจอ ปุ่ม ก่อนเริ่มต้น ให้เลือก เสียงสื่อ.
ขั้นตอนที่ 2เปิดวิดีโอหรือเพลงที่คุณต้องการบันทึก จากนั้นให้โปรแกรมบันทึกหน้าจอทำการบันทึกพร้อมเสียง
ขั้นตอนที่ 3หยุดบันทึกเมื่อเสร็จแล้ว ไฟล์จะถูกเก็บไว้ในแกลเลอรีของคุณ ใช้แอปแปลงวิดีโอเป็น MP3 เพื่อแยกเสียงออกมา
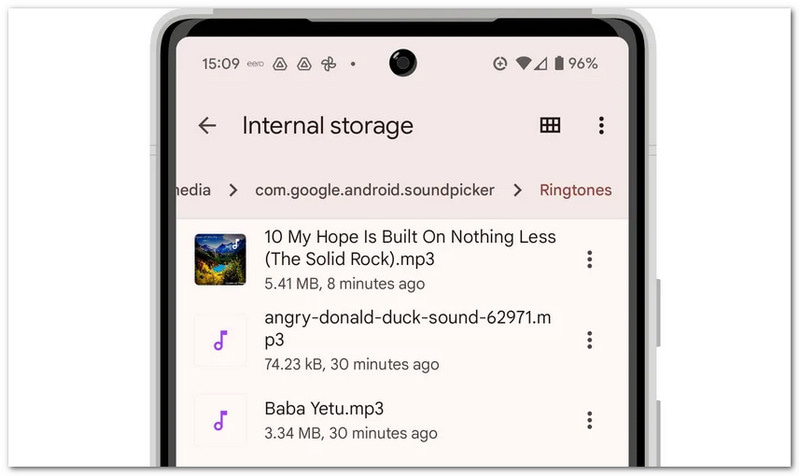
ขั้นตอนที่ 4ย้ายไฟล์ MP3 ไปยังที่ของคุณ หน่วยความจำภายใน > โฟลเดอร์ริงโทน เพื่อให้สามารถนำไปใช้ในภายหลังได้
วิธีการนี้แสดงให้เห็นว่า การบันทึกหน้าจอ Samsungดังนั้น โปรดตรวจสอบให้แน่ใจว่าได้แปลงวิดีโอที่บันทึกไว้เป็นเสียงอย่างเดียว เพื่อนำไปใช้เป็นเสียงเรียกเข้าได้
2. โปรแกรมสร้างริงโทนในตัว
การตั้งค่าเสียงเรียกเข้าของ Samsung ช่วยให้ผู้ใช้สามารถเลือกเพลง ตัดแต่งส่วนที่โดดเด่น และกำหนดให้เป็นเสียงเรียกเข้าเริ่มต้นของโทรศัพท์ได้ทันที
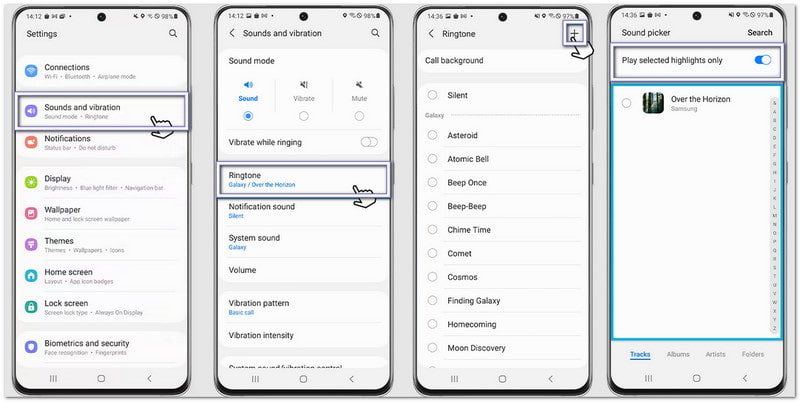
ขั้นตอนที่ 1เปิดโทรศัพท์ของคุณแล้วไปที่ การตั้งค่า. แตะ เสียงและการสั่นสะเทือน- จากนั้นเลือก ริงโทน.
ขั้นตอนที่ 2แตะ เพิ่ม กดปุ่มแล้วเลือกเพลงหรือไฟล์เสียงที่บันทึกไว้จากโทรศัพท์ของคุณ
ขั้นตอนที่ 3เปิดใช้งาน เล่นเฉพาะไฮไลท์ที่เลือกไว้เท่านั้น หากมีให้เลือก Samsung จะตัดส่วนที่ดีที่สุดของเสียงออกโดยอัตโนมัติ
ขั้นตอนที่ 4ยืนยันการเลือกของคุณ และเสียงนั้นจะถูกตั้งเป็นเสียงเรียกเข้าเริ่มต้นของคุณ
3. วิธีการจัดการไฟล์
โปรแกรมจัดการไฟล์ของ Samsung จะจัดระเบียบไฟล์เสียงและอนุญาตให้คัดลอกไฟล์ไปยังโฟลเดอร์ Ringtones ได้โดยตรง เพื่อให้ระบบตรวจจับริงโทนอัตโนมัติ
ขั้นตอนที่ 1เปิดตัว ไฟล์ของฉัน แอปบนโทรศัพท์ Samsung ของคุณ
ขั้นตอนที่ 2ไปที่ ดาวน์โหลด หรือ เครื่องเสียง โฟลเดอร์ ค้นหาไฟล์เสียงที่คุณบันทึกหรือดาวน์โหลดไว้
ขั้นตอนที่ 3กดค้างที่ไฟล์ แตะ สำเนาจากนั้นไปที่ พื้นที่เก็บข้อมูลภายใน > ริงโทน.
ขั้นตอนที่ 4วางไฟล์ลงในโฟลเดอร์ริงโทน จากนั้นกลับไปที่การตั้งค่าเสียง ไฟล์ของคุณจะปรากฏในรายการริงโทนแล้ว
ส่วนที่ 5. เคล็ดลับระดับมืออาชีพเพื่อผลลัพธ์ที่ดีที่สุด
ก่อนตั้งเสียงเรียกเข้า ควรทำตามคำแนะนำง่ายๆ สองสามข้อนี้ก่อน วิธีนี้จะทำให้เสียงเรียกเข้าของคุณชัดเจนและใช้งานได้ดียิ่งขึ้นบนโทรศัพท์ของคุณ
เคล็ดลับข้อที่ #1: เขียนให้กระชับ
ตั้งเสียงเรียกเข้าของคุณให้มีความยาวเพียง 30 ถึง 40 วินาทีเท่านั้น เพื่อให้เสียงราบรื่นและใช้งานได้ดีกับโทรศัพท์ Android
เคล็ดลับที่ #2: ใช้รูปแบบที่ถูกต้อง
ควรใช้ไฟล์ MP3 หรือ M4A เมื่อเป็นไปได้ รูปแบบไฟล์เหล่านี้ใช้งานได้ดีบนอุปกรณ์ Android ส่วนใหญ่โดยไม่มีข้อผิดพลาด
เคล็ดลับที่ #3: ตรวจสอบระดับเสียงก่อน
ลองเปิดเสียงเรียกเข้าดูก่อนตั้งค่า ตรวจสอบให้แน่ใจว่าเสียงดังหรือเบาเกินไป เพื่อป้องกันไม่ให้เกิดเหตุการณ์ไม่คาดฝันเมื่อมีคนโทรเข้ามา
คุณได้เรียนรู้แล้ว วิธีบันทึกริงโทนบนไอโฟนทั้งบนระบบแอนดรอยด์และคอมพิวเตอร์เดสก์ท็อป ดังนั้นไม่ว่าคุณจะใช้อุปกรณ์ใด คุณก็สามารถสร้างริงโทนแบบกำหนดเองได้ทุกเมื่อ
สำหรับผู้ใช้ Windows และ Mac โปรแกรมบันทึกหน้าจอ AVAide ทำให้กระบวนการง่ายขึ้น คุณสามารถบันทึกเสียงของคุณเองหรือบันทึกเสียงจากระบบของคุณได้ นอกจากนี้ยังสามารถตัดแต่งไฟล์หลังจากบันทึกเสร็จแล้ว ช่วยให้คุณเก็บเฉพาะส่วนที่ดีที่สุดสำหรับริงโทนของคุณ
เกี่ยวกับผู้เขียน

จับภาพกิจกรรมบนหน้าจอด้วยเสียง การประชุมออนไลน์ วิดีโอการเล่นเกม เพลง เว็บแคม ฯลฯ