Mac-användare kan enkelt fånga vad som helst på sin skärm. Oavsett om det är för arbete, skola eller personligt bruk, finns det ett enkelt sätt att göra det.
I den här guiden om hur man tar en skärmdump på en Mac, kommer du att lära dig allt du behöver. Från grundläggande skärmdumpsgenvägar till scrollning och helsidesbilder. Du kommer också att lära dig hur du skriver ut, sparar och hanterar dina skärmdumpar. Det finns till och med sätt att redigera och ta bort dem vid behov.
Så om du vill bemästra skärmdumpar på Mac hittar du alla viktiga steg här.
- Del 1. Grundläggande skärmdumpsgenvägar på Mac
- Del 2. Var hamnar skärmdumpar på Mac
- Del 3. Hur man tar skärmdumpar av hela sidan och skrollar på en Mac
- Del 4. Hur man redigerar, beskär och kommenterar skärmdumpar
- Del 5. Hur man skriver ut en skärmdump på Mac
- Del 6. Hur man hanterar och tar bort skärmdumpar
- Del 7. Felsökning
Del 1. Grundläggande skärmdumpsgenvägar på Mac
Mac har inbyggda verktyg för att ta skärmdumpar. Du kan använda enkla kortkommandon för att ta bilder av hela skärmen, ett markerat område, en skärm eller till och med Touch Bar. De flesta skärmdumpar sparas automatiskt på skrivbordet, så att du kan hitta dem direkt efter att du tagit dem.
Metod 1: Ta hela skärmen
Med den här metoden kan du ta en fullständig skärmdump av allt som syns på din Mac-skärm med en snabb åtgärd.
Steg 1Öppna skärmen du vill ta en inspelning av.
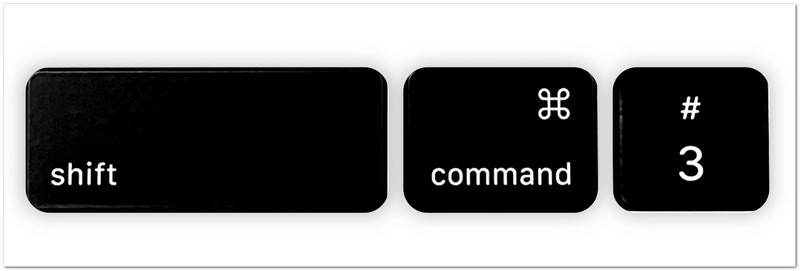
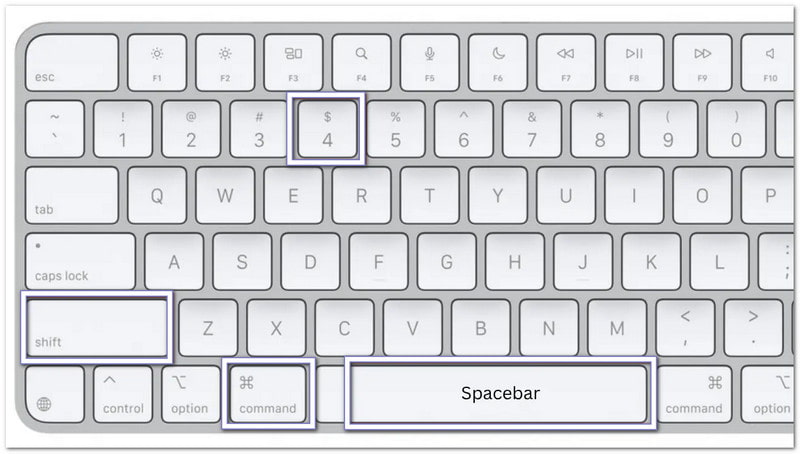
Steg 2Tryck Flytta + Kommando + 3 på ditt tangentbord samtidigt.
Steg 3Din Mac tar direkt en skärmdump av allt som visas på skärmen.
Steg 4En liten miniatyrbild kan visas i hörnet av skärmen. Klicka på den om du vill göra snabba redigeringar.
Steg 5Om du inte klickar på miniatyrbilden sparas skärmdumpen automatiskt som en bildfil på skrivbordet.
Metod 2: Ta en vald del (delvis skärmdump)
Det här alternativet låter dig använda en ofullständig skärmdump av Mac för att välja och ta en specifik del av skärmen genom att dra markören.
Steg 1Gå till sidan, appen eller innehållet du vill spara.
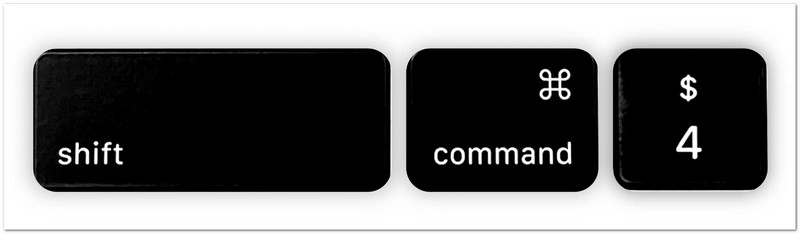
Steg 2Tryck Flytta + Kommando + 4 tillsammans.
Steg 3Din muspekare kommer att ändra form till ett hårkors. Klicka och dra den över det område du vill ta en skärmdump av.
Steg 4Justera markeringen tills den täcker exakt den del du behöver.
Steg 5Avklicka på Mus knapp eller Styrplatta för att ta skärmdumpen. Bilden sparas sedan automatiskt.
Extra tips: Tryck och håll ned Mellanslagstangenten medan du drar om du behöver flytta det markerade området. Tryck på Esc om du vill avbryta och börja om.
Metod 3: Fånga ett specifikt fönster
Den här metoden fokuserar på ett öppet fönster och fångar endast den appen eller det fönstret tydligt utan extra skärmdelar.
Steg 1Öppna skärmen som du vill ta en inspelning av.
Steg 2Tryck Flytta + Kommando + 4 på ditt tangentbord.
Steg 3tryck på MellanslagstangentenDin markör kommer att ändras till en kamerasymbol.
Steg 4Flytta kamerasymbolen över skärmen, menyn eller dockningsstationen du vill ta en bild av. Den markeras när den är klar.
Steg 5Klicka en gång för att ta skärmdumpen. Det inspelade fönstret sparas sedan som en bildfil.
Extra tips: Håll Alternativ tangenten medan du klickar om du vill ta bort skuggan som visas runt fönstret.
Metod 4: Avbilda Touch Bar (om din Mac har en)
Den här funktionen sparar det som visas på MacBook Touch Bar för att spara eller dela den aktuella skärmbilden.
Steg 1Se till att din MacBook Pro har en Touch Bar.
Steg 2Visa knapparna, kontrollerna eller innehållet du vill spara på Touch Bar.
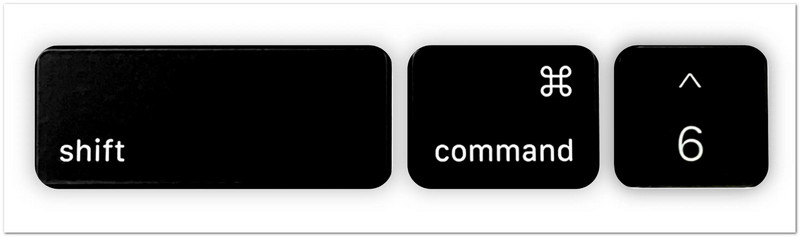
Steg 3Tryck Flytta + Kommando + 6 samtidigt.
Steg 4Din Mac tar direkt en skärmdump av allt som visas på Touch Bar.
Steg 5Skärmdumpen sparas automatiskt på skrivbordet så att du kan visa eller dela den senare.
Dessa kortkommandon är det snabbaste sättet att ta skärmdumpar på en Mac. De fungerar utan att du behöver installera ett extra program och hjälper dig att fånga exakt det du behöver på bara några sekunder.
Del 2. Var hamnar skärmdumpar på Mac
Efter att ha tagit en skärmdump på din Mac kanske du undrar var skärmdumparna hamnar på din Mac. Mac sparar skärmdumpar automatiskt, och det ger dig också flera sätt att hitta dem snabbare eller ändra var de lagras. Följ metoderna nedan för att hantera dina skärmdumpar enkelt!
1. Standardplats för sparning
Skärmdumpar sparas automatiskt på en standardplats på din Mac för snabb åtkomst efter varje inspelning.
Steg 1Ta en skärmdump med valfri skärmdumpsgenväg på din Mac.
Steg 2Gå till skrivbordet och leta efter den nya bildfilen som just skapades.
Steg 3Hitta en fil med namnet "Skärmdump [Datum] vid [Tid]"Mac sparar skärmdumpar som PNG-filer som standard.
Steg 4Dubbelklicka på filen om du vill öppna, visa, redigera eller dela din skärmdump.
Steg 5Upprepa den här processen när du behöver hitta skärmdumpar som sparats på standardplatsen.

2. Hur man ändrar var skärmdumpar sparas på Mac
Du kan justera inställningarna för att ändra var skärmdumpar sparas på Mac och välja en ny mapp där alla skärmdumpar lagras automatiskt.
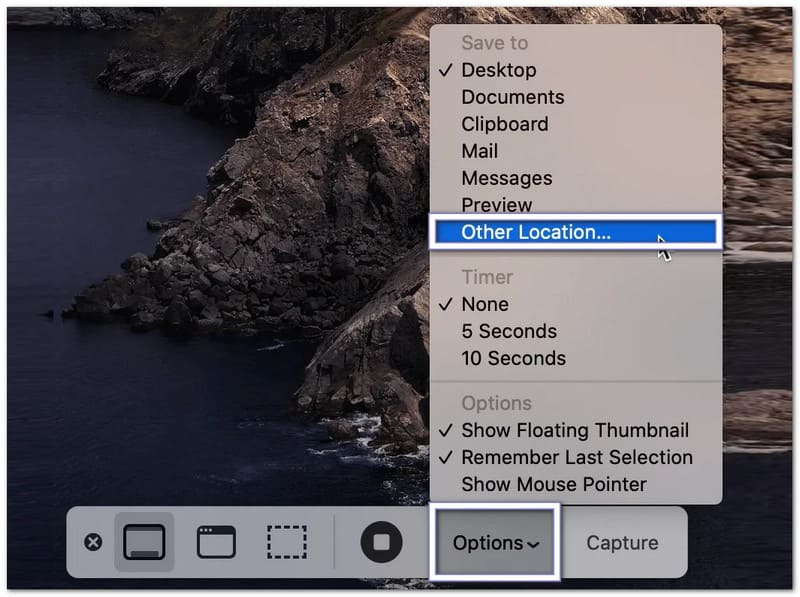
Steg 1Tryck Kommando + Flytta + 5 på tangentbordet för att öppna verktygsfältet Skärmdump.
Steg 2Klick alternativ längst ner i verktygsfältet för att öppna skärmdumpsinställningarna.
Steg 3Välj Annan plats från menyn. Välj sedan en mapp som Dokument eller Nedladdningar. Du kan också skapa en ny mapp för dina skärmdumpar.
Steg 4Bekräfta din valda mapp och återgå till verktygsfältet Skärmdump.
Steg 5Ta en ny skärmdump av ett fönster eller ett markerat område. Din Mac sparar nu framtida skärmdumpar i den mapp du valde.
3. Hur man snabbt hittar nya skärmdumpar
Det hjälper när du lär dig att hitta skärmdumpar på Mac, eftersom det hjälper dig att snabbt hitta dina senaste skärmdumpar med hjälp av Finder-verktyg eller sorteringsalternativ för senaste filer.
Steg 1Öppen Upphittare från din docka.
Steg 2Klick Senaste i vänster sidofält för att se dina senaste filer.
Steg 3Sortera filerna efter Skapad datum om det behövs. Det hjälper till att placera dina senaste skärmdumpar nära toppen.
Steg 4Titta igenom listan och hitta den skärmdump du vill öppna.
Steg 5Dubbelklicka på filen för att visa den eller flytta den till en annan mapp för bättre organisering.
Del 3. Hur man tar skärmdumpar av hela sidan och skrollar på en Mac
En vanlig skärmdump visar bara det du kan se på skärmen. Om du vill spara en hel webbsida, en lång artikel, en chattkonversation eller ett dokument behöver du en rullande skärmdump eller en helsidesskärmdump på en Mac. Mac erbjuder inbyggda sätt att göra detta i webbläsare, och du kan också använda tredjepartsverktyg för andra appar.
Metod 1: Skärmdumpa hela webbsidan i Safari
Safari har en inbyggd funktion som låter dig spara en hel webbsida utan att behöva ta flera skärmdumpar.
Steg 1Kör Safari och gå till webbplatsen du vill fånga.
Steg 2Träffa Fil från menyraden högst upp på skärmen.
Steg 3Välj Exportera som PDF från rullgardinsmenyn.
Steg 4Välj var du vill spara filen och ge den ett namn om det behövs.
Steg 5Träffa SparaSafari skapar en PDF som innehåller hela webbsidan från topp till botten.

Metod 2: Skärmdumpa hela webbsidan i Chrome/Firefox
1. Skärmdumpa en hel webbsida i Google Chrome
Google Chrome har en dold funktion för att skärmdumpa en hel webbsida på Mac, som kan fånga en hel webbsida i en enda bild.
Steg 1Öppna webbsidan du vill fånga i Chrome.
Steg 2Tryck Kommando + Alternativ + I för att öppna Utvecklarverktyg.
Steg 3Tryck Kommando + Flytta + P för att öppna kommandomenyn.
Steg 4Skriv skärmdump i sökfältet som visas.
Steg 5Välj Ta en skärmdump i full storlekChrome skapar och laddar automatiskt ner en helsidesbild av webbsidan.

2. Skärmdumpa en hel webbsida i Firefox
Firefox gör det enkelt att ta helsidesskärmdumpar eftersom funktionen är inbyggd i webbläsarmenyn.
Steg 1Öppna webbsidan du vill fånga.
Steg 2Högerklicka på ett tomt område på sidan. Om du använder en styrplatta kan du också Ctrl-klicka.
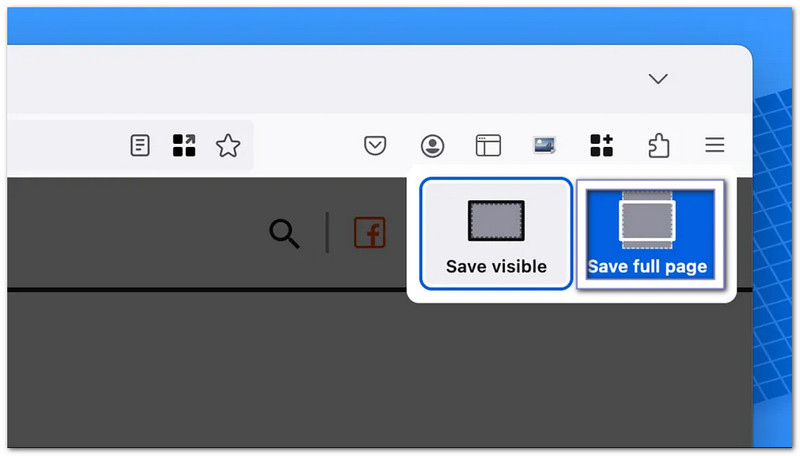
Steg 3Välj Ta skärmdump från menyn.
Steg 4Klick Spara hel sida att fånga allt på webbsidan.
Steg 5Ladda ner och spara bilden till din Mac.
Metod 3: Scrollande inspelning i valfri app
Med AVAide-skärminspelare, är du inte begränsad till att bara scrolla skärmdumpar på Mac i webbläsare. Du kan använda den i vilken app som helst på din Mac. Den fungerar för chattar, e-postmeddelanden, dokument, anteckningar och långa appsidor.
Den har ett inbyggt skärmdumpsläge som gör det möjligt att scrolla skärmdumpar till en enda ren bild. Efter inspelningen kan du kopiera dem för snabb inklistring i appar som Word eller Notes. Du kan också spara dem direkt i din lokala mapp för enkel åtkomst senare.
Steg 1Ladda ner och installera AVAide Screen Recorder på din Mac. Öppna programmet efter installationen så att det är klart att använda.

GRATIS NEDLADDNING För Windows 7 eller senare
 Säker nedladdning
GRATIS NEDLADDNING För Mac OS X 10.13 eller senare
Säker nedladdningSteg 2Öppna appen, webbsidan, chatten eller dokumentet som du vill spara. Se till att hela innehållet är laddat på skärmen innan du börjar.
Steg 3Från huvudgränssnittet väljer du Skärminspelning. Välj sedan Rullande skärmdump som inspelningsläge.
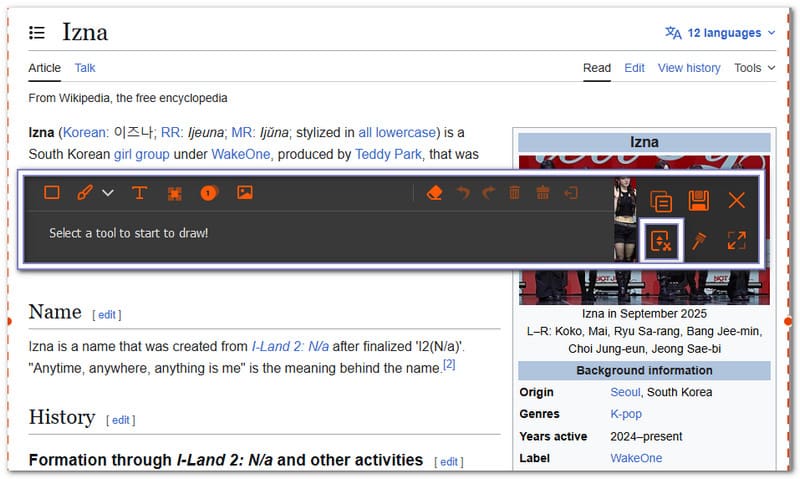
Steg 4Markera det fönster du vill avbilda. Använd mushjulet, mellanslagstangenten eller skrolla för att navigera på sidan. AVAide Screen Recorder följer rullningen och avbildar allt. Tryck på Esc om du vill sluta
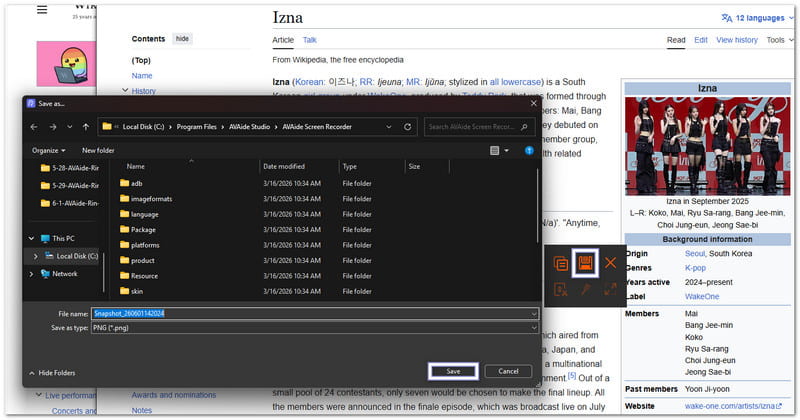
Steg 5När inspelningen är klar klickar du på Spara knappen. Välj din mappplats och spara sedan den slutliga rullande skärmdumpen på din Mac.
Del 4. Hur man redigerar, beskär och kommenterar skärmdumpar
Att lära sig att ta skärmdumpar på en Mac-dator är bara det första steget. Men tänk om du behöver beskära oönskade delar, lägga till anteckningar, rita pilar eller markera viktiga detaljer?
Den goda nyheten är att Mac-datorer har inbyggda verktyg som gör det snabbt och enkelt att redigera skärmdumpar. Om du behöver mer sofistikerade funktioner kan du också använda tredjepartsappar.
1. Direktredigering efter inspelning
Med Mac kan du redigera en skärmdump direkt när du tar den. Det är ett av de snabbaste sätten att göra ändringar utan att öppna en annan app.
Steg 1 Ta en skärmdump med hjälp av Flytta + Kommando + 4 eller Flytta + Kommando + 5.
Steg 2Leta efter den flytande miniatyrbilden som visas längst ner till höger på skärmen.
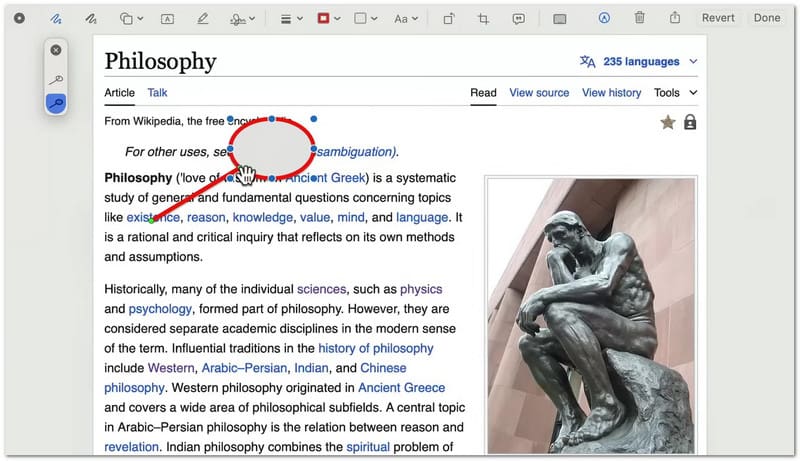
Steg 3Klicka på miniatyrbilden innan den försvinner. Skärmdumpen öppnas i redigeringsfönstret för markering.
Steg 4Använd verktygsfältet högst upp för att lägga till text, pilar, former, linjer eller markeringar. Du kan också använda beskärningsverktyget för att ta bort oönskade delar av bilden.
Steg 5Klick Gjort för att spara dina ändringar. Du kan också klicka på Dela med sig knappen om du vill skicka skärmdumpen via e-post, Meddelanden eller en annan app.
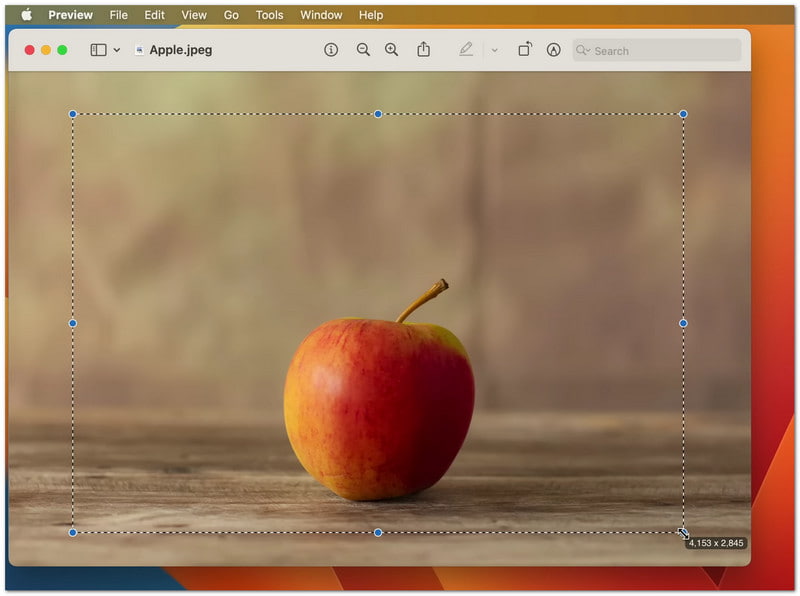
2. Använda förhandsgranskning för att beskära befintliga skärmdumpar
Om skärmdumpen redan är sparad på din Mac kan du beskära den senare med hjälp av den inbyggda förhandsgranskningsappen; förutom att du också kan använda den för att beskär video.
Steg 1Leta reda på skärmdumpsfilen och dubbelklicka på den för att öppna den i förhandsgranskningen.
Steg 2Kontrollera om markeringsverktygsfältet syns. Om du inte ser det klickar du på Visa och väljer sedan Visa verktygsfältet för markering.
Steg 3Klicka och dra muspekaren över det område du vill behålla. Det skapar en markering runt den viktiga delen av bilden.
Steg 4Klicka på Beskära knappen i verktygsfältet. Förhandsgranskningen tar bort allt utanför det markerade området.
Steg 5Tryck Kommando + S för att spara den redigerade skärmdumpen.
3. Tredjeparts fotoredigerare
När Macs inbyggda verktyg inte räcker till, tredjepartsverktyg fotoredigerare hjälpa dig att göra mer med dina skärmdumpar. De används för att redigera, förbättra och organisera bilder efter att du har tagit dem på din Mac. Varje verktyg har olika styrkor beroende på dina behov!
1. Skitch
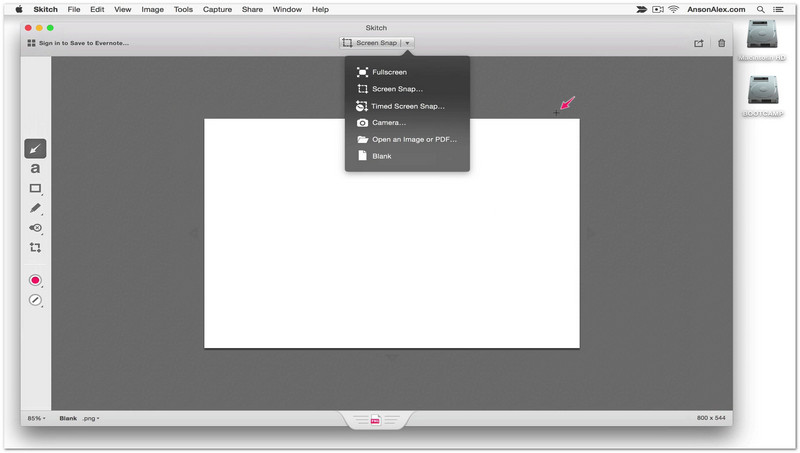
Skitch är skapat för snabb redigering av skärmdumpar med enkla verktyg. Du kan öppna en skärmdump och direkt markera den med pilar, stämplar eller korta textanteckningar. Det är superanvändbart när du bara behöver markera viktiga delar snabbt. Det gör redigeringen enkel och överbelastar dig inte med komplexa funktioner.
2. Canva
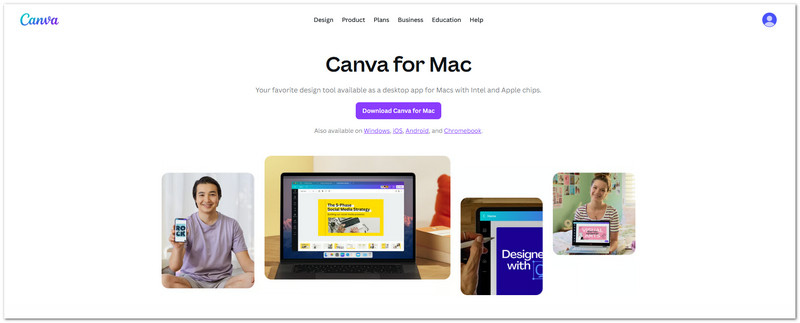
När du vill skapa enkla visuella designer från skärmdumpar kan du använda Canva. Skärmdumpar kan läggas till i mallar, blandas med andra former eller bilder och ges titlar. Det är fördelaktigt för att skapa inlägg på sociala medier, bilder och skolrapporter. Dessutom gör det det enkelt att ändra storlek på skärmdumpar för olika layouter.
3. Photoshop
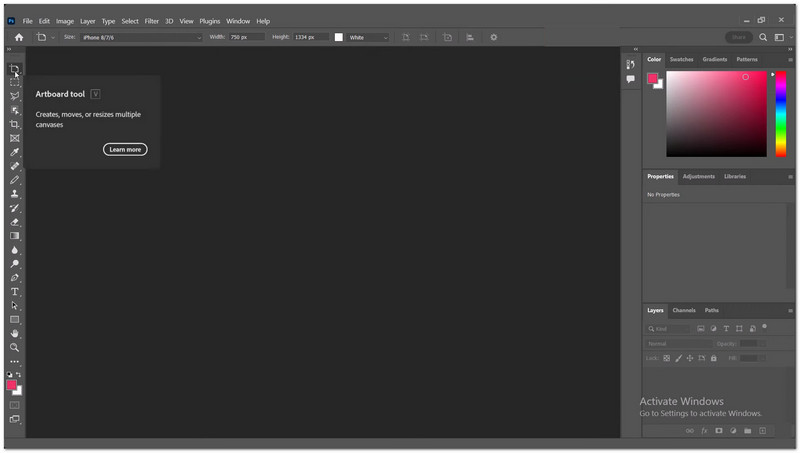
Adobe Photoshop ger fullständig kontroll över redigering av skärmdumpar. Du kan arbeta med flera lager, ta bort oönskade objekt, justera ljussättning och beskära exakt. För professionellt arbete, där skärmdumpar behöver vara tydliga och detaljerade, är det bra. Det ger mest redigeringskontroll, men det kräver övning.
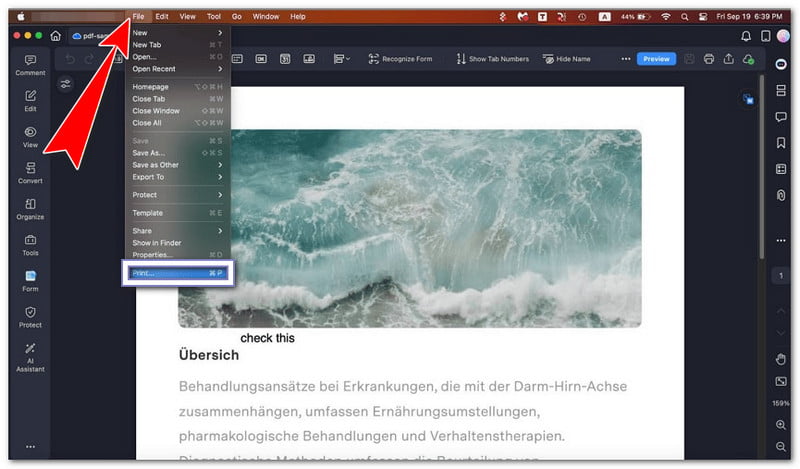
Del 5. Hur man skriver ut en skärmdump på Mac
Du kan använda stegen för hur man skriver ut en skärmdump på en Mac för att skriva ut den direkt från en sparad bild. Du kan också kopiera den först och klistra in den i ett dokument innan du skriver ut. Båda metoderna är enkla och fungerar bra för skolan, jobbet eller personligt bruk.
Metod 1: Skriv ut en sparad skärmdump med hjälp av förhandsgranskning
Med hjälp av de inbyggda utskriftsfunktionerna i Mac kan du öppna en sparad skärmdump i Förhandsgranskning och skriva ut den direkt.
Steg 1Hitta din skärmdump på skrivbordet eller i mappen där den sparades. Det är vanligtvis en PNG-fil med namnet "Skärmdump [Datum] vid [Tid]".
Steg 2Dubbelklicka på skärmdumpsfilen. Den öppnas i förhandsgranskningsappen. Det är standardbildvisaren på Mac.
Steg 3Kontrollera bilden noggrant. Se till att det är rätt skärmdump som du vill skriva ut.
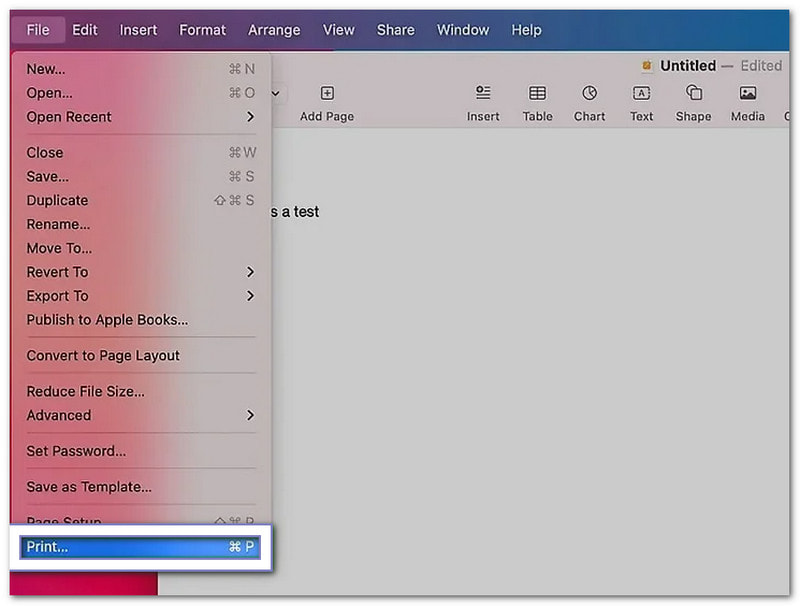
Steg 4Tryck Kommando + P på tangentbordet. Du kan också klicka Fil i den översta menyn och välj sedan Skriva ut.
Steg 5Välj din skrivare från listan. Justera inställningarna om det behövs. Klicka sedan på Skriv ut för att starta utskriften.
Metod 2: Klistra in en skärmdump i ett dokument innan utskrift
Den här metoden låter dig lära dig hur du klistrar in en skärmdump på en Mac genom att först placera skärmdumpen i ett dokument och sedan skriva ut den med tillagt innehåll om det behövs.
Steg 1Tryck Kontrollera + Flytta + Kommando + 3 för att ta en skärmdump och kopiera den direkt till urklipp.
Steg 2Öppna en dokumentapp som Pages, Word eller Notes. Gå till en tom sida eller ett tomt avsnitt.
Steg 3Tryck Kommando + V för att klistra in skärmdumpen i dokumentet.
Steg 4Flytta eller ändra storlek på bilden om det behövs så att den får plats bra på sidan.
Steg 5Tryck Kommando + P för att öppna utskriftsfönstret. Välj din skrivare och klicka sedan på Skriva ut.
Del 6. Hur man hanterar och tar bort skärmdumpar
Skärmdumpar kan snabbt samlas på din Mac. Det är därför det är bra att hantera dem. Du kan ändra filstorlek, byta filformat och ta bort oönskade skärmdumpar för att hålla skrivbordet rent och organiserat.
1. Inställningar för skärmdumpstorlek och filformat
De här inställningarna hjälper till att kontrollera hur stora dina skärmdumpar är och vilken filtyp de sparas som.
Minska skärmdumpsfilstorleken
Det här alternativet hjälper till att göra skärmdumpar mindre så att de tar upp mindre lagringsutrymme på din Mac.
Steg 1Ta bara skärmdumpar av det du behöver. Tryck på Kommando + Flytta + 4 och dra för att välja ett litet område. Det hjälper till att undvika stora helskärmsbilder.
Steg 2Högerklicka på skärmdumpsfilen på din Mac efter att du har sparat.
Steg 3Välja Snabba åtgärder > Konvertera bildDu kan ändra den till JPG eller HEIF. Dessa format gör filen mindre.
Steg 4Spara den nya versionen. Det hjälper dig att spara utrymme på din Mac.
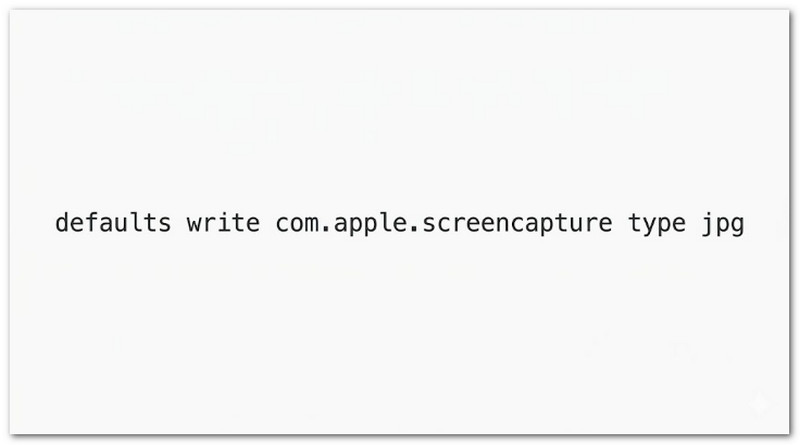
Ändra skärmdumpsfilformat med hjälp av terminalen
Du kan använda Terminal för att växla mellan skärmdumpsformat som PNG, JPG eller andra filtyper som stöds.
Steg 1Öppen Terminal på din Mac. Tryck Kommando + Utrymme, skriv "Terminal" och tryck sedan på Återvända.
Steg 2Skriv det här kommandot exakt: standardinställningar skriv com.apple.screencapture typ jpg.
Steg 3Tryck Stiga på för att tillämpa kommandot. Det ändrar skärmdumpsformatet till JPG.
Steg 4Starta om din Mac. Eller skriv killall SystemUIServer och tryck Stiga på för att aktivera ändringen direkt.
Steg 5Ta en ny skärmdump. Den kommer nu att sparas i det nya formatet du valde.
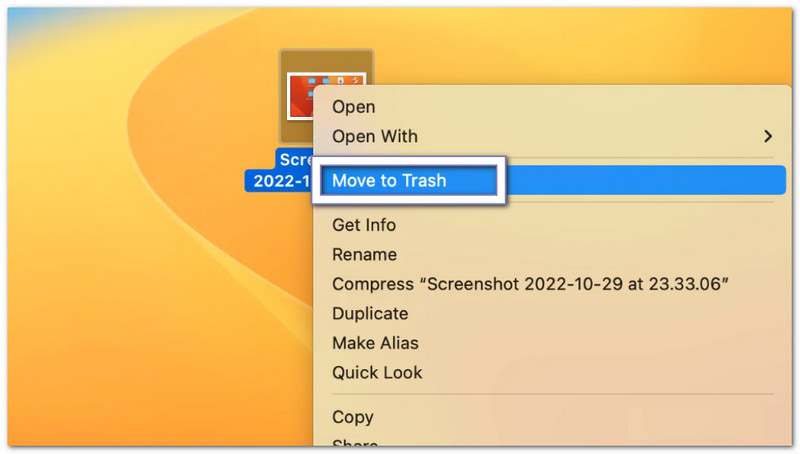
2. Hur man tar bort skärmdumpar
Det här avsnittet förklarar hur du tar bort skärmdumpar på Mac med hjälp av olika metoder för att ta bort oönskade bilder och hålla din Mac-lagring ren.
Ta bort skärmdumpar från miniatyrbilden.
Du kan snabbt radera en skärmdump direkt efter att du tagit den med hjälp av det flytande förhandsgranskningsfönstret.
Steg 1Ta en skärmdump med valfri genväg på Mac.
Steg 2Titta på den flytande miniatyrbilden som visas i hörnet av skärmen.
Steg 3Klicka på miniatyrbilden innan den försvinner. Redigeringsfönstret öppnas.
Steg 4Klicka på Skräp knappen i fönstret för att radera skärmdumpen direkt.
Steg 5Stäng fönstret när du är klar.
Ta bort skärmdumpar från skrivbordet eller Finder.
Den här metoden tar bort skärmdumpar manuellt från skrivbordet eller Finder genom att flytta dem till papperskorgen.
Steg 1Gå till skrivbordet eller öppna Finder och hitta din skärmdumpsfil.
Steg 2Klicka på skärmdumpen en gång för att välja den.
Steg 3Dra filen till Skräp i Dockan.
Steg 4Eller tryck Kommando + Radera för att snabbt flytta den till papperskorgen.
Steg 5Töm papperskorgen om du vill ta bort den permanent.
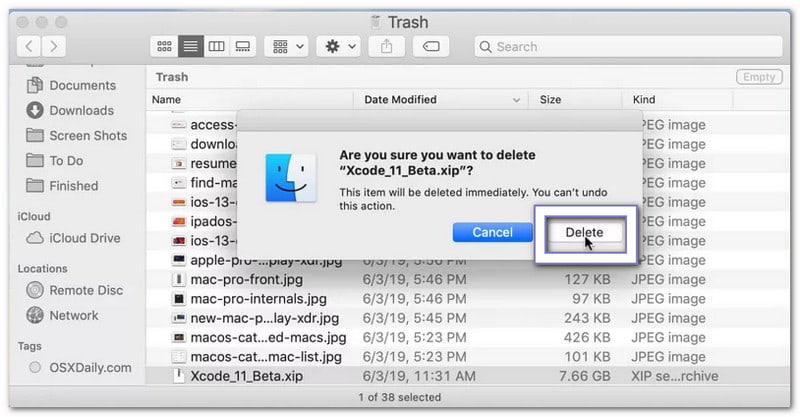
Ta bort en skärmdump permanent.
Det här alternativet tar bort skärmdumpar omedelbart utan att skicka dem till papperskorgen för återställning.
Steg 1Välj skärmdumpsfilen på din Mac.
Steg 2Tryck Alternativ + Kommando + Radera på ditt tangentbord.
Steg 3En varning kommer att visas som ber om bekräftelse.
Steg 4Bekräfta åtgärden för att omedelbart radera filen.
Steg 5Skärmdumpen tas bort utan att hamna i papperskorgen.
Del 7. Felsökning
Ibland fungerar inte skärmdumpar på en Mac som förväntat. Du kanske inte kan dra dem, de kanske inte sparas eller så visas de som svarta. Dessa problem är vanliga och kan åtgärdas med enkla kontroller.
1. Kan inte längre dra skärmdumpar
Om du har problem med att "det går inte längre att dra skärmdumpar på Mac", gå till Systeminställningar > Styrplatta eller Mus och se till att klicka och dra är aktiverat, för om det är avstängt fungerar det inte att dra. Öppna sedan Upphittare, håll Skift-tangenten, Klicka på Äpple menyn och välj Hitta tvångsavslut, Klicka sedan ÅterlanseraOm det fortfarande misslyckas, öppna skärmdumpens miniatyrbild och använd Dela med sig knappen istället, eller spara den först och flytta den från skrivbordet.
2. Skärmdumpar sparas inte
Om skärmdumpar inte visas på skrivbordet trycker du på Kommando + Flytta + 5, klicka på Alternativ och kontrollera platsen där du vill spara eftersom den kan vara felaktigt inställd. Se till Skrivbord eller Dokument är valt. Om du använder Dropbox eller OneDrive, kontrollera deras inställningar eftersom de kan spara dina filer i molnet. Om det fortfarande inte fungerar, starta om Upphittare eller starta om din Mac för att åtgärda problemet.
3. Skärmbilderna är tomma/svarta
Appen kan blockera din skärmdump om den är svart. Skärmdumpar fungerar inte med streamingappar som Netflix eller Apple TV eftersom de använder DRM-skydd. Stäng av Hårdvaruacceleration i webbläsarens inställningar om det inträffar. Bekräfta dessutom att skärmdumpsbehörigheter är tillåtna genom att gå till Systeminställningar > Sekretess och säkerhet > Skärminspelning.
Hoppas att den här guiden hjälper dig ta en skärmdump på en Mac helt enkelt. Nu kan du ta en skärmdump när som helst utan problem.
Om du någonsin behöver spela in långa sidor eller chattar, tveka inte att använda AVAide-skärminspelareDet gör det enklare att scrolla bland skärmdumpar i olika appar. Du kan också spara dina skärmdumpar direkt i din lokala mapp.
OM FÖRFATTAREN

Fånga det bästa ögonblicket med AVAide Screen Recorder. Screencast, anpassa och dela på några sekunder.
Skärminspelning