Você quer um toque personalizado. Não algo genérico. Algo que você criou para chamadas e alertas.
Estamos aqui para te ajudar com isso. Mostraremos diferentes maneiras de gravar toque em diferentes sistemas. Também compartilharemos dicas simples para melhores resultados. Então, prepare sua voz ou som para um toque personalizado.
Parte 1. Como gravar um toque no iPhone
1. Gravar áudio para toque (O jeito mais fácil)
O aplicativo Gravador de Voz grava áudio e o transforma instantaneamente em um toque personalizado utilizável com ferramentas básicas de edição. Esta seção ensinará exatamente como transformar uma gravação de voz em um toque no iPhone.
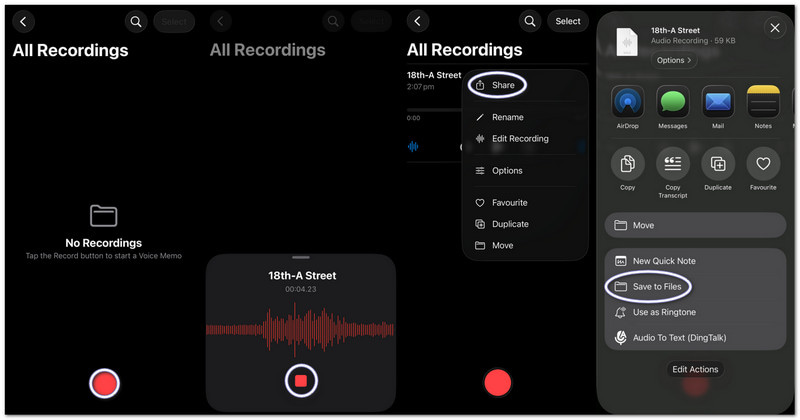
Passo 1Inicie o Gravador de Voz no seu iPhone.
Passo 2Toque no vermelho Registro botão e fale ou reproduza seu áudio.
etapa 3Toque Pare quando você terminar.
Passo 4Toque em três pontos (...) na sua gravação.
Etapa 5Escolher Salvar em arquivos Para armazenar seu áudio e usá-lo posteriormente como toque.
2. Qualquer arquivo de áudio (MP3/M4A) para toque.
Arquivos de áudio MP3 ou M4A armazenados em downloads ou aplicativos de música podem ser selecionados e definidos como toque no iPhone.
Passo 1Baixe seu arquivo MP3 ou M4A e salve-o no arquivos aplicativo.
Passo 2Correr Banda de garagem e escolha Gravador de áudio.
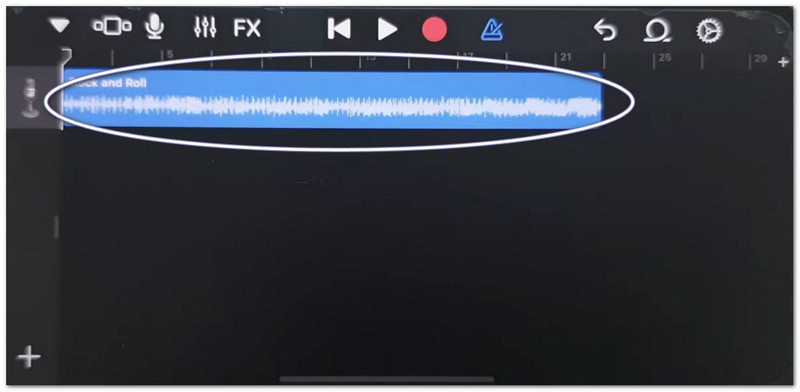
etapa 3Localize seu áudio em arquivosEm seguida, arraste-o para a linha do tempo.
Passo 4Vamos para arquivosLocalize o áudio e arraste-o para a linha do tempo.
Etapa 5Corte o vídeo para menos de 30 segundos e depois toque em Compartilhado > toque > Exportar.
3. Usando o GarageBand (para versões antigas do iOS)
O GarageBand edita clipes de áudio com controles precisos, permitindo que os usuários cortem, organizem e exportem toques personalizados com facilidade, o que torna simples entender como definir uma gravação de voz como toque em um iPhone.
Passo 1Aberto Banda de garagem e selecione Gravador de áudio.
Passo 2Toque em Vista das trilhas, então abra o Navegador Loop.
etapa 3Importe seu memorando de voz ou arquivo de áudio salvo.
Passo 4Arraste o vídeo para a linha do tempo e corte-o para 30 segundos ou menos.
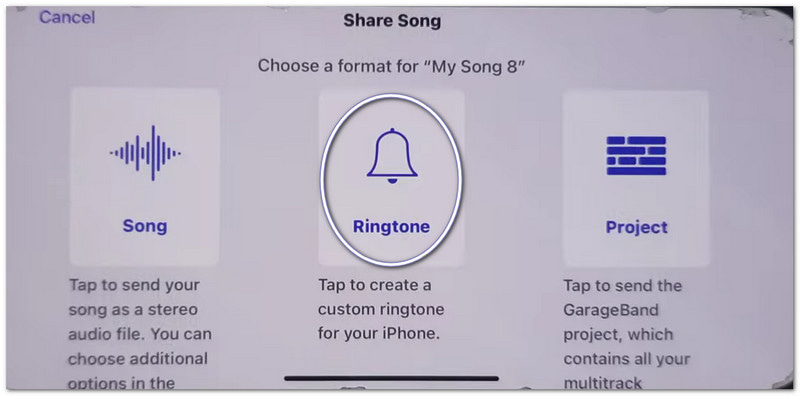
Etapa 5Toque Minhas Músicas, então Compartilhado > toque > Exportar.
Solução de problemas "Compartilhar notas no iPhone não funciona"
Se a folha de compartilhamento congelar, travar ou não exibir os aplicativos ao compartilhar arquivos do Gravador de Voz ou do GarageBand, tente estas soluções.
Soluções rápidas:
- Reiniciar à força: Pressione Aumentar o volume e Diminuir o volumeEm seguida, mantenha pressionado o botão Liga/Desliga até que o símbolo da Apple apareça.
- Atualizar iOS: Acesse Configurações > Em geral > Atualização de softwareInstale todas as atualizações. Isso corrige erros do sistema.
- Ativar/desativar AirDrop: Abrir Centro de Controle Para desativar o AirDrop, desative e ative o AirDrop novamente. O compartilhamento será atualizado.
Correções do sistema
- Libere espaço de armazenamento: mantenha pelo menos 2 gigabytes de espaço livre. Exclua arquivos ou vídeos não utilizados. Pouco espaço de armazenamento pode impedir o funcionamento da Folha de Compartilhamento.
Solução final
- Redefinir todas as configurações: Acesse Configurações > Em geral > Transferir ou Redefinir iPhone > Redefinir todas as configuraçõesNão apaga seus dados. Apenas redefine as configurações do sistema e pode corrigir problemas com a Folha de Compartilhamento.
Parte 2. Como gravar um toque no Android
1. Usando um aplicativo para criar toques (Altamente recomendado)
Se você quer aprender a gravar seu próprio toque, pode usar o Maker: Music Cutter, disponível na Google Play Store. Seu principal objetivo é ajudar você a cortar músicas, recortar trechos de áudio específicos e defini-los instantaneamente como toques personalizados em celulares Android.
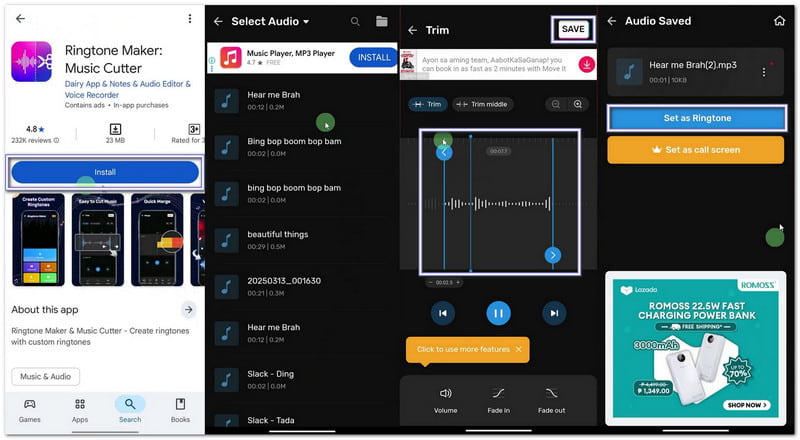
Passo 1Abra a Google Play Store. Pesquise por Criador de toques: Cortador de músicasInstale-o. Em seguida, pressione Aberto.
Passo 2Toque Iniciar. Escolher Aparar áudioConceda as permissões necessárias para que o aplicativo possa acessar seus arquivos.
etapa 3Selecione uma música ou arquivo de áudio do seu telefone. Mova os controles deslizantes para escolher as partes inicial e final do seu toque.
Passo 4 Toque Cortar ou Salve Selecione a nitidez, se necessário. Pressione confirme. Então clique Definir como toquePermita o acesso às configurações do sistema e escolha o toque padrão.
2. Configurações integradas (para áudio baixado)
As configurações do Android permitem selecionar diretamente arquivos de áudio salvos e atribuí-los como toques sem a necessidade de aplicativos ou ferramentas adicionais.
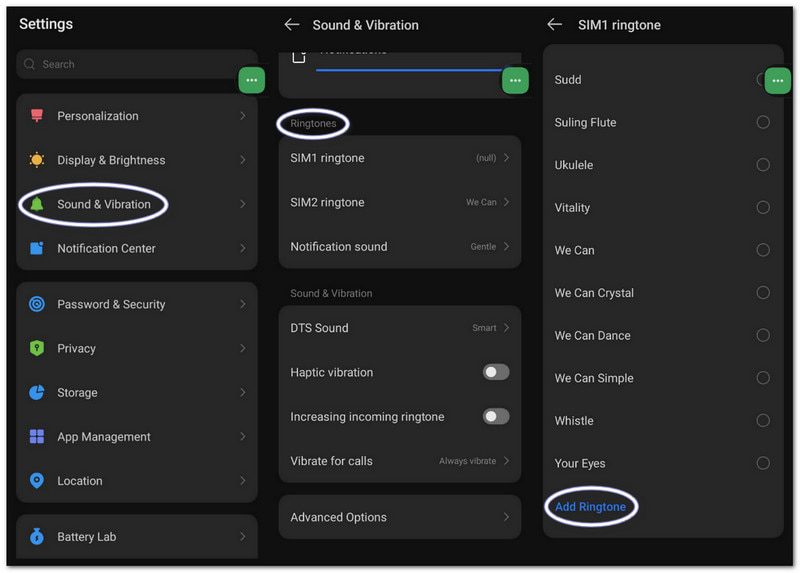
Passo 1Acesse as configurações do seu telefone. Toque em Som e vibração ou Som.
Passo 2Toque toque de telefone Para ver as opções disponíveis.
etapa 3Toque em Mais botão ou o Adicionar toque botão na parte superior.
Passo 4Navegue pelo seu armazenamento. Selecione seu arquivo de áudio. Toque em FeitoEm seguida, confirme para defini-lo como seu toque padrão.
Parte 3. Como transformar uma gravação de tela em um toque.
Você também pode transformar uma gravação de tela em toque de celular em um computador Windows ou Mac usando Gravador de tela AVAidePossui um modo de gravação de áudio que captura o som do seu sistema e a sua voz, o que facilita a gravação de um toque.
Ele também oferece configurações de som, onde você pode diminuir ou aumentar o volume, ativar o cancelamento de ruído e exibir um aviso quando nenhum áudio for detectado. Claro, você pode exportar seu toque em formatos compatíveis, como MP3 e M4A, que funcionam bem em dispositivos móveis.
Passo 1Obtenha e configure o AVAide Screen Recorder no seu computador Windows ou Mac.

DOWNLOAD GRATUITO Para Windows 7 ou posterior
 Download seguro
DOWNLOAD GRATUITO Para Mac OS X 10.13 ou posterior
Download seguroPasso 2Inicia no modo Gravador de Tela. Clique no menu suspenso. Selecione Gravador de áudio Para uma melhor captação de som.
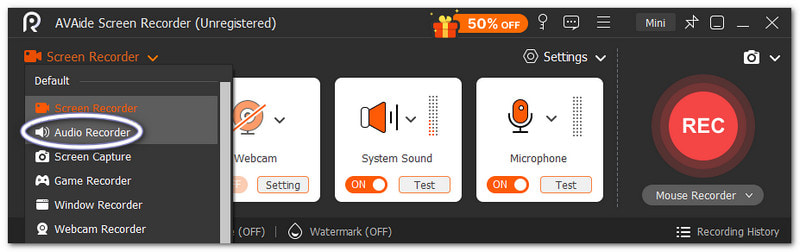
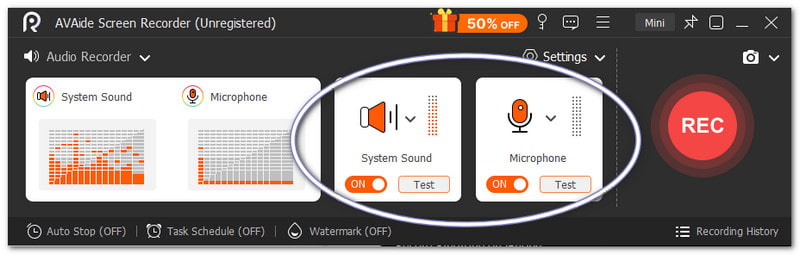
etapa 3Ligar Som do sistema Para gravar áudio interno. Ligue o Microfone Se você quiser que sua voz seja adicionada, também pode ajustar o volume, se necessário.
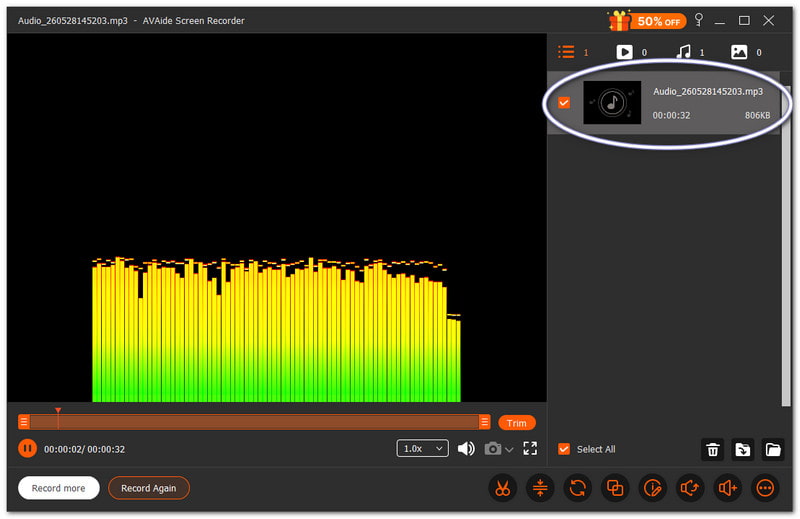
Passo 4Bater GRAVANDO Para começar, aguarde a contagem regressiva. Assim que começar, reproduza o som desejado. Pressione o Pare Assim que terminar, clique no botão. Depois disso, o arquivo é salvo automaticamente. Mas você também pode cortar ou editar o vídeo antes de usá-lo como toque.
Não há dúvida de que este Mac e Gravador de áudio do Windows Pode ajudar você a criar um toque que você pessoalmente deseja e gosta para o seu dispositivo.
Parte 4. Etapas específicas da Samsung
1. Usando o gravador de tela integrado
O Gravador de Tela da Samsung captura áudio de vídeos e ajuda a transformar sons gravados em toques utilizáveis.
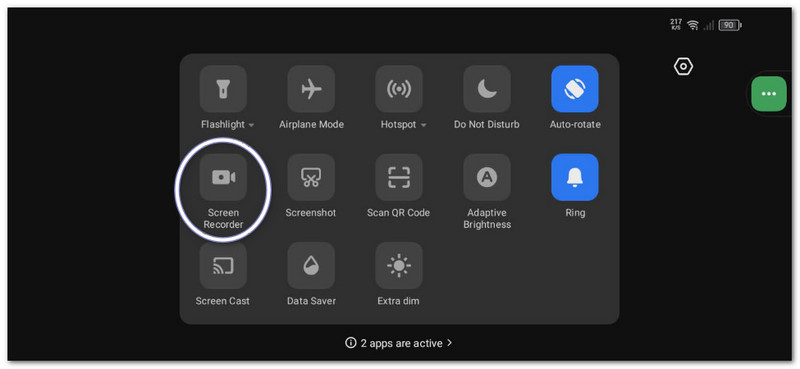
Passo 1No Painel rápido, deslize para baixo. Pressione o Gravador de ecrã botão. Antes de começar, selecione o Sons da mídia.
Passo 2Reproduza o vídeo ou a música que deseja capturar. Deixe o gravador de tela gravar tudo com o som.
etapa 3Pare a gravação quando terminar. O arquivo será armazenado na sua galeria. Use um aplicativo de conversão de vídeo para MP3 para extrair o áudio.
Passo 4Mova o arquivo MP3 para o seu Armazenamento interno > Pasta de toques para que possa ser usado posteriormente.
Este método mostra Gravação de tela SamsungPortanto, certifique-se de converter o vídeo gravado apenas em áudio para que possa ser usado como toque de celular.
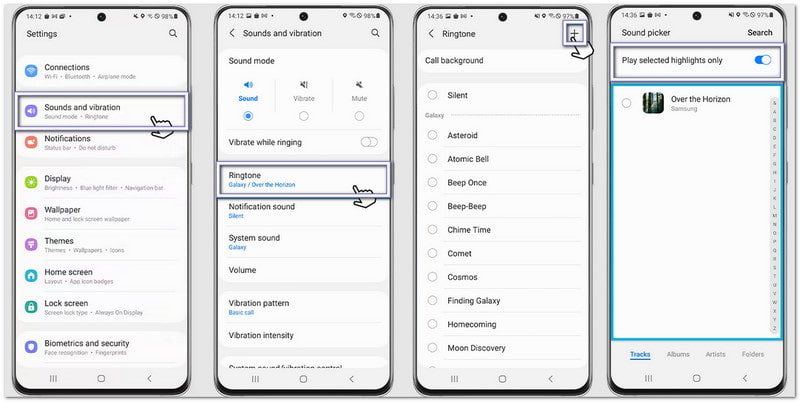
2. Criador de toques integrado
As configurações de toque da Samsung permitem que os usuários escolham músicas, recortem trechos importantes e os definam instantaneamente como toque padrão do telefone.
Passo 1Abra seu telefone e acesse Configurações. Tocar Sons e vibração. Em seguida, selecione toque.
Passo 2Toque em Adicionar botão e selecione uma música ou gravação salva no seu telefone.
etapa 3Habilitar Exibir apenas os melhores momentos selecionados Se disponível, a Samsung irá cortar automaticamente a melhor parte do áudio.
Passo 4Confirme sua seleção e o som será definido como seu toque padrão.
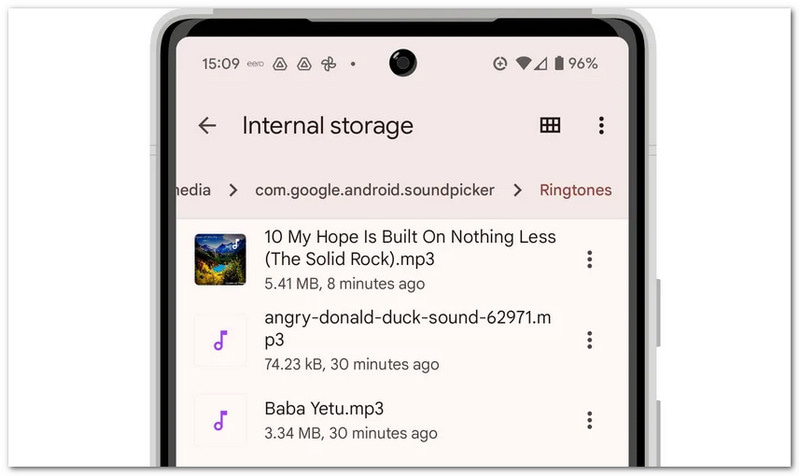
3. Método do Gerenciador de Arquivos
O Samsung File Manager organiza arquivos de áudio e permite a cópia direta para a pasta Toques para detecção automática de toques.
Passo 1Inicie o Meus Arquivos aplicativo no seu telefone Samsung.
Passo 2Vamos para Transferências ou Áudio pasta. Localize o som gravado ou baixado.
etapa 3Pressione e segure o arquivo. Toque em cópia deEm seguida, acesse Armazenamento interno > Toques.
Passo 4Cole o arquivo na pasta Toques. Em seguida, volte às configurações de Som. Seu arquivo agora aparecerá na lista de toques.
Parte 5. Dicas profissionais para obter os melhores resultados
Antes de definir seu toque, é útil seguir algumas dicas simples. Elas farão com que seu toque soe nítido e funcione melhor no seu telefone.
Dica #1: Seja breve.
Defina seu toque com duração de apenas 30 a 40 segundos. Isso garante uma reprodução fluida e totalmente compatível com celulares Android.
Dica #2: Use o formato correto.
Use arquivos MP3 ou M4A sempre que possível. Esses formatos funcionam bem na maioria dos dispositivos Android, sem erros.
Dica #3: Verifique o volume primeiro.
Ouça o toque antes de configurá-lo. Certifique-se de que o volume não esteja muito alto nem muito baixo. Isso ajuda a evitar surpresas quando alguém ligar.
Você aprendeu Como gravar um toque no iPhone, Android e computador. Portanto, independentemente do dispositivo que você usar, poderá criar seu próprio toque personalizado a qualquer momento.
Para usuários de Windows e Mac, Gravador de tela AVAide Simplifica o processo. Você pode gravar sua própria voz ou capturar áudio do seu sistema. Você também pode cortar o arquivo após a gravação. Isso ajuda a manter apenas a melhor parte para o seu toque.
SOBRE O AUTOR

Capture atividades na tela com áudio, reuniões online, vídeos de jogos, música, webcam, etc.