Ik probeer erachter te komen Hoe neem je audio op met een Mac? Dit gebeurt vaak wanneer je een college wilt opnemen, een videogesprek wilt opslaan, een podcast wilt opnemen of snel spraakcontent wilt creëren. Gelukkig bevat macOS ingebouwde opnametools en zijn er diverse opties van derden waarmee je eenvoudig hoogwaardige microfoon- en interne audio kunt opnemen.
Methode 1: QuickTime Player gebruiken
Iedereen lijkt QuickTime op zijn macOS te hebben. QuickTime biedt een intuïtieve interface, betrouwbare microfoonopname en snelle exportmogelijkheden waarvoor geen andere applicatie nodig is. Deze techniek is handig voor voice-overs, lezingen, online vergaderingen en zelfs eenvoudige podcastopnames.
Stap 1Start QuickTime Player vanuit de map Programma's of via Spotlight-zoekopdracht.
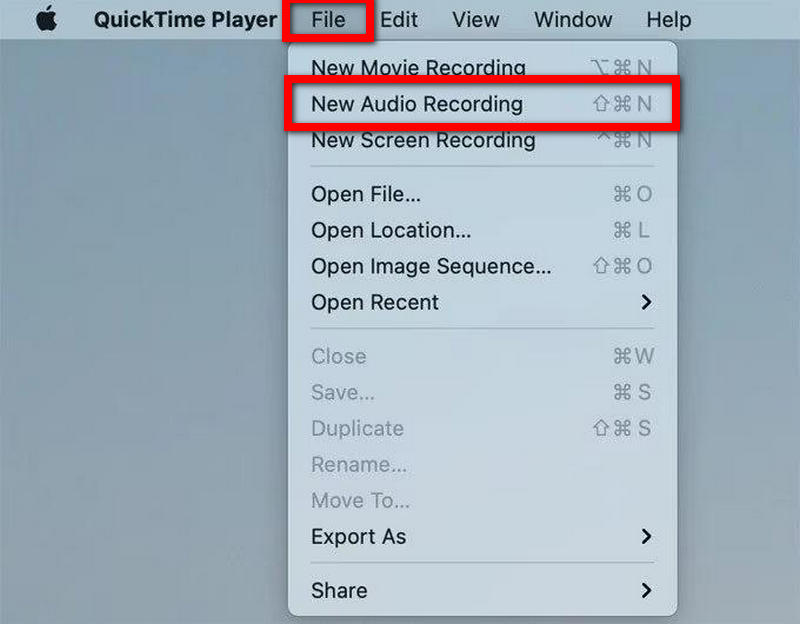
Stap 2Ga naar de Bestand menu vanuit de bovenste menubalk.
Stap 3Klik Nieuwe audio-opname.
Stap 4Druk op het kleine pijltje ernaast. Vermelding Met deze knop kunt u de gewenste microfoon selecteren.
Stap 5Pas indien nodig het ingangsvolume aan.
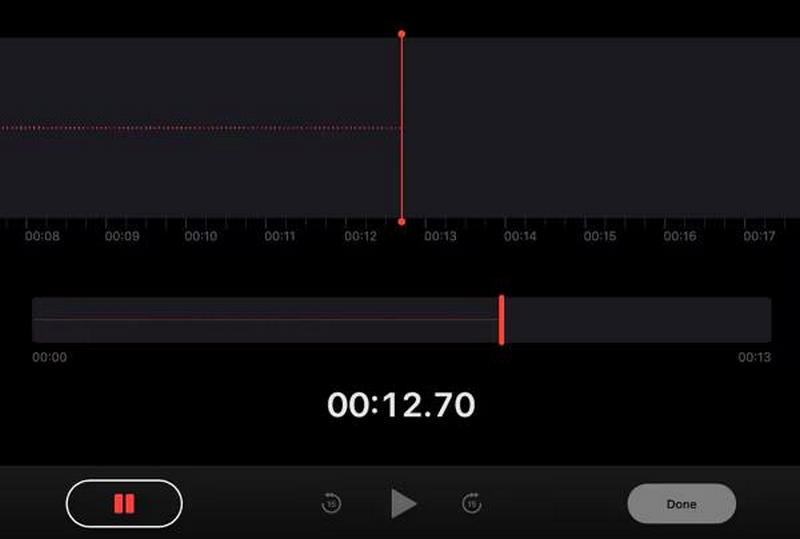
Stap 6Om te beginnen met opnemen, drukt u op de Vermelding knop.
Stap 7 Spreek in de microfoon.
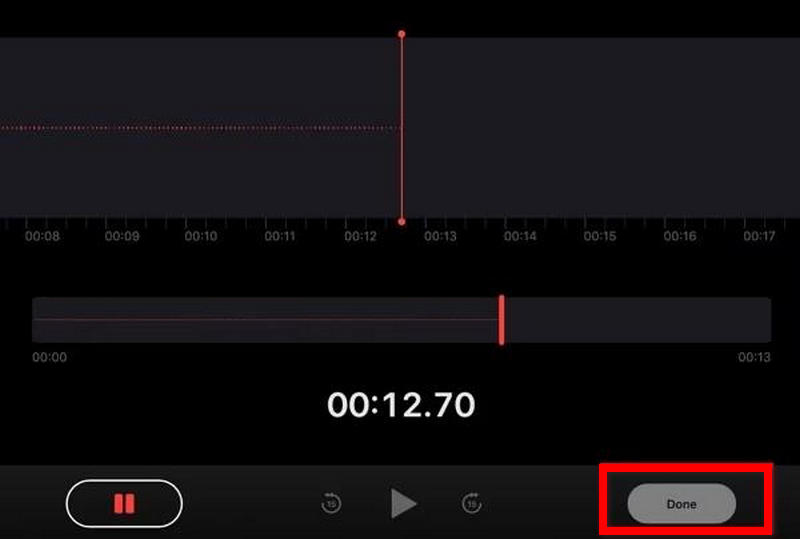
Stap 8druk de Hou op knop om de opname te beëindigen.
Stap 9Om de opname op je Mac op te slaan, ga je naar Bestand en selecteer Sparen.
Methode 2: Spraakmemo's gebruiken
Voice Memos is gemaakt voor snelle spraakopnames. Deze applicatie is handig voor het maken van persoonlijke herinneringen, brainstormsessies, korte presentaties en korte audio-opnames. Opgenomen spraakmemo's worden automatisch gesynchroniseerd via iCloud, zodat de opnames beschikbaar zijn op alle Apple-apparaten.
Stap 1Start Voice Memos op je Mac.
Stap 2druk de Vermelding knop.
Stap 3Spreek door de microfoon.
Stap 4Als u de opname even wilt onderbreken, selecteer dan Pauze.
Stap 5druk op Gedaan om de opname af te ronden.
Stap 6Om de opname gemakkelijker terug te vinden, selecteer de Hernoemen optie.
Stap 7Om de opname te delen, dupliceren of exporteren, klikt u met de rechtermuisknop op het bestand.
Waarom macOS geen native ondersteuning biedt voor interne audio-opname
macOS staat standaard het gebruik van de microfoon toe. Het is echter niet mogelijk om intern systeemgeluid op te nemen met de ingebouwde functionaliteit. Dit omvat media die in apps worden afgespeeld, muziek en browsergeluiden. Privacy, auteursrechtbescherming en systeembeveiliging zijn de redenen waarom macOS deze beperkingen hanteert.
In tegenstelling tot microfoongeluid kan intern geluid beschermde media of privécommunicatie van apps bevatten. Daarom beperkt Apple de toegang tot interne audiokanalen, tenzij gebruikers extra software installeren.
Vanwege deze problemen kunnen programma's zoals QuickTime geen intern geluid opnemen, maar extern geluid via een microfoon wel.
Voorbeelden van deze problemen:
- Neem gameplay op inclusief geluid.
- Neem een online les op.
- Neem online audio en video op.
- Audio opnemen van een online video op het web.
- Neem instructievideo's op met de interne audio van de computer.
Methode 3: BlackHole gebruiken in combinatie met QuickTime Player
BlackHole is een gratis virtueel audiostuurprogramma waarmee systeemgeluid intern naar opnamesoftware kan worden doorgestuurd. In combinatie met QuickTime kunnen Mac-gebruikers zowel intern geluid als geluid van een externe microfoon opnemen. Met dit stuurprogramma kunnen gebruikers online vergaderingen, tutorials, videogames, webinars, podcasts en browsergeluid opnemen, allemaal met een hoge geluidskwaliteit en heldere weergave.
Stap 1Download en installeer BlackHole op je Mac via de officiële website en open vervolgens Audio MIDI Setup.
Stap 2Maak een apparaat met meerdere uitvoermogelijkheden aan en schakel zowel de luidsprekers of hoofdtelefoon van je Mac als BlackHole in.
Stap 3 Stel het apparaat met meerdere uitgangen in als uw standaard audio-uitvoer in de geluidsinstellingen.
Stap 4Open QuickTime Player, selecteer Bestand > Nieuwe audio-opname, kies dan Zwart gat als microfoon of audiobron.
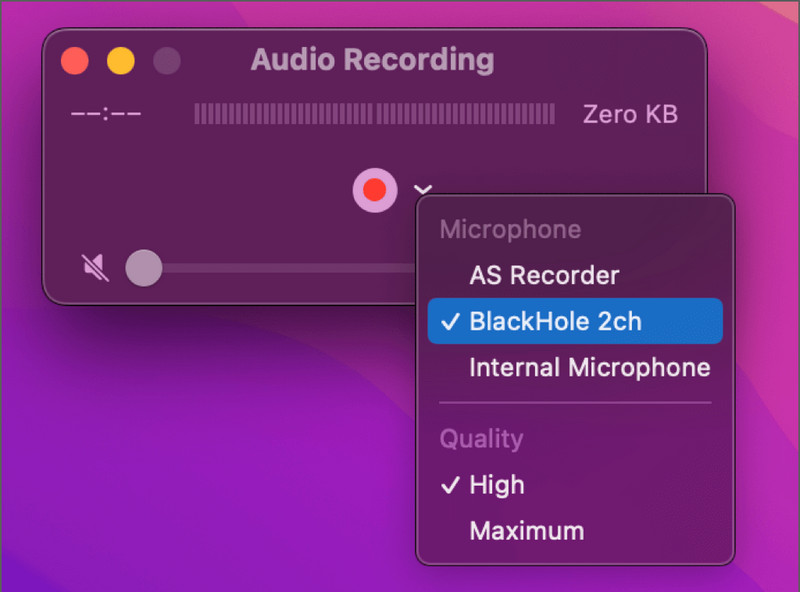
Stap 5Klik op de Vermelding Druk op de knop, speel de audio af die je wilt opnemen, en stop en sla de opname op als je klaar bent.
Methode 4: Gebruikmaken van specifieke software van derden
1. AVAide-schermrecorder
AVAide-schermrecorder AVAide is perfect voor Mac-gebruikers die een eenvoudige maar krachtige tool zoeken om spraak en audio op te nemen. Naast schermopname kan AVAide ook audio vastleggen van je microfoon, systeemluidsprekers en webcam, evenals van je telefoonscherm. Een van de beste eigenschappen van AVAide is dat het is ontworpen voor zowel beginners als gevorderde gebruikers, waardoor het een uitstekende optie is voor iedereen die spraak op een Mac wil opnemen.
- Neemt zowel het microfoongeluid als het systeemgeluid gelijktijdig op.
- Ondersteunt hoogwaardige audio-opnames met minimale vertraging.
- Maakt opnames op volledig scherm, in een venster of in een aangepast gebied mogelijk.
- Inclusief webcamopname voor tutorials en podcasts.
- Ondersteunt meerdere exportformaten zoals MP3, AAC, FLAC, M4A en meer.

 Veilige download
Stap 1Download en installeer de software
Ga naar de AVAide-website om de software te downloaden. Volg de installatie-instructies op het scherm om de software succesvol te installeren.
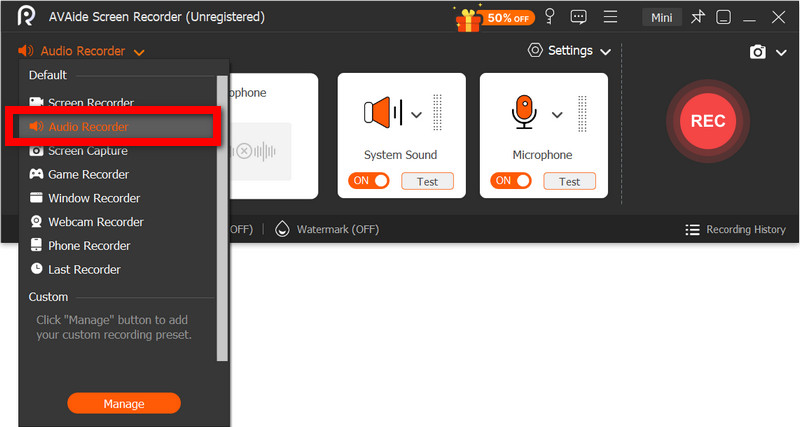
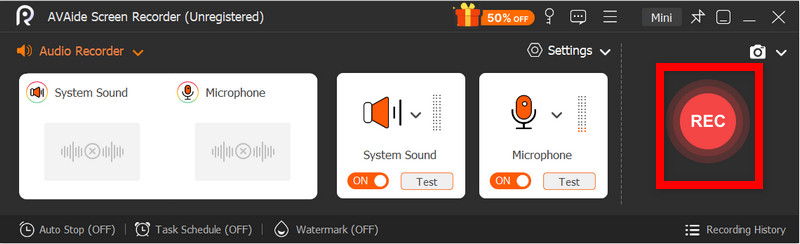
Stap 2Selecteer Audiorecorder
Open de software en selecteer vanaf de hoofdpagina Audiorecorder Om alleen de stem op te nemen.
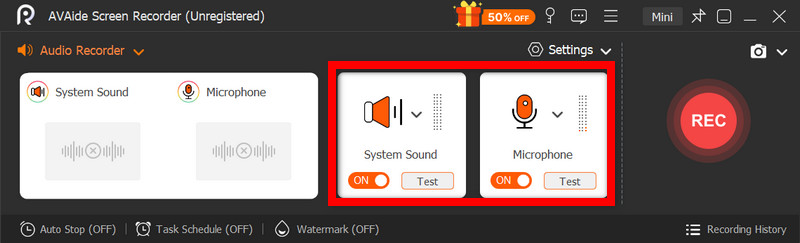
Stap 3Activeer microfoon en systeemgeluid
Activeer de Microfoon optie om spraak duidelijk op te nemen. Activeer de Systeemgeluid om de interne audio van je Mac op te nemen.
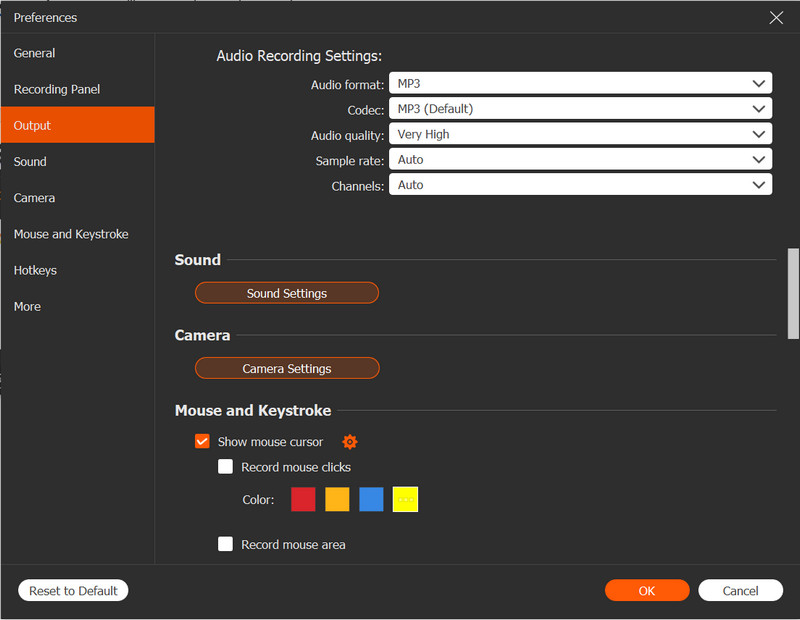
Stap 4Opname-instellingen aanpassen
Van de Instellingen In het menu selecteert u het gewenste audioformaat en de uitvoerkwaliteit. Bepaal de opslaglocatie en pas het volumeniveau aan voor de microfoon en het systeemgeluid.
Stap 5Beginnen met opnemen
Selecteer de REC Je hebt de mogelijkheid om je stem op te nemen. Tijdens de opname kun je de opname pauzeren, hervatten of notities toevoegen.
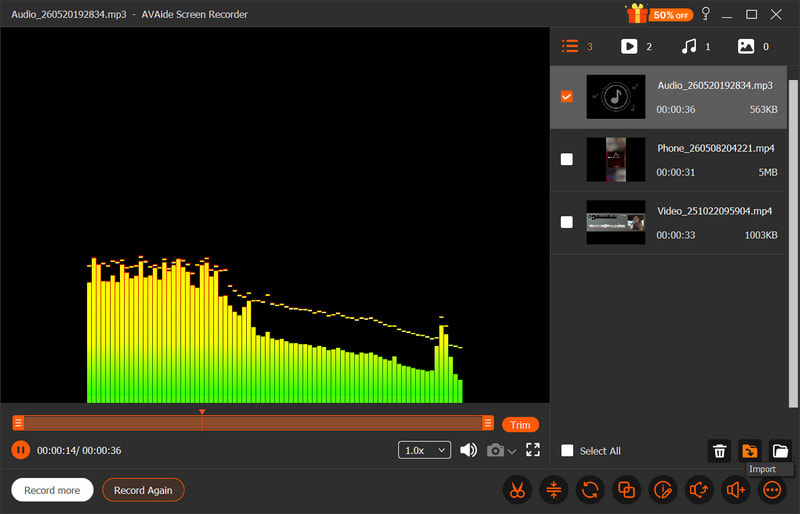
Stap 6Opslaan en voorbeeld bekijken
Selecteer de Hou op Je hebt de optie om de audio-opname te beëindigen. Vervolgens kun je de audio bijsnijden en de opgenomen audio op je Mac opslaan.
2. Audacity gebruiken
Audacity is een gebruiksvriendelijke, krachtige en gratis audio-opname- en bewerkingssoftware voor Mac. Het wordt vaak verkozen boven andere opties voor podcasts en muziekprojecten vanwege de eenvoudige workflows en professionele functies zoals ruisonderdrukking, bijsnijden en audioverbetering. Ondanks al deze functies heeft Audacity een eenvoudige gebruikersinterface, waardoor het een uitstekende keuze is voor beginners.
Stap 1Download Audacity en installeer het op je Mac. Open de app zodra de installatie is voltooid.
Stap 2Selecteer uw audio-ingang. Stel de ingang in op uw audioapparaat en pas het opnameniveau aan.
Stap 3Druk op de knop wanneer u klaar bent om op te nemen. Vermelding Druk op de knop en begin in de microfoon te spreken.
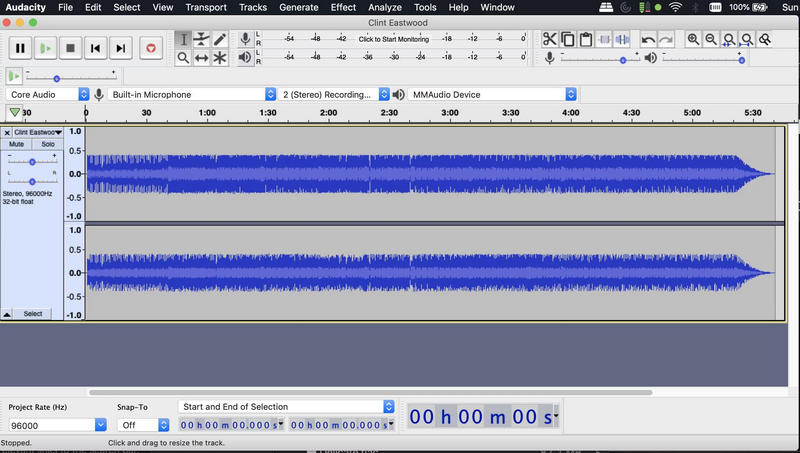
Stap 4Druk op de knop als de opname is voltooid. Hou op knop.
Stap 5Als je tevreden bent met de opname, selecteer dan het project dat je wilt exporteren door naar te gaan Bestand > Exporteren. Selecteer MP3, WAVof een andere optie voor audio-export.
3. GarageBand gebruiken
Een uitstekend alternatief voor Audacity is GarageBand, een app van Apple die standaard op alle Macs is geïnstalleerd. GarageBand heeft dezelfde functies als Audacity en meer, zoals muziektools en audio-effecten. GarageBand is zelfs nog beter voor muziekproducties en wordt veel gebruikt voor podcast opnemen Sessies, voice-overs en hoogwaardige audioprojecten met professionele geluidsregeling.
Stap 1Start GarageBand en selecteer Nieuw project, waarbij je de optie kiest. Stem.
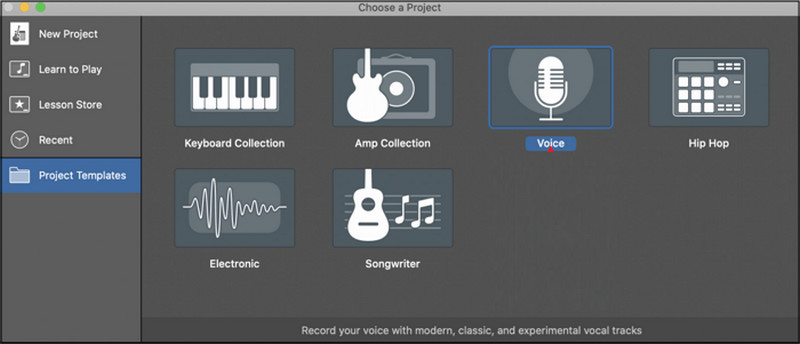
Stap 2Selecteer de gewenste ingang voor de opname. Desgewenst kunt u audiomonitoring inschakelen om uw stem tijdens de opname te horen.
Stap 3Hit Vermelding en begin je sessie.
Stap 4Als je klaar bent met opnemen, druk dan op de knop. Hou op knop. Gebruik de bewerkings- en geluidsaanpassingsfuncties in GarageBand om je opname te verfijnen.
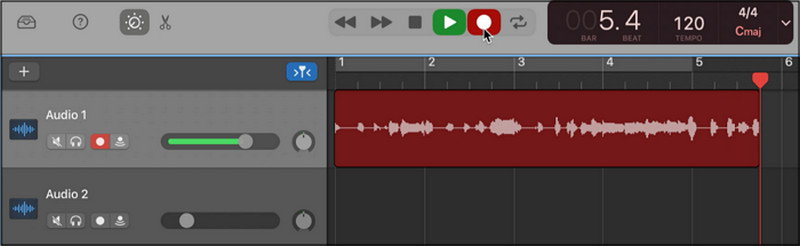
Stap 5Exporteer het voltooide audioproject in de gewenste kwaliteit en het gewenste formaat naar je Mac.
Bonustips
1. Audio opnemen van YouTube op een Mac
Om audio van YouTube, online cursussen, webinars en podcasts en muziek op je Mac op te nemen, kun je OBS Studio gebruiken, een gratis opnameprogramma voor schermopnames en livestreams. Omdat OBS Studio hoogwaardige opnames van systeemgeluiden biedt, is het een uitstekende optie.
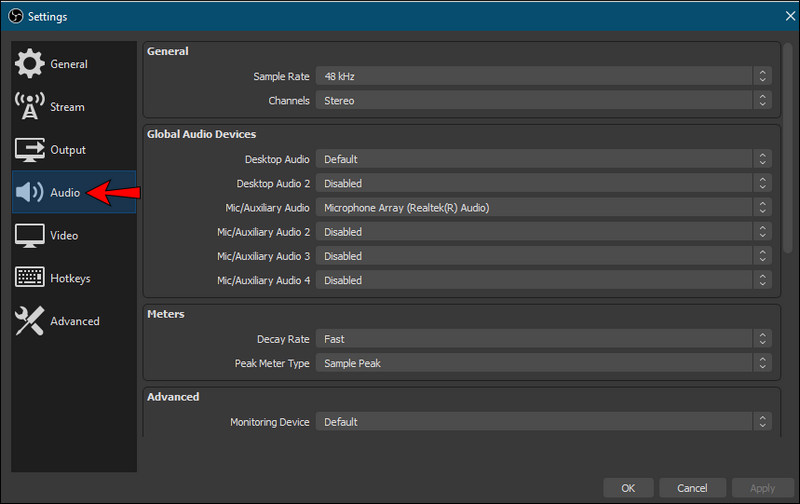
Stap 1Download en installeer OBS Studio op je Mac en open de software zodra deze is geïnstalleerd.
Stap 2Maak een nieuwe bron aan in de Audio Selecteer vervolgens uw systeemaudioapparaat of virtuele audiodriver.
Stap 3Open YouTube in je browser en laad de video/audio die je wilt opnemen.
Stap 4Druk op de Beginnen met opnemen klik op de knop en speel vervolgens de YouTube-video/audio normaal af.
Stap 5Wacht tot de audio die je wilt opnemen is afgelopen en druk dan op de knop. Hou op Druk op de knop en zoek het audiobestand, dat nu op je Mac is opgeslagen.
2. Audio opnemen op een Mac met een externe microfoon
Audio van externe microfoons heeft in de meeste gevallen een hogere geluidskwaliteit dan de interne microfoon van een Mac. USB-microfoons kunnen rechtstreeks op een Mac worden aangesloten. XLR-microfoons hebben echter mogelijk een audio-interface nodig voor een betere geluidskwaliteit en minder ruis. beste schermrecorder voor Mac Het kan ook helpen om duidelijkere opnames te maken bij het combineren van audio- en videotaken.
Stap 1Sluit de microfoon van je keuze aan op je Mac en open het menu. Systeem instellingen, ga naar Geluiden stel de zojuist aangesloten microfoon in als invoerapparaat.
Stap 2Stel het microfooningangsniveau in en test het geluid om er zeker van te zijn dat uw stem duidelijk wordt opgevangen.
Stap 3Open je favoriete opnamesoftware, zoals AVAide Screen Recorder.
Stap 4Selecteer de externe microfoon in de software-instellingen en begin met het opnemen van je stem of audiosessie.
Stap 5Stop de opname, controleer de geluidskwaliteit en sla het uiteindelijke audiobestand op of exporteer het naar je Mac.
Mac-stem opnemen Je kunt eenvoudig gebruikmaken van ingebouwde tools zoals QuickTime en Voice Memos, of geavanceerde software voor professionele opnames. Of je nu interne audio, podcast-commentaar of online college-opnames nodig hebt, deze methoden bieden betrouwbare manieren om efficiënt helder geluid op te nemen op je Mac.
OVER DE AUTEUR

Leg schermactiviteiten vast met audio, online vergaderingen, gameplay-video's, muziek, webcam, enz.