自分だけのオリジナル着信音が欲しい。どこかで見つけたものではなく、電話や通知用に自分で作った着信音が欲しい。
私たちはそのお手伝いをします。さまざまな方法をお見せします 着信音を録音する さまざまなシステムに対応しています。より良い結果を得るための簡単なヒントもご紹介します。さあ、カスタム着信音用にあなたの声やサウンドを準備しましょう。
パート1:iPhoneで着信音を録音する方法
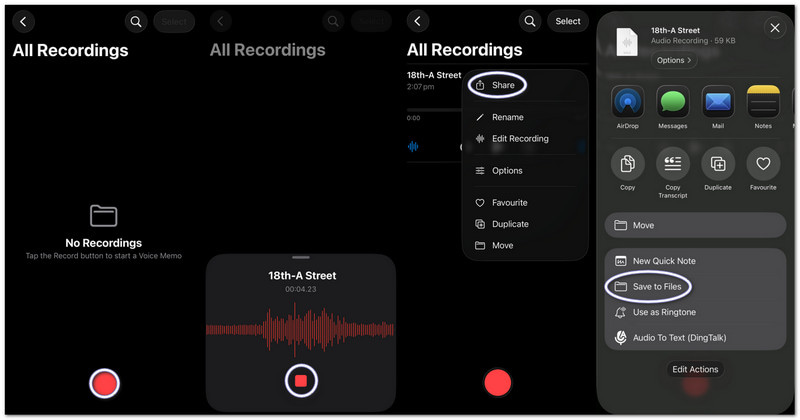
1. 音声メモを着信音にする(最も簡単な方法)
ボイスメモは音声を録音し、基本的なトリミングツールを使ってすぐに使えるカスタム着信音に変換します。このパートでは、iPhoneで音声録音を着信音にする方法を具体的に説明します。
ステップ1iPhoneでボイスメモを起動します。
ステップ2赤い部分をタップ 記録 ボタンを押して、音声を再生または話す。
ステップ3タップ やめる 完了したら。
ステップ4をタップします 3つの点(…) あなたの録音について。
ステップ5選ぶ ファイルに保存 音声を保存して、後で着信音として使用できます。
2. 任意のオーディオファイル(MP3/M4A)を着信音にする
ダウンロードしたファイルや音楽アプリに保存されているMP3またはM4A形式のオーディオファイルを選択して、iPhoneの着信音として設定できます。
ステップ1MP3またはM4Aファイルをダウンロードして保存します ファイル アプリ。
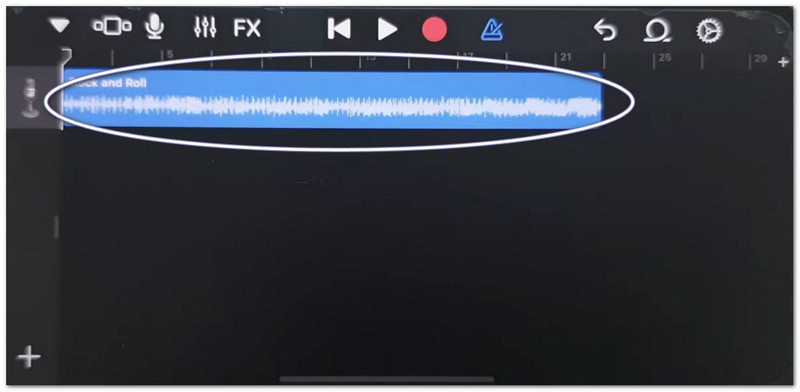
ステップ2走る ガレージバンド そして選ぶ 録音機.
ステップ3オーディオファイルを探す ファイルそして、それをタイムラインにドラッグします。
ステップ4に移動 ファイルオーディオファイルを見つけて、タイムラインにドラッグしてください。
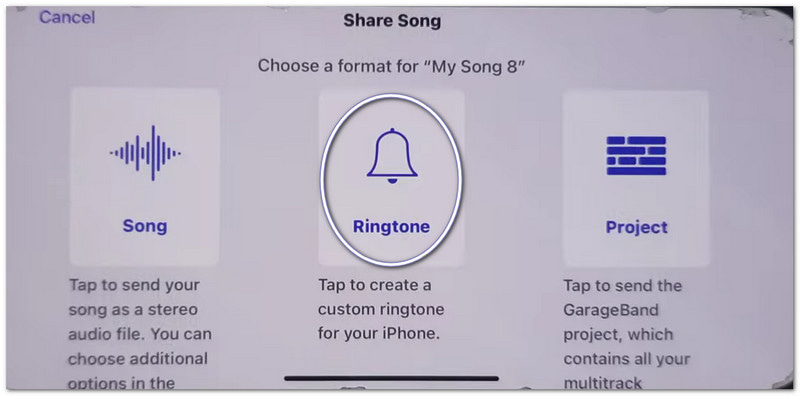
ステップ530秒未満にトリミングしてからタップしてください。 シェア >> 着信音 >> 輸出.
3. GarageBandを使用する(古いiOSバージョン向け)
GarageBandは、オーディオクリップを精密なコントロールで編集できるため、ユーザーは簡単にカスタム着信音をカット、配置、エクスポートできます。そのため、iPhoneで音声録音を着信音として設定する方法も簡単に理解できます。
ステップ1開ける ガレージバンド を選択します 録音機.
ステップ2をタップします トラックビュー開いて ループブラウザ.
ステップ3保存済みのボイスメモまたは音声ファイルをインポートしてください。
ステップ4タイムラインにドラッグして、30秒以下にトリミングしてください。
ステップ5タップ 私の歌、 それから シェア >> 着信音 >> 輸出.
「iPhoneでメモの共有が機能しない」問題のトラブルシューティング
ボイスメモやGarageBandファイルを共有する際に、共有シートがフリーズしたり、クラッシュしたり、アプリが表示されない場合は、以下の解決策をお試しください。
簡単な解決策:
- 強制再起動: 押す 音量を上げる と 音量を下げる次に、Appleのロゴが表示されるまで電源ボタンを押し続けます。
- iOSをアップデートするには、 設定 >> 全般的 >> ソフトウェアの更新アップデートをインストールしてください。システムエラーが修正されます。
- AirDropの切り替え:開く コントロールセンター AirDropをオフにするには、AirDropを一度オフにしてから再度オンにしてください。共有設定が更新されます。
システム修正
- ストレージ容量を確保しましょう:最低でも2ギガバイトの空き容量を確保してください。使用していないファイルや動画は削除してください。ストレージ容量が不足すると、共有シートが正常に動作しなくなる場合があります。
最終修正
- すべての設定をリセット: 移動先 設定 >> 全般的 >> 移行 また iPhoneをリセットする >> すべての設定をリセットデータを削除することはありません。システム設定をリセットするだけで、Share Sheetの問題を修正できます。
パート2:Androidで着信音を録音する方法
1. 着信音作成アプリを使用する(最も推奨)
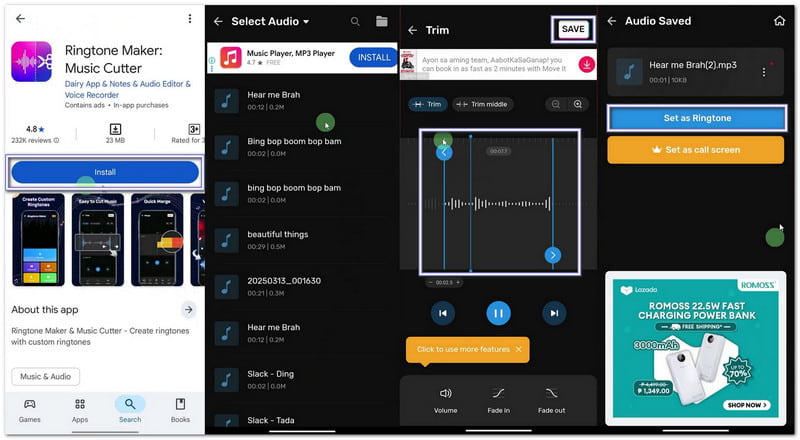
自分で着信音を録音する方法を学びたい場合は、Google Play ストアで入手できる「Maker: Music Cutter」というアプリを使ってみてください。このアプリの主な目的は、曲をトリミングしたり、特定のオーディオ部分を切り取ったりして、Android スマートフォンにカスタム着信音として即座に設定できるようにすることです。
ステップ1Google Play ストアを開きます。 着信音メーカー:ミュージックカッターインストールします。次に、 開ける.
ステップ2タップ はじめに。選ぶ 音声をトリミングアプリがファイルにアクセスできるように、権限を許可してください。
ステップ3スマートフォンから曲または音声ファイルを選択してください。スライダーを動かして、着信音の開始部分と終了部分を選択します。
ステップ4 タップ 切る また 保存する必要に応じて明瞭度を選択してください。 確認次に、 着信音として設定システム設定へのアクセスを許可し、デフォルトの着信音を選択してください。
2. 内蔵設定(ダウンロードした音声用)
Androidの設定では、保存済みの音声ファイルを直接選択し、追加のアプリやツールを必要とせずに着信音として設定できます。
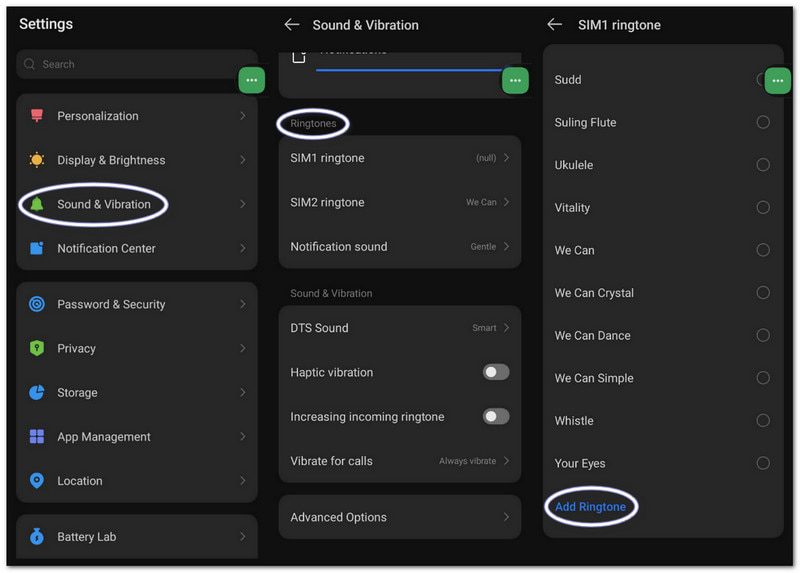
ステップ1スマートフォンの設定を開きます。 音と振動 また 音.
ステップ2タップ 電話の着信音 利用可能なオプションを確認するには。
ステップ3をタップします プラス ボタンまたは 着信音を追加 上部のボタンをクリックします。
ステップ4ストレージを参照します。オーディオファイルを選択します。タップします。 終わり次に、それをデフォルトの着信音として設定することを確認します。
パート3:画面録画を着信音に変換する方法
また、Windows または Mac コンピューターで画面録画を着信音に変換するには、 AVAideスクリーンレコーダーオーディオレコーダーモードを搭載しており、システムからの音声や自分の声を録音できるため、着信音を簡単に録音できます。
また、音量調整機能も備えており、音量を上げたり下げたり、ノイズキャンセリングを有効にしたり、音声が検出されない場合に警告を表示したりできます。もちろん、MP3やM4Aなどの対応フォーマットで着信音をエクスポートできるので、モバイルデバイスでの使用にも最適です。
ステップ1WindowsまたはMacコンピュータにAVAide Screen Recorderをダウンロードしてインストールしてください。

 安全なダウンロード
ステップ2画面録画モードで起動します。ドロップダウンをクリックします。 録音機 より良い音声録音のために。
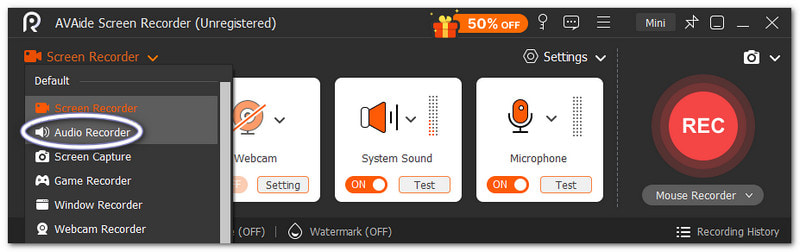
ステップ3オンにする システムサウンド 内部音声を録音するには、 マイクロフォン ご自身の音声を追加したい場合は、その旨をお知らせください。必要に応じて音量を微調整することもできます。
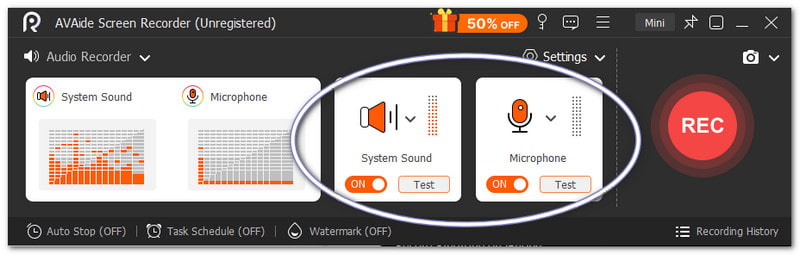
ステップ4打つ REC 開始するには、カウントダウンが終わるまでお待ちください。開始したら、好きな音を再生してください。 やめる 完了したらボタンを押してください。その後、ファイルは自動的に保存されます。ただし、着信音として使用する前に、トリミングや編集を行うこともできます。
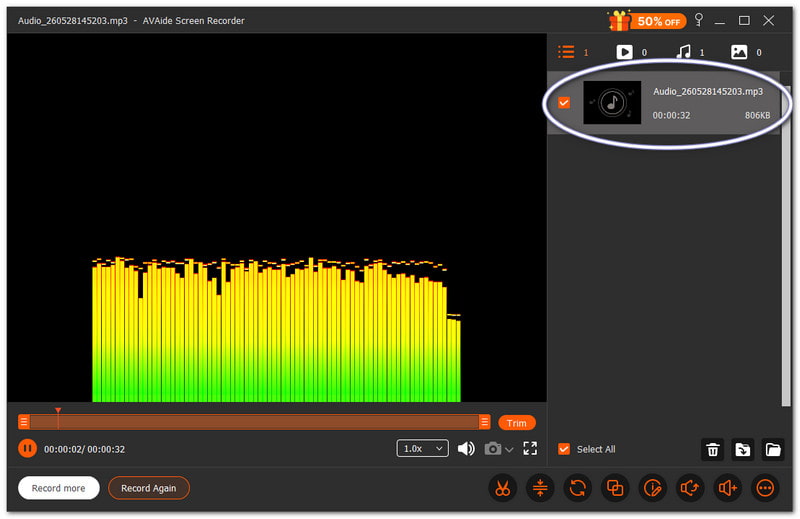
このMacと Windowsオーディオレコーダー お使いのデバイス用に、ご自身が個人的に希望する、お気に入りの着信音を作成するお手伝いをいたします。
パート4.サムスン固有の手順
1. 内蔵スクリーンレコーダーの使用
Samsungスクリーンレコーダーは動画から音声を録音し、録音した音声を着信音として利用できるようにします。
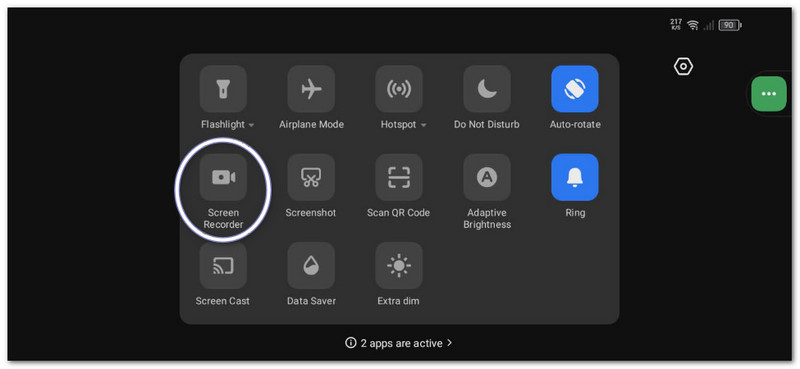
ステップ1の中に クイックパネル下にスワイプします。 スクリーンレコーダー ボタン。開始する前に、 メディアサウンド.
ステップ2キャプチャしたい動画や音楽を再生してください。画面録画ソフトで音声付きで録画しましょう。
ステップ3録画が終わったら停止してください。ファイルはギャラリーに保存されます。音声を抽出するには、動画からMP3への変換アプリを使用してください。
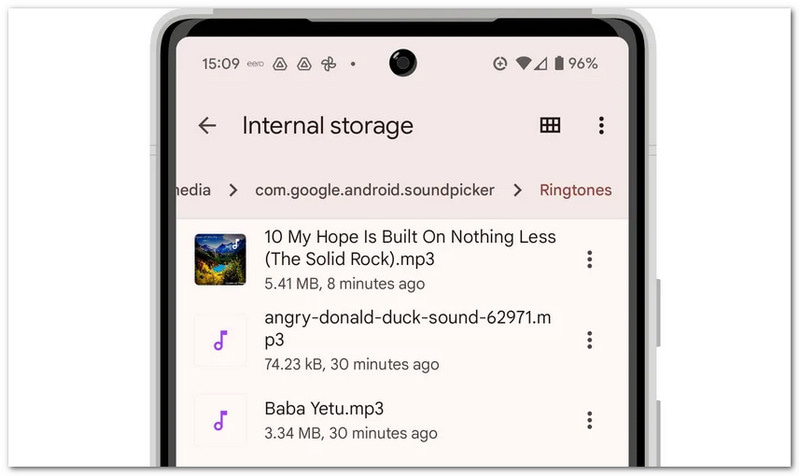
ステップ4MP3ファイルをあなたの 内部ストレージ >> 着信音フォルダ 後で使えるように。
この方法は、 サムスンの画面録画ですから、録画した動画を音声のみに変換して、着信音として使用できるようにしてください。
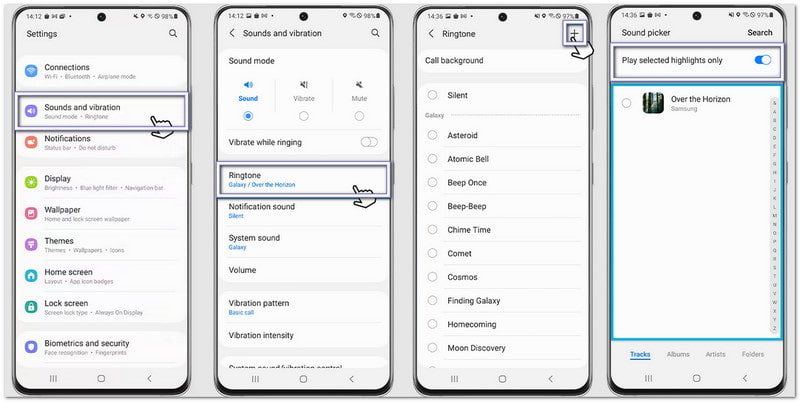
2. 内蔵着信音メーカー
Samsungの着信音設定では、ユーザーは曲を選び、ハイライト部分を切り抜き、それをすぐにデフォルトの着信音として設定できます。
ステップ1携帯電話を開いて、 設定タップ 音と振動次に、 着信音.
ステップ2をタップします 追加 ボタンを押して、スマートフォンに保存されている曲または録音を選択します。
ステップ3有効にする 厳選されたハイライトのみ再生 利用可能な場合、Samsungは音声の最適な部分を自動的にトリミングします。
ステップ4選択を確定すると、そのサウンドがデフォルトの着信音として設定されます。
3. ファイルマネージャー方式
Samsungファイルマネージャーは音声ファイルを整理し、着信音フォルダに直接コピーすることで、着信音の自動検出を可能にします。
ステップ1を起動します マイファイル お使いのSamsungスマートフォンにアプリをインストールしてください。
ステップ2に移動 ダウンロード また オーディオ フォルダを開いて、録音またはダウンロードした音声ファイルを探してください。
ステップ3ファイルを長押しします。タップします。 コピー. 次に、 内部ストレージ >> 着信音.
ステップ4ファイルを「着信音」フォルダに貼り付けてください。その後、サウンド設定に戻ります。すると、ファイルが着信音リストに表示されます。
パート5:最高の結果を得るためのプロのヒント
着信音を設定する前に、いくつかの簡単なヒントを参考にすると良いでしょう。これらのヒントに従うことで、着信音がクリアに聞こえ、スマートフォンでよりスムーズに動作します。
ヒント#1:簡潔にまとめましょう。
着信音は30秒から40秒程度にしてください。そうすることでスムーズな動作が維持され、Androidスマートフォンとの互換性も確保されます。
ヒント#2:正しい形式を使用してください。
可能な限りMP3またはM4Aファイルを使用してください。これらの形式は、ほとんどのAndroidデバイスでエラーなく正常に動作します。
ヒント#3:まず音量を確認してください。
着信音を設定する前に、必ず再生してみてください。音が大きすぎたり小さすぎたりしないか確認しましょう。そうすることで、着信時に不意を突かれるのを防ぐことができます。
あなたは学びました iPhoneで着信音を録音する方法Android端末やデスクトップパソコンなど、どのデバイスを使っていても、いつでも自分だけのオリジナル着信音を作成できます。
WindowsおよびMacユーザー向け AVAideスクリーンレコーダー 簡単に操作できます。自分の声を録音したり、システムから音声をキャプチャしたりできます。録音後にファイルをトリミングすることも可能です。着信音に最適な部分だけを残すのに役立ちます。
著者について

オーディオ、オンライン会議、ゲームプレイビデオ、音楽、Webカメラなどで画面アクティビティをキャプチャします。