Desideri una suonata personalizzata. Non una predefinita. Qualcosa che hai creato tu per le chiamate e le notifiche.
Siamo qui per aiutarti in questo. Ti mostreremo diversi modi per registrare una suoneria su diversi sistemi. Condivideremo anche semplici consigli per ottenere risultati migliori. Quindi, preparate la vostra voce o il vostro suono per una suonata personalizzata.
Parte 1. Come registrare una suonata su iPhone
1. Trasformare un memo vocale in suoneria (il modo più semplice)
L'app Memo Vocali registra l'audio e lo trasforma immediatamente in una suonata personalizzata utilizzabile con semplici strumenti di modifica. Questa sezione ti insegnerà esattamente come trasformare una registrazione vocale in una suoneria per iPhone.
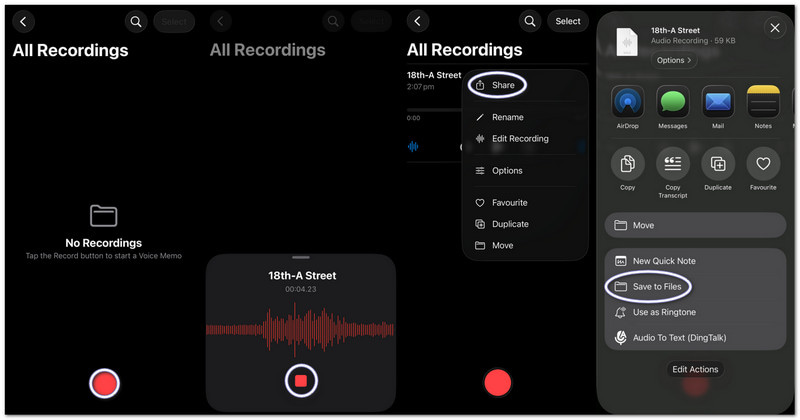
Passo 1Avvia Memo Vocali sul tuo iPhone.
Passo 2Tocca il rosso Disco premere il pulsante e parlare o riprodurre l'audio.
Passaggio 3Rubinetto Fermare quando hai finito.
Passaggio 4Clicca il tre punti (...) sulla tua registrazione.
Passaggio 5Scegliere Salva su file per memorizzare i tuoi file audio e utilizzarli in seguito come suoneria.
2. Trasforma qualsiasi file audio (MP3/M4A) in suoneria
È possibile selezionare e impostare come suoneria su iPhone i file audio MP3 o M4A scaricati o memorizzati in app musicali.
Passo 1Scarica il tuo file MP3 o M4A e salvalo nella File applicazione.
Passo 2Correre Garage Band e scegli Registratore audio.
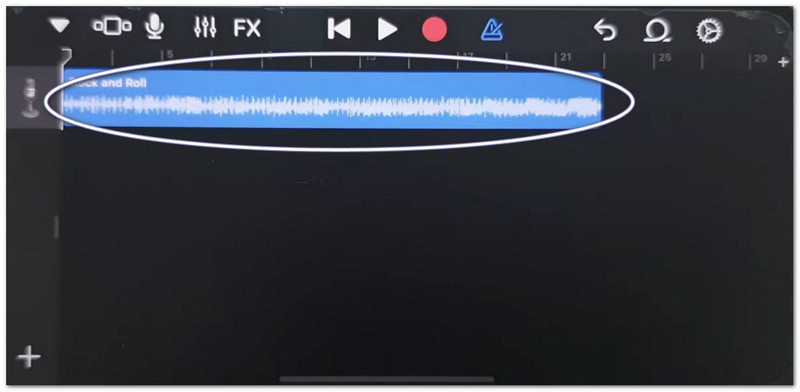
Passaggio 3Individua il tuo audio in File, quindi trascinalo sulla timeline.
Passaggio 4Vai a File, trova il tuo file audio e trascinalo sulla timeline.
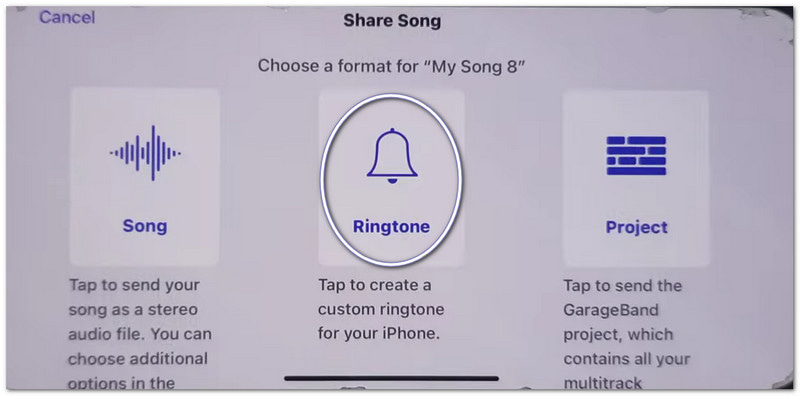
Passaggio 5Riducilo a meno di 30 secondi, poi toccalo Condividere > Suoneria > Esportare.
3. Utilizzo di GarageBand (per versioni iOS precedenti)
GarageBand permette di modificare clip audio con controlli precisi, consentendo agli utenti di tagliare, organizzare ed esportare facilmente suonerie personalizzate, rendendo semplice capire come impostare una registrazione vocale come suoneria su un iPhone.
Passo 1Aprire Garage Band e seleziona Registratore audio.
Passo 2Clicca il Visualizzazione delle tracce, quindi apri il Loop Browser.
Passaggio 3Importa il tuo memo vocale o file audio salvato.
Passaggio 4Trascinalo sulla timeline e ritaglialo in modo che duri 30 secondi o meno.
Passaggio 5Rubinetto Le mie canzoni, poi Condividere > Suoneria > Esportare.
Risoluzione dei problemi relativi al problema "Condividi note su iPhone non funziona"
Se il menu di condivisione si blocca, si arresta in modo anomalo o non mostra le app durante la condivisione di memo vocali o file di GarageBand, prova queste soluzioni.
Soluzioni rapide:
- Riavvio forzato: premere Aumenta il volume e Abbassa il volumeQuindi, tieni premuto il pulsante di accensione finché non compare il simbolo Apple.
- Aggiorna iOS: Vai a Impostazioni > Generale > Aggiornamento del softwareInstalla tutti gli aggiornamenti. Risolveranno gli errori di sistema.
- Attiva/disattiva AirDrop: Apri Centro di controllo Per disattivare AirDrop. Disattiva e riattiva AirDrop. La condivisione verrà aggiornata.
Correzioni di sistema
- Libera spazio di archiviazione: mantieni almeno 2 gigabyte di spazio libero. Elimina file o video inutilizzati. Uno spazio di archiviazione insufficiente può impedire il funzionamento di Share Sheet.
Final Fix
- Ripristina tutte le impostazioni: Vai a Impostazioni > Generale > Trasferire o Reimpostare iPhone > Ripristina tutte le impostazioniNon elimina i tuoi dati. Ripristina solo le impostazioni di sistema e può risolvere i problemi di Share Sheet.
Parte 2. Come registrare una suonata su Android
1. Utilizzare un'app per creare suonerie (opzione più consigliata)
Se vuoi imparare a registrare la tua suonata personalizzata, puoi usare Maker: Music Cutter, disponibile sul Google Play Store. Il suo scopo principale è quello di aiutarti a tagliare brani musicali, ritagliare parti audio precise e impostarle istantaneamente come suonerie personalizzate sui telefoni Android.
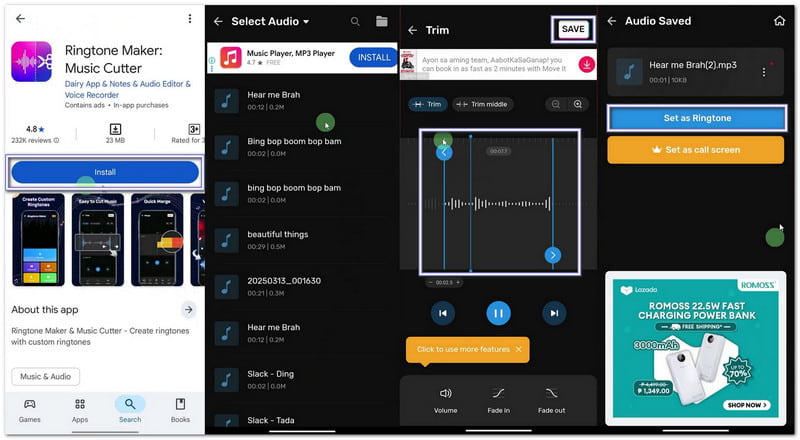
Passo 1Apri il Google Play Store. Cerca Creatore di suonerie: Taglia musica. Installalo. Quindi premi Aprire.
Passo 2Rubinetto Iniziare. Scegliere Trim AudioConcedi le autorizzazioni necessarie affinché l'app possa accedere ai tuoi file.
Passaggio 3Scegli un brano o un file audio dal tuo telefono. Sposta i cursori per selezionare l'inizio e la fine della tua suonata.
Passaggio 4 Rubinetto Taglio o SalvaSeleziona il livello di chiarezza se necessario. Premi Confermare. Quindi, fare clic Imposta come suoneriaConsenti l'accesso alle impostazioni di sistema e scegli la suonata predefinita.
2. Impostazioni integrate (per l'audio scaricato)
Le impostazioni di Android consentono di selezionare direttamente i file audio salvati e di assegnarli come suonerie senza bisogno di app o strumenti aggiuntivi.
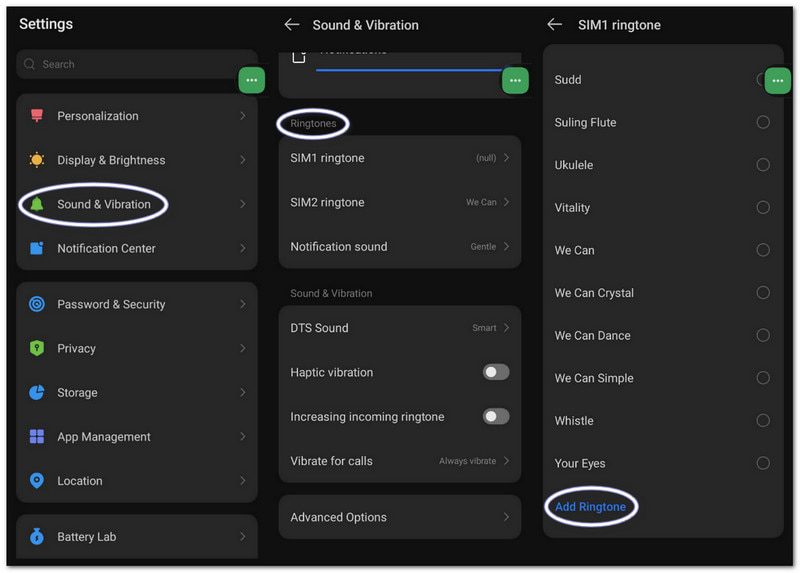
Passo 1Vai alle impostazioni del tuo telefono. Tocca Suono e vibrazione o Suono.
Passo 2Rubinetto Suoneria del telefono per visualizzare le opzioni disponibili.
Passaggio 3Clicca il Più pulsante o il Aggiungi suoneria pulsante in alto.
Passaggio 4Esplora la tua memoria. Seleziona il tuo file audio. Tocca FattoQuindi, conferma per impostarla come suoneria predefinita.
Parte 3. Come trasformare una registrazione dello schermo in una suoneria
È anche possibile trasformare una registrazione dello schermo in una suoneria su un computer Windows o Mac utilizzando AVAide Screen RecorderDispone di una modalità di registrazione audio che cattura i suoni del sistema e la voce, facilitando la registrazione di una suonata.
Offre inoltre impostazioni audio che consentono di regolare il volume, attivare la cancellazione del rumore e visualizzare un avviso in caso di assenza di audio. Naturalmente, è possibile esportare la suonata in formati supportati come MP3 e M4A, ideali per i dispositivi mobili.
Passo 1Scarica e installa AVAide Screen Recorder sul tuo computer Windows o Mac.

DOWNLOAD GRATUITO Per Windows 7 o successivo
 Download sicuro
DOWNLOAD GRATUITO Per Mac OS X 10.13 o successivo
Download sicuroPasso 2Si avvia in modalità Registratore schermo. Fai clic sul menu a discesa. Seleziona Registratore audio per una migliore cattura del suono.
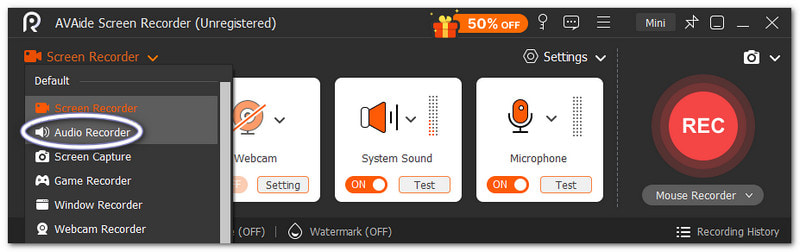
Passaggio 3Accendere Suono di sistema per registrare l'audio interno. Attivare il Microfono Se desideri che venga aggiunta la tua voce, puoi anche regolarne il volume con precisione.
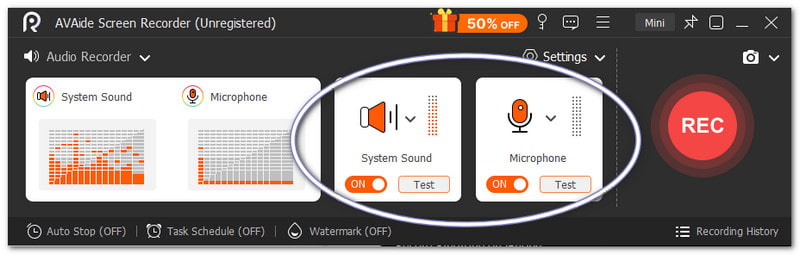
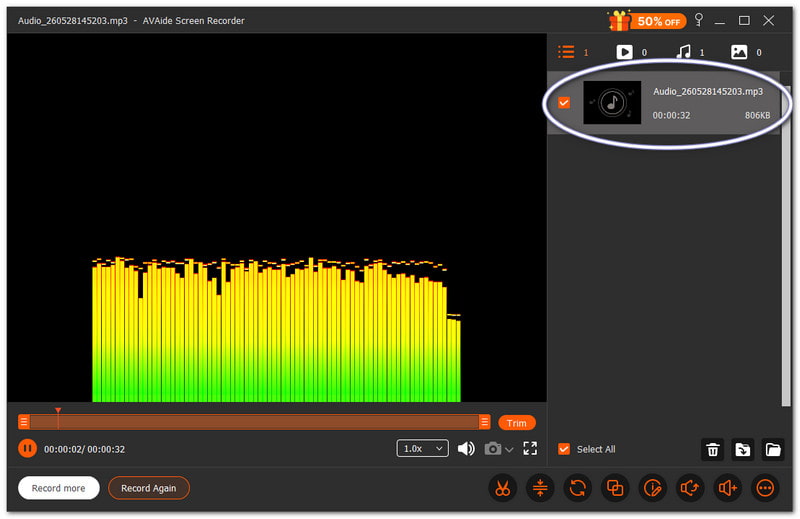
Passaggio 4Colpo REC per iniziare, attendi il conto alla rovescia. Una volta avviato, riproduci il suono che desideri. Premi il pulsante Fermare Una volta terminato, premi il pulsante. Dopodiché, il file verrà salvato automaticamente. Puoi anche ritagliarlo o modificarlo prima di utilizzarlo come suoneria.
Non c'è dubbio che questo Mac e Registratore audio di Windows può aiutarti a creare una suonata che ti piaccia e che soddisfi i tuoi gusti personali per il tuo dispositivo.
Parte 4. Passaggi specifici per Samsung
1. Utilizzo del registratore schermo integrato
Samsung Screen Recorder cattura l'audio dai video e aiuta a trasformare i suoni registrati in suonerie utilizzabili.
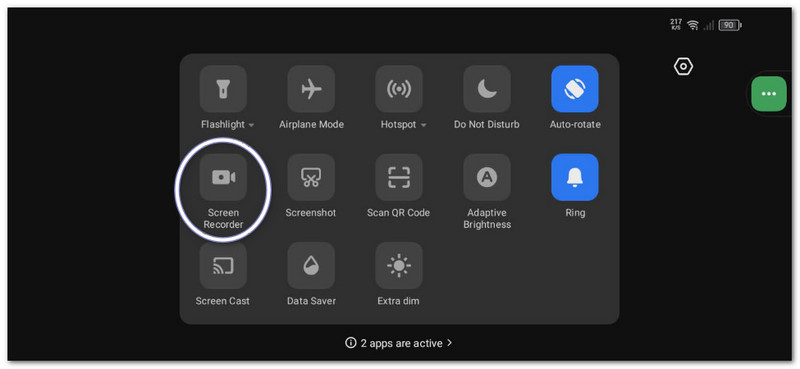
Passo 1Nel Pannello rapido, scorri verso il basso. Premi il Registratore dello schermo pulsante. Prima di iniziare, selezionare il Suoni multimediali.
Passo 2Riproduci il video o la musica che desideri registrare. Lascia che il programma di registrazione dello schermo lo registri con l'audio.
Passaggio 3Interrompi la registrazione al termine. Il file verrà salvato nella tua galleria. Utilizza un'app di conversione da video a MP3 per estrarre l'audio.
Passaggio 4Sposta il file MP3 nella tua Memoria interna > Cartella Suonerie così potrà essere utilizzato in seguito.
Questo metodo mostra Registrazione schermo SamsungAssicurati quindi di convertire il video registrato in solo audio, in modo che possa essere utilizzato come suoneria.
2. Creatore di suonerie integrato
Le impostazioni della suoneria Samsung consentono agli utenti di scegliere i brani, ritagliare i punti salienti e impostarli istantaneamente come suoneria predefinita del telefono.
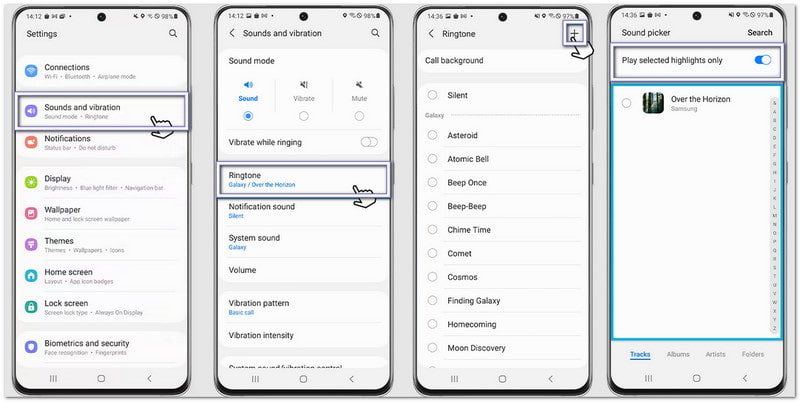
Passo 1Apri il telefono e vai a Impostazioni. Rubinetto Suoni e vibrazioni. Quindi, seleziona Suoneria.
Passo 2Clicca il Aggiungere premere il pulsante e selezionare un brano o una registrazione salvati dal telefono.
Passaggio 3Abilitare Guarda solo i momenti salienti selezionati se disponibile. Samsung taglierà automaticamente la parte migliore dell'audio.
Passaggio 4Conferma la tua selezione e il suono verrà impostato come suoneria predefinita.
3. Metodo del gestore file
Samsung File Manager organizza i file audio e consente di copiarli direttamente nella cartella Suonerie per il rilevamento automatico delle suonerie.
Passo 1Avvia il I miei file app sul tuo telefono Samsung.
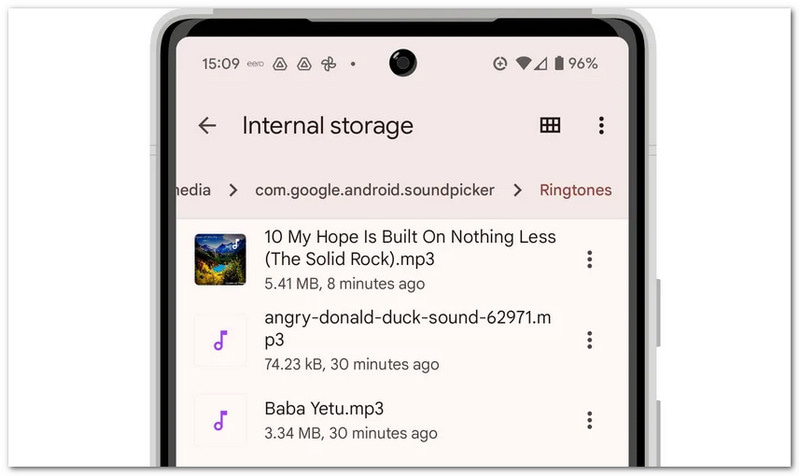
Passo 2Vai a Download o Audio cartella. Individua il file audio registrato o scaricato.
Passaggio 3Tieni premuto a lungo sul file. Tocca copiaQuindi, vai a Memoria interna > Suonerie.
Passaggio 4Incolla il file nella cartella Suonerie. Dopodiché, torna alle impostazioni audio. Il file apparirà ora nell'elenco delle suonerie.
Parte 5. Consigli professionali per ottenere risultati ottimali
Prima di impostare la suonata, è utile seguire alcuni semplici consigli. Questi accorgimenti renderanno la suoneria più nitida e la faranno funzionare al meglio sul tuo telefono.
Suggerimento #1: Sii conciso.
Imposta una durata della suonata di soli 30-40 secondi. In questo modo il suono sarà fluido e la suoneria sarà perfettamente compatibile con i telefoni Android.
Suggerimento #2: Utilizzare il formato corretto.
Quando possibile, utilizza file MP3 o M4A. Questi formati funzionano correttamente sulla maggior parte dei dispositivi Android senza errori.
Suggerimento #3: Controlla prima il volume.
Prima di impostare la suonata, ascoltala in anteprima. Assicurati che il volume non sia né troppo alto né troppo basso. Questo ti aiuterà a evitare sorprese quando qualcuno ti chiama.
Hai imparato come registrare una suoneria su un iPhone, Android e un computer desktop. Quindi, indipendentemente dal dispositivo che utilizzi, puoi creare la tua suonata personalizzata in qualsiasi momento.
Per gli utenti Windows e Mac, AVAide Screen Recorder Rende il processo semplice. Puoi registrare la tua voce o acquisire l'audio dal tuo sistema. Puoi anche tagliare il file dopo la registrazione. Ti aiuta a conservare solo la parte migliore per la tua suoneria.
INFORMAZIONI SULL'AUTORE

Cattura le attività sullo schermo con audio, riunioni online, video di gioco, musica, webcam, ecc.
Registrazione audio