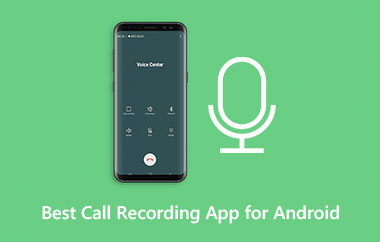
משתמשי אנדרואיד שרוצים ללמוד איך להקליט אודיו באנדרואיד נמצאים במקום הנכון, שכן מאמר זה יכסה כל שיטה פשוטה שאתם צריכים.
נעסוק באופן הקלטת אודיו חיצוני, כמו קול וצלילי סביבה, וכן באופן שבו ניתן ללכוד אודיו פנימי ממערכת הטלפון שלכם. נכלול גם מדריך בסיסי לפתרון בעיות שיעזור לכם לפתור בעיות הקלטה נפוצות.
חלק 1. הקלטת אודיו חיצוני (קול וצלילי סביבה)
1. שימוש באפליקציית הקלטת הקול המובנית
שיטה זו מספקת דרך קלה לשלוט בהקלטת אודיו בטלפון אנדרואיד, באמצעות תכונה בסיסית שכבר נמצאת ברוב טלפוני האנדרואיד ללכידת קול וצליל.
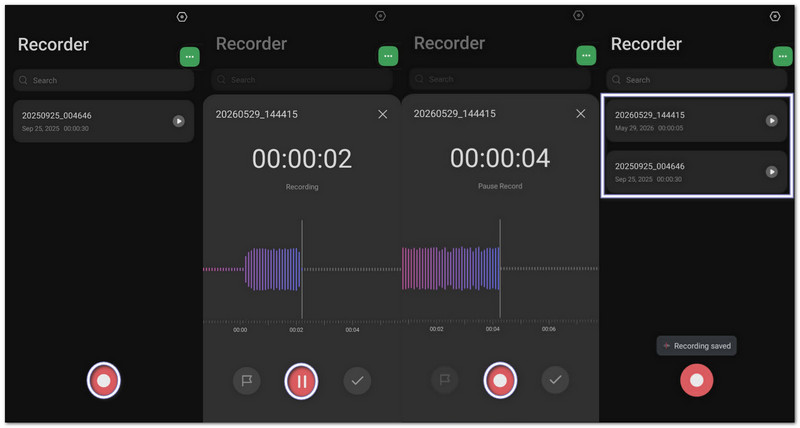
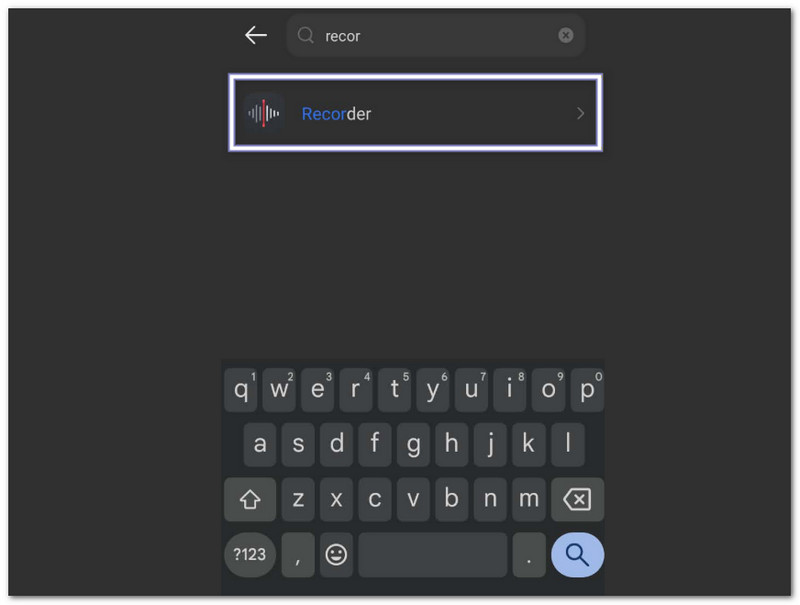
שלב 1פתח את מגירת האפליקציות שלך וחפש את מקליט קול.
שלב 2הקש על האדום תקליט כדי להתחיל להקליט את קולך או צלילים בקרבת מקום.
שלב 3בֶּרֶז הַפסָקָה אם אתם זקוקים להפסקה קצרה. הקישו קוֹרוֹת חַיִים להמשיך.
שלב 4בֶּרֶז להציל לאחר שתסיים. קובץ האודיו שלך מאוחסן באפליקציה 'קבצים' או 'הקבצים שלי'. רוב ההקלטות נשמרות כקבצי MP3 או M4A.
2. הקלטת אודיו חיצוני ללא כל אפליקציה
גישה זו מאפשרת הקלטת קול באנדרואיד ללכידת שמע מיידית באמצעות תכונות טלפון מובנות מבלי לפתוח אפליקציית הקלטה מותקנת.
א. ווידג'ט המקליט של גוגל
שלב 1לחץ והחזק אזור ריק במסך הבית.
שלב 2בֶּרֶז ווידג'טים ולמצוא את מקליט גוגל ווידג'ט.
שלב 3גרור אותו למסך הבית שלך.
שלב 4הקש על הווידג'ט בכל עת כדי להתחיל להקליט בנגיעה אחת.
ב. עוזר גוגל
שלב 1תגיד "היי גוגל"או להחזיק את כּוֹחַ לַחְצָן.
שלב 2תגיד "להקליט את הקול שלי" או "התחל הקלטת שמע."
שלב 3העוזר של גוגל יפתח את מכשיר ההקלטה ויתחיל להקליט צליל.

ג. משבצת הגדרות מהירות
שלב 1החלק למטה מראש המסך.
שלב 2לְחַפֵּשׂ מקליט אודיו אוֹ מקליט מסך בהגדרות מהירות.
שלב 3הקש עליו כדי להתחיל להקליט באופן מיידי.
שלב 4עצרו את ההקלטה לאחר סיום ההקלטה ושמרו את הקובץ.
3. הקלטה עם אפליקציית צד שלישי (לאיכות ותכונות טובות יותר)
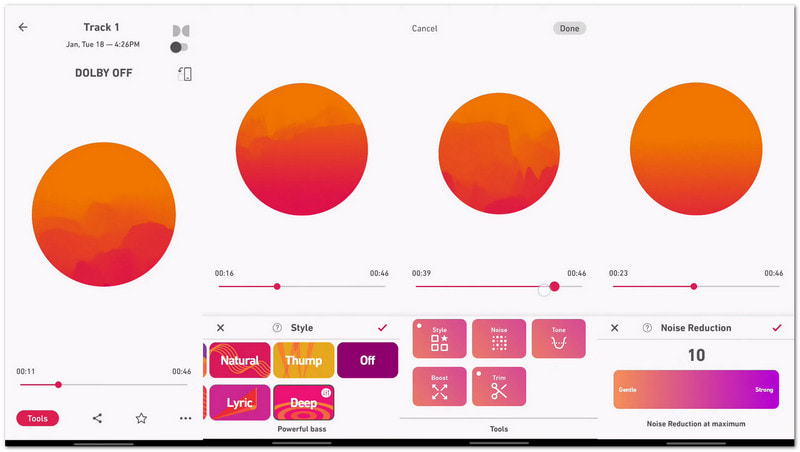
הקלטה באמצעות אפליקציית צד שלישי, כמו Dolby On, מעניקה צליל טוב יותר ושליטה רבה יותר בכל סוגי צרכי האודיו. היא הופכת את הטלפון שלכם לאולפן הקלטות פשוט לקול, מוזיקה וסרטונים.
זה משפר את הסאונד עם הפחתת רעשים, איקוולייזר ואפקטים של אולפן לאודיו נקי ומקצועי יותר. זה ממש שימושי אם אתם צריכים ללמוד איך להקליט אודיו בסמסונג ובמותגי אנדרואיד אחרים.
שלב 1להתקין דולבי מופעל מחנות גוגל פליי.
שלב 2פתחו את האפליקציה ולחצו על תקליט לַחְצָן.
שלב 3הקלט את הקול, המוזיקה או צלילי הרקע שלך. האפליקציה מפחיתה באופן אוטומטי רעש ומשפרת את בהירות הצליל.
שלב 4שמור או שתף את ההקלטה לאחר העריכה בעזרת כלי שמע מובנים.
חלק 2. הקלטת אודיו פנימי (ממערכת הטלפון שלך)
1. שימוש במקליט המסך המובנה
זוהי תכונת האנדרואיד הרשמית ללמוד כיצד להקליט אודיו פנימי באנדרואיד, והוא מקליט צלילי מערכת יחד עם פעילות המסך בצורה יציבה.
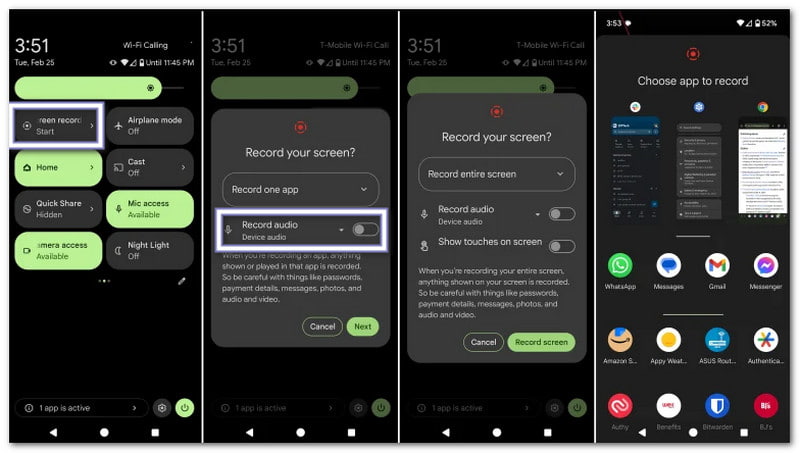
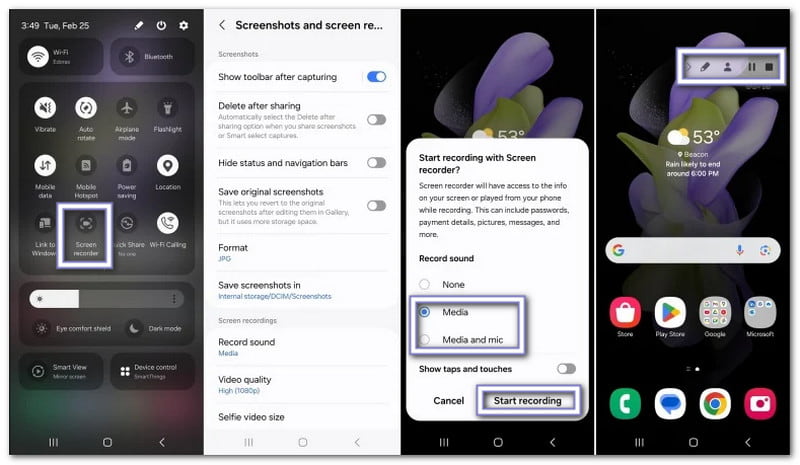
שלב 1החליקו פעמיים למטה מראש המסך כדי לפתוח הגדרות מהירות.
שלב 2למצוא מקליט מסךאם הוא חסר, לחץ על עִפָּרוֹן אוֹ לַעֲרוֹך כפתור ולהוסיף אותו תחילה.
שלב 3בֶּרֶז מקליט מסך ולבחור אודיו של המכשיר אוֹ כְּלֵי תִקְשׁוֹרֶת ו מִיקרוֹפוֹן כמקור הקול.
שלב 4התחל להקליט ופתח את האפליקציה, המשחק או הסרטון שברצונך לצלם. עצור את ההקלטה לאחר שתסתיים.
2. הקלטת אודיו פנימי טהור (ללא וידאו) באמצעות אפליקציה של צד שלישי
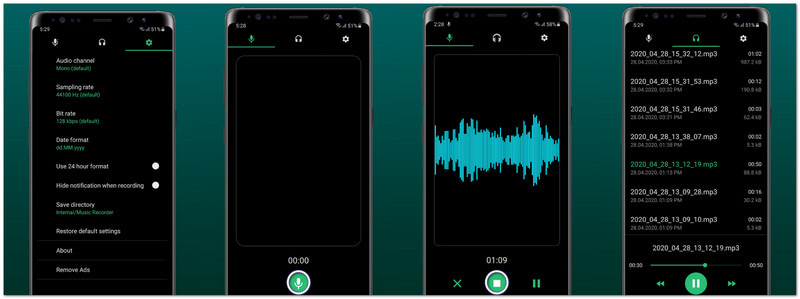
אם אתם מחפשים כיצד להקליט רק אודיו באנדרואיד, Music Recorder - Song Recorder, שפותח על ידי Jaya Zone Tech, הוא פתרון פשוט.
זֶה אפליקציית הקלטת קול לוכד צליל באיכות גבוהה מאפליקציות, משחקים ונגני מוזיקה. ניתן גם להגדיר קצב סיביות, קצב דגימה ולבחור מונו או סטריאו לקבלת פלט טוב יותר. הוא תומך בהשהיה, חידוש הפעלה, עריכה, שיתוף ואפילו מצב הקלטה נסתר לשימוש גמיש.
שלב 1להתקין מקליט מוזיקה - מקליט שירים מחנות גוגל פליי ופתח את האפליקציה.
שלב 2אפשר את ההרשאות הנדרשות עבור מִיקרוֹפוֹן ו גישה לאחסון.
שלב 3לִפְתוֹחַ הגדרות ולשנות את מקור ההקלטה מ מיקרופון ל שמע פנימיניתן גם לבחור MP3 אוֹ WAV פוּרמָט.
שלב 4בֶּרֶז תקליט והפעילו את האודיו, המשחק או הסרטון שברצונכם ללכוד. האפליקציה מקליטה רק את הצליל הפנימי.
חלק 3. במקרה שתצטרכו להשתמש במיקרופונים חיצוניים עם אנדרואיד
המיקרופון של הטלפון שלך עובד מצוין להקלטות פשוטות. אבל אם אתה רוצה צליל ברור יותר, פחות רעש או לכידת קול חזקה יותר, מיקרופון חיצוני יכול לעזור מאוד.
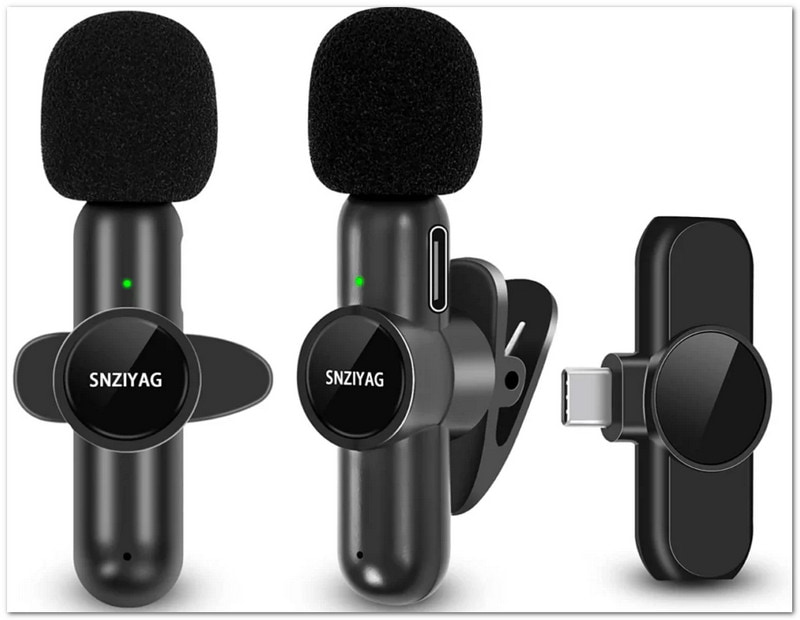
אפשרות א': מיקרופונים מסוג USB-C
מיקרופונים מסוג USB-C הם פשוטים ומהירים לשימוש. כל שעליכם לעשות הוא לחבר אותם ליציאת ה-USB-C של הטלפון ולהתחיל להקליט. רוב טלפוני האנדרואיד מזהים אותם אוטומטית. לעתים קרובות הם נותנים צליל נקי יותר ובהירות קול טובה יותר מאשר המיקרופון המובנה בטלפון. הם נהדרים ליוצרי תוכן, סטודנטים והקלטת וידאו בנייד.
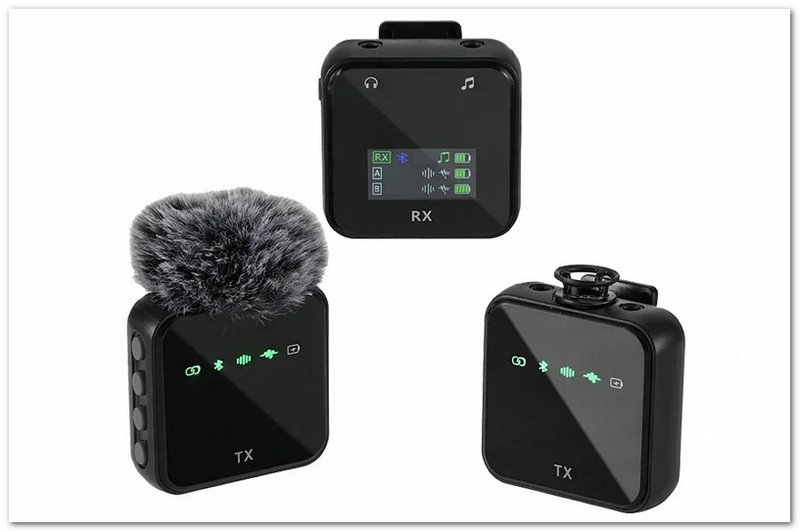
אפשרות ב': מיקרופונים אלחוטיים בלוטות'
מיקרופונים עם בלוטות' מאפשרים לכם להקליט ללא חוטים. אתם מחברים אותם דרך הגדרות ה-Bluetooth של הטלפון ומתחילים להקליט כרגיל. הם שימושיים אם אתם זזים בזמן צילום או דיבור. אנשים רבים משתמשים בהם עבור ולוגים, מצגות, סרטוני חוץ וראיונות מכיוון שהם ניידים וקלים לנשיאה.
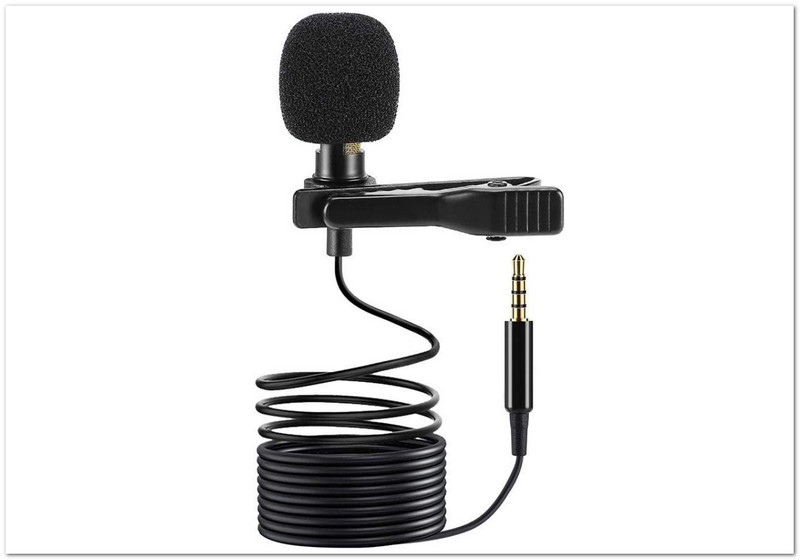
אפשרות ג': מיקרופונים 3.5 מ"מ
מיקרופונים בגודל 3.5 מ"מ מתחברים דרך שקע האוזניות של טלפון האנדרואיד שלכם. אם למכשיר שלכם אין שקע אוזניות, תוכלו להשתמש במתאם USB-C ל-3.5 מ"מ. מיקרופונים אלה במחירים נוחים וקלים לשימוש עבור הערות קוליות, פרויקטים לבית הספר, שיחות והקלטות פשוטות. הם גם בחירה טובה למתחילים שרוצים אודיו טוב יותר מבלי להוציא יותר מדי כסף.
חלק 4. פתרון בעיות נפוצות
סיימת ללמוד הקלטת אודיו באנדרואיד. אבל מה אם אתה נתקל בבעיות בלתי צפויות? האם אתה יודע מה לעשות?
זה יכול להרגיש קשה, במיוחד אם אתם מתחילים. אבל אל דאגה. אנחנו לא נשאיר אתכם תקועים. אנחנו גם נספק פתרונות פשוטים שתוכלו לסמוך עליהם אם אי פעם תיתקלו בבעיות כמו אלה שלהלן.
1. אפשרות שמע פנימית באפור
אנדרואיד חוסם אודיו פנימי בחלק מהאפליקציות. הוא יכול להיות מוגבל גם על ידי כללי זכויות יוצרים. השתמש בתכונה המובנה מקליט מסך מ הגדרות מהירותזה עובד טוב יותר עבור צליל המערכת. אם אפשר, הגדר את האודיו ל- אודיו של המכשיר אוֹ כְּלֵי תִקְשׁוֹרֶת ו מיקרופון.
2. מיקרופון חיצוני לא מזוהה
זה קורה כאשר הטלפון לא יכול לזהות את המיקרופון. הפעל OTG ב הגדרות ל מיקרופונים מסוג USB-Cבדוק כבלים ו מתאמים לתמיכה ו- שבב DACחברו את המיקרופון תחילה לפני פתיחת האפליקציה. נסו פתח את המצלמה במידת צורך.
3. מקליט הקול לא מופיע
ייתכן שהאפליקציה מוסתרת או מושבתת. פתח מגירת האפליקציות וחיפוש מַקלִיט. לך ל הגדרות > אפליקציות ולהפעיל אותו אם הוא מושבת.
4. הקלטה ברקע נעצרת
ייתכן שאנדרואיד יסגור אפליקציות כדי לחסוך בסוללה. הגדר אופטימיזציה של סוללה ל ללא הגבלהנעל את האפליקציה אפליקציות אחרונות אז זה נשאר פתוח.
5. הקלטות לא נשמרות
לעיתים קרובות מדובר בבעיית אחסון או הרשאה. אפשר אִחסוּן אוֹ הרשאת קבציםבדוק אם האחסון מלא. נקה את מטמון ולנסות שוב.
בונוס: מקליט המסך הטוב ביותר לאנדרואיד עם פלט באיכות טובה יותר
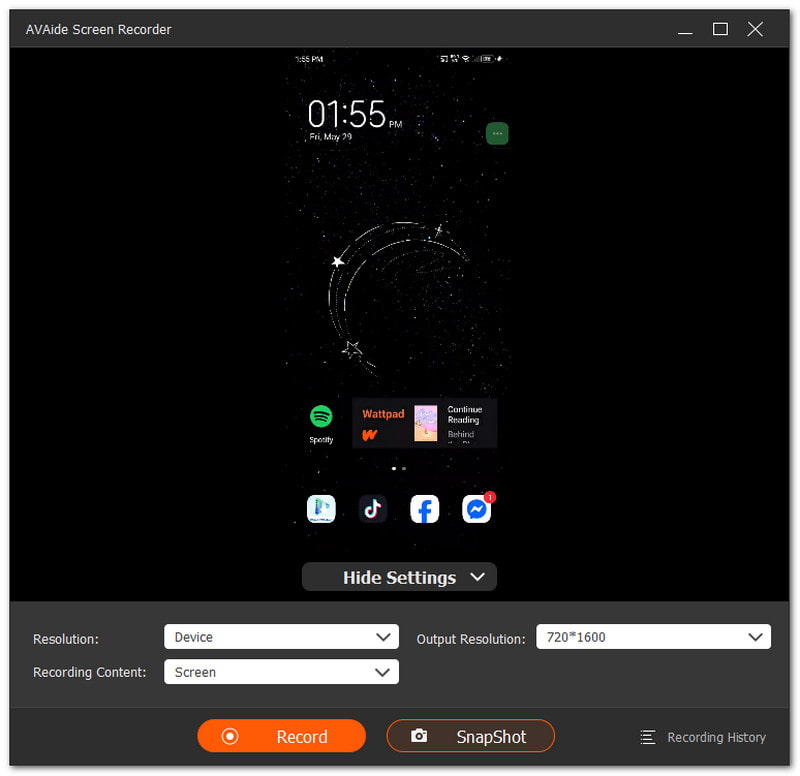
מקליט מסך AVAide מציע תכונת הקלטת טלפון שעובדת עבור מכשירי אנדרואיד. הוא תומך ברזולוציה של עד 4K לפלט וידאו ברור וחד. הוא גם מאפשר לך ללכוד את המיקרופון של הטלפון שלך, את צליל הרמקול של המחשב שלך, או את שניהם בו זמנית. בנוסף, אתה יכול לצלם תמונת מצב תוך כדי הקלטה ללכידה מיידית. זה מתאים מאוד למשחקי אפליקציות מובייל, הדרכות אפליקציות ושיחות וידאו.
- מקליט אודיו באייפון, אנדרואיד, חלונות ומק.
- מצלם את מסך הטלפון ברזולוציה גבוהה.
- מאפשר עריכה כמו חיתוך, מיזוג, המרה והגברת אודיו.
- תומך בפורמטים כמו MP4, WMV, AVI, GIF ו-MP3.

 הורדה מאובטחת
עכשיו אתה יודע איך להקליט סאונד באנדרואיד ומה לעשות כשאתם נתקלים בבעיות. אם מתרחשות בעיות, פשוט בדקו את ההגדרות, ההרשאות וכלי ההקלטה שלכם.
לקבלת תוצאות טובות יותר, ניתן להשתמש גם בכלי רב עוצמה כמו מקליט מסך AVAideהוא מספק הקלטה חלקה ופלט ברירות גבוהה למשתמשי אנדרואיד ואפילו למשתמשי Windows ו-Mac.
אודות המחבר

צלם פעילויות מסך עם אודיו, פגישות מקוונות, סרטוני משחק, מוזיקה, מצלמת אינטרנט וכו'.