אתם רוצים צלצול אישי משלכם. לא משהו מאיפה שהוא. משהו שיצרתם בעצמכם לשיחות והתראות.
אנחנו כאן כדי לעזור לך עם זה. נראה לך דרכים שונות לעשות זאת להקליט צלצול במערכות שונות. נשתף גם טיפים פשוטים לתוצאות טובות יותר. אז הכינו את הקול או הצליל שלכם לצלצול מותאם אישית.
חלק 1. כיצד להקליט צלצול באייפון
1. תזכיר קולי לצלצול (הדרך הקלה ביותר)
Voice Memos מקליטה צליל והופכת אותו מיד לצלצול מותאם אישית שמיש בעזרת כלי חיתוך בסיסיים, וחלק זה ילמד אתכם בדיוק כיצד להפוך הקלטת קול לצלצול באייפון.
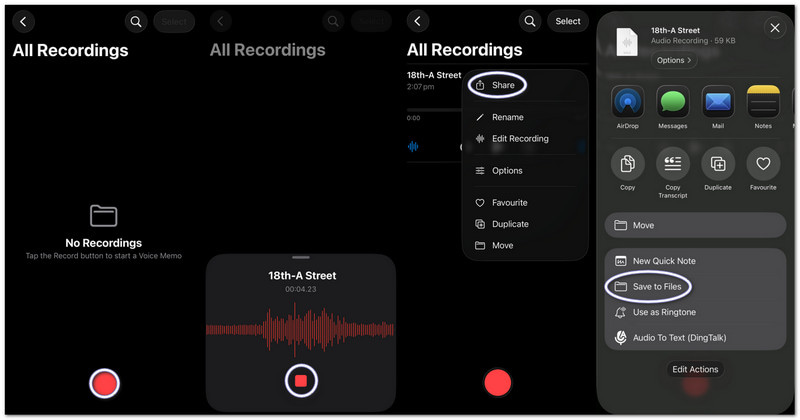
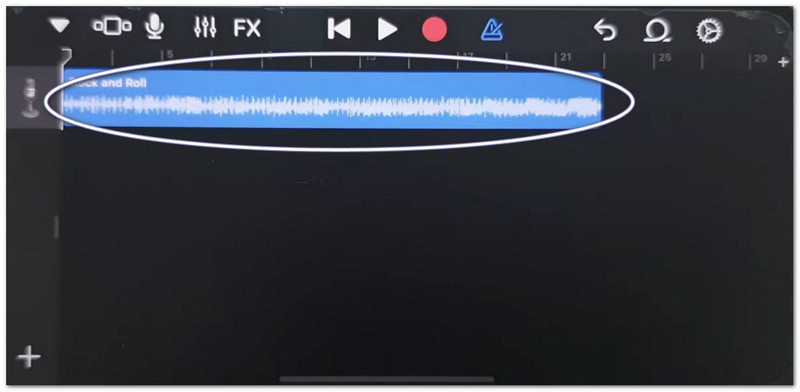
שלב 1הפעל את תזכורות הקול באייפון שלך.
שלב 2הקש על האדום תקליט כפתור ודבר או השמע את השמע שלך.
שלב 3בֶּרֶז תפסיק כשתסיים.
שלב 4הקש על שלוש נקודות (...) על ההקלטה שלך.
שלב 5בחר שמור בקבצים כדי לאחסן את השמע שלך ולהשתמש בו מאוחר יותר כצלצול.
2. כל קובץ שמע (MP3/M4A) לצלצול
ניתן לבחור קבצי שמע MP3 או M4A המאוחסנים מהורדות או מאפליקציות מוזיקה ולהגדיר אותם כצלצול באייפון.
שלב 1הורד את קובץ ה-MP3 או ה-M4A שלך ושמור אותו ב- קבצים אפליקציה.
שלב 2לָרוּץ GarageBand ולבחור מקליט אודיו.
שלב 3אתר את האודיו שלך ב קבצים, ולאחר מכן גררו אותו לציר הזמן.
שלב 4לך ל קבצים, מצא את האודיו שלך וגרור אותו לציר הזמן.
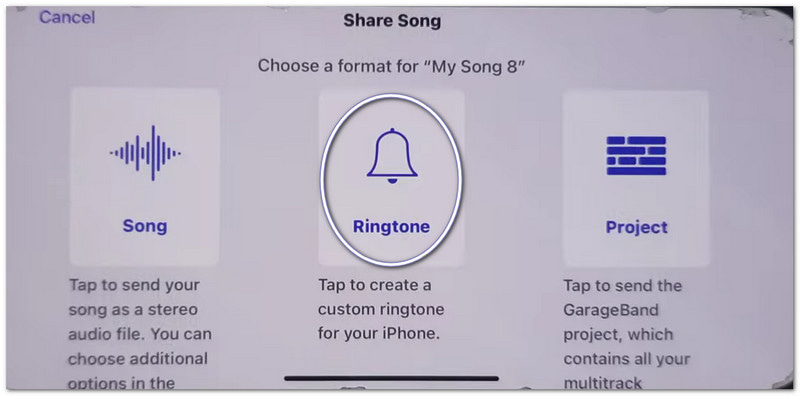
שלב 5חתוך אותו לפחות מ-30 שניות, לאחר מכן הקש לַחֲלוֹק > רינגטון > יְצוּא.
3. שימוש ב-GarageBand (לגרסאות iOS ישנות יותר)
GarageBand עורך קטעי אודיו בעזרת פקדים מדויקים, המאפשרים למשתמשים לחתוך, לסדר ולייצא צלצולים מותאמים אישית בקלות, מה שמקל על ההבנה כיצד להגדיר הקלטת קול כצלצול באייפון.
שלב 1לִפְתוֹחַ GarageBand ובחר מקליט אודיו.
שלב 2הקש על תצוגת מסלולים, לאחר מכן פתח את דפדפן לולאות.
שלב 3ייבא את תזכורת הקול או קובץ השמע ששמרת.
שלב 4גררו אותו לציר הזמן וקצצו אותו ל-30 שניות או פחות.
שלב 5בֶּרֶז השירים שלי, לאחר מכן לַחֲלוֹק > רינגטון > יְצוּא.
פתרון בעיות "שיתוף הערות באייפון לא עובד"
אם גיליון השיתוף קופא, קורס או לא מציג אפליקציות בעת שיתוף תזכירי קול או קבצי GarageBand, נסו את התיקונים הבאים.
תיקונים מהירים:
- הפעלה מחדש כפויה: לחץ הגברת עוצמת הקול ו הנמכת עוצמת הקוללאחר מכן, החזק את לחצן ההפעלה עד להופעת סמל Apple.
- עדכון iOS: עבור אל הגדרות > כללי > עדכון תוכנההתקן את כל העדכונים. זה מתקן שגיאות מערכת.
- פתח/י את AirDrop מרכז שליטה כדי לכבות את AirDrop. כבה את AirDrop והפעל אותו מחדש. השיתוף יבוצע רענון.
תיקוני מערכת
- פינוי אחסון: שמור לפחות 2 ג'יגה-בייט של שטח פנוי. מחק קבצים או סרטונים שאינם בשימוש. שטח אחסון נמוך עלול למנוע מגיליון השיתוף לפעול.
תיקון סופי
- איפוס כל ההגדרות: עבור אל הגדרות > כללי > לְהַעֲבִיר אוֹ איפוס אייפון > איפוס כל ההגדרותזה לא מוחק את הנתונים שלך. זה רק מאפס את הגדרות המערכת ויכול לתקן בעיות בגיליון השיתוף.
חלק 2. כיצד להקליט צלצול באנדרואיד
1. שימוש באפליקציית יצירת צלצולים (המומלץ ביותר)
אם אתם רוצים ללמוד כיצד להקליט צלצול משלכם, תוכלו להשתמש ב-Maker: Music Cutter בחנות Google Play. המטרה העיקרית שלו היא לעזור לכם לקצץ שירים, לחתוך חלקי אודיו מדויקים ולהגדיר אותם באופן מיידי כצלצולים מותאמים אישית בטלפונים של אנדרואיד.
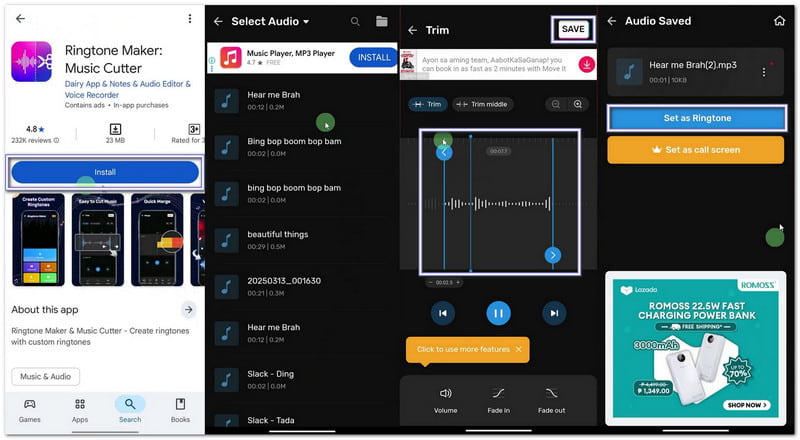
שלב 1פתח את חנות Google Play. חפש יוצר צלצולים: חותך מוזיקההתקן אותו. לאחר מכן, לחץ על לִפְתוֹחַ.
שלב 2בֶּרֶז להתחיל. בחר חיתוך אודיואפשר הרשאות כדי שהאפליקציה תוכל לגשת לקבצים שלך.
שלב 3בחר שיר או קובץ שמע מהטלפון שלך. הזז את המחוונים כדי לבחור את החלקים הראשונים והסיומיים של הצלצול שלך.
שלב 4 בֶּרֶז גזירה אוֹ להצילבחר את הבהירות במידת הצורך. לחץ לְאַשֵׁר. לאחר מכן, לחץ הגדר כצלצולאפשר גישה להגדרות המערכת ובחר את הצלצול המוגדר כברירת מחדל.
2. הגדרות מובנות (להורדת אודיו)
הגדרות אנדרואיד מאפשרות בחירה ישירה של קבצי שמע שנשמרו והקצאתם כצלצולים ללא צורך באפליקציות או כלים נוספים.
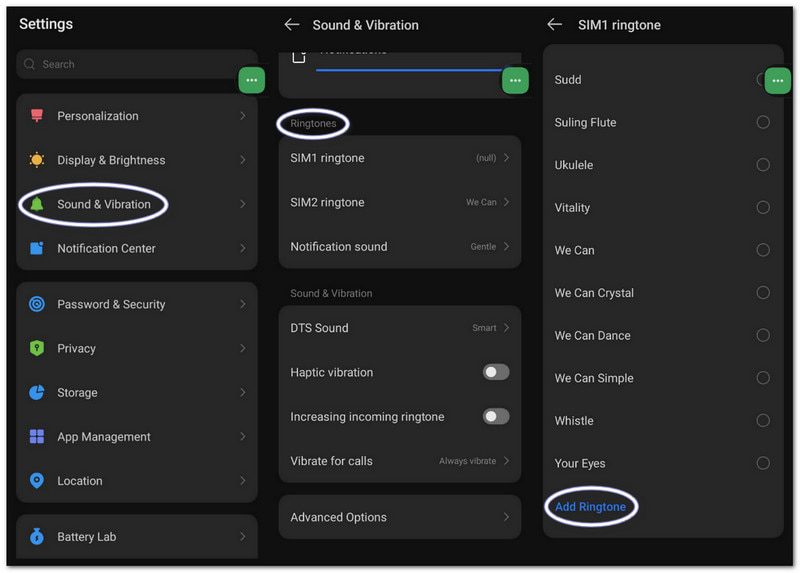
שלב 1עבור אל הגדרות הטלפון שלך. הקש על צליל ורעידות אוֹ נשמע.
שלב 2בֶּרֶז צלצול הטלפון כדי לראות את האפשרויות הזמינות.
שלב 3הקש על ועוד כפתור או ה הוסף צלצול כפתור בחלק העליון.
שלב 4עיין באחסון שלך. בחר את קובץ האודיו שלך. הקש בוצעלאחר מכן, אשר/י את הגדרתו כצלצול ברירת המחדל שלך.
חלק 3. כיצד להפוך הקלטת מסך לצלצול
ניתן גם להפוך הקלטת מסך לצלצול במחשב Windows או Mac באמצעות מקליט מסך AVAideיש לו מצב הקלטת שמע שלוכד צליל מהמערכת שלך ואת הקול שלך, מה שמקל על הקלטת צלצול.
הוא מציע גם הגדרות צליל, בהן ניתן להנמיך או להגביר את עוצמת הקול, להפעיל ביטול רעשים ולהציג אזהרה כאשר לא מזוהה שמע. כמובן, ניתן לייצא את הצלצול שלך בפורמטים נתמכים כמו MP3 ו-M4A, שעובדים היטב עבור מכשירים ניידים.
שלב 1הורד והגדר את AVAide Screen Recorder במחשב Windows או Mac שלך.

 הורדה מאובטחת
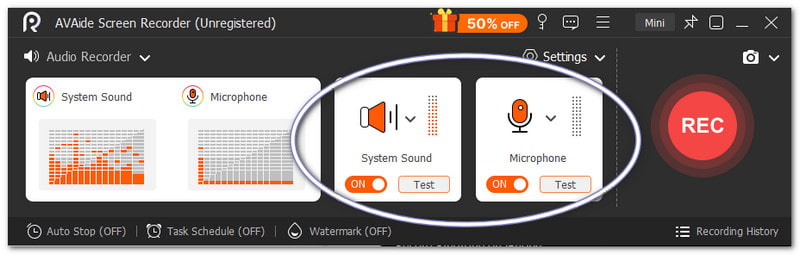
שלב 2זה מתחיל במצב הקלטת מסך. לחץ על התפריט הנפתח. בחר מקליט אודיו ללכידת קול טובה יותר.
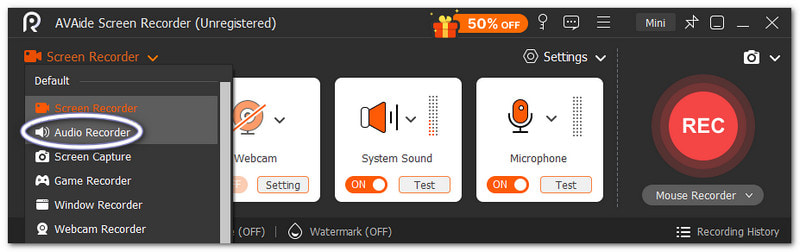
שלב 3להדליק סאונד מערכת כדי להקליט אודיו פנימי. הפעל את מִיקרוֹפוֹן אם ברצונך להוסיף את קולך. ניתן גם לכוונן את עוצמת הקול במידת הצורך.
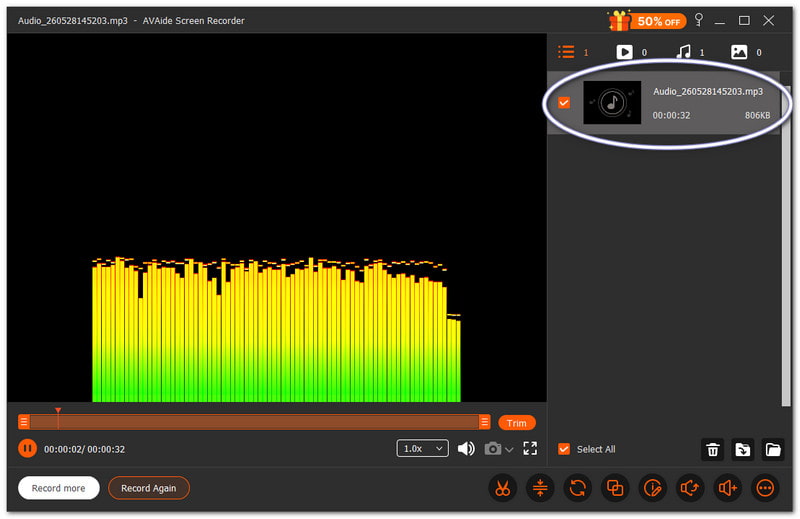
שלב 4מכה REC כדי להתחיל, אנא המתינו לספירה לאחור. לאחר תחילתה, הפעילו את הצליל הרצוי. לחצו על תפסיק לאחר מכן, הקובץ נשמר אוטומטית. אך ניתן גם לקצץ או לערוך אותו לפני השימוש בו כצלצול.
אין ספק שהמק הזה ו מקליט שמע של Windows יכול לעזור לך ליצור צלצול שאתה באופן אישי רוצה ואהבה למכשיר שלך.
חלק 4. צעדים ספציפיים לסמסונג
1. שימוש במקליט המסך המובנה
מקליט המסך של סמסונג לוכד אודיו מסרטונים ועוזר להפוך צלילים מוקלטים לצלצולים שמישים.
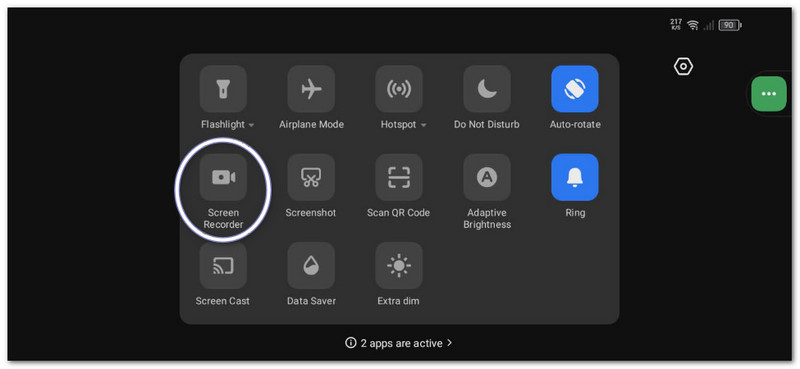
שלב 1בתוך ה פאנל מהיר, החלק למטה. לחץ על מקליט מסך כפתור. לפני שמתחילים, בחר את צלילי מדיה.
שלב 2הפעילו את הסרטון או המוזיקה שברצונכם לצלם. תנו למקליט המסך להקליט אותם עם קול.
שלב 3הפסק את ההקלטה לאחר שתסיים. הקובץ יאוחסן בגלריה שלך. השתמש באפליקציית וידאו ל-MP3 כדי לחלץ את האודיו.
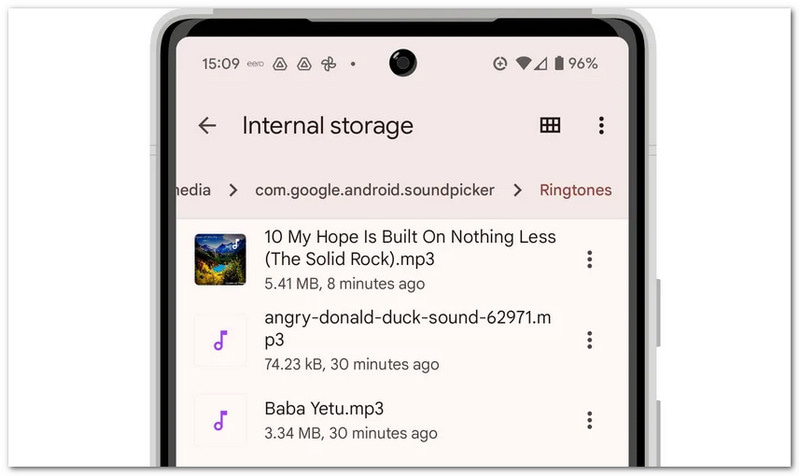
שלב 4העבר את קובץ ה-MP3 אל אחסון פנימי > תיקיית צלצולים כך שניתן יהיה להשתמש בו מאוחר יותר.
שיטה זו מראה הקלטת מסך של סמסונגלכן, אנא ודאו להמיר את הסרטון המוקלט לאודיו בלבד כדי שניתן יהיה להשתמש בו כצלצול.
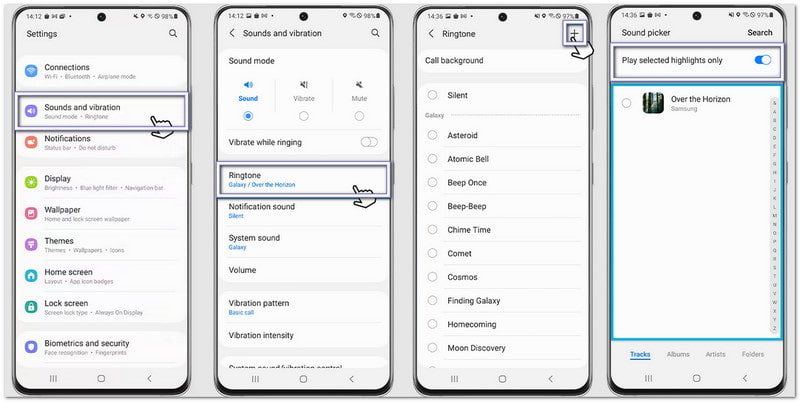
2. יוצר צלצולים מובנה
הגדרות הצלצול של סמסונג מאפשרות למשתמשים לבחור שירים, לקצץ את הקטעים הבולטים ולהקצות אותם באופן מיידי כצלצול ברירת המחדל של הטלפון.
שלב 1פתח את הטלפון שלך ועבור אל הגדרות. בֶּרֶז צלילים ורעידות. לאחר מכן, בחר רינגטון.
שלב 2הקש על לְהוֹסִיף ובחר שיר או הקלטה שנשמרו מהטלפון שלך.
שלב 3לְאַפשֵׁר הפעל רק את הקטעים הבולטים שנבחרו אם זמין. סמסונג תגזום אוטומטית את החלק הטוב ביותר של האודיו.
שלב 4אשר את בחירתך, והצליל יוגדר כעת כצלצול ברירת המחדל שלך.
3. שיטת מנהל הקבצים
מנהל הקבצים של סמסונג מארגן קבצי שמע ומאפשר העתקה ישירה לתיקיית הצלצולים לזיהוי צלצולים אוטומטי.
שלב 1הפעל את הקבצים שלי אפליקציה בטלפון הסמסונג שלך.
שלב 2לך ל הורדות אוֹ שֶׁמַע תיקייה. אתר את הצליל המוקלט או שהורדת.
שלב 3לחץ לחיצה ארוכה על הקובץ. הקש עותקלאחר מכן, עבור אל אחסון פנימי > צלצולים.
שלב 4הדבק את הקובץ לתוך תיקיית הצלילים. לאחר מכן, חזור להגדרות הצלילים. הקובץ שלך יופיע כעת ברשימת הצלילים.
חלק 5. טיפים מקצועיים לתוצאות הטובות ביותר
לפני שאתם מגדירים את הצלצול שלכם, כדאי לפעול לפי כמה טיפים פשוטים. אלה יגרמו לצלצול שלכם להישמע ברור ולעבוד טוב יותר בטלפון שלכם.
טיפ #1: תקצרו.
צור את הצלצול שלך באורך של 30 עד 40 שניות בלבד. זה שומר עליו חלק ותואם לחלוטין לטלפונים של אנדרואיד.
טיפ #2: השתמשו בפורמט הנכון.
השתמשו בקבצי MP3 או M4A במידת האפשר. פורמטים אלה פועלים היטב ברוב מכשירי האנדרואיד ללא שגיאות.
טיפ #3: בדקו תחילה את עוצמת הקול.
השמע את הצלצול שלך לפני הגדרתו. ודא שהוא לא חזק מדי או חלש מדי. זה עוזר לך להימנע מהפתעות כשמישהו מתקשר.
אתה למדת איך להקליט צלצול באייפון, אנדרואיד ומחשב שולחני. אז לא משנה באיזה מכשיר אתם משתמשים, תוכלו ליצור צלצול מותאם אישית משלכם בכל עת.
עבור משתמשי Windows ו-Mac, מקליט מסך AVAide הופך את התהליך לקל. ניתן להקליט את הקול שלכם או ללכוד אודיו מהמערכת שלכם. ניתן גם לחתוך את הקובץ לאחר ההקלטה. זה עוזר לכם לשמור רק את החלק הטוב ביותר עבור הצלצול שלכם.
אודות המחבר

צלם פעילויות מסך עם אודיו, פגישות מקוונות, סרטוני משחק, מוזיקה, מצלמת אינטרנט וכו'.