Vous voulez une sonnerie personnalisée, pas une sonnerie standard. Une sonnerie que vous avez créée vous-même pour vos appels et alertes.
Nous sommes là pour vous aider. Nous vous montrerons différentes façons de enregistrer une sonnerie sur différents systèmes. Nous partagerons également des conseils simples pour de meilleurs résultats. Alors, préparez votre voix ou votre son pour une sonnerie personnalisée.
Partie 1. Comment enregistrer une sonnerie sur iPhone
1. Mémo vocal transformé en sonnerie (la méthode la plus simple)
L'application Dictaphone enregistre le son et le transforme immédiatement en une sonnerie personnalisée utilisable grâce à des outils de découpage basiques. Cette section vous apprendra précisément comment transformer un enregistrement vocal en sonnerie sur un iPhone.
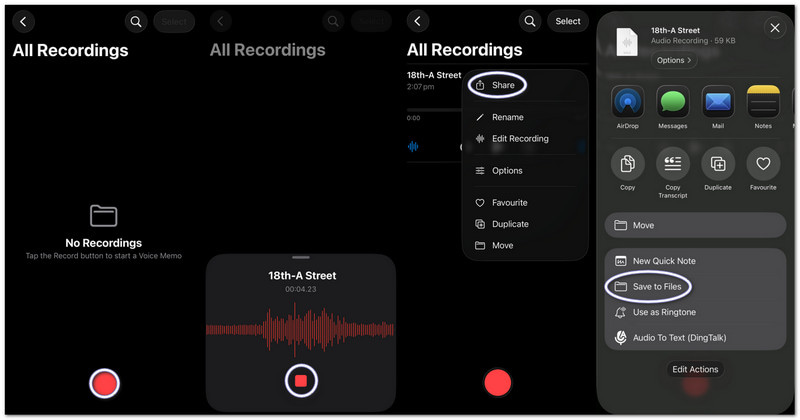
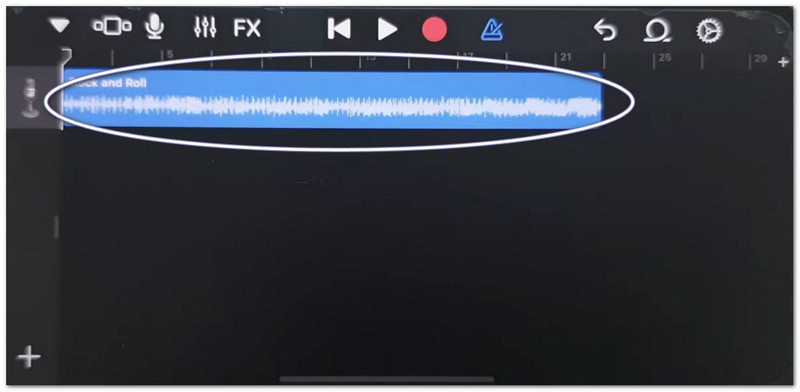
Étape 1Lancez Dictaphone sur votre iPhone.
Étape 2Appuyez sur le rouge Disque Appuyez sur le bouton et parlez ou diffusez votre contenu audio.
Étape 3Robinet Arrêter quand tu auras fini.
Étape 4Appuyez sur le trois points (...) sur votre enregistrement.
Étape 5Choisir Enregistrer dans des fichiers pour enregistrer votre fichier audio et l'utiliser ultérieurement comme sonnerie.
2. Convertir n'importe quel fichier audio (MP3/M4A) en sonnerie
Les fichiers audio MP3 ou M4A stockés depuis les téléchargements ou les applications musicales peuvent être sélectionnés et définis comme sonnerie sur un iPhone.
Étape 1Téléchargez votre fichier MP3 ou M4A et enregistrez-le dans le Des dossiers application.
Étape 2Courir GarageBand et choisissez Enregistreur audio.
Étape 3Localisez votre fichier audio dans Des dossiers, puis faites-le glisser sur la chronologie.
Étape 4Aller à Des dossiersTrouvez votre fichier audio et faites-le glisser sur la timeline.
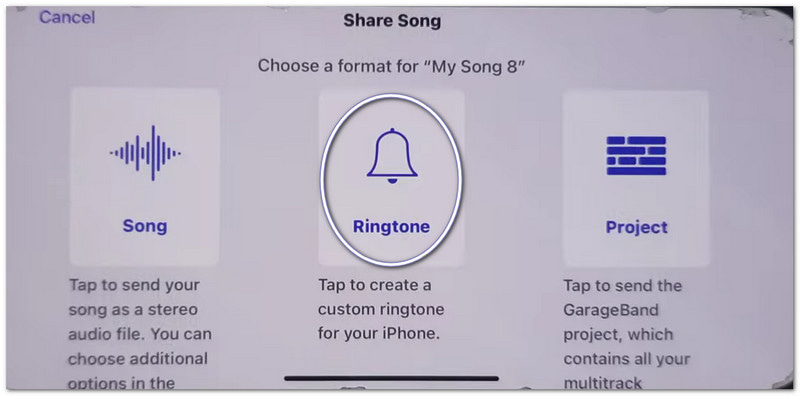
Étape 5Réduisez-le à moins de 30 secondes, puis appuyez Partager > Sonnerie > Exportation.
3. Utilisation de GarageBand (pour les anciennes versions d'iOS)
GarageBand permet de modifier des clips audio avec des commandes précises, permettant aux utilisateurs de couper, d'arranger et d'exporter facilement des sonneries personnalisées, ce qui simplifie la compréhension de la façon de définir un enregistrement vocal comme sonnerie sur un iPhone.
Étape 1Ouvert GarageBand et sélectionnez Enregistreur audio.
Étape 2Appuyez sur le Vue des pistes, puis ouvrez le Navigateur de boucles.
Étape 3Importez votre mémo vocal ou votre fichier audio enregistré.
Étape 4Faites-le glisser sur la timeline et réduisez-le à 30 secondes ou moins.
Étape 5Robinet Mes chansons, ensuite Partager > Sonnerie > Exportation.
Dépannage du problème « Partager des notes sur iPhone ne fonctionne pas »
Si la feuille de partage se bloque, plante ou n'affiche pas les applications lors du partage de mémos vocaux ou de fichiers GarageBand, essayez ces solutions.
Solutions rapides :
- Redémarrage forcé : appuyez sur Augmenter le volume et Baisser le volumeEnsuite, maintenez le bouton Marche/Arrêt enfoncé jusqu'à ce que le symbole Apple apparaisse.
- Mise à jour iOS : Accédez à Réglages > Général > Mise à jour logicielleInstallez les mises à jour. Elles corrigent les erreurs système.
- Activer/désactiver AirDrop : Ouvrir Centre de contrôle Pour désactiver AirDrop, désactivez-le puis réactivez-le. Le partage est actualisé.
Correctifs système
- Libérez de l'espace de stockage : conservez au moins 2 Go d'espace libre. Supprimez les fichiers et vidéos inutilisés. Un espace de stockage insuffisant peut empêcher le fonctionnement de Share Sheet.
Solution finale
- Réinitialiser tous les paramètres : Accédez à Réglages > Général > Transfert ou Réinitialiser l'iPhone > Réinitialiser tous les paramètresCela ne supprime pas vos données. Cela réinitialise uniquement les paramètres système et peut résoudre les problèmes liés à Share Sheet.
Partie 2. Comment enregistrer une sonnerie sur Android
1. Utiliser une application de création de sonneries (Fortement recommandé)
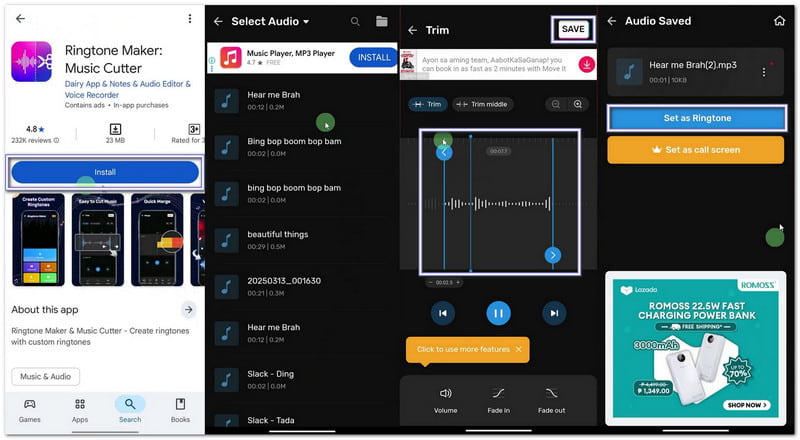
Si vous souhaitez apprendre à enregistrer votre propre sonnerie, vous pouvez utiliser Maker : Music Cutter, disponible sur le Google Play Store. Son objectif principal est de vous permettre de découper des morceaux, d'extraire des parties audio précises et de les définir instantanément comme sonneries personnalisées sur les téléphones Android.
Étape 1Ouvrez le Google Play Store. Recherchez Créateur de sonneries : Découpeur de musiqueInstallez-le. Ensuite, appuyez sur Ouvert.
Étape 2Robinet Commencer. Choisir Trim AudioAutorisez l'application à accéder à vos fichiers.
Étape 3Choisissez une chanson ou un fichier audio sur votre téléphone. Déplacez les curseurs pour choisir le début et la fin de votre sonnerie.
Étape 4 Robinet Couper ou SauvegarderChoisissez la clarté si nécessaire. Appuyez sur Confirmer. Puis clique Définir comme sonnerieAutoriser l'accès aux paramètres système et choisir la sonnerie par défaut.
2. Paramètres intégrés (pour l'audio téléchargé)
Les paramètres Android permettent de sélectionner directement des fichiers audio enregistrés et de les définir comme sonneries sans avoir besoin d'applications ou d'outils supplémentaires.
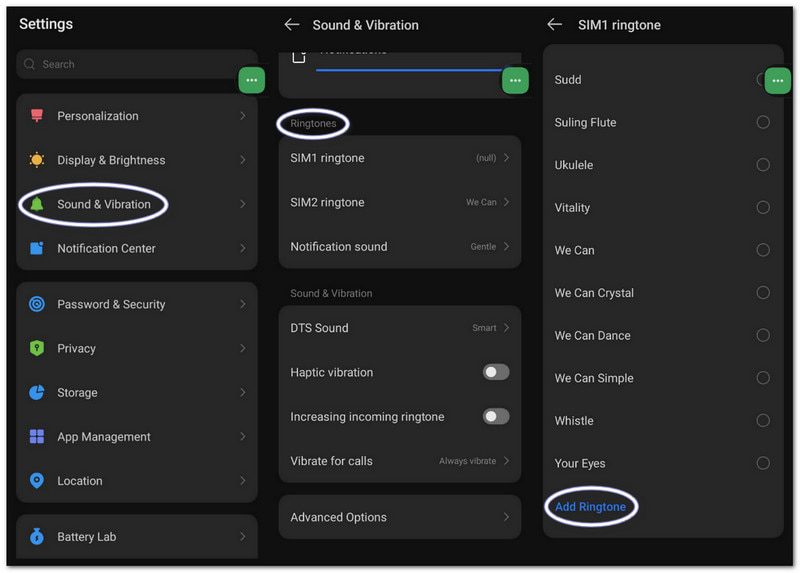
Étape 1Accédez aux paramètres de votre téléphone. Appuyez sur Son et vibrations ou Sonner.
Étape 2Robinet Sonnerie de téléphone pour voir les options disponibles.
Étape 3Appuyez sur le Plus bouton ou le Ajouter une sonnerie bouton en haut.
Étape 4Parcourez votre espace de stockage. Sélectionnez votre fichier audio. Appuyez sur FaitEnsuite, confirmez pour la définir comme sonnerie par défaut.
Partie 3. Comment transformer un enregistrement d'écran en sonnerie
Vous pouvez également transformer un enregistrement d'écran en sonnerie sur un ordinateur Windows ou Mac en utilisant AVAide Enregistreur d'écranIl possède un mode enregistreur audio qui capture le son de votre système et votre voix, ce qui facilite l'enregistrement d'une sonnerie.
Elle propose également des réglages audio permettant de baisser ou d'augmenter le volume, d'activer la réduction du bruit et d'afficher un avertissement en cas d'absence de signal audio. Bien entendu, vous pouvez exporter votre sonnerie dans des formats compatibles tels que MP3 et M4A, parfaitement adaptés aux appareils mobiles.
Étape 1Téléchargez et installez AVAide Screen Recorder sur votre ordinateur Windows ou Mac.

TÉLÉCHARGEMENT GRATUIT Pour Windows 7 ou version ultérieure
 Téléchargement sécurisé
TÉLÉCHARGEMENT GRATUIT Pour Mac OS X 10.13 ou version ultérieure
Téléchargement sécuriséÉtape 2Il démarre en mode enregistreur d'écran. Cliquez sur le menu déroulant. Sélectionnez Enregistreur audio pour une meilleure capture sonore.
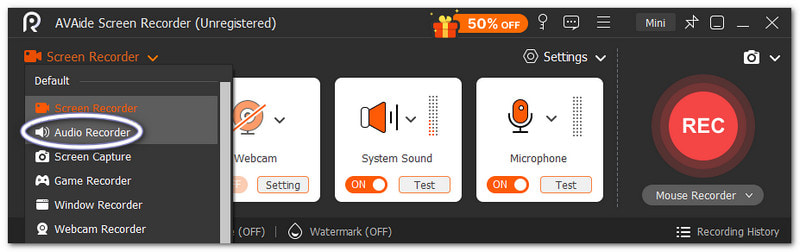
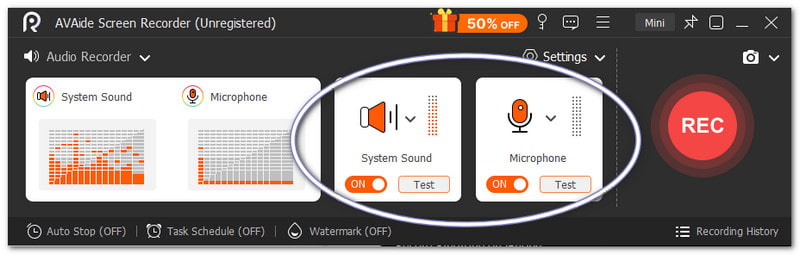
Étape 3Allumer Son du système pour enregistrer l'audio interne. Activez le Microphone Si vous souhaitez que votre voix soit ajoutée, vous pouvez également ajuster le volume si nécessaire.
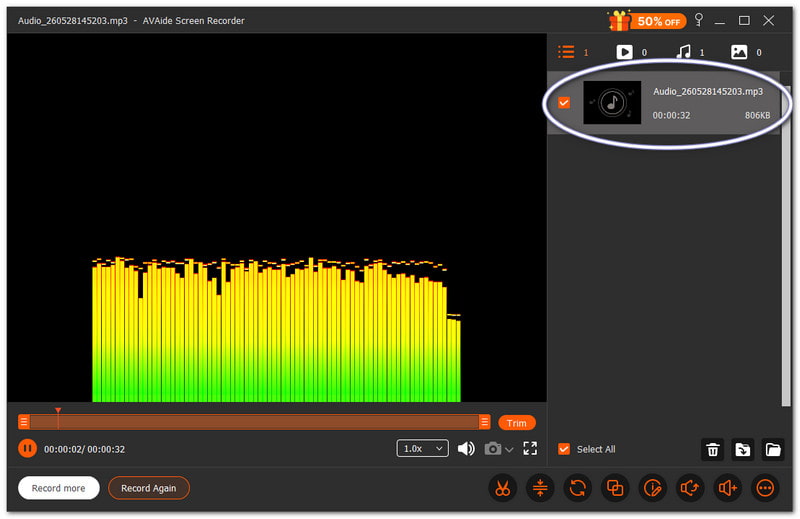
Étape 4Frapper REC Pour commencer, veuillez patienter jusqu'à la fin du compte à rebours. Une fois lancé, jouez le son souhaité. Appuyez sur Arrêter Une fois terminé, appuyez sur le bouton. Le fichier s'enregistre ensuite automatiquement. Vous pouvez également le découper ou le modifier avant de l'utiliser comme sonnerie.
Il ne fait aucun doute que ce Mac et Enregistreur audio Windows peut vous aider à créer une sonnerie que vous souhaitez et appréciez personnellement pour votre appareil.
Partie 4. Étapes spécifiques à Samsung
1. Utilisation de l'enregistreur d'écran intégré
L'application Samsung Screen Recorder capture l'audio des vidéos et permet de transformer les sons enregistrés en sonneries utilisables.
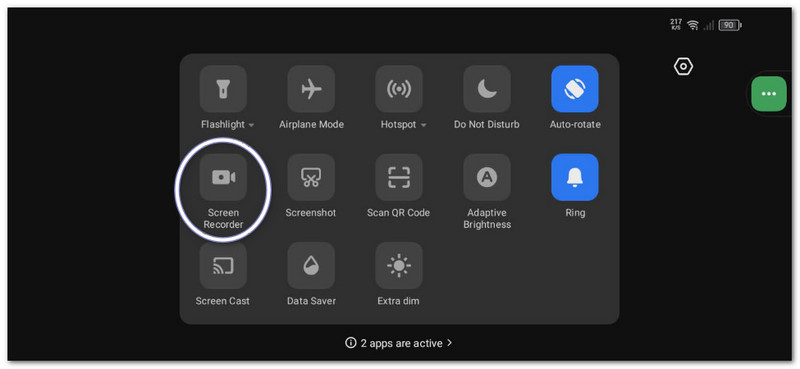
Étape 1Dans le Panneau rapide, faites glisser vers le bas. Appuyez sur le Enregistreur d'écran bouton. Avant de commencer, sélectionnez le Sons des médias.
Étape 2Lancez la vidéo ou la musique que vous souhaitez enregistrer. Laissez l'enregistreur d'écran l'enregistrer avec le son.
Étape 3Arrêtez l'enregistrement une fois terminé. Le fichier sera enregistré dans votre galerie. Utilisez une application de conversion vidéo en MP3 pour extraire l'audio.
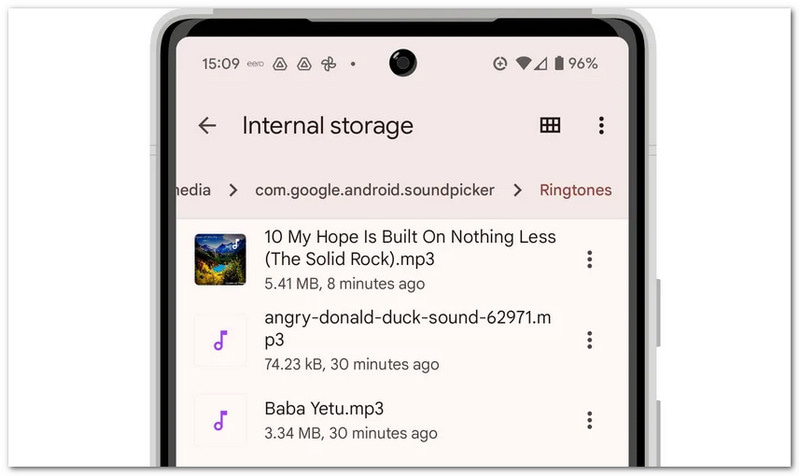
Étape 4Déplacez le fichier MP3 vers votre Stockage interne > Dossier des sonneries afin qu'il puisse être utilisé ultérieurement.
Cette méthode montre Enregistrement d'écran SamsungVeuillez donc convertir la vidéo enregistrée en audio uniquement afin qu'elle puisse être utilisée comme sonnerie.
2. Créateur de sonneries intégré
Les paramètres de sonnerie Samsung permettent aux utilisateurs de choisir des chansons, de sélectionner des extraits et de les définir instantanément comme sonnerie par défaut du téléphone.
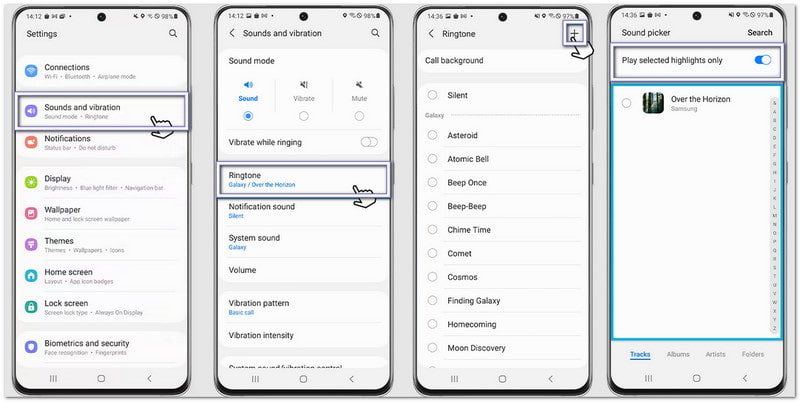
Étape 1Ouvrez votre téléphone et allez sur Réglages. Robinet Sons et vibrations. Ensuite, sélectionnez Sonnerie.
Étape 2Appuyez sur le Ajouter appuyez sur le bouton et sélectionnez une chanson ou un enregistrement enregistré sur votre téléphone.
Étape 3Activer Visionnez uniquement les meilleurs moments sélectionnés Si disponible, Samsung découpera automatiquement la meilleure partie de l'audio.
Étape 4Confirmez votre sélection, et ce son sera désormais défini comme sonnerie par défaut.
3. Méthode du gestionnaire de fichiers
Samsung File Manager organise les fichiers audio et permet la copie directe dans le dossier Sonneries pour une détection automatique des sonneries.
Étape 1Lancez le Mes fichiers application sur votre téléphone Samsung.
Étape 2Aller à Téléchargements ou l'audio Dossier. Localisez votre fichier audio enregistré ou téléchargé.
Étape 3Appuyez longuement sur le fichier. Appuyez sur CopieEnsuite, allez à Stockage interne > Sonneries.
Étape 4Collez le fichier dans le dossier Sonneries. Ensuite, retournez dans les paramètres audio. Votre fichier apparaîtra alors dans la liste des sonneries.
Partie 5. Conseils de pro pour des résultats optimaux
Avant de définir votre sonnerie, il est utile de suivre quelques conseils simples. Cela permettra d'obtenir une sonnerie claire et un meilleur fonctionnement sur votre téléphone.
Conseil #1 : Faites court.
Limitez votre sonnerie à 30 ou 40 secondes seulement. Elle restera fluide et parfaitement compatible avec les téléphones Android.
Conseil #2 : Utilisez le bon format.
Utilisez les fichiers MP3 ou M4A lorsque c'est possible. Ces formats fonctionnent parfaitement sur la plupart des appareils Android sans erreur.
Conseil #3 : Vérifiez d’abord le volume.
Écoutez votre sonnerie avant de la définir. Assurez-vous que le volume n'est ni trop fort ni trop faible. Cela vous évitera les mauvaises surprises lors d'un appel.
Tu as appris Comment enregistrer une sonnerie sur un iPhoneAndroid et ordinateur. Ainsi, quel que soit l'appareil utilisé, vous pouvez créer votre propre sonnerie personnalisée à tout moment.
Pour les utilisateurs Windows et Mac, AVAide Enregistreur d'écran Cela simplifie le processus. Vous pouvez enregistrer votre propre voix ou capturer l'audio de votre système. Vous pouvez également découper le fichier après l'enregistrement. Cela vous permet de ne conserver que la meilleure partie pour votre sonnerie.
À PROPOS DE L'AUTEUR

Capturez les activités de l'écran avec de l'audio, des réunions en ligne, des vidéos de jeu, de la musique, une webcam, etc.
Enregistrement audio
- Enregistrer l'audio depuis l'ordinateur
- Meilleur logiciel d'enregistrement audio
- Enregistrer les appels iPhone
- Studio d'enregistrement FL
- Comment enregistrer un podcast
- Télécharger Soundgasm
- Télécharger les chansons d'Audiomack
- Enregistrer de la musique depuis Deezer
- SoundCloud en MP3
- Télécharger X Space Audio
- Téléchargement de musique gratuit