Cómo grabar la pantalla en un portátil Lenovo Depende de la herramienta que elijas, desde las funciones integradas de Windows hasta software avanzado. Esta guía muestra métodos sencillos, claros y eficaces para capturar la pantalla en dispositivos Lenovo, ya sea para tutoriales, reuniones, juegos o grabaciones cotidianas.
Método 1. Usando la barra de juegos de Xbox
La función de grabación integrada de la Xbox Game Bar, desarrollada por Microsoft, se integra a la perfección con Windows y es la solución de grabación más práctica para los usuarios de Lenovo. Fue diseñada para jugar, pero también funciona como grabador de aplicaciones, creador de tutoriales y grabador de navegador. Su principal ventaja es que no requiere configuración; está lista para usar de inmediato.
Pero tiene desventajas evidentes. No graba el escritorio ni el Explorador de archivos, y la personalización se limita a herramientas profesionales. Sin embargo, sigue siendo una de las opciones integradas más prácticas para sesiones informales donde la calidad y el esfuerzo no son tan importantes.
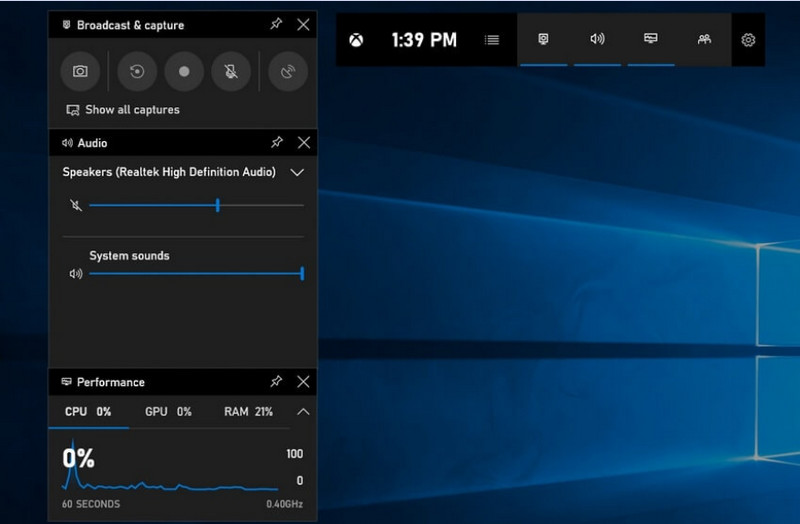
Paso 1Para abrir la barra de juegos de Xbox, pulse Windows + G en tu teclado.
Paso 2Encuentra el Captura panel o haga clic en él desde el Widgets menú.
Paso 3Haga clic en el Registro (●) botón o presione Windows + Alt + R.
Etapa 4Si desea grabar voz, habilite la Micrófono.
Paso 5Prensa Windows + Alt + R de nuevo o haga clic Detener (■) para completar.
Paso 6Encontrarás tu grabación en Vídeos > capturas.
Método 2. Uso de Lenovo Vantage
Lenovo Vantage no es una grabadora de pantalla; es una suite de gestión y optimización del sistema. Su función en la grabación es más bien indirecta, con muy pocas funciones que faciliten el proceso, dependiendo del modelo del dispositivo de grabación, o incluso con algunos dispositivos que ofrecen accesos directos o herramientas de cámara/pantalla que pueden ayudar en la grabación.
Existe una amplia variación en el rendimiento y la disponibilidad. Es posible que algunos dispositivos Lenovo admitan funciones básicas de grabación, pero otros podrían no tenerlas en absoluto. Es limitado y algo inconsistente en lo que puede hacer para grabar en pantalla completa, pero podría ser valioso para los usuarios que desean permanecer dentro del ecosistema Lenovo o grabar podcast contenido con herramientas básicas.
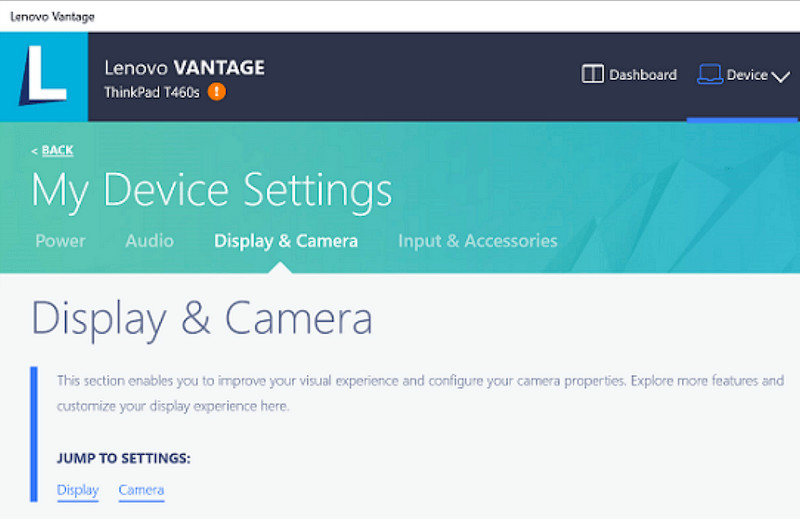
Paso 1Ve a la Comienzo menú y haga clic en Lenovo Vantage.
Paso 2Grifo Configuración de mi dispositivo > Pantalla y cámara.
Paso 3Compruebe si hay grabaciones u otras funciones disponibles.
Etapa 4Ponga a disposición todas las opciones o atajos necesarios.
Paso 5Graba la música utilizando la función proporcionada (si es posible).
Paso 6Encuentra las grabaciones que has guardado en tu carpeta de Vídeos.
Método 3. Uso de Legion Zone / Lenovo Nerve Center
Lenovo Nerve Center (o Legion Nerve Center; las herramientas más recientes de Legion han reemplazado a Nerve Sense) está optimizado para dispositivos Lenovo, específicamente para portátiles Lenovo Legion, y está dirigido a jugadores. Además, está totalmente integrado con herramientas de rendimiento para juegos, lo que permite a los usuarios tomar capturas de pantalla de sus juegos mientras supervisan y optimizan los recursos del sistema.
Sin embargo, se trata de una grabadora bastante básica. Prioriza la comodidad sobre la personalización y solo ofrece opciones de grabación básicas con control limitado sobre la resolución, la tasa de bits y los ajustes avanzados. Además, solo está disponible en algunos sistemas más recientes, y otros la han reemplazado o eliminado de sus sistemas, por lo que ya no es tan fiable como antes.
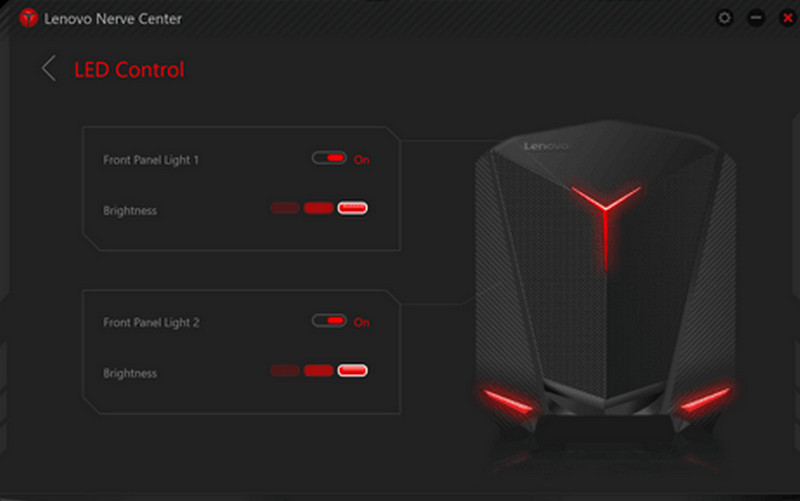
Paso 1Acceder al Centro de control Lenovo o Zona de la Legión del dispositivo.
Paso 2Acceda a las herramientas de grabación y/o juego.
Paso 3Si es posible, cambie la configuración de grabación, como la resolución o la calidad del audio.
Etapa 4Inicia el juego o la aplicación.
Paso 5Graba con el acceso directo o botón predeterminado.
Paso 6Deja de grabar y mira en tu Vídeos carpeta para comprobar si el archivo se ha grabado.
Método 4. Uso de la grabadora de pantalla AVAide
Grabador de pantalla AVAide Es una grabadora de pantalla más sofisticada y versátil para Lenovo que la integrada. Está diseñada para quienes buscan calidad de vídeo, un funcionamiento más fluido y un mayor control de la grabación. Es la herramienta perfecta para crear tutoriales, grabar reuniones o capturar partidas de videojuegos, sin necesidad de configuraciones complicadas y con resultados profesionales.
Si bien puede capturar el sonido del sistema, la entrada del micrófono, la cámara web y áreas de la pantalla, también admite grabación en Full HD e incluso 4K con una latencia mínima en comparación con las grabadoras básicas. Esto la convierte en una aplicación de captura de pantalla todo en uno, ideal tanto para el trabajo como para el ocio.
- Graba vídeos en 1080p o 4K con un rendimiento fluido y sin interrupciones.
- Graba en modo de pantalla COMPLETA o PERSONALIZADA según tus necesidades.
- Graba simultáneamente el sonido interno y la voz con una salida nítida.
- Añade la función de grabación con cámara frontal para tutoriales, presentaciones o vídeos de juegos.
- Recorta, comprime y mejora las grabaciones después de capturarlas.

 Descarga segura
Paso 1Descargue e instale el software
Visita el sitio web oficial de AVAide Screen Recorder. Descarga el instalador para Windows, instálalo en tu portátil Lenovo y ejecútalo.
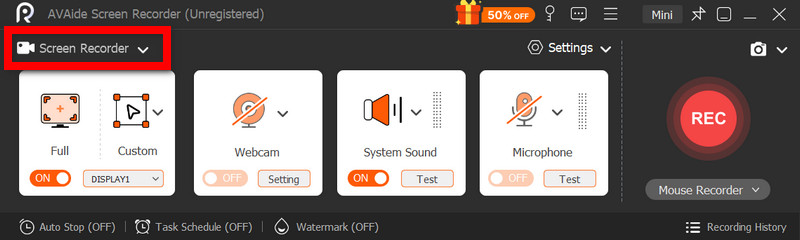
Paso 2Seleccione el modo de grabación
Abra el software y luego haga clic. Grabador de pantalla. Graba toda la pantalla con Completo o una parte de la pantalla con Personalizado.
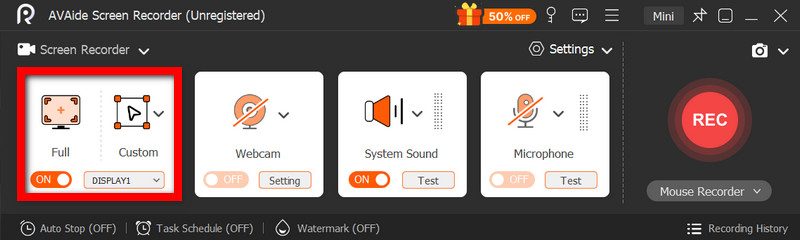
Paso 3Configurar ajustes de audio
Para grabar cualquier sonido producido por el ordenador, active Sonido del sistemaPara incluir tu propia voz, activa la MicrófonoLa cámara web también se puede encender según sea necesario.
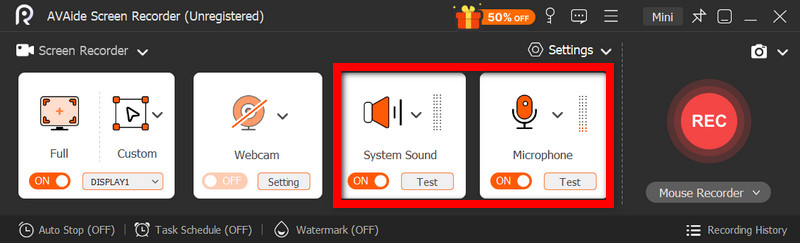
Etapa 4Ajustar la configuración de grabación
Utilizar el Ajustes Botón para configurar la calidad de vídeo, la resolución, la velocidad de fotogramas y el formato de salida para lograr un rendimiento de grabación óptimo.
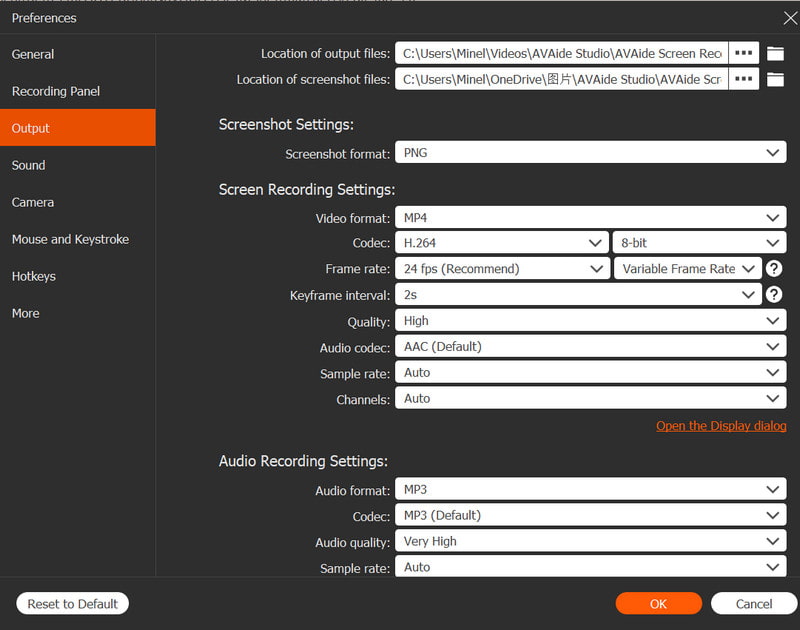
Paso 5Empezar a grabar
presione el REC Botón para iniciar la grabación. Las grabaciones de Google Meet, los tutoriales, las partidas o cualquier actividad en pantalla se pueden grabar sin problemas.
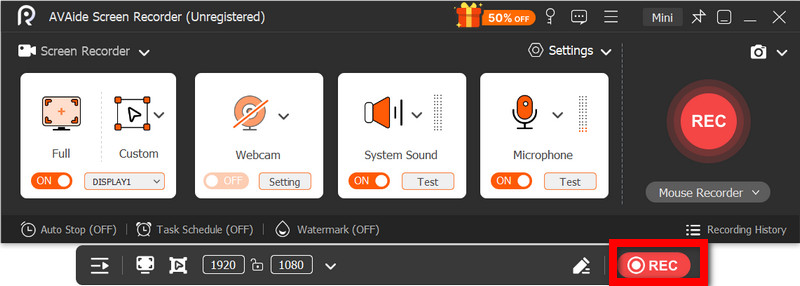
Paso 6Detener y guardar la grabación
Cuando hayas terminado, haz clic en el Detener Botón. Previsualiza tu grabación, edítala rápidamente si es necesario y guárdala en tu ordenador al instante.
Método 5. Uso de la configuración rápida
En las tabletas Android de Lenovo, la opción de grabación de pantalla viene integrada en los ajustes rápidos. La mejor manera de grabar tutoriales, partidas o la actividad de las aplicaciones en tu tableta es sin necesidad de descargar aplicaciones de terceros. Fácil, rápida y optimizada para dispositivos móviles, es ideal para grabaciones rápidas sobre la marcha.
Carece de las funciones avanzadas de edición y personalización que se encuentran en otras herramientas de captura de pantalla, pero es suficiente para capturas de pantalla sencillas con sonido.
Paso 1Desliza el dedo hacia arriba desde la parte inferior de la pantalla para abrir el Configuración rápida.
Paso 2Busca el Grabación de pantalla o Grabador de pantalla botón. Si no está ahí, haga clic en el Editar botón y agréguelo a su panel.
Paso 3Hacer clic Grabador de pantallaLuego, seleccione la configuración deseada.
Etapa 4Grifo Comienzo Para comenzar la grabación. Habrá una cuenta regresiva antes de que comience la grabación.
Paso 5Toca la barra de herramientas flotante o la barra de notificaciones y luego presiona Detener para finalizar la grabación.
Solución de problemas comunes de grabación de pantalla en Lenovo
Puedes leer consejos para solucionar problemas comunes al grabar la pantalla en un dispositivo Lenovo.
Si bien generalmente no hay complicaciones importantes al grabar la pantalla en dispositivos Lenovo, siempre existe la posibilidad de que surjan problemas dependiendo de la herramienta o el dispositivo de grabación que se utilice. A continuación, se describen los problemas más comunes y cómo solucionarlos.
- La grabadora de pantalla no funciona: Reinicia tu dispositivo e inténtalo de nuevo. Para herramientas integradas como la Barra de juegos de Xbox, asegúrate de que esté habilitada en la configuración de Windows, en la sección de Juegos.
- No hay audio en la grabación: Antes de grabar, compruebe que el sonido del sistema o el micrófono estén activados. Asimismo, verifique que el volumen del sistema no esté silenciado.
- Vídeo con retraso o de baja calidad: Reduce la calidad del vídeo o cierra las aplicaciones que se ejecutan en segundo plano. Actualizar los controladores de gráficos también puede mejorar el rendimiento.
- No se puede grabar el escritorio ni el Explorador de archivos: Esta es una de las limitaciones comunes de la Xbox Game Bar. Si quieres grabar tu pantalla y capturar todo, usa un programa avanzado como AVAide Screen Recorder, uno de los Los mejores grabadores de pantalla para Mac y ventanas.
- La grabación no se está guardando: Asegúrate de que tu almacenamiento no esté lleno y verifica la ubicación de guardado predeterminada. En la configuración, cambia la carpeta de salida e inténtalo de nuevo.
Botón de grabación de pantalla de Lenovo Las opciones varían según el dispositivo y la herramienta que utilice. En general, las funciones integradas y las aplicaciones de terceros simplifican la grabación, ofreciéndole formas flexibles de capturar, guardar y gestionar la actividad de la pantalla de manera eficiente en dispositivos Lenovo.
SOBRE EL AUTOR

Capture actividades de pantalla con audio, reuniones en línea, videos de juegos, música, cámara web, etc.
Grabación de pantalla
- Registro de pantalla en Windows
- Grabar Instagram Live
- Copiar vídeos de Tubi
- Convertir vídeos de YouTube a MP3
- Descargar vídeos de Fansly
- Descargar vídeos de JW Player
- Descargar vídeos de Bilibili
- Descargar vídeos de Patreon
- Descargar vídeos de SpankBang
- Descargar vídeos de Discord
- Descargar el vídeo de DoodSream