Imagina que intentas guardar un tutorial, un momento de juego o una reunión en línea, pero no estás seguro de cómo capturarlo en tu dispositivo. Sabiendo Cómo grabar la pantalla en un iPad Te permite guardar y compartir estos momentos fácilmente. Esta guía te explica cómo activar la grabación, usar el sonido, solucionar problemas y mejorar la calidad para obtener grabaciones de pantalla más fluidas y mejores en todo momento.
Parte 1. Cómo activar la grabación de pantalla en el iPad
No te preocupes, el botón de grabación de pantalla aún no está instalado en el Centro de control, a menos que no lo tengas en tu iPad. Apple ha incluido esta función de forma nativa en iPadOS, y debes activarla antes de poder usarla. Una vez añadida, podrás grabar la pantalla cuando quieras con solo deslizar y tocar.
Paso 1Toque en el Ajustes aplicación en tu iPad.
Paso 2Haga clic en Centro de control en el menú a medida que te desplazas hacia abajo.
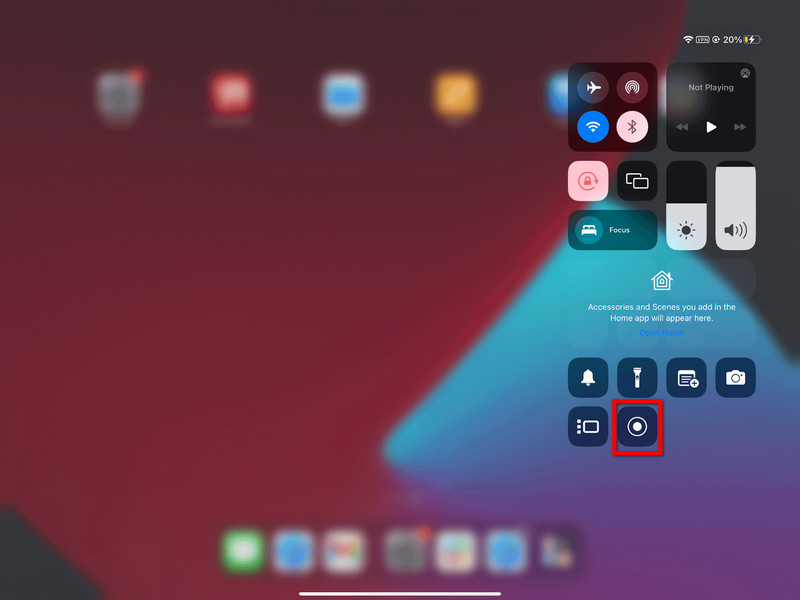
Paso 3Toque en el + (Agregar) botón en el Grabación de pantalla sección de la lista de controles disponibles.
Etapa 4Para acceder a la Centro de controlDesliza el dedo hacia abajo desde la esquina superior derecha de la pantalla. Ahora deberías ver el registro.
Parte 2. Cómo grabar la pantalla en un iPad
Una vez activada, grabar la pantalla de tu iPad es fácil y rápido. La grabadora integrada de iPadOS es una función muy práctica que te permite capturar partidas, tutoriales o incluso videollamadas sin necesidad de instalar aplicaciones de terceros.
Paso 1Mantén pulsada la parte superior derecha de la pantalla de tu iPad y, a continuación, deslízala hacia abajo.
Paso 2Toque en el Grabación de pantalla Botón. Habrá una cuenta regresiva de 3 segundos antes de que comience la grabación.
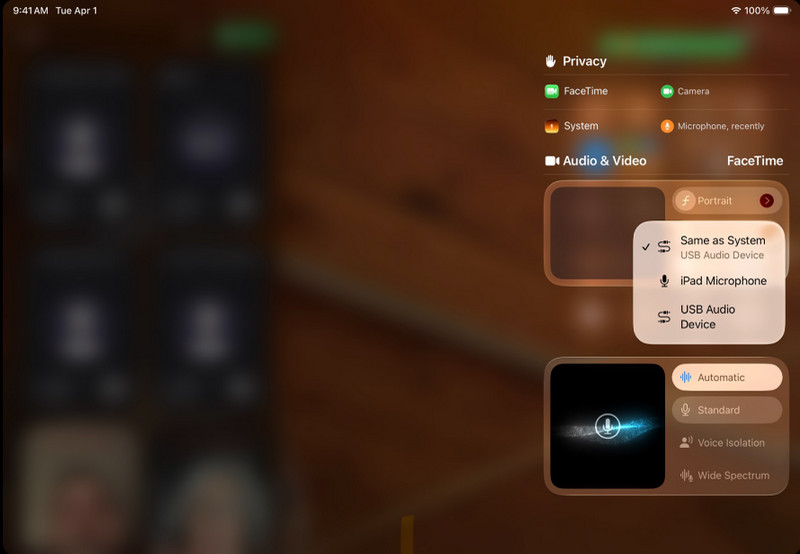
(Opcional) Mantenga presionado el Grabación de pantalla botón y toque el Micrófono para activarlo cuando desees grabar tu voz.
Paso 3Selecciona las aplicaciones o actividades que deseas grabar.
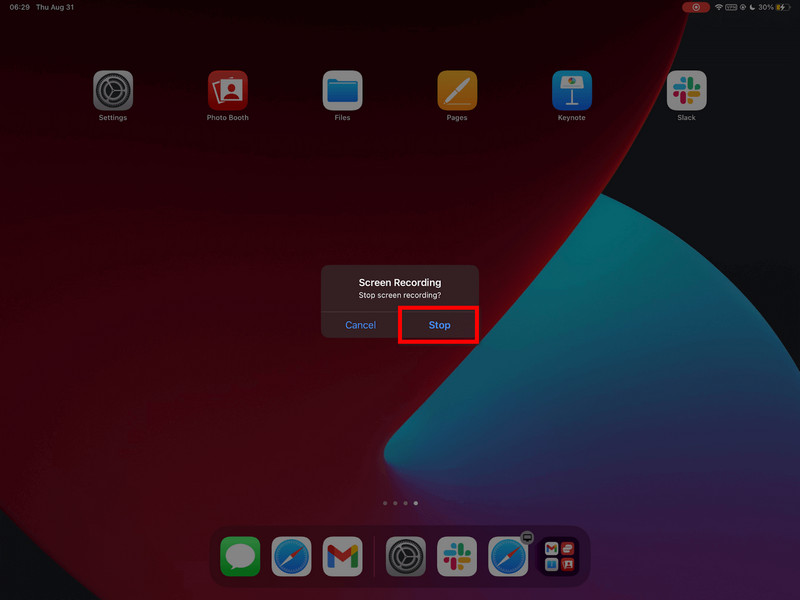
Etapa 4Toca la barra de estado roja y luego toca Detenero volver al Centro de control y toca el Registro botón de nuevo.
Paso 5Tu vídeo se guardará automáticamente en la Fotos aplicación, donde puedes editarlo o compartirlo.
Parte 3. Cómo grabar la pantalla del iPad con sonido
Capturar la pantalla y el audio con el iPad es útil para tutoriales, juegos, clases en línea y demostraciones. La grabación en iPadOS tiene limitaciones, por lo que es importante comprender la relación entre el micrófono y el audio del sistema antes de grabar.
Distinción importante: Micrófono vs. Audio del sistema
| Tipo de audio | Lo que registra | Disponibilidad en iPadOS | Mejores casos de uso |
| Audio del micrófono | El micrófono del iPad capta tu voz y los sonidos externos. | Disponible | Comentarios, tutoriales, narración. |
| Sistema de audio | Sonidos internos de aplicaciones, juegos, vídeos y reproducción multimedia. | No cuenta con soporte directo. | Requiere herramientas externas o una solución alternativa. |
Pasos para grabar audio con un micrófono
Paso 1Desliza el dedo hacia arriba desde la parte superior derecha de la pantalla de tu iPad para abrir el Centro de control.
Paso 2Mantenga presionado el Grabación de pantalla Botón para ver más opciones.
Paso 3Pulsa el micrófono para encenderlo. Debería ponerse rojo para indicar que la grabación de voz está activada.
Etapa 4Hacer clic Empezar a grabary cuando finaliza la cuenta atrás de 3 segundos, comienza la grabación.
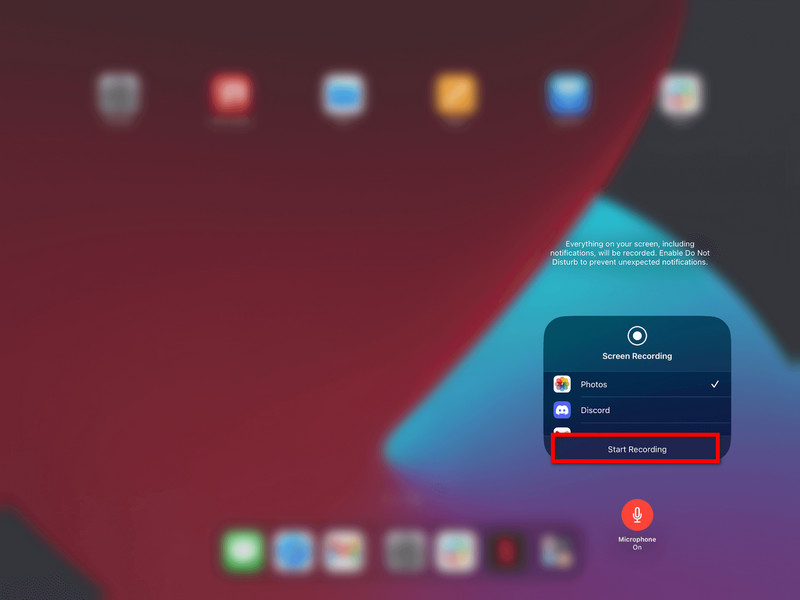
Paso 5Repite los movimientos que deseas grabar. Si el micrófono está encendido, tu voz quedará grabada.
Paso 6Toca la barra de estado roja en la parte superior de la pantalla o regresa a Centro de control y toca el Registro botón de nuevo.
Paso 7El vídeo se guardará automáticamente en la Fotos aplicación, donde puedes verlo o editarlo.
Alternativa para la grabación de audio del sistema
Desafortunadamente, debido a limitaciones del sistema, no se puede grabar audio interno directamente en el iPad, por lo que se necesita una solución basada en computadora. Una excelente herramienta es la Grabador de pantalla AVAide, que te permite duplicar la pantalla de un iPad y grabar la pantalla y el audio del sistema simultáneamente.
AVAide Screen Recorder es un software de grabación de pantalla de alta calidad que captura la actividad en pantalla con nitidez. Puede grabar sin retrasos ni interrupciones hasta en 4K/1080p. Además, permite la grabación simultánea del audio del sistema y del micrófono, ideal para tutoriales, videojuegos y presentaciones.
- La grabación de alta calidad te permite capturar vídeos en 4K o 1080p con resultados nítidos y de alta calidad.
- Audio dual
- Permite grabar simultáneamente el sonido del sistema y el audio del micrófono.
- La función Duplicar pantalla de iOS muestra y graba la pantalla de tu iPad en un PC o Mac.
- Los modos de pantalla flexibles permiten grabar a pantalla completa o en un área personalizada.
- Las herramientas de edición integradas te ayudan a recortar, mejorar y editar grabaciones rápidamente.

 Descarga segura
Paso 1Descargar e instalar
Visita el sitio web oficial y descarga AVAide Screen Recorder. Descarga AVAide Screen Recorder desde el sitio web oficial. Una vez instalado, podrás ejecutarlo en tu ordenador Windows o Mac.
Paso 2Seleccione la opción iOS
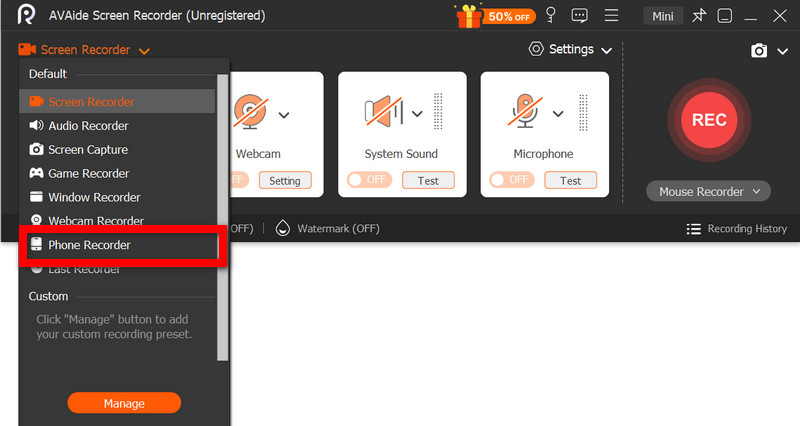
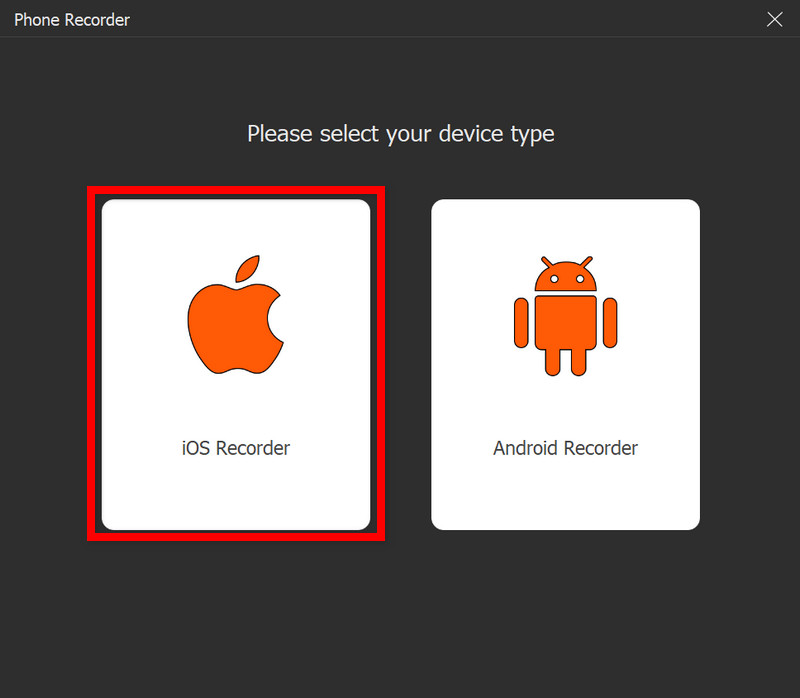
En la interfaz principal, haga clic grabadora de telefono, luego seleccione Grabadora iOS de la lista de opciones (iOS y Android).
Paso 3Conecta el iPad al PC
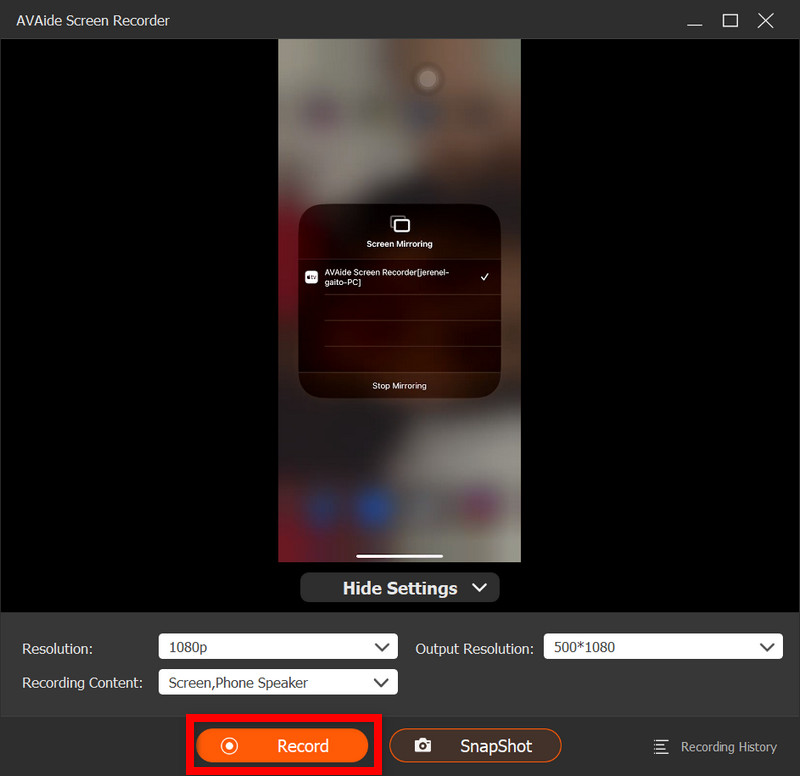
Es posible duplicar la pantalla de tu iPad en tu ordenador de forma inalámbrica a través de la misma red o mediante un cable USB, si dispones de uno. En la aplicación Duplicar pantalla de tu iPad, selecciona el dispositivo AVAide. Una vez conectado, verás la pantalla de tu iPad en tu ordenador.
Etapa 4Empezar a grabar
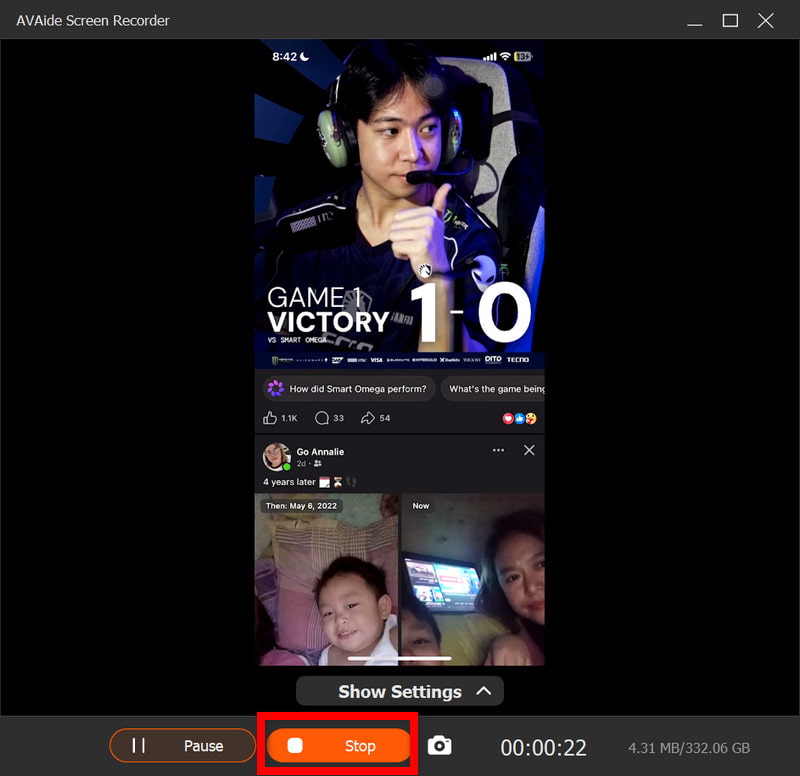
Con una duplicación exitosa, presione Registro Para comenzar a grabar la pantalla de tu iPad, el audio del sistema y la entrada del micrófono (si la hay).
Paso 5Para de grabar
presione el Detener pulsa el botón cuando hayas terminado. Tu grabación se guardará automáticamente en tu ordenador.
Paso 6Editar el vídeo
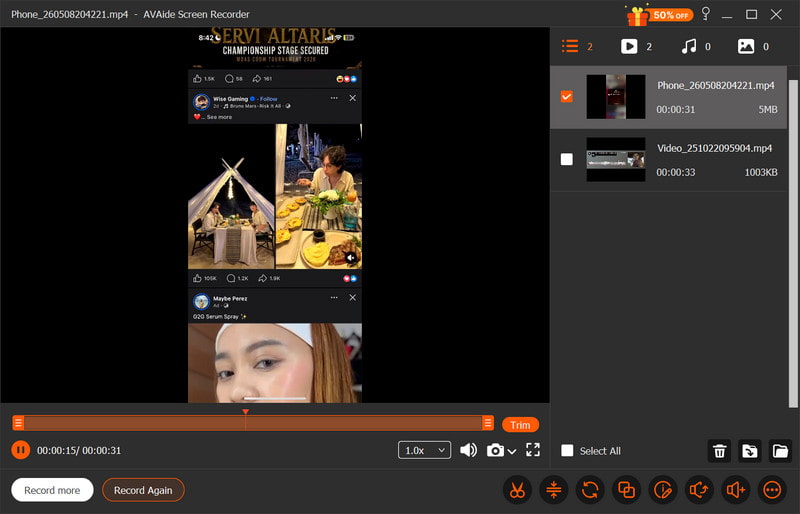
Una vez grabada la grabación, se abrirá una ventana de previsualización. Podrás recortar las partes no deseadas, ajustar el sonido o realizar ediciones sencillas antes de exportar el vídeo final.
Parte 4. ¿Por qué no puedo grabar la pantalla de mi iPad?
Los problemas de grabación de vídeo en el iPad suelen deberse a ajustes, restricciones o problemas de rendimiento. A continuación, se muestran los problemas y causas más comunes.
1. El botón no está presente en absoluto.
Esto ocurre si la Grabación de pantalla no está instalada en el Centro de control. Debes añadirla manualmente en Ajustes > Centro de control para que aparezca allí.
2. El botón está desactivado o no responde.
Normalmente, esto se debe a una restricción en la grabación de pantalla impuesta por la configuración del sistema o los controles del dispositivo.
- Se pueden establecer límites de tiempo de pantalla.
- La grabación puede estar prohibida por la configuración del perfil del dispositivo en la escuela o el trabajo.
- Es posible que algunas aplicaciones no permitan tomar capturas de pantalla mientras se utilizan.
3. La grabación se detiene inmediatamente después de comenzar.
El problema suele estar relacionado con problemas del sistema o del almacenamiento, como la falta de espacio disponible o la interferencia de otras aplicaciones con el proceso de grabación.
4. No hay sonido en la grabación.
Esto ocurre cuando el audio no está conectado correctamente o cuando el usuario espera audio interno; no es posible grabar la pantalla internamente en iPadOS, por lo que usar el El mejor grabador de pantalla para Mac puede ayudar a capturar el sonido del sistema correctamente.
5. La grabación es entrecortada o de baja calidad.
Esto suele deberse a uno de estos factores: almacenamiento limitado en el dispositivo, ejecución de demasiadas aplicaciones o un modelo de iPad antiguo que no puede grabar a una resolución tan alta.
Parte 5. Consejos profesionales para obtener mejores grabaciones de pantalla.
Al grabar en iPadOS, asegúrate de que tu iPad esté configurado correctamente para obtener una grabación fluida, nítida y de alta calidad. Aquí tienes algunos consejos útiles para optimizar la calidad de vídeo y audio.
1. Liberar espacio de almacenamiento
Antes de empezar a grabar, asegúrate de que tu iPad tenga suficiente espacio libre para que no se ralentice ni presente fallos, lo que podría causar problemas de grabación mientras filmas.
2. Cierra las aplicaciones que no uses.
Cierra todas las aplicaciones innecesarias que se ejecuten en segundo plano para mejorar el rendimiento del sistema y evitar interrupciones o ralentizaciones durante la grabación.
3. Activar No molestar
Activa el modo No molestar para evitar que todas las llamadas, mensajes y notificaciones entrantes aparezcan en la pantalla y te distraigan mientras grabas.
4. Mantén una configuración de pantalla estable.
No modifique el brillo, la orientación ni la configuración del sistema durante la grabación, ya que los cambios repentinos pueden afectar la coherencia del vídeo y la calidad de la grabación.
5. Prueba primero el audio.
Antes de empezar a grabar el vídeo, haz una breve grabación de prueba para comprobar que los niveles del micrófono estén configurados correctamente y que tu voz suene clara y se esté grabando adecuadamente.
6. Usa una pantalla de inicio limpia.
Limpia la pantalla de inicio o mueve las aplicaciones delicadas a una carpeta diferente para que tu grabación se vea enfocada, profesional y ordenada.
7. Graba en un entorno tranquilo.
Si puedes grabar en una habitación tranquila con poco ruido de fondo, tu micrófono captará mejor el audio de la voz y minimizará los sonidos no deseados cuando... Grabación de voz en una Mac o iPad.
Grabación de pantalla del iPad Es una forma sencilla pero eficaz de grabar tutoriales, partidas y momentos importantes directamente desde tu dispositivo. Con la configuración y los consejos adecuados, puedes mejorar la calidad de vídeo y audio para obtener mejores resultados. Tanto si utilizas las herramientas integradas como software externo, grabar se vuelve más fácil y fiable.
SOBRE EL AUTOR

Capture actividades de pantalla con audio, reuniones en línea, videos de juegos, música, cámara web, etc.
Grabación de pantalla
- Registro de pantalla en Windows
- Grabar Instagram Live
- Copiar vídeos de Tubi
- Convertir vídeos de YouTube a MP3
- Descargar vídeos de Fansly
- Descargar vídeos de JW Player
- Descargar vídeos de Bilibili
- Descargar vídeos de Patreon
- Descargar vídeos de SpankBang
- Descargar vídeos de Discord
- Descargar el vídeo de DoodSream