أحاول أن أفهم كيفية تسجيل الصوت على جهاز ماك يحدث هذا غالبًا عندما تحتاج إلى تسجيل محاضرة، أو حفظ مكالمة فيديو، أو تسجيل بودكاست، أو إنشاء محتوى صوتي بسرعة. لحسن الحظ، يتضمن نظام macOS أدوات تسجيل مدمجة، كما تتوفر العديد من الخيارات الخارجية التي تساعدك على تسجيل صوت الميكروفون والصوت الداخلي بجودة عالية بسهولة.
الطريقة الأولى: استخدام برنامج QuickTime Player
يبدو أن برنامج QuickTime مثبتٌ لدى الجميع على نظام macOS. يوفر QuickTime واجهة سهلة الاستخدام، وتسجيلًا صوتيًا موثوقًا، وتصديرًا سريعًا دون الحاجة إلى أي تطبيق آخر. هذه التقنية مفيدة للتعليق الصوتي، والمحاضرات، والاجتماعات عبر الإنترنت، وحتى تسجيلات البودكاست الأساسية.
الخطوة 1قم بتشغيل برنامج QuickTime Player إما من مجلد التطبيقات أو عبر بحث Spotlight.
الخطوة 2اذهب إلى ملف القائمة من شريط القوائم العلوي.
الخطوه 3انقر تسجيل صوتي جديد.
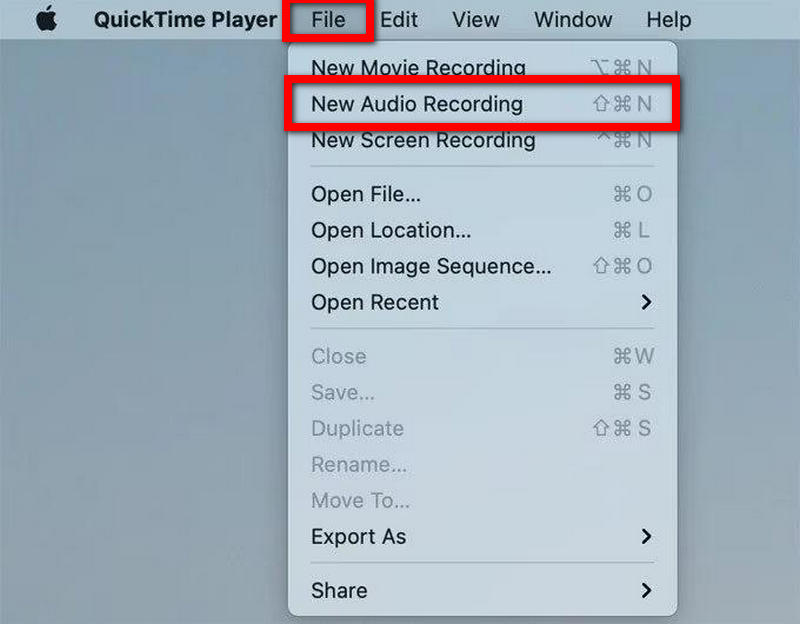
الخطوة 4اضغط على السهم الصغير المجاور لـ سجل زر لتحديد الميكروفون الذي تريد استخدامه.
الخطوة الخامسةإذا لزم الأمر، اضبط مستوى صوت الإدخال.
الخطوة 6لبدء التسجيل ، اضغط على سجل زر.
الخطوة 7 تحدث في الميكروفون.
الخطوة 8اضغط على قف اضغط على الزر لإنهاء التسجيل.
الخطوة 9لحفظ التسجيل على جهاز Mac الخاص بك، انتقل إلى ملف واختر يحفظ.
الطريقة الثانية: استخدام المذكرات الصوتية
تطبيق "المذكرات الصوتية" مصمم لتسجيل الصوت بسرعة. يُعد هذا التطبيق مثاليًا لتدوين التذكيرات الشخصية، وتبادل الأفكار، وإلقاء المحاضرات القصيرة، وتسجيل مقاطع صوتية قصيرة. تتم مزامنة المذكرات الصوتية المسجلة تلقائيًا عبر iCloud، مما يجعلها متاحة على جميع أجهزة Apple.
الخطوة 1قم بتشغيل تطبيق المذكرات الصوتية على جهاز Mac الخاص بك.
الخطوة 2اضغط على سجل زر.
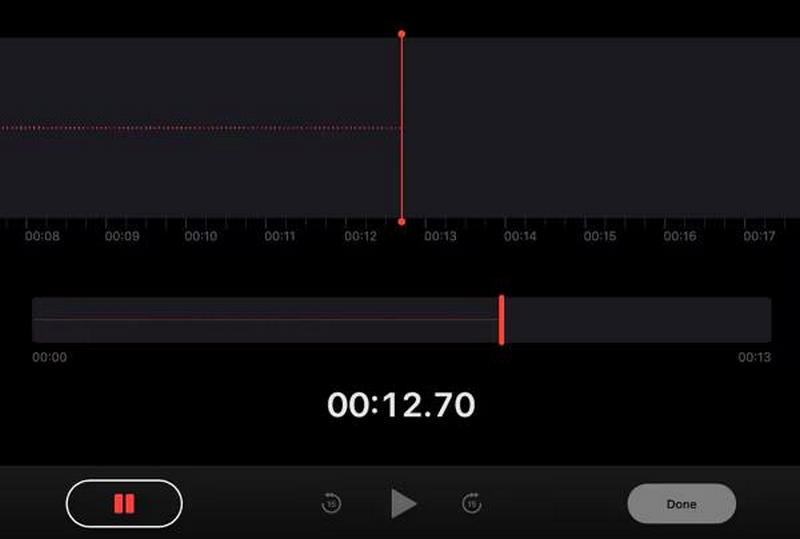
الخطوه 3تحدث عبر الميكروفون.
الخطوة 4إذا كنت بحاجة إلى إيقاف التسجيل للحظة، فحدد يوقف.
الخطوة الخامسةيضعط منجز لإنهاء التسجيل.
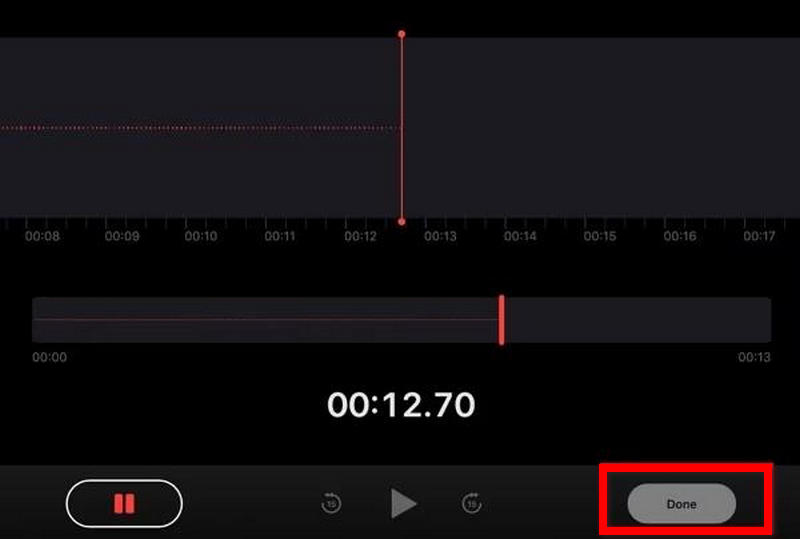
الخطوة 6لتسهيل العثور على التسجيل، حدد إعادة تسمية اختيار.
الخطوة 7لمشاركة التسجيل أو نسخه أو تصديره، انقر بزر الماوس الأيمن على الملف.
لماذا لا يدعم نظام macOS تسجيل الصوت الداخلي بشكل أصلي؟
يُتيح نظام macOS استخدام الميكروفون افتراضيًا. مع ذلك، لا يُمكن تسجيل الصوت الداخلي للنظام باستخدام هذه الخاصية. يشمل ذلك تشغيل الوسائط في التطبيقات، والموسيقى، وأصوات المتصفح. تُعزى هذه القيود في macOS إلى حرص النظام على الخصوصية، وحماية حقوق الملكية الفكرية، وأمان النظام.
على عكس صوت الميكروفون، قد يحتوي الصوت الداخلي على وسائط محمية أو اتصالات خاصة من التطبيقات. ولهذا السبب، تقيّد Apple الوصول إلى قنوات الصوت الداخلية ما لم يقم المستخدمون بتثبيت برامج إضافية.
بسبب هذه المشكلات، لا تستطيع أدوات مثل QuickTime تسجيل الصوت الداخلي، ولكن يمكن تسجيل الصوت الخارجي من خلال الميكروفون.
أمثلة على هذه المشكلات:
- سجل اللعب في ألعاب الفيديو مع الصوت.
- سجل حصة دراسية عبر الإنترنت.
- سجل الصوت والفيديو عبر الإنترنت.
- قم بتسجيل الصوت من فيديو على الإنترنت.
- سجل مقاطع الفيديو التعليمية باستخدام الصوت الداخلي للكمبيوتر.
الطريقة الثالثة: استخدام برنامج BlackHole + QuickTime Player
BlackHole هو برنامج تشغيل صوتي افتراضي مجاني يسمح بتوجيه صوت النظام داخليًا إلى برامج التسجيل. عند استخدام هذا البرنامج مع QuickTime، يُمكن لمستخدمي Mac تسجيل الصوت الداخلي وصوت الميكروفون الخارجي. يتيح هذا البرنامج للمستخدمين تسجيل الاجتماعات عبر الإنترنت، والدروس التعليمية، وألعاب الفيديو، والندوات عبر الإنترنت، والبودكاست، وصوت المتصفح، بجودة صوت عالية وواضحة.
الخطوة 1قم بتنزيل وتثبيت برنامج BlackHole على جهاز Mac الخاص بك من الموقع الرسمي، ثم افتح برنامج Audio MIDI Setup.
الخطوة 2قم بإنشاء جهاز إخراج متعدد وقم بتمكين كل من مكبرات الصوت أو سماعات الرأس الخاصة بجهاز Mac و BlackHole.
الخطوه 3 قم بتعيين جهاز الإخراج المتعدد كجهاز الإخراج الصوتي الافتراضي في إعدادات الصوت.
الخطوة 4افتح برنامج QuickTime Player، ثم حدد ملف > تسجيل صوتي جديد، ثم اختر ثقب أسود كميكروفون أو مصدر صوتي.
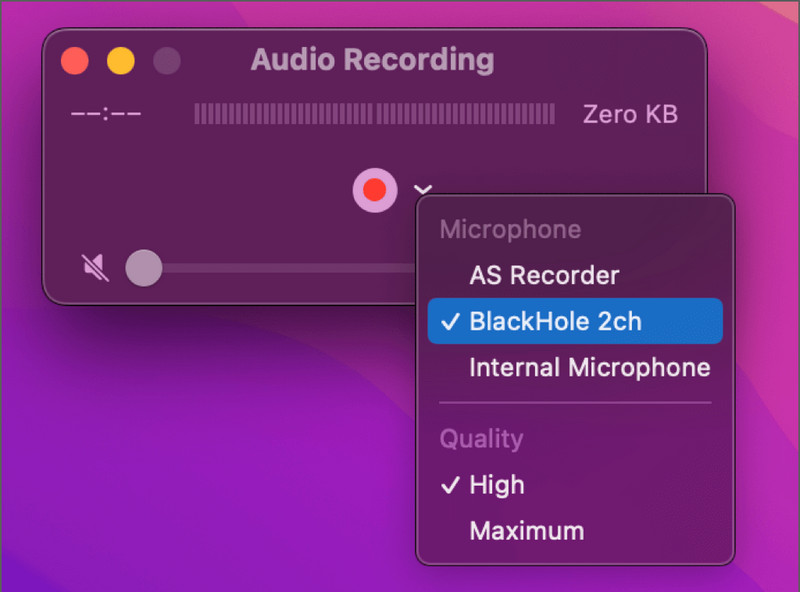
الخطوة الخامسةانقر على سجل اضغط على الزر، ثم شغّل الصوت الذي تريد تسجيله، ثم أوقف التسجيل واحفظه بمجرد الانتهاء.
الطريقة الرابعة: استخدام برامج مخصصة من جهات خارجية
1. AVAide مسجل الشاشة
AVAide مسجل الشاشة يُعدّ AVAide مثاليًا لمستخدمي أجهزة Mac الذين يرغبون في أداة بسيطة وفعّالة لتسجيل الصوت. فبالإضافة إلى تسجيل الشاشة، يُمكنه التقاط الصوت من الميكروفون، ومكبرات صوت النظام، وكاميرا الويب، وكذلك شاشة الهاتف. ومن أبرز ميزات AVAide أنه مُصمّم للمبتدئين والمستخدمين المتقدمين على حدّ سواء، مما يجعله خيارًا رائعًا لكل من يحتاج إلى تسجيل الصوت على جهاز Mac.
- يسجل صوت الميكروفون وصوت النظام في وقت واحد.
- يدعم تسجيل الصوت بجودة عالية مع أقل قدر من التأخير.
- يسمح بتسجيل الشاشة الكاملة أو النافذة أو منطقة مخصصة.
- يتضمن تسجيلًا عبر كاميرا الويب للدروس التعليمية والبودكاست.
- يدعم العديد من تنسيقات التصدير مثل MP3 و AAC و FLAC و M4A وغيرها.

 تحميل آمن
الخطوة 1قم بتنزيل البرنامج وتثبيته
انتقل إلى موقع AVAide الإلكتروني لتنزيل البرنامج. اتبع تعليمات التثبيت التي تظهر على الشاشة لتثبيت البرنامج بنجاح.
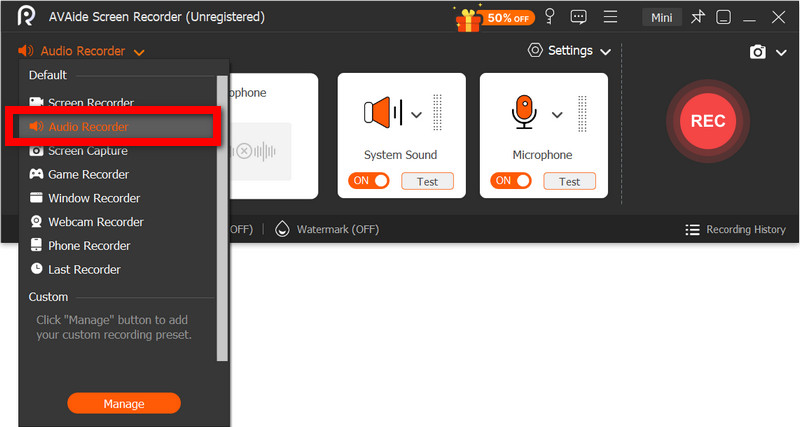
الخطوة 2حدد مسجل الصوت
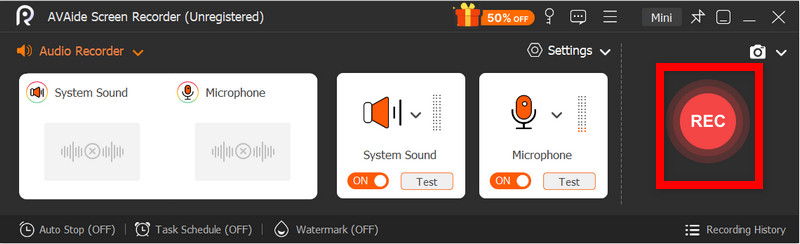
افتح البرنامج، ومن الصفحة الرئيسية، حدد مسجل الصوت لتسجيل الصوت فقط.
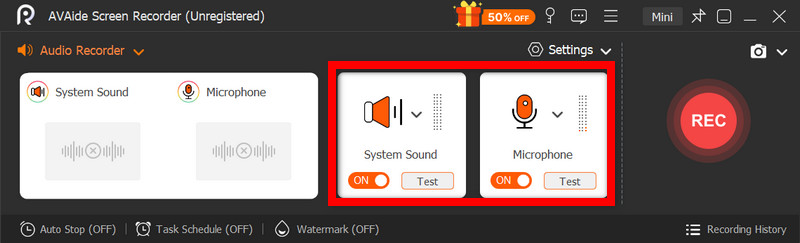
الخطوه 3تفعيل الميكروفون وصوت النظام
تفعيل ميكروفون خيار تسجيل الصوت بوضوح. فعّل صوت النظام لالتقاط الصوت الداخلي من جهاز Mac الخاص بك.
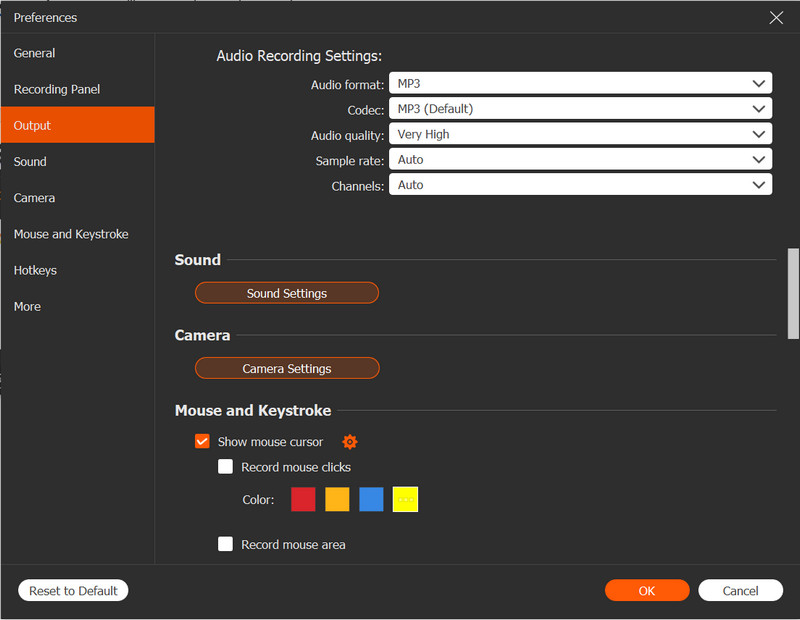
الخطوة 4اضبط إعدادات التسجيل
من إعدادات من القائمة، اختر تنسيق الصوت وجودة الإخراج المفضلة لديك. حدد موقع الحفظ واضبط مستوى صوت الميكروفون وصوت النظام.
الخطوة الخامسةابدأ التسجيل
حدد ملف REC يمكنك بدء تسجيل صوتك. أثناء جلسة التسجيل، يمكنك إيقاف التسجيل مؤقتًا، أو استئنافه، أو إضافة ملاحظات.
الخطوة 6حفظ ومعاينة
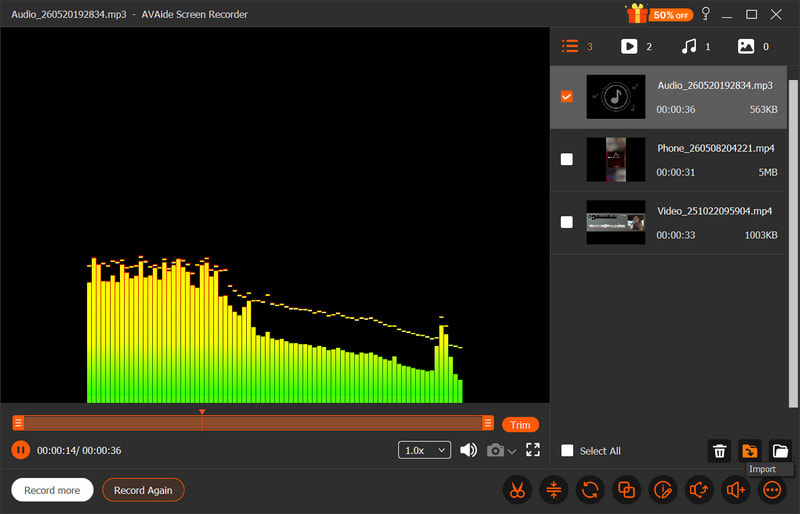
حدد ملف قف خيار لإنهاء تسجيل الصوت. يمكنك بعد ذلك قص الصوت وحفظ التسجيل على جهاز Mac الخاص بك.
2. استخدام برنامج Audacity
أوداسيتي برنامج سهل الاستخدام، قوي، ومجاني لتسجيل وتحرير الصوت على نظام ماك. يُفضّل استخدامه غالبًا على غيره من الخيارات في مجال البودكاست والمشاريع الموسيقية نظرًا لبساطة إجراءات العمل فيه وميزاته الاحترافية مثل تقليل الضوضاء، والقص، وتحسين الصوت. مع كل هذه الميزات، يتميز أوداسيتي بواجهة مستخدم بسيطة، مما يجعله خيارًا ممتازًا للمبتدئين.
الخطوة 1قم بتنزيل برنامج Audacity وتثبيته على جهاز Mac الخاص بك. افتح التطبيق عند الانتهاء من التثبيت.
الخطوة 2حدد مصدر الصوت الخاص بك. اضبط مصدر الصوت على جهازك الصوتي، ثم اضبط مستوى التسجيل.
الخطوه 3عندما تكون جاهزًا للتسجيل، اضغط على سجل اضغط على الزر وابدأ بالتحدث في الميكروفون.
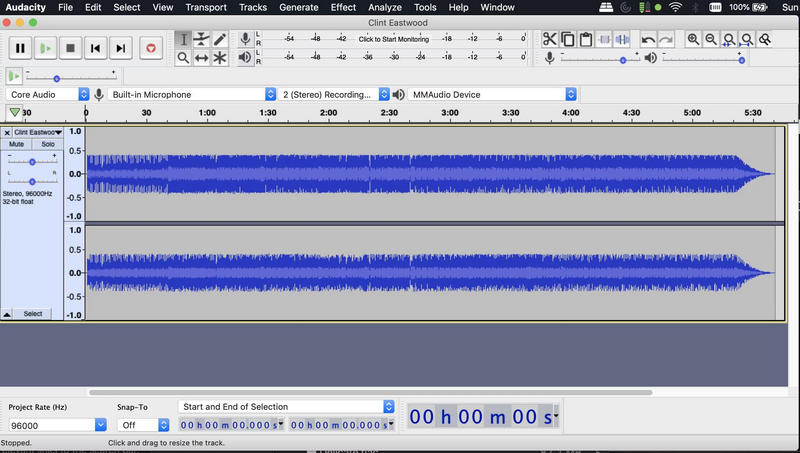
الخطوة 4عند الانتهاء من التسجيل، اضغط على قف زر.
الخطوة الخامسةعند الرضا عن التسجيل، حدد المشروع الذي ترغب في تصديره بالانتقال إلى ملف > يصدر. يختار MP3, WAVأو خيار آخر لتصدير الصوت.
3. استخدام برنامج GarageBand
يُعدّ GarageBand بديلاً ممتازاً لبرنامج Audacity، وهو تطبيق خاص بشركة Apple مُثبّت مسبقاً على جميع أجهزة Mac. يحتوي GarageBand على جميع ميزات Audacity، بالإضافة إلى ميزات أخرى، مثل أدوات الموسيقى والمؤثرات الصوتية. يُعتبر GarageBand أفضل بكثير لإنتاج الموسيقى، ويُستخدم على نطاق واسع لـ بودكاست مسجل جلسات تسجيل، وتعليقات صوتية، ومشاريع صوتية عالية الجودة مع تحكم احترافي في الصوت.
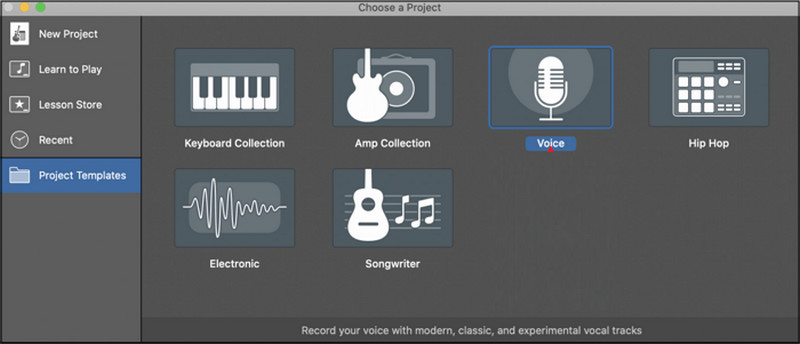
الخطوة 1قم بتشغيل برنامج GarageBand واختر مشروع جديد، ثم حدد الخيار صوت.
الخطوة 2اختر المدخل الذي ترغب في التسجيل به. إذا رغبت، فعّل خاصية مراقبة الصوت لسماع صوتك أثناء التسجيل.
الخطوه 3يضرب سجل وابدأ جلستك.
الخطوة 4عند الانتهاء من التسجيل، اضغط على قف استخدم زر التحرير وميزات ضبط الصوت في GarageBand لتحسين تسجيلك.
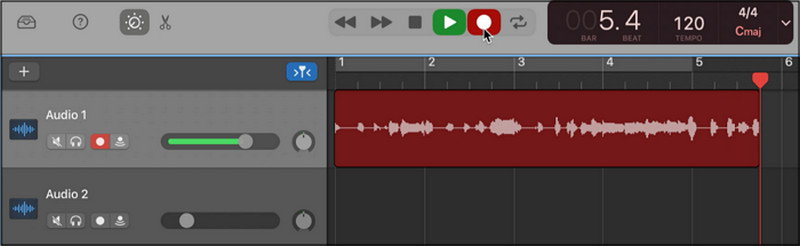
الخطوة الخامسةقم بتصدير مشروع الصوت النهائي بالجودة والتنسيق المطلوبين إلى جهاز Mac الخاص بك.
نصائح إضافية
1. كيفية تسجيل الصوت من يوتيوب على نظام ماك
لتسجيل الصوت من يوتيوب، والدورات التدريبية عبر الإنترنت، والندوات الإلكترونية، وتشغيل ملفات البودكاست والموسيقى على جهاز ماك، يمكنك استخدام برنامج OBS Studio، وهو برنامج تسجيل مجاني لتسجيل شاشة الكمبيوتر والبث المباشر. يُعد OBS Studio خيارًا ممتازًا نظرًا لجودة تسجيله العالية لأصوات النظام.
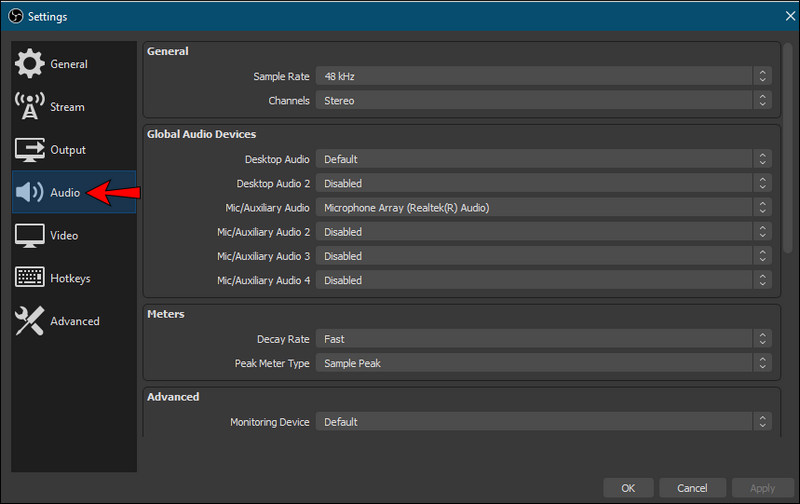
الخطوة 1قم بتنزيل وتثبيت برنامج OBS Studio على جهاز Mac الخاص بك وافتح البرنامج بعد تثبيته.
الخطوة 2أنشئ مصدرًا جديدًا في صوتي اختر الخيار وحدد جهاز الصوت الخاص بنظامك أو برنامج تشغيل الصوت الافتراضي.
الخطوه 3افتح موقع يوتيوب في المتصفح وقم بتحميل الفيديو/الصوت الذي تريد تسجيله.
الخطوة 4ضرب ابدأ التسجيل اضغط على الزر، ثم شغّل فيديو/صوت يوتيوب بشكل طبيعي.
الخطوة الخامسةانتظر حتى ينتهي تسجيل الصوت الذي تريد تسجيله، ثم اضغط على زر التشغيل/الإيقاف. قف اضغط على الزر وحدد موقع ملف الصوت، الذي تم حفظه الآن على جهاز Mac الخاص بك.
2. كيفية تسجيل الصوت على جهاز ماك باستخدام ميكروفون خارجي
في معظم الحالات، يكون الصوت المُسجّل من الميكروفونات الخارجية بجودة أعلى مقارنةً بالميكروفون الداخلي في جهاز ماك. تتصل ميكروفونات USB بجهاز ماك مباشرةً. أما ميكروفونات XLR، فقد تحتاج إلى واجهة صوتية للحصول على جودة صوت أفضل وتقليل التشويش. أفضل برنامج لتسجيل الشاشة لأجهزة ماك كما يمكن أن يساعد ذلك في الحصول على تسجيلات أكثر وضوحًا عند دمج مهام الصوت والفيديو.
الخطوة 1قم بتوصيل الميكروفون الذي اخترته بجهاز Mac الخاص بك، ثم افتحه. اعدادات النظام، اذهب إلى صوتوقم بتعيين الميكروفون الذي قمت بتوصيله للتو كجهاز إدخال.
الخطوة 2اضبط مستوى إدخال الميكروفون واختبر الصوت للتأكد من أن صوتك يتم التقاطه بوضوح.
الخطوه 3افتح برنامج التسجيل المفضل لديك، مثل برنامج AVAide Screen Recorder.
الخطوة 4اختر الميكروفون الخارجي من داخل إعدادات البرنامج وابدأ بتسجيل صوتك أو جلسة الصوت.
الخطوة الخامسةأوقف التسجيل، راجع جودة الصوت، ثم احفظ أو صدّر ملف الصوت النهائي إلى جهاز Mac الخاص بك.
تسجيل صوت ماك يمكنك بسهولة استخدام الأدوات المدمجة مثل QuickTime وVoice Memos أو البرامج المتقدمة لتسجيلات بجودة احترافية. سواء كنت بحاجة إلى تسجيلات صوتية داخلية، أو تعليق صوتي للبودكاست، أو تسجيلات محاضرات عبر الإنترنت، فإن هذه الطرق توفر وسائل موثوقة لالتقاط صوت واضح بكفاءة على جهاز Mac الخاص بك.
نبذة عن المؤلف

تسجيل أنشطة الشاشة بالصوت ، والاجتماعات عبر الإنترنت ، ومقاطع فيديو اللعب ، والموسيقى ، وكاميرا الويب ، وما إلى ذلك.