PSDs are Photoshop Document files that could contain multiple layers. These files are produced by Photoshop, used by designers, marketers, and developers. However, it is not as accessible as GIF files that you wish to share on social media, edit as animations or web elements. There are limited tools that can open this type of tool. The only program where you can view it is using Photoshop. Nevertheless, this guide covers the methods to export PSD to GIF in a matter of seconds. You will learn step-by-step processes and ensure your GIFs load fast and look sharp.
Part 1: Why Convert PSD to GIF
PSD or Photoshop Document is an image format produced by the leading industry photo editor, Photoshop. When the file is saved in this format and shared, other editors can modify where the previous editor left off. However, converting a PSD to a GIF serves a specific purpose. That is especially true when the final design is ready for digital use and sharing. While it is true that PSD retains editable elements and layers for future modifications, GIFs are optimized for web compatibility and sharing.
One key advantage of converting a PSD to a GIF is its support for making ideal banners, memes, small animated graphics, and simple animations. Moreover, GIFs are capable of preserving the transparency of logos and icons to blend into different backgrounds. Furthermore, a photo is in a small file size compared to a layered PSD that eats up a lot of storage space. The thing is, it lacks layers and is naturally raster-based. Therefore, this format is ideal for further editing, but reversing the conversion will make it possible. Needless to say, GIF conversion is best suited for finalized designs where no additional changes are required for broad compatibility and quick loading times across different platforms and browsers.
Part 2: How to Convert PSD to GIF in Photoshop
If you are into layer-based editing, Photoshop is a powerful image editing software to use. Its features include converting PSD files to various formats, such as JPEG, PNG, and GIF. That said, you can convert PSD to JPG or PNG using this program. With it, you can make GIFs for web graphics due to its support for transparency and simple animations. Additionally, you can use its timeline panel to set up frame-by-frame animation for animated GIFs. Below is a step-by-step guide to exporting PSD to GIF efficiently.
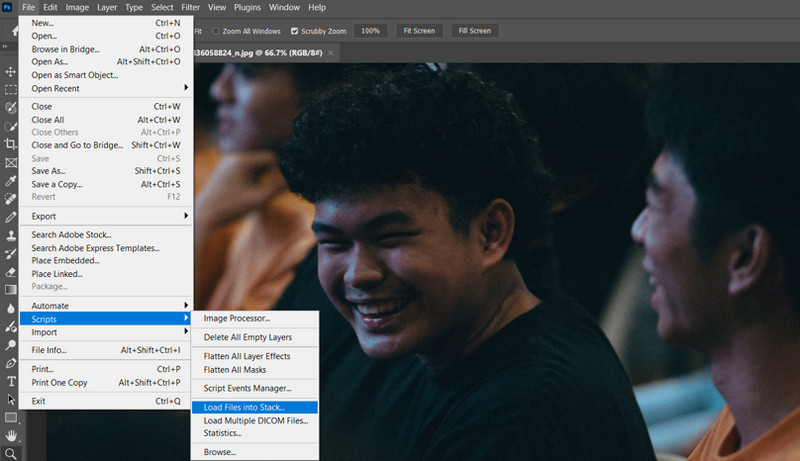
Step 1First, download the latest version of Photoshop and set it up by installing it on your computer. After installing the program, launch it and open your PSD file. To do that, create a new document and set the size for your canvas to work on. It should be the size you want your final GIF to be. Next, go to File > Scripts > Load Files into Stack and select your PSD file.
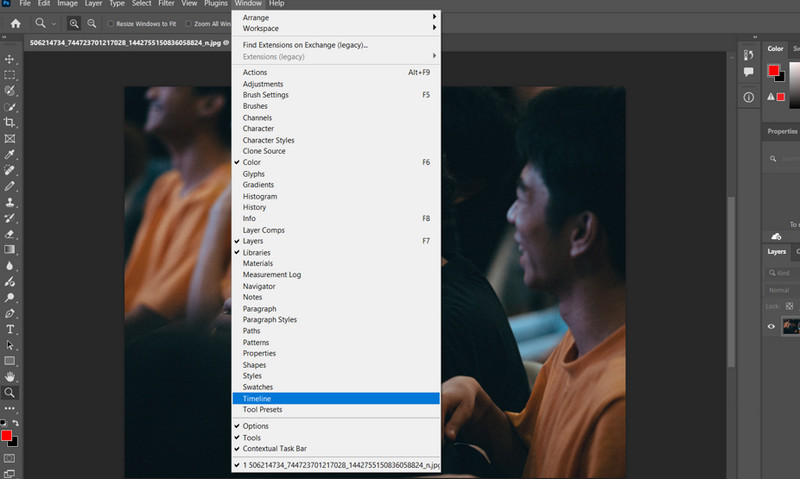
Step 2This time, open the timeline window where you will do the editing tasks. Top open, go to the top menu and click Window, select the Timeline option to get started. After that, the timeline window will appear at the bottom of the interface. If you wish to have control over the animation, sound, and resolution settings, you can access them above the layers section of the timeline window.
Step 3To create frame animations, look for the dropdown arrow next to Create Video Timeline. From here, select the Create Frame Animation option. This process goes first before animating anything in the file.
Step 4Next, choose Select in the top menu, followed by All Layers in the select option. This option reveals all the layers highlighted and selected. Head back to the Timeline window and click the Menu button. Then, select Create New Layer for Each New Frame.
Step 5After that, select Make Frames From Layers in the same menu to turn each layer into a frame. By then, you can select each separate frame and edit as needed. You may also arrange the order by dragging an individual frame.
Step 6To edit a frame, click the dropdown arrow beside the time of an individual frame. You may adjust this option by setting .1, .2, .5, 1.0, seconds and so on. For this procedure, you can adjust the speed at which a specific frame should play.
Step 7You may also edit the loop option. Your GIF will loop forever by default, as indicated below your frames, where it says Forever. If you wish your GIF to play non-stop, leave it be.
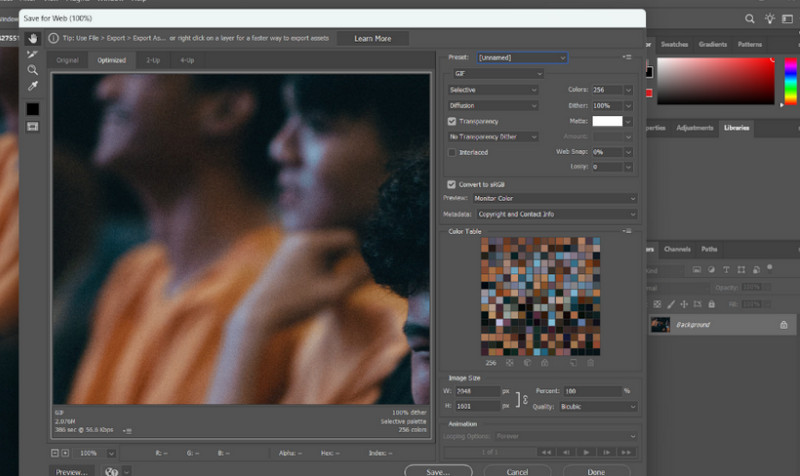
Step 8To preview your work, hit the Play button and inspect how your GIF behaves. Once satisfied, go to File > Export > Save for Web (Legacy) and save your masterpiece. Then, another window will appear.
Step 9Now, choose GIF as the output format by selecting the dropdown under the Preset option. In the Preset option, choose a dithering percentage that translates to the appearance of more colors and detail. The more details and colors, the bigger the file size will be. That is how to convert PSD to GIF with Photoshop. Using the outlined steps in steps 8 and 9, you can also create a PNG from a PSD file.
Part 3: The Easiest Way to Convert a Video or a Photo to an Animated GIF
Thanks to user-friendly tools that allow transforming videos or series of photos into shareable and engaging GIFs in just a few clicks. Creating animated GIFs has never been easier with AVAide Video Converter. With it, there is no need for you to have image editing technical skills and to manually set the settings for editing GIFs. Likewise, it allows users to fine-tune settings, including resolution, frame rate, frame rearrangement, and loop animation to ensure high-quality and professional results. To convert a video or photo into a GIF, below is a walkthrough:
Step 1Begin by downloading and installing the app using the Free Download buttons below. Choose the right installer according to your computer’s OS.

FREE DOWNLOAD For Windows 7 or later
 Secure Download
FREE DOWNLOAD For Mac OS X 10.13 or later
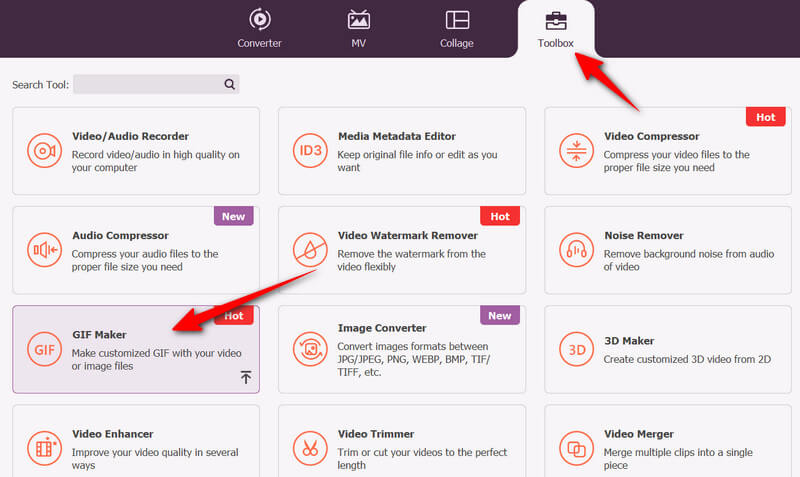
Secure DownloadStep 2Once the app is installed, go to the Toolbox tab in the upper menu. From there, select GIF Maker or use the Search Tool option and type the name of the option for instant access.
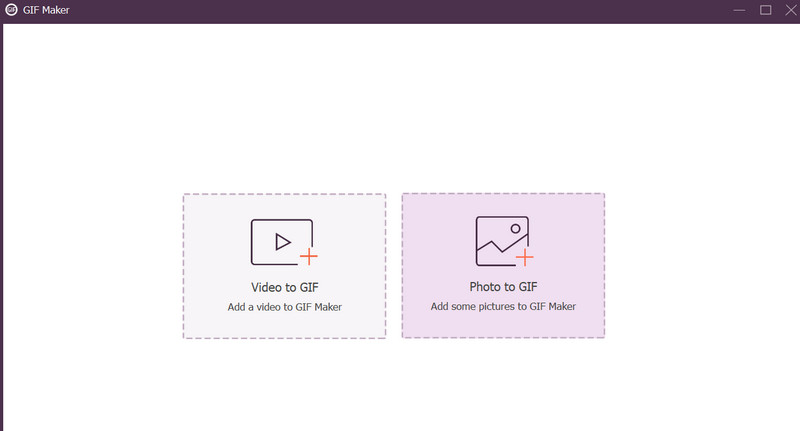
Step 3Pick an option whether to make a Video to GIF or a Photo to GIF. Then, it will prompt you to load a file depending on the selected option (video/photo). In this case, we have chosen photos to upload and convert to GIF.
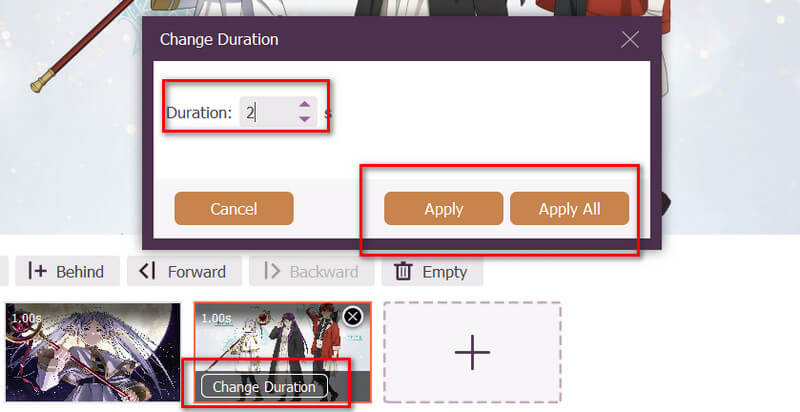
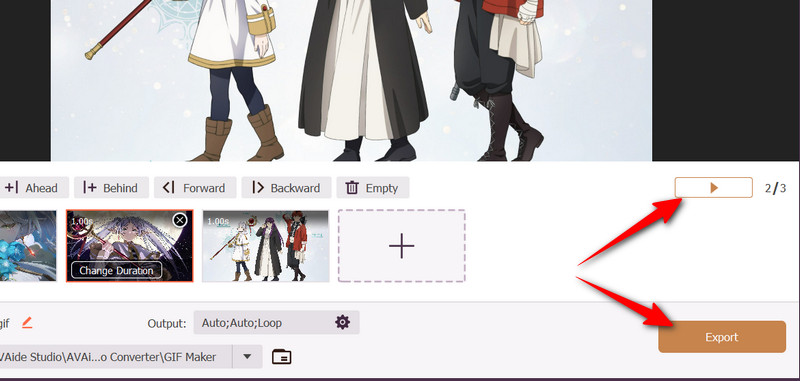
Step 4After loading your photos into the program, rearrange the order of the photos accordingly. Each photo comes with an option to edit the duration. Simply click the Change Duration on the photo and enter the duration in seconds. Then, hit Apply for individual application or Apply All to apply the duration to all photos.
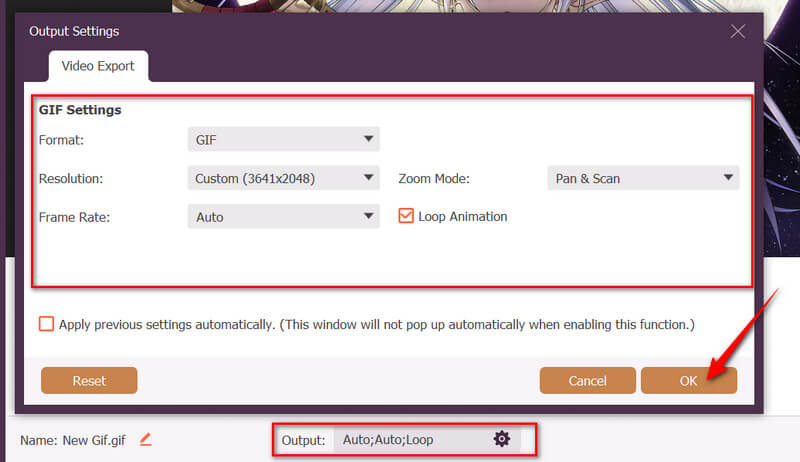
Step 5This time, click the Output dropdown, set the format to GIF, adjust the resolution, frame rate, zoom mode, and loop animation, and hit OK to confirm.
Step 6To inspect the final output, click the Play button. If you are happy with the results, click the Export button.
This post outlines a detailed guide to convert a PSD file to a GIF animation with Photoshop. True enough, PSD files can be more useful when saved as GIFs. However, the process takes effort and time. Nonetheless, you may opt for convenient tools that offer efficient ways to convert videos or photos to GIF without the need for expertise in a specific program.
Your complete video toolbox that supports 350+ formats for conversion in lossless quality.