Any decent recording can be compromised in the seconds that a background sound appears, whether it's a whirring fan, noise outside, or simply room noise. It occurs more frequently than you would expect. The positive news? You do not require being an audio specialist to repair it. This guide will walk you through how to use Audacity remove background noise tools step by step, then explore a smarter, faster way to clean up your audio automatically. Achieving a clear professional sound is just a few clicks away, whether it is the first track you have edited or a project being refined.
Part 1: How to Eliminate the Background Noise in Audacity
If your audio has a low hum, fan buzz, or any unwanted sound creeping in, Audacity has tools that can help. It may take a few attempts to get it just right, but the process is straightforward once you know what to do. In this section, we will show you how to use Audacity noise reduction features to clean up your recording without affecting the parts you want to keep. These three steps will guide you through isolating the noise, reducing it, and fine-tuning your results.
Step 1. Isolate the Noise You Want to Remove
First, make sure Audacity is installed. Open it, then import your audio by going to File > Import > Audio and selecting the track you want to edit. Next, you need to help Audacity identify the sound you want to erase. This could be a portion of silence in your recording where only background noise is present, such as the sound of a fan or air conditioner. Use the Selection Tool to highlight a few seconds of that noise.
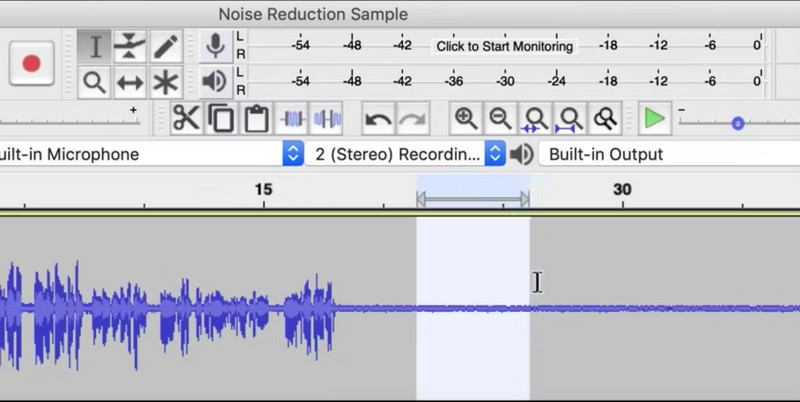
It is important to pick a part where no one is speaking. It tells Audacity what the unwanted sound looks like, without affecting your main audio.
Step 2. Apply the Noise Reduction Effect
With your noise sample selected, go to Effect > Noise Reduction and click the Get Noise Profile button. It teaches Audacity which frequencies to remove. Now, highlight your full audio track. You can do this by clicking on the track panel or pressing Ctrl + A or Command + A on Mac.
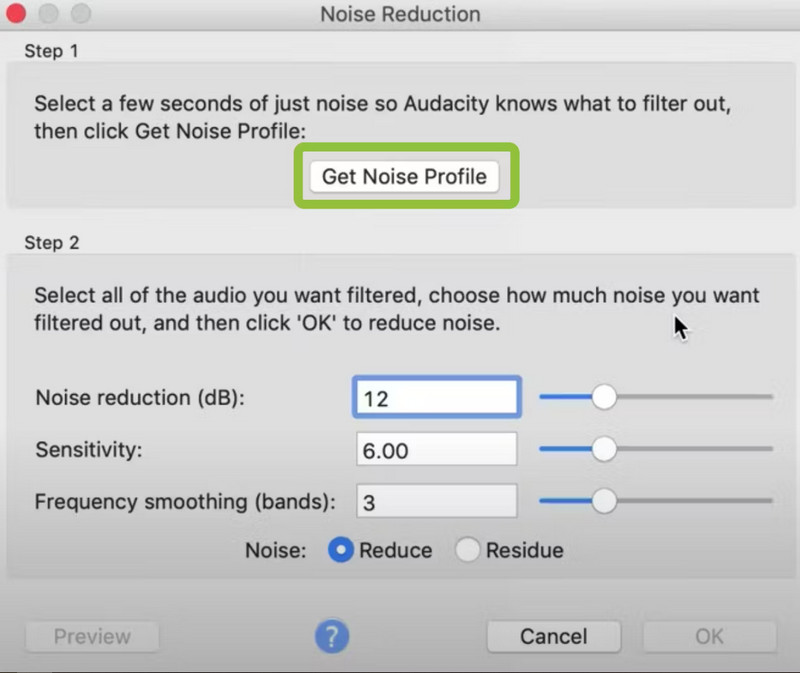
Go back to Effect > Noise Reduction again. This time, you will be applying the effect to the entire audio file using the profile you just created.
Step 3. Adjust the Settings for Best Results
In the Noise Reduction settings window, you will see three main options:
Noise Reduction (dB):
Controls how much noise to remove. A good starting point is 12 decibels.
Sensitivity:
Set to 6 by default. It determines how sensitive Audacity is when detecting noise.
Frequency Smoothing (bands):
Usually set to 3. It softens the edges so your audio does not sound choppy.
You can test the changes before using them. If the result still sounds rough, undo it and increase the noise reduction level by a few decibels. Repeat until you get clean, natural-sounding audio. Additionally, you can also use Audacity for reverse audio editing, as it is well-suited for this purpose.
Part 2: The Best Way to Remove Background Noise in Audio
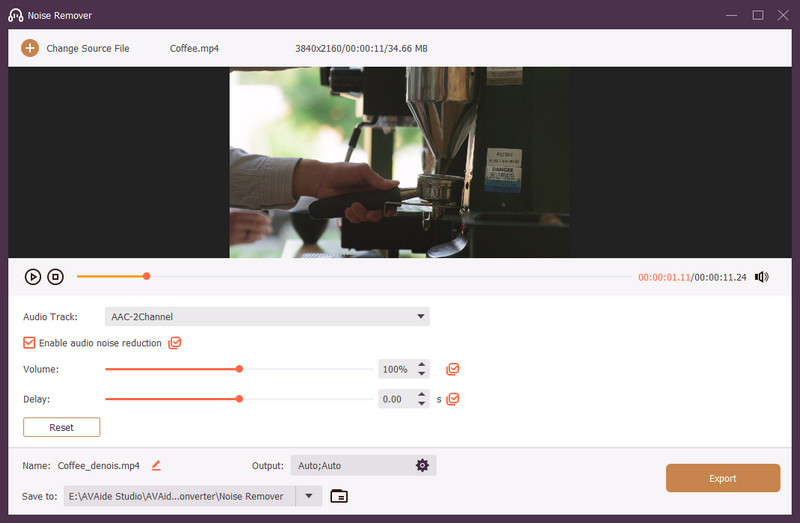
If you want a faster and more beginner-friendly solution than manual editing, AVAide Video Converter is a strong alternative. Other than being a conventional editor, it comes with a built-in Noise Remover under its More Tools. Noise profiles or parameters are not necessary, as they automatically remove unwanted noises once you start adding your audio. What makes it even better is the flexibility it offers. You can customize the output format, change the audio codec, adjust the bitrate, or switch channels depending on your needs. It is a one-stop solution for cleaning up audio with minimal effort.

FREE DOWNLOAD For Windows 7 or later
 Secure Download
FREE DOWNLOAD For Mac OS X 10.13 or later
Secure DownloadWhile tools like background noise reduction Audacity, are great for precision editing, AVAide focuses on convenience without cutting corners on quality. It is affordable, time-saving, and provides you with a professional-sounding clean. This tool makes it easy, whether you want to polish a voiceover, prepare a podcast, or merge multiple audio files. AVAide is worth trying for creators who do not want to bother with setting every value and achieve high-quality results at the same time.
Part 3: How to Prevent Audio Background Noise
The best way to fix background noise is to avoid it in the first place. Clean recordings save you time, reduce editing, and give your projects a more professional sound. Before you even open your editing software, these simple tips can help you capture audio that needs little to no post-processing.
1. Optimize Your Recording Space
Your recording environment matters more than you think. Choose a quiet room, ideally one without HVAC units, traffic noise, or electronics like external drives that generate white noise. Soft furnishings, such as curtains, rugs, and couches, can naturally absorb sound and enhance the room tone. By starting with a clean space, you may not even need Audacity background noise removal in the first place.
2. Use a Dynamic Mic for Better Control
Dynamic microphones are great for recording speech. They are less sensitive than condenser mics, so they focus more on your voice and less on what is happening in the background. If you are podcasting or recording vocals, a dynamic mic like the Samson Q2U can give you great quality with fewer issues to clean up later. It is a smart way to avoid needing tools like Audacity macro noise reduction down the line.
3. Lower Your Gain and Get Closer to the Mic
Turning down your gain or sensitivity and speaking directly into it helps your voice stand out while minimizing room noise. Aim for audio levels that peak between -12 dB and -10 dB. This setting maintains a strong signal and minimizes background noise. Later, you will not have to search for guides on how to remove background noise in Audacity style.
4. Minimize Computer Fan and Background Noise
Even your computer can work against you. Fans get louder when your system heats up, and that low hum can sneak into your recordings. Turn the mic away from the computer, close extra apps, and keep the system cool. These small changes make a big difference and help reduce your need for post-editing with tools like Audacity, such as how to eliminate background noise.
By using these techniques before hitting record, you will prevent most background noise issues and have the extra step of learning how to remove background noise in Audacity later on. Prevention is better than a cure.
This article teaches you how to take out background noise in Audacity using the available tutorial here. Aside from Audacity, you can also use the AVAide tool to solve the problem, which offers a much quicker way to remove background noise from your video and provides polishing similar to professional software.
Your complete video toolbox that supports 350+ formats for conversion in lossless quality.