Vrei propriul tău ton de apel personalizat. Nu ceva de nicăieri. Ceva ce ți-ai creat singur pentru apeluri și alerte.
Suntem aici să vă ajutăm cu asta. Vă vom arăta diferite modalități de a înregistrați un ton de apel pe diferite sisteme. De asemenea, vom împărtăși sfaturi simple pentru rezultate mai bune. Așadar, pregătește-ți vocea sau sunetul pentru un ton de apel personalizat.
Partea 1. Cum să înregistrezi un ton de apel pe iPhone
1. Memo vocal în ton de apel (cea mai ușoară cale)
Aplicația Voice Memos înregistrează sunete și le transformă imediat într-un ton de apel personalizat utilizabil cu instrumente de bază pentru decupare, iar această parte vă va învăța exact cum să transformați o înregistrare vocală într-un ton de apel pe un iPhone.
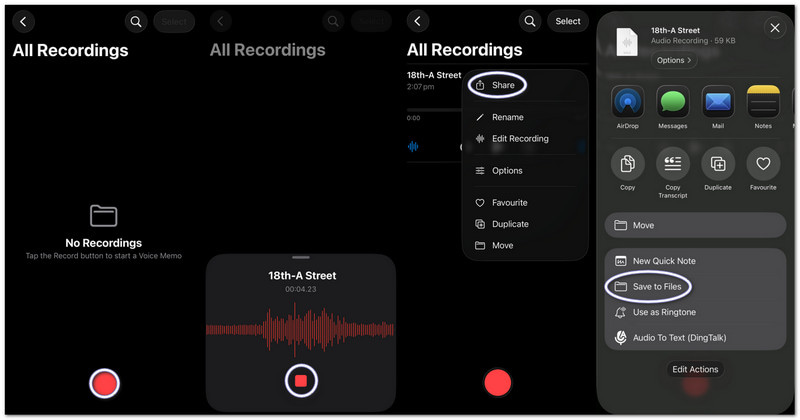
Pasul 1Lansează aplicația Memo-uri vocale pe iPhone.
Pasul 2Atingeți roșul Record și rostiți sau redați sunetul.
Pasul 3Atingeți Stop când ai terminat.
Pasul 4Apasă pe trei puncte (...) pe înregistrarea ta.
Pasul 5Alege Salvare în fișiere pentru a stoca sunetul și a-l utiliza mai târziu ca ton de apel.
2. Orice fișier audio (MP3/M4A) ca ton de apel
Fișierele audio MP3 sau M4A stocate din descărcări sau aplicații muzicale pot fi selectate și setate ca ton de apel pe un iPhone.
Pasul 1Descărcați fișierul MP3 sau M4A și salvați-l în Fișiere aplicația.
Pasul 2Alerga GarageBand și alege Inregistrare audio.
Pasul 3Localizează-ți fișierul audio în Fișiere, apoi trageți-l în cronologie.
Pasul 4Mergi la Fișiere, găsește fișierul audio și trage-l în cronologie.
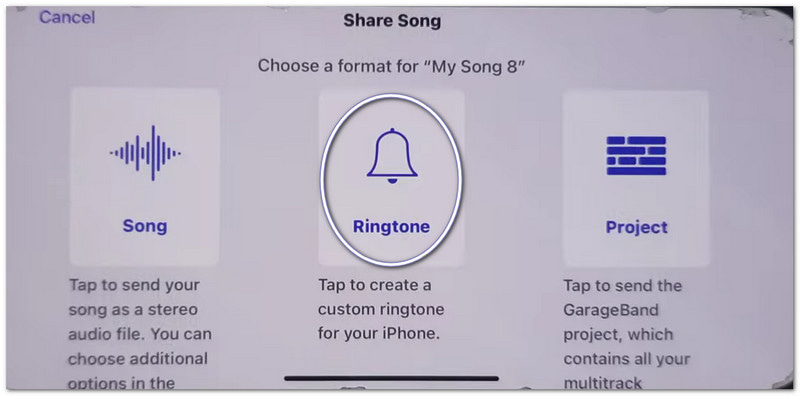
Pasul 5Reduceți la mai puțin de 30 de secunde, apoi atingeți Acțiune > Ton de apel > Export.
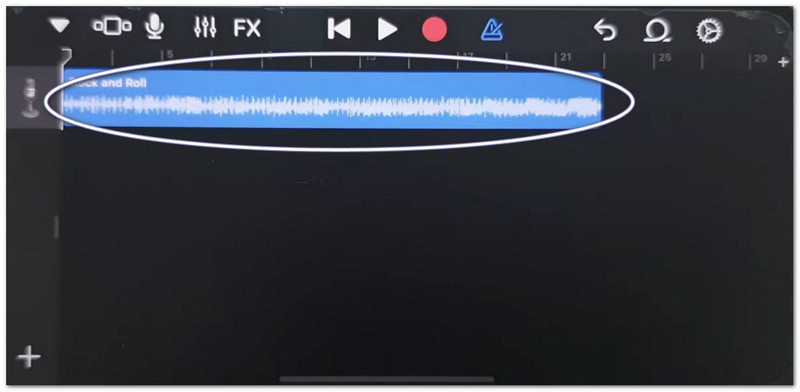
3. Utilizarea GarageBand (pentru versiunile mai vechi de iOS)
GarageBand editează clipuri audio cu controale precise, permițând utilizatorilor să taie, să aranjeze și să exporte cu ușurință tonuri de apel personalizate, ceea ce simplifică înțelegerea modului de setare a unei înregistrări vocale ca ton de apel pe un iPhone.
Pasul 1Deschis GarageBand și selectați Inregistrare audio.
Pasul 2Apasă pe Vizualizare piste, apoi deschideți Browser de bucle.
Pasul 3Importați notița vocală sau fișierul audio salvat.
Pasul 4Trageți-l în cronologie și decupați-l la maximum 30 de secunde.
Pasul 5Atingeți Cântecele mele, atunci Acțiune > Ton de apel > Export.
Depanarea erorii „Partajarea notelor pe iPhone nu funcționează”
Dacă Foaia de partajare se blochează, se blochează sau nu afișează aplicațiile atunci când partajați note vocale sau fișiere GarageBand, încercați aceste soluții.
Remedieri rapide:
- Repornire forțată: Apăsați Mărire volum și Reducere volumApoi, țineți apăsat butonul de Pornire/Oprire până când apare simbolul Apple.
- Actualizare iOS: Accesați Setări > General > Actualizare de softwareInstalați orice actualizări. Corectează erorile de sistem.
- Comutare AirDrop: Deschidere Centrul de Control pentru a dezactiva AirDrop. Dezactivați și activați din nou AirDrop. Partajarea este reîmprospătată.
Corecții de sistem
- Eliberați spațiu de stocare: Păstrați cel puțin 2 gigaocteți de spațiu liber. Ștergeți fișierele sau videoclipurile neutilizate. Spațiul de stocare insuficient poate împiedica funcționarea foii de partajare.
Reparație finală
- Resetare toate setările: Accesați Setări > General > Transfer sau Resetează iPhone-ul > Resetare toate setărileNu șterge datele. Doar resetează setările de sistem și poate remedia problemele legate de foaia de partajare.
Partea 2. Cum să înregistrezi un ton de apel pe Android
1. Utilizarea unei aplicații pentru crearea de tonuri de apel (cea mai recomandată)
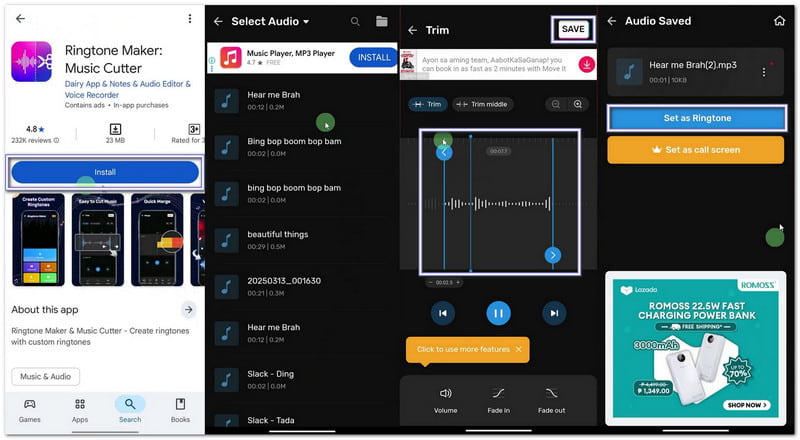
Dacă vrei să înveți cum să-ți înregistrezi propriul ton de apel, poți folosi Maker: Music Cutter din Magazinul Google Play. Scopul său principal este de a te ajuta să decupezi melodii, să tai exact părți audio și să le setezi instantaneu ca tonuri de apel personalizate pe telefoanele Android.
Pasul 1Deschide Magazinul Google Play. Caută Creator de tonuri de apel: Cutter muzicalInstalați-l. Apoi, apăsați Deschis.
Pasul 2Atingeți Incepe. Alege Ajustați sunetulAcordă permisiuni pentru ca aplicația să poată accesa fișierele tale.
Pasul 3Alege o melodie sau un fișier audio de pe telefon. Mută glisoarele pentru a alege părțile de început și de sfârșit ale tonului de apel.
Pasul 4 Atingeți A tăia sau salvaAlegeți claritatea dacă este necesar. Apăsați A confirma. Apoi apasa Setează ca ton de apelPermiteți accesul la setările de sistem și alegeți tonul de apel implicit.
2. Setări încorporate (pentru fișiere audio descărcate)
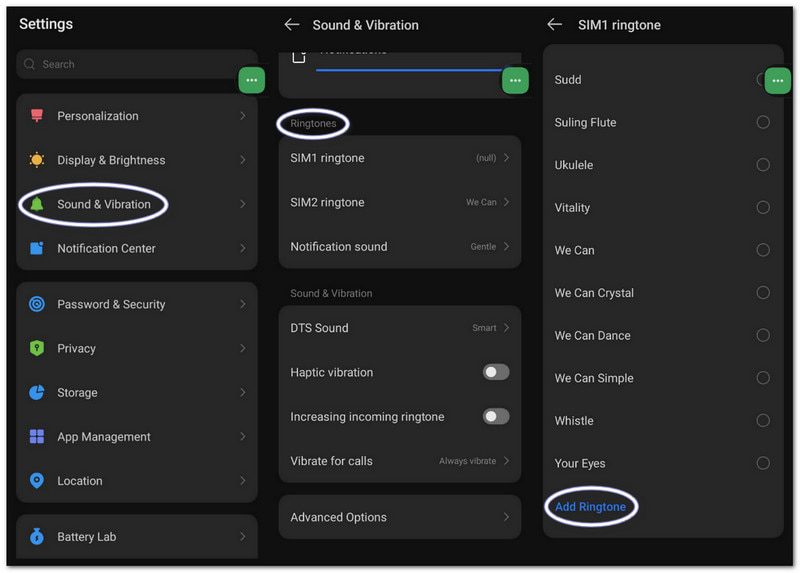
Setările Android permit selectarea directă a fișierelor audio salvate și atribuirea lor ca tonuri de apel fără a fi nevoie de aplicații sau instrumente suplimentare.
Pasul 1Accesați setările telefonului. Atingeți Sunet și vibrații sau Sunet.
Pasul 2Atingeți Ton de apel telefon pentru a vedea opțiunile disponibile.
Pasul 3Apasă pe Plus butonul sau Adăugați un ton de apel butonul din partea de sus.
Pasul 4Răsfoiți spațiul de stocare. Selectați fișierul audio. Atingeți TerminatApoi, confirmați pentru a-l seta ca ton de apel implicit.
Partea 3. Cum să transformi o înregistrare a ecranului într-un ton de apel
De asemenea, puteți transforma o înregistrare a ecranului într-un ton de apel pe un computer Windows sau Mac folosind AVaide Screen RecorderAre un mod de înregistrare audio care captează sunetul din sistem și vocea ta, ceea ce facilitează înregistrarea unui ton de apel.
De asemenea, oferă setări de sunet, unde puteți reduce sau mări volumul, activa anularea zgomotului și afișa un avertisment atunci când nu se detectează sunet. Desigur, puteți exporta tonul de apel în formate acceptate, cum ar fi MP3 și M4A, care funcționează bine pentru dispozitivele mobile.
Pasul 1Obțineți și configurați AVAide Screen Recorder pe computerul dvs. cu Windows sau Mac.

DESCĂRCARE GRATUITĂ Pentru Windows 7 sau o versiune ulterioară
 Descărcare sigură
DESCĂRCARE GRATUITĂ Pentru Mac OS X 10.13 sau o versiune ulterioară
Descărcare sigurăPasul 2Pornește în modul Înregistrator ecran. Faceți clic pe meniul derulant. Selectați Inregistrare audio pentru o mai bună captare a sunetului.
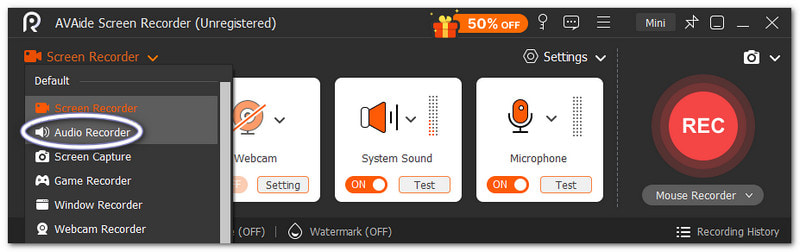
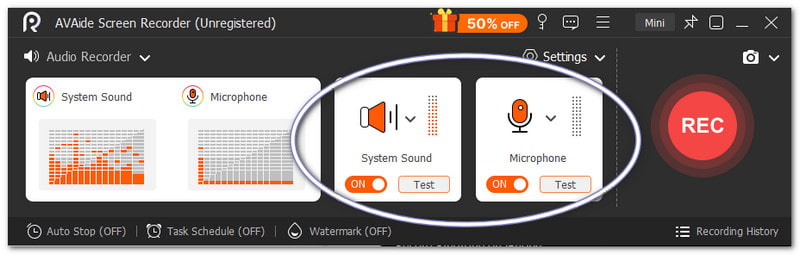
Pasul 3Porniți Sunet de sistem pentru a înregistra sunetul intern. Porniți Microfon dacă doriți să fie adăugată și vocea dumneavoastră. De asemenea, puteți regla fin volumul, dacă este necesar.
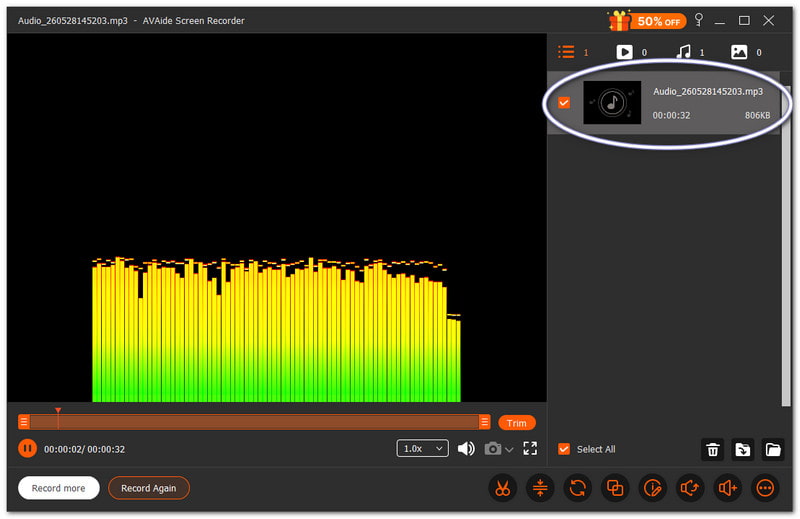
Pasul 4Lovit REC pentru a începe și așteptați numărătoarea inversă. Odată ce a început, redați sunetul dorit. Apăsați butonul Stop butonul odată ce ați terminat. După aceea, fișierul se salvează automat. Dar îl puteți decupa sau edita înainte de a-l utiliza ca ton de apel.
Nu există nicio îndoială că acest Mac și Înregistrator audio Windows te poate ajuta să creezi un ton de apel pe care îl dorești și pe care îl preferi pentru dispozitivul tău.
Partea 4. Pași specifici Samsung
1. Utilizarea înregistratorului de ecran încorporat
Samsung Screen Recorder captează sunetul din videoclipuri și ajută la transformarea sunetelor înregistrate în tonuri de apel utilizabile.
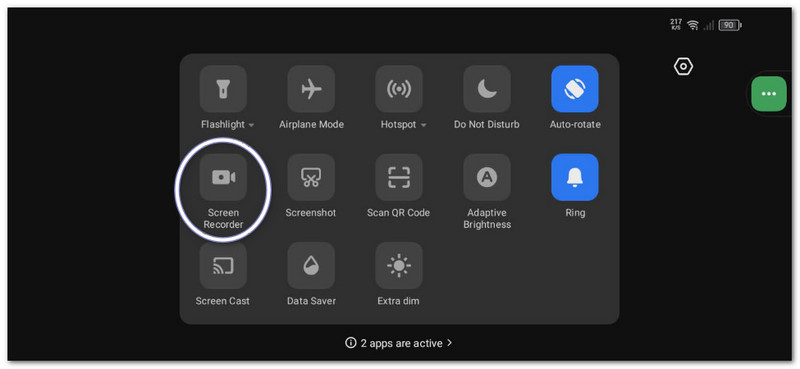
Pasul 1În Panou rapid, glisați în jos. Apăsați butonul Screen Recorder butonul. Înainte de a începe, selectați Sunete media.
Pasul 2Redați videoclipul sau muzica pe care doriți să o capturați. Lăsați înregistratorul de ecran să o înregistreze cu sunet.
Pasul 3Oprește înregistrarea după ce ai terminat. Fișierul va fi stocat în galeria ta. Folosește o aplicație de conversie video în MP3 pentru a extrage sunetul.
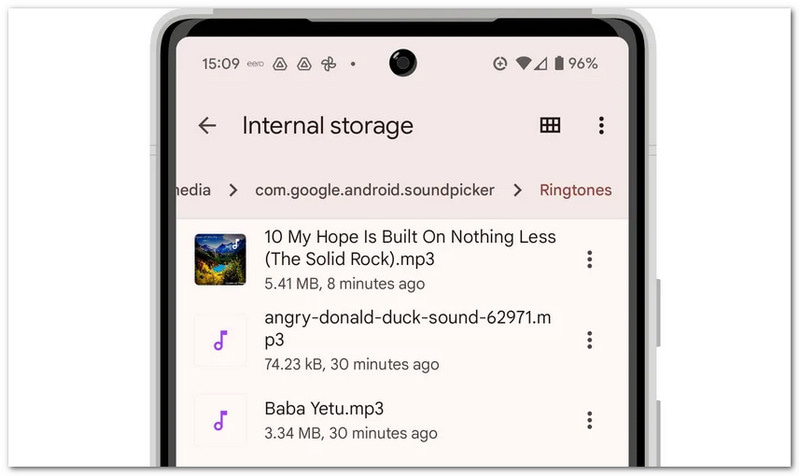
Pasul 4Mutați fișierul MP3 pe Stocare internă > Dosarul Tonuri de apel astfel încât să poată fi folosit ulterior.
Această metodă arată Înregistrare ecran SamsungAșadar, asigurați-vă că convertiți înregistrarea video doar în format audio, astfel încât să poată fi folosită ca ton de apel.
2. Creator de tonuri de apel încorporat
Setările tonului de apel Samsung permit utilizatorilor să aleagă melodii, să decupeze momentele importante și să le atribuie instantaneu ca ton de apel implicit al telefonului.
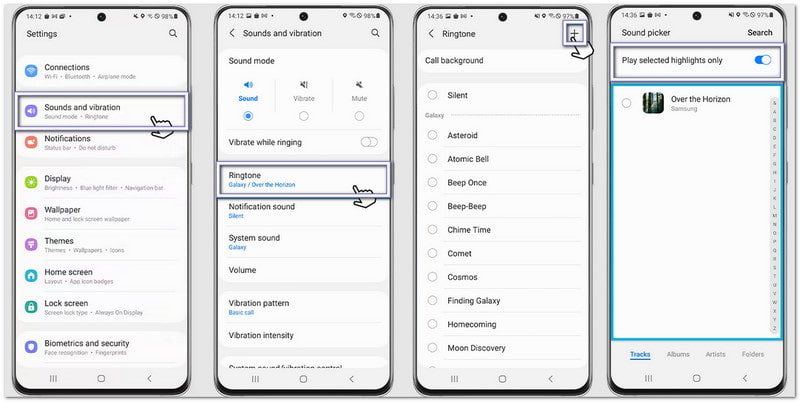
Pasul 1Deschide telefonul și mergi la Setări. Robinet Sunete și vibrații. Apoi, selectați Ton de apel.
Pasul 2Apasă pe Adăuga și selectați o melodie sau o înregistrare salvată de pe telefon.
Pasul 3Permite Redă doar momentele importante selectate dacă este disponibil. Samsung va decupa automat cea mai bună parte a sunetului.
Pasul 4Confirmați selecția, iar sunetul va fi acum setat ca ton de apel implicit.
3. Metoda Managerului de Fișiere
Managerul de fișiere Samsung organizează fișierele audio și permite copierea directă în folderul Tonuri de apel pentru detectarea automată a tonului de apel.
Pasul 1Lansați Fișierele mele aplicație pe telefonul tău Samsung.
Pasul 2Mergi la Descărcări sau Audio folder. Localizați sunetul înregistrat sau descărcat.
Pasul 3Apăsați lung fișierul. Atingeți CopieApoi, mergeți la Stocare internă > Tonuri de apel.
Pasul 4Lipiți fișierul în folderul Tonuri de apel. Apoi, reveniți la setările Sunet. Fișierul dvs. va apărea acum în lista de tonuri de apel.
Partea 5. Sfaturi profesionale pentru cele mai bune rezultate
Înainte de a seta tonul de apel, este util să urmați câteva sfaturi simple. Acestea vor face ca tonul de apel să sune clar și să funcționeze mai bine pe telefon.
Sfat #1: Fii scurt.
Setează-ți tonul de apel să dureze doar 30-40 de secunde. Îl menține fluid și complet compatibil cu telefoanele Android.
Sfat #2: Folosește formatul corect.
Folosește fișiere MP3 sau M4A atunci când este posibil. Aceste formate funcționează bine pe majoritatea dispozitivelor Android fără erori.
Sfat #3: Verificați mai întâi volumul.
Redă tonul de apel înainte de a-l seta. Asigură-te că nu este nici prea tare, nici prea încet. Te ajută să eviți surprizele când cineva te sună.
Ai invatat cum să înregistrezi un ton de apel pe un iPhone, Android și un desktop. Așadar, indiferent de dispozitivul pe care îl utilizați, vă puteți crea oricând propriul ton de apel personalizat.
Pentru utilizatorii de Windows și Mac, AVaide Screen Recorder simplifică procesul. Poți să-ți înregistrezi propria voce sau să captezi sunet din sistem. De asemenea, poți tăia fișierul după înregistrare. Te ajută să păstrezi doar cea mai bună parte pentru tonul de apel.
DESPRE AUTOR

Capturați activități pe ecran cu sunet, întâlniri online, videoclipuri de joc, muzică, cameră web etc.
Inregistrare audio
- Înregistrați audio de pe computer
- Cel mai bun software de înregistrare audio
- Înregistrați apelurile iPhone
- Studioul de înregistrări FL
- Cum să înregistrezi podcast
- Descărcați Soundgasm
- Descărcați melodii Audiomack
- Salvează muzică de pe Deezer
- SoundCloud în MP3
- Descărcați X Space Audio
- Descărcare gratuită de muzică