PNG files can store images with transparent backgrounds. This helps keep edges smooth and shapes clean. It is particularly for logos, product images, and on-screen graphics where accuracy is crucial. Numerous individuals are in trouble due to wrongly saved files or wrong steps being concealed in the common tools. A web-based PNG transparent maker assists in the easier handling of background removal and the export options. This article defines what a transparent background PNG is and when to use it. It then uses free web tools and obvious procedures in Canva, Photoshop, Procreate and Paint.
- Part 1: What Is a Transparent Background PNG?
- Part 2: The Easiest Way to Make a Transparent PNG Free Online
- Part 3: How to Make a Transparent PNG with Canva
- Part 4: How to Make a Transparent PNG with Photoshop
- Part 5: How to Make a Transparent PNG with Procreate
- Part 6: How to Make a Transparent PNG with Paint
- Part 7: Why Do You Need to Make a PNG Background Transparent?
Part 1: What Is a Transparent Background PNG?
A PNG file with a transparent background lacks the background colour, and the space behind the content is entirely clear. However, unlike typical images, which are filled with color in every pixel, a transparent PNG lets whatever the image is covering, like a website, a document, a piece of a design, etc. to be visible. It is especially useful for logos, icons, and graphics that need to look clean and professional in different contexts.
To achieve this effect, you can use a tool or software to make a PNG transparent. Removing the background ensures the image integrates seamlessly with any layout without clashing with colors or design elements.
Part 2: The Easiest Way to Make a Transparent PNG Free Online
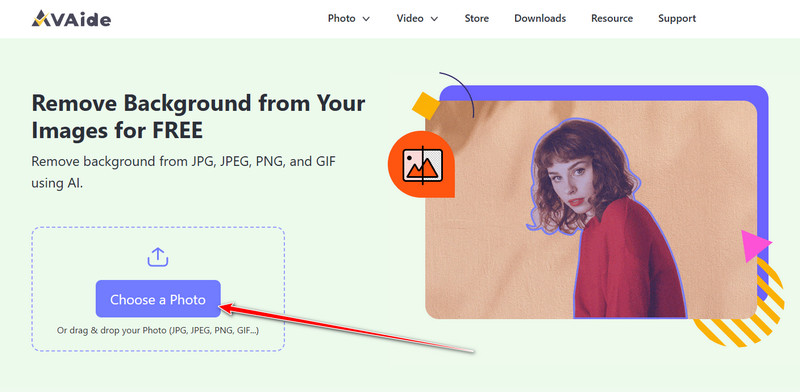
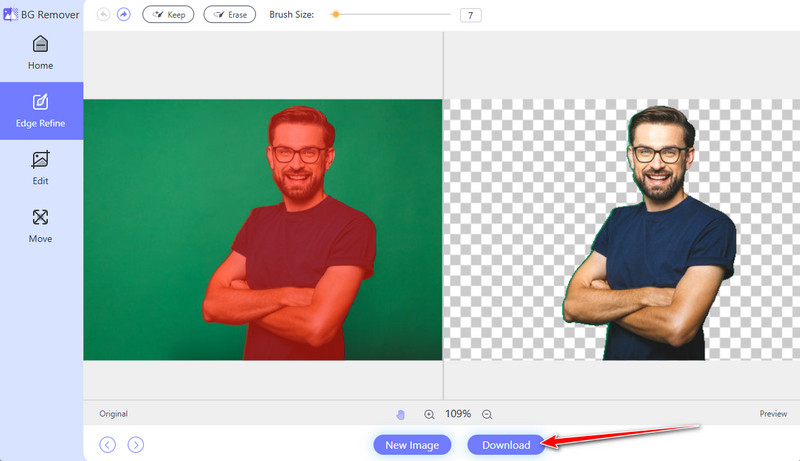
AVAide Background Eraser is a reliable online tool to create transparent PNG images without installing any software. It is an artificial intelligence instrument that can automatically recognize the subject of your photo and blur out the background in every detail. The tool supports PNG files as well as other popular image formats, allowing you to export clean images quickly. You can refine the automatic selection with the brush tool to mark areas to keep or remove. Its intuitive interface makes uploading, editing, and downloading straightforward.
Step 1Visit the AVAide Background Eraser website and click Choose a Photo to upload your image. Select the PNG file you want to make transparent.
Step 2The AI will highlight the subject and remove the background automatically. Use the brush tool to adjust areas you want to keep if needed.
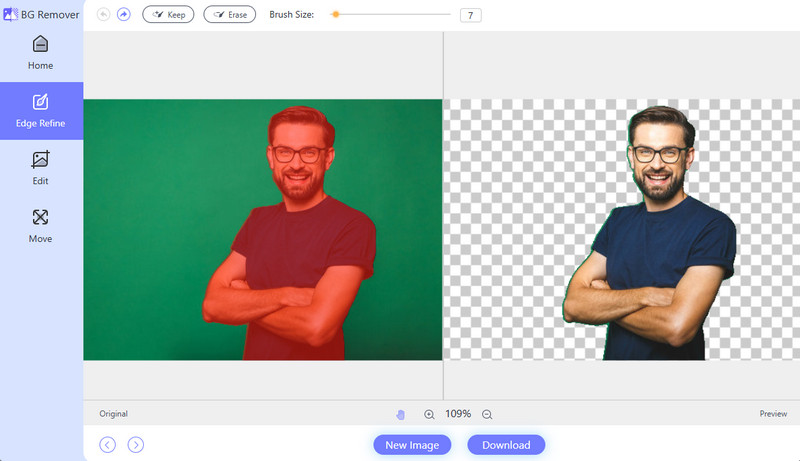
Step 3Preview the image to ensure the background is fully removed, then click Download to save the file to your device for free with no watermark.
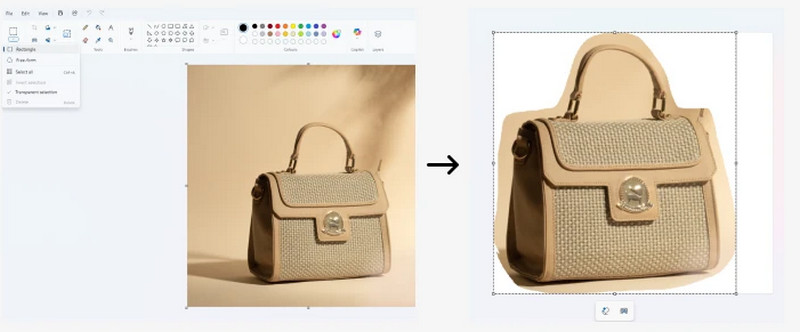
Part 3: How to Make a Transparent PNG with Canva
Canva makes it easy to create a PNG to PNG transparent image by removing the background from your design. It ensures that the main subject remains sharp while the background is fully clear. Transparent PNGs are perfect for logos, icons, product images, and graphics that need to blend seamlessly into websites, social media, presentations, or other designs. Using its built-in tools preserves clean edges and high-quality detail, making your images look professional and versatile.
Step 1Log in to your Canva account and upload the PNG file you want to edit. Drag the uploaded image onto your design canvas.
Step 2Click on the image to select it. A toolbar will appear at the top of the editor. Click the Edit Photo button on the toolbar.
Step 3Select the Background Remover option. Its AI will automatically detect the subject and remove the background, usually within a few seconds.
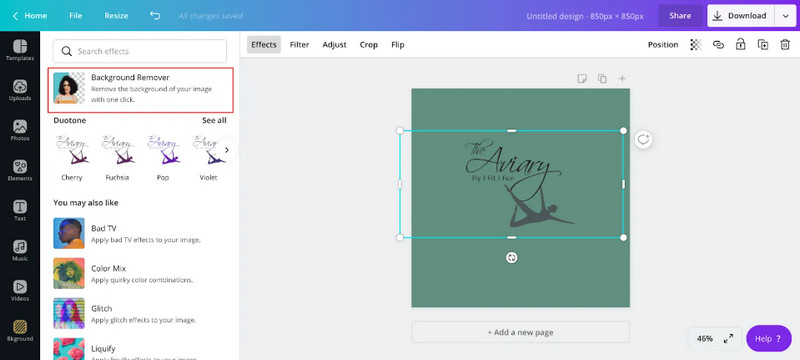
Step 4Once the background is removed, export the image in PNG transparent format to keep the background clear and clean edges. If you have a HEIC file, you can upload it here and turn HEIC to PNG quickly with the removed background, as long as you follow the steps.
Part 4: How to Make a Transparent PNG with Photoshop
Photoshop is a professional image editor that gives you full control when you create a transparent background PNG. It is ideal for logos, product shots, and other graphics that need crisp, clean edges and high quality.
Completing it with its own support page that shows how to remove backgrounds and isolate subjects in just a few steps using Quick Actions or selection tools, all while preserving transparency for export. Plus, you can resize PNGs quickly with its extensive editing feature.
Step 1Open your logo or image in Adobe Photoshop. It should be the file with the background you want to remove.
Step 2Create a new layer and place it below your image layer. This layer will act as the transparent background.
Step 3Use the Lasso or Magic Wand tool to click on the background area you want to remove. Adjust the tolerance if needed to select more or less of the background.
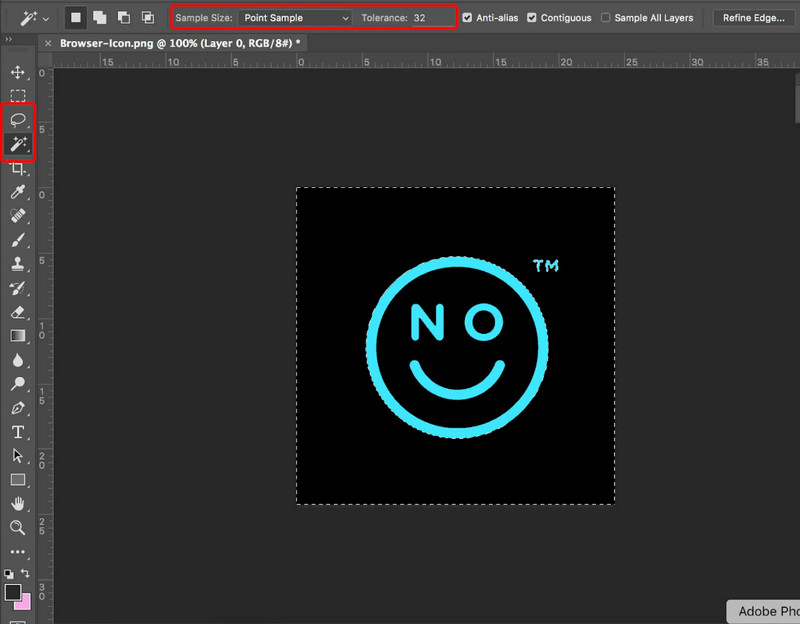
Step 4Push the Delete key to remove the selected area. A gray and white checker pattern will appear, showing that the background is now transparent. Repeat this step if there are other background areas to remove.
Step 5Click File > Save As, choose PNG as the file format, and make sure the image is saved in RGB color mode. It keeps the transparent background PNG when you export the file.
Part 5: How to Make a Transparent PNG with Procreate
Procreate allows you to turn artwork into a PNG to transparent file by hiding the background color layer before exporting. This method works well for illustrations, stickers, and custom graphics that need a clear background for other designs.
Step 1Hit the Layers button in the top right corner of the screen to open the Layers panel.
Step 2Scroll to the last of the Layers panel and find the Background Color layer. Uncheck the box next to it to hide the layer. The canvas will show a grid pattern, which means the background is now transparent.
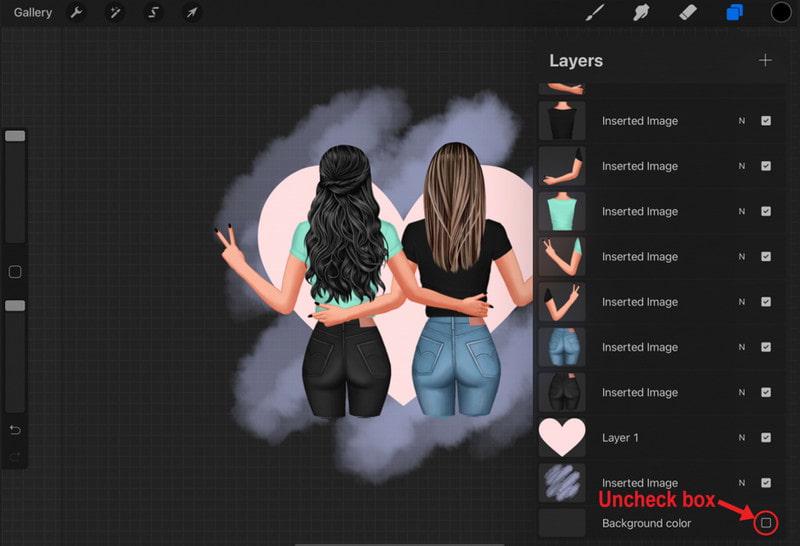
Step 3Tap the wrench button to open the Actions panel, then tap Share. Choose PNG under the image or layer options and select where you want to save the file.
Part 6: How to Make a Transparent PNG with Paint
Microsoft Paint provides a simple means of treating transparency, whereby the subject of an image is cut instead of removing the background. It is suitable when dealing with simple pictures with solid backgrounds and obvious edges, e.g., icons or basic product pictures. Paint is often used when no advanced design software is available and when converting JPG to PNG transparent images for simple projects.
Step 1Open Microsoft Paint and load your image by clicking File > Open. Click the Select button in the top menu and enable the Transparent selection option. This allows the background to remain clear when the image is moved.
Step 2From the Select menu, choose Free-form selection. This tool lets you draw around the subject without being limited to a fixed shape.
Step 3Carefully click and drag around the object you want to keep. The selected area will be protected while the rest of the image is excluded.
Step 4Right-click the selected area and choose Cut. It removes the subject from the original background. Open a new Paint window and paste the cut-out image. Save the file as a PNG to complete the process and preserve the transparent background.
Part 7: Why Do You Need to Make a PNG Background Transparent?
Converting a PNG to a transparent background offers several benefits. It allows images to blend seamlessly into any design, giving logos, icons, and graphics a clean, professional look.
1. Seamless Integration
Clear pictures could be put on any background, color color or pattern without conflicting, and this makes them ideal for websites, presentations and social media.
2. Professional Appearance
The elimination of the background makes logos, icons and graphics look neat and clean, which is distinct.
3. Easy Layering
Transparent PNGs enable designers to stack several elements and not to blocking or interfering with one another.
4. Versatile Usage
Transparent images can be reused in various other projects, such as marketing materials, slideshows, merchandise and print designs.
5. Simplified Editing
When the background is clear, it is easier to edit, resize, or recolor and have a greater amount of control over your design.
6. Optimized File Management
Eliminating the irrelevant background colours makes your files small and versatile, as far as the web or print is concerned.
The transparent PNG creator enables one to easily cut the background without degrading the quality of your pictures, and it gives them a professional feel. Tools allow you to make sterile, versatile PNGs, which are suitable for websites, social media, presentations, and print. The background elimination will make your logos, icons and graphics appear clean, and they will fit perfectly into any design.
ABOUT THE AUTHOR


Uses AI and automated background removal technology to capture complex backgrounds from JPG, JPEG, PNG, and GIF.
PROCESS NOW