팟캐스트 녹음 소프트웨어 팟캐스트를 처음 시작하려고 마음먹었지만 음질이 좋지 않거나, 배경 소음이 심하거나, 녹음 도구가 복잡해서 어려움을 겪고 있다면 이 가이드가 필수적입니다. 혼자 진행하는 에피소드, 원격 인터뷰, 아이폰 팟캐스트 등 어떤 종류의 팟캐스트를 계획하든, 이 가이드는 전문적인 품질의 팟캐스트 에피소드를 제작하는 데 필요한 장비, 녹음 방법, 실용적인 도구들을 다룹니다.
파트 1. 팟캐스트 녹음에 필수적인 장비
마이크: 가장 중요한 투자
팟캐스트의 음질은 사용하는 마이크의 품질에 직접적으로 비례합니다. 균형 잡힌 음질과 선명한 사운드는 청취자의 몰입도를 높이고 전문적인 팟캐스트 제작에 필수적입니다.
1. USB 마이크
USB 마이크는 사용이 매우 간편하며, 기기에 직접 연결하여 간단한 팟캐스트 제작을 지원합니다. 따라서 온라인 인터뷰나 홈 스튜디오 구축에 적합하여 초보자에게 특히 좋습니다.
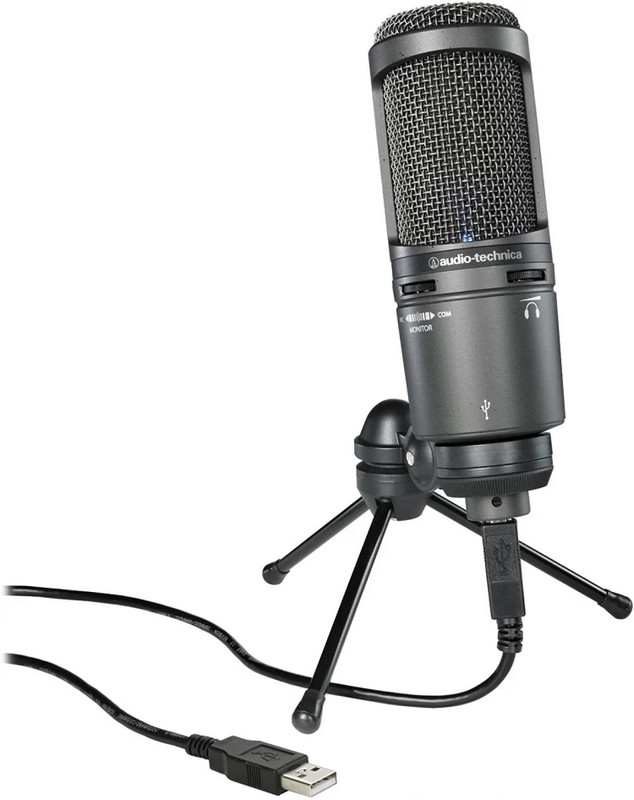
일반적인 USB 마이크는 다음과 같습니다.
- 블루 예티
- 오디오테크니카 AT2020USB+
- Rode NT-USB
2. XLR 마이크
XLR 마이크는 USB 마이크와는 정반대입니다. 뛰어난 음질의 오디오 입력과 오디오 사운드에 대한 정밀한 제어 기능을 제공합니다. 고급 팟캐스팅 환경을 구축하는 데 있어 훌륭한 투자입니다. USB 마이크와 달리 XLR 마이크는 오디오 인터페이스나 믹서가 필요합니다.

일반적인 XLR 마이크는 다음과 같습니다.
- 슈어 SM7B
- 로드 포드마이크
- 일렉트로-보이스 RE20
오디오 인터페이스 (XLR 마이크용)
오디오 인터페이스는 XLR 마이크와 완벽한 조합을 이룹니다. 녹음 품질을 향상시키고 오디오를 컴퓨터가 이해할 수 있는 디지털 형식으로 변환해 줍니다. 이 과정을 통해 녹음 시 발생하는 노이즈를 상당 부분 제거하고, 더 나아가 다음과 같은 기능까지 제공합니다. 녹음하는 동안 음악을 재생하세요.
몇 가지 괜찮은 오디오 인터페이스는 다음과 같습니다.
- 포커스라이트 스칼렛 2i2
- PreSonus AudioBox USB 96
- 유니버설 오디오 볼트 2
헤드폰
고품질 밀폐형 헤드폰을 사용하면 녹음 중 오디오를 모니터링하고 마이크로 유입되는 에코를 제어할 수 있다는 장점이 있습니다.
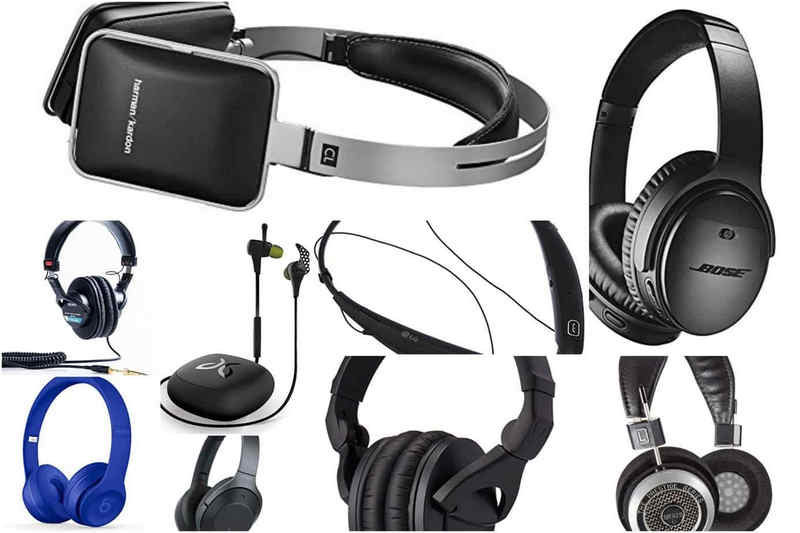
훌륭한 팟캐스트용 헤드폰 몇 가지:
- 오디오테크니카 ATH-M50x
- 소니 MDR-7506
- 베이어다이나믹 DT 770 프로
부속품
녹음 시 편안함과 음질을 향상시키는 데 필수적인 구매 품목 중 하나는 추가 액세서리입니다.

- 팝 필터: 이것들은 P나 B 같은 글자가 내는 거친 팝핑 소리를 줄이기 위해 사용됩니다.
- 붐 암: 이 제품들은 마이크를 안정적으로 고정시켜 줄 뿐만 아니라 책상 공간도 확보해 줍니다.
- 방음 폼 패널: 이 제품들은 공간의 음향을 개선하는 동시에 울림을 제어하는 데 매우 효과적입니다.
- 충격 흡수 장치: 충격 방지 마운트는 녹음 중 진동과 책상 소음을 최소화합니다.
파트 2. 최고의 팟캐스트 녹음 방법
방법 1: AVAide 화면 녹화기를 사용하여 팟캐스트 녹음하기
팟캐스트 녹음하기 AVAide 스크린 레코더 간단하고 안정적입니다. 화면, 웹캠, 오디오를 한 번에 캡처할 수 있는 최고의 프로그램 중 하나이며, 휴대폰 화면도 캡처할 수 있습니다. 이 소프트웨어는 지연 없이 작동하며 원격 인터뷰, 팟캐스트 세션, 반응 영상, 교육용 팟캐스트, 비디오 팟캐스트에 이상적입니다.
- 마이크와 시스템 오디오를 동시에 녹음합니다.
- 웹캠과 화면을 함께 캡처하여 비디오 팟캐스트를 제작합니다.
- 전체 화면, 창 모드 또는 사용자 지정 녹화 영역을 지원합니다.
- 녹화 중에 주석 도구를 제공합니다.
- MP4, MP3, AAC, FLAC 등 다양한 형식으로 녹음 파일을 내보낼 수 있습니다.

 안전한 다운로드
1 단계소프트웨어 다운로드 및 설치
AVAide 공식 웹사이트에 접속하여 Windows 또는 Mac 컴퓨터용 AVAide를 다운로드하십시오. 안내에 따라 소프트웨어를 설치하십시오.
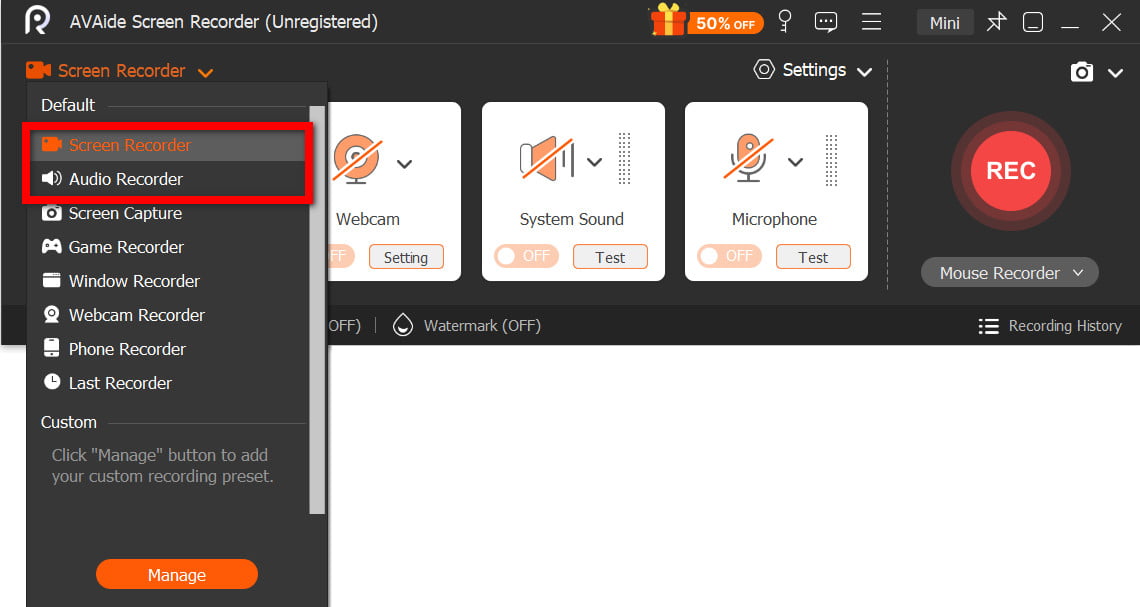
2 단계오디오 또는 비디오 레코더를 선택하세요
소프트웨어를 열고 다음 중 하나를 클릭하십시오. 녹음기 또는 스크린 레코더음성 전용 팟캐스트를 만들지, 영상 팟캐스트를 만들지에 따라 다릅니다.
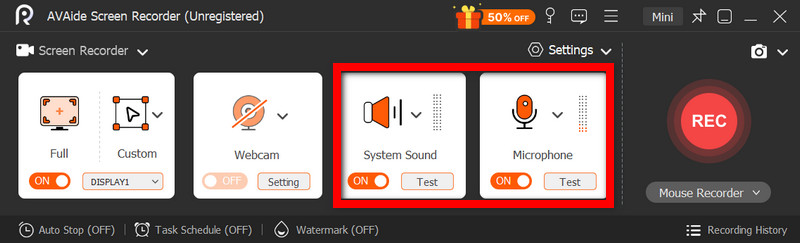
3단계마이크 및 시스템 소리를 켜세요
활성화 마이크로폰 당신의 목소리를 녹음하기 위해서입니다. 시스템 사운드 온라인 인터뷰, 음악 및 게스트 음성을 녹음할 수 있도록 설정해야 합니다.
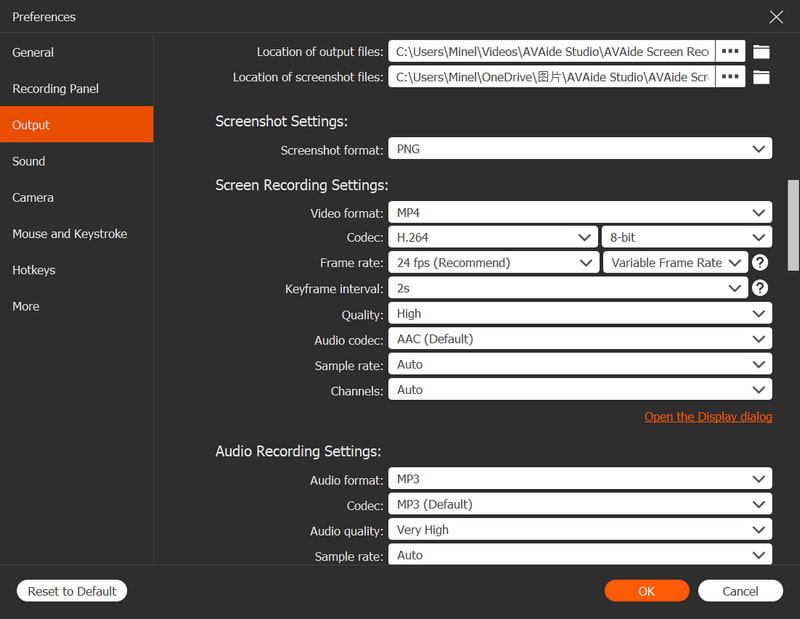
4단계녹화 환경설정
아래에서 원하는 오디오 형식과 음질을 선택하세요. 설정 메뉴에서 비디오 팟캐스트의 경우 녹화 영역과 웹캠 오버레이를 설정하세요.
5단계기록
그 후에 녹음 버튼을 누르면 팟캐스트 녹음이 시작됩니다. 언제든지 메모나 하이라이트를 추가할 수 있습니다.
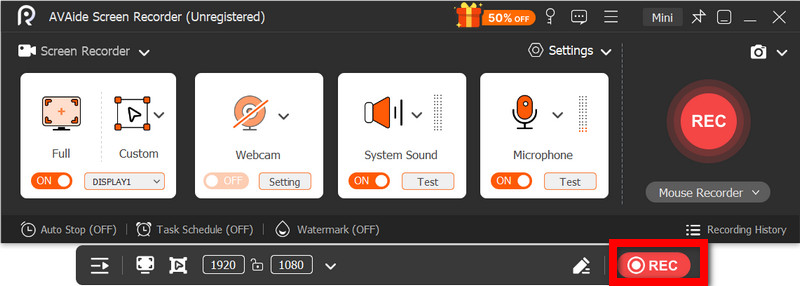
6단계저장 및 미리보기
타격 후 중지 이 버튼을 누르면 원치 않는 부분을 잘라낸 후 팟캐스트를 저장할 수 있습니다. 또한 작업물을 미리 볼 수도 있습니다.
방법 2: Audacity를 사용하여 팟캐스트 녹음하기
Audacity는 팟캐스팅용 오디오 녹음 및 편집에 가장 널리 사용되는 프로그램 중 하나입니다. 오픈 소스 코드로 개발된 무료 프로그램인 Audacity는 노이즈 제거, 오디오 효과, 멀티트랙 지원 등 유용한 기능을 통해 오디오를 녹음하고 편집할 수 있도록 해줍니다. 이러한 기능들을 활용하면 Audacity로 전문가 수준의 팟캐스트 녹음을 빠르고 쉽게 제작할 수 있습니다.
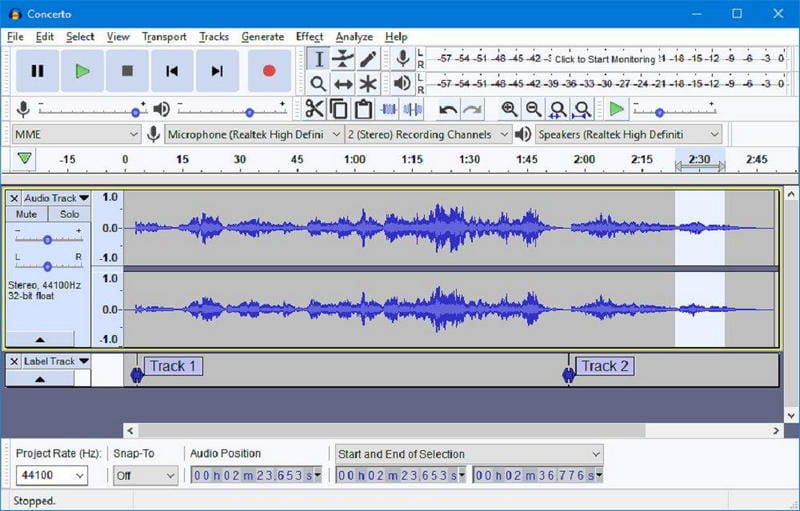
1 단계Audacity 공식 웹사이트에서 Audacity를 다운로드하여 개인용 컴퓨터에 설치하세요.
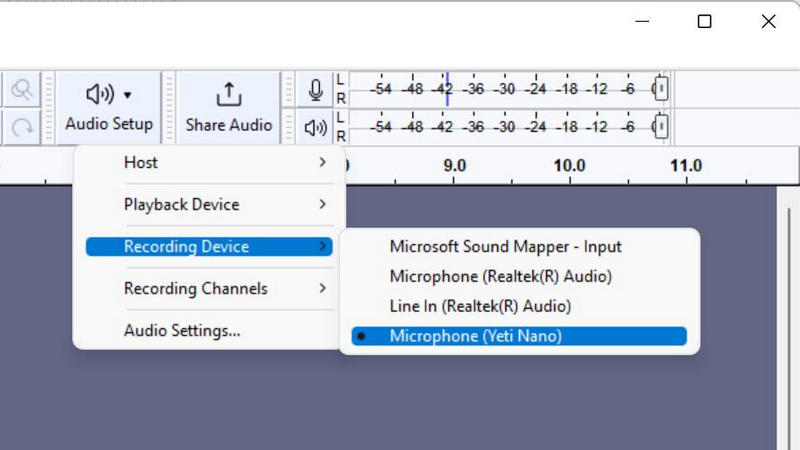
2 단계USB 또는 XLR 마이크를 사용하고 Audacity에서 녹음 장치로 설정하십시오.
3단계팟캐스트에 필요한 녹음 채널과 음질을 설정하세요.
4단계클릭 기록 버튼을 누르고 마이크에 대고 내용을 말하세요.
5단계 Audacity 편집 도구를 사용하여 팟캐스트에서 오류를 수정하고, 인트로 음악을 추가하거나, 음향 효과를 삽입하세요.
6단계팟캐스트 오디오를 MP3 또는 WAV 파일로 내보내 저장하세요.
방법 3: Adobe Audition으로 팟캐스트 녹음하기
Adobe Audition을 사용하면 팟캐스트에 더욱 전문적인 품질의 오디오를 구현할 수 있습니다. Adobe Audition은 노이즈 감소 및 오디오 복원과 같은 고품질 팟캐스트 오디오 편집에 필요한 훌륭한 기능을 제공합니다. 또한 뛰어난 멀티트랙 편집 기능도 갖추고 있습니다.
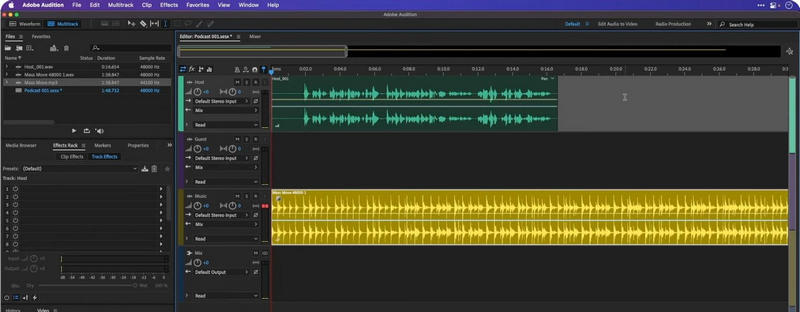
1 단계 어도비 공식 웹사이트에서 어도비 오디션을 다운로드하여 기기에 설치하세요.
2 단계 프로그램을 열고 새 멀티트랙 팟캐스트 세션을 생성 및 설정하세요.
3단계사용 오디오 하드웨어 마이크와 헤드폰을 선택하는 설정입니다.
4단계녹음할 오디오 트랙을 선택하세요.
5단계팟캐스트 세션을 시작하려면 클릭하세요. 기록 단추.
6단계Adobe Audition 편집 도구를 사용하여 팟캐스트 세션을 편집하면 완료됩니다.
파트 3. 원격으로 팟캐스트를 녹음하는 방법
Riverside.fm은 원격 팟캐스트 녹음에 가장 적합하고 신뢰할 수 있는 사이트 중 하나입니다. 인터넷을 통해 오디오와 비디오를 녹음하는 대신, 각 하드웨어에 고품질의 로컬 오디오 및 비디오를 녹음합니다. Riverside.fm은 인터넷 연결이 불안정한 상황에서도 선명한 녹음을 제공하고 다른 도구들과도 잘 연동되기 때문에 비디오 팟캐스트, 웨비나, 온라인 토크쇼, 인터뷰 등에 매우 유용한 도구입니다. 맥용 최고의 화면 녹화 프로그램 백업 또는 녹화 지원을 위해.
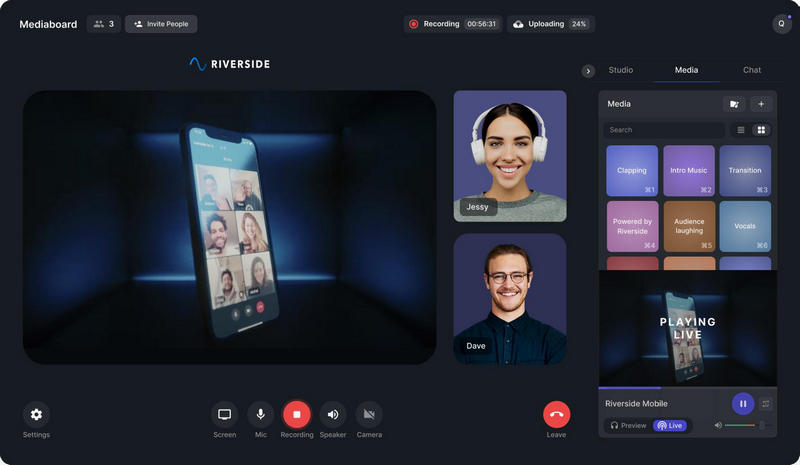
1 단계Riverside.fm 사이트에 접속하여 계정을 만드세요. 가입 후 스튜디오에 로그인하세요.
2 단계클릭 크리에이트 스튜디오 버튼을 클릭하고 팟캐스트 설정을 선택하세요. 음성 전용 팟캐스트 또는 영상 팟캐스트 중 어떤 것을 녹음할지 결정하세요.
3단계팟캐스트 게스트에게 초대 링크를 보내세요. 게스트는 웹 브라우저를 통해 참여할 수 있으며, 별도의 소프트웨어를 다운로드할 필요가 없습니다.
4단계스튜디오에 들어가기 전에 원하는 마이크, 헤드폰, 웹캠을 선택하고, 스튜디오를 떠나기 전에 오디오를 테스트하여 기술적인 문제가 없는지 확인하십시오.
5단계준비가 되면 클릭하세요 기록 버튼. Riverside.fm은 모든 오디오와 비디오를 고품질로 로컬에서 캡처합니다.
파트 4. 아이폰으로 팟캐스트 녹음하는 방법
GarageBand는 내장 음성 메모 앱 이상의 기능을 원하는 많은 iPhone 사용자에게 최고의 팟캐스트 녹음 앱입니다. 멀티트랙 녹음, 음향 효과, 배경 음악 추가는 물론, 다양한 편집 도구까지 제공합니다.
1 단계GarageBand를 다운로드하려면 App Store로 이동하여 iPhone에 이미 설치되어 있는지 확인하세요. 설치되어 있지 않다면 설치하세요.
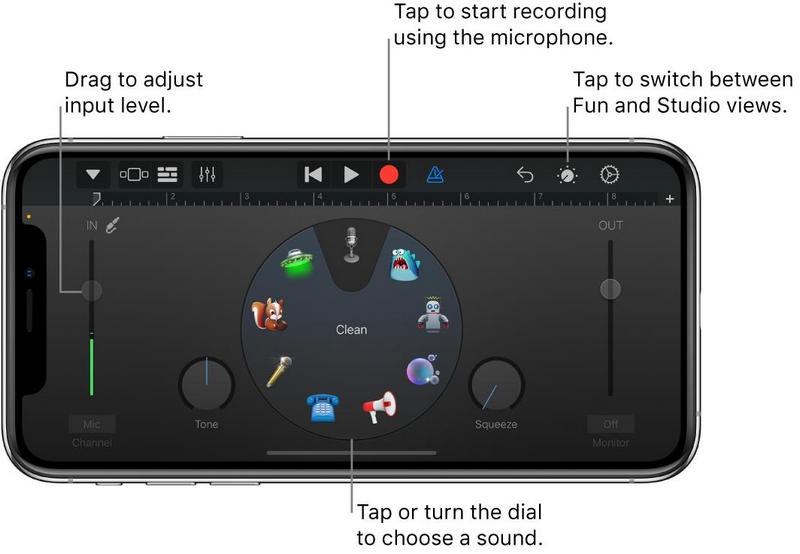
2 단계GarageBand를 실행한 후 다음을 선택하세요. 녹음기 사용 가능한 녹음 도구 중에서.
3단계외부 마이크를 사용하면 팟캐스트가 훨씬 더 전문적으로 들릴 것입니다. 음질도 더 선명해지고, 잡음도 줄어들 것입니다.
4단계모니터링은 마이크가 포착하는 소리의 크기를 확인하고 소리가 깨끗하고 압축되지 않았는지 확인하는 데 유용합니다.
5단계팟캐스트 녹음을 바로 시작하려면 해당 버튼을 탭하세요. 기록 버튼을 누르면 녹화가 일시 정지되고, 일시 정지를 해제하면 다시 시작됩니다.
6단계GarageBand의 자르기 기능을 사용하면 실수를 편집하거나 음량을 조절할 수 있습니다. 또한 음악을 추가할 수도 있습니다.
7단계오랜 시간 연습하고 녹음하고 편집한 팟캐스트를 아이폰에 저장하고 공유할 수 있습니다.
설정 중 팟캐스트를 녹음하다 적절한 장비와 소프트웨어만 있으면 팟캐스트 제작은 편리합니다. 컴퓨터에서, 게스트와 함께 원격으로, 또는 좋은 장비를 사용하면 아이폰에서 직접 녹음하여 매번 고품질의 팟캐스트를 제작할 수 있습니다.
저자 소개

오디오, 온라인 회의, 게임 플레이 비디오, 음악, 웹캠 등으로 화면 활동을 캡처합니다.