Minecraft is one of the most well-known games today, with over 151 million daily active users. With it being available on different platforms like PlayStation, PC, Xbox, and phones, you could think that it is special because of the things you can do in the game world. While here, you can farm, play with other friends, hunt for the best treasures, and even create your own world, and you would want to capture these important highlights. Depending on the platform you use, taking Minecraft screenshots is as easy as this article gathered methods you could use. So, hop in and let's get started.
Part 1. How to Take a Screenshot in Minecraft
Minecraft has two PC versions that have different ways to capture in-game photos. Check Java and Bedrock editions and learn how to screenshot in Minecraft on PC.
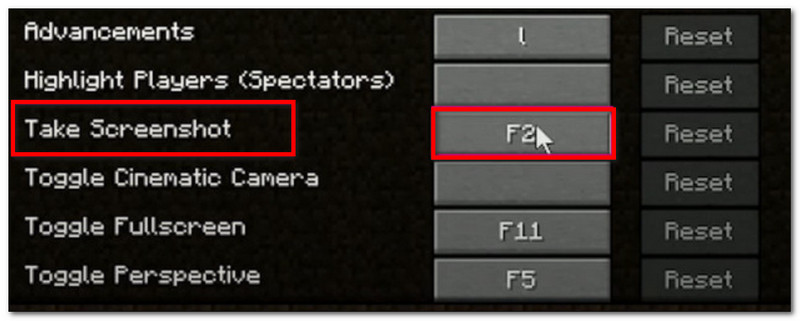
1. Java Edition - The Classic F2 Method
This edition of Minecraft is the original computer-based version of the game, and it has a built-in screenshot feature you can use. Here's how to screenshot Minecraft Java:
ステップ1Prepare the part of the game you want to capture, then press F2 キーボードで。

ステップ2When a message with a file name appears, click on it to preview the screenshot.
2. Bedrock Edition - Two Different Methods
The Bedrock edition highlights cross-device play on various platforms. This means even if you are using a PC, you can play with friends who use different devices. With that said, there are two popular screenshot methods in this edition.
Method A (Xbox Game Bar)
ステップ1プレス ウィンドウズ + G simultaneously on your keyboard. Your screen will dim, then click the カメラ icon to take a screenshot.
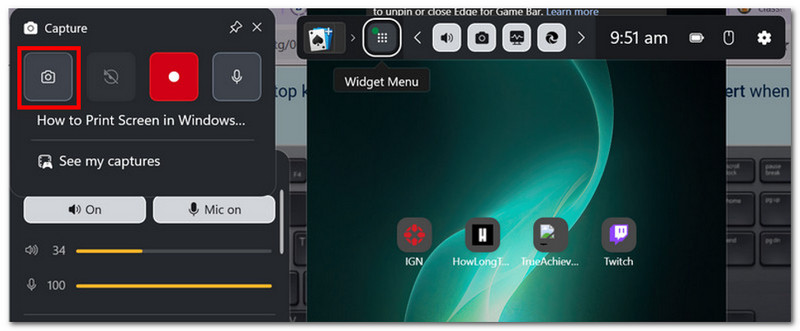
ステップ2You can access the Minecraft screenshot folder from ビデオ >> キャプチャ, where photos taken by Game Bar are located.
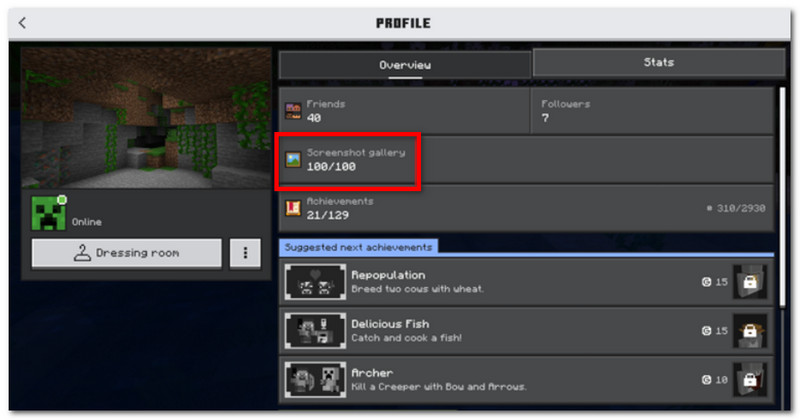
Method B (In-Game Camera)
ステップ1Open Minecraft and enter a world. Click the Minecraft screenshot button or F2 on the screen to capture.
ステップ2To find the Minecraft screenshot location, simply go to プロフィール そして開く Screenshot Gallery.
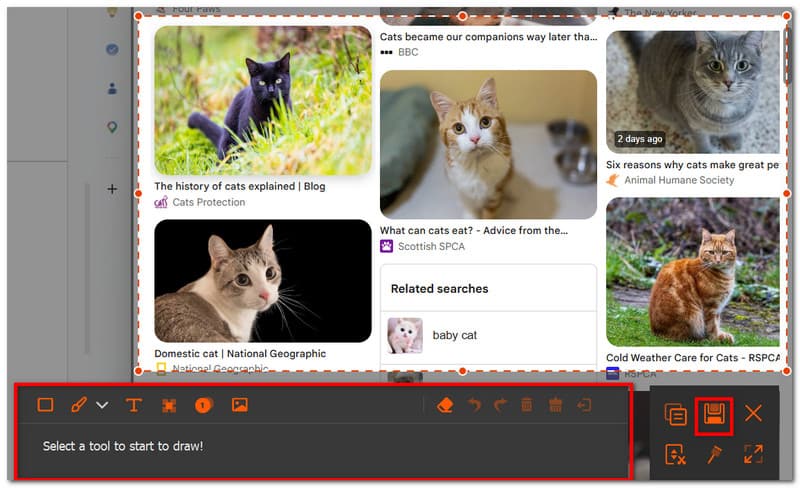
3. AVAide Screen Recorder
AVAideスクリーンレコーダー is an alternative tool to use for Minecraft Java and Bedrock editions. It is an all-in-one solution, where you can take screenshots and do video and audio recordings. Its Screen Capture is an intuitive feature to take screenshots in different modes: Fullscreen, Active Window, and Freeform using customizable shortcuts. On the other hand, it allows you to export screenshots in popular image formats, including JPEG, PNG, and GIF. What makes AVAide the best alternative is the built-in editing option to edit screenshots with tools like drawing, annotation, and other elements. Not to mention, the software offers high-quality screen recording that is perfect for capturing your gameplay on devices like PC and mobile phones.
ステップ1Download and install the screen recorder. Open it and choose the 画面キャプチャ from the top left menu. Make sure that Minecraft is prepared on your computer.

 安全なダウンロード
ステップ2When your mouse cursor turns into a crosshair, select the area you want to capture. Press ESC if you want to exit the Screen Capture.

ステップ3Use the editing options to edit the picture. Then, click 保存する to save the screenshot on your device. The Minecraft screenshot directory would be AVAide Studio >> AVAide Screen Recorder.
Part 2. Where to Find Screenshots
Since Minecraft is available on almost any platform, you would wonder, 'Where are Minecraft screenshots saved?' This part will show the exact location of the folder of the screenshots once taken on the specific OS.
Windows 10/11 (Java Edition)
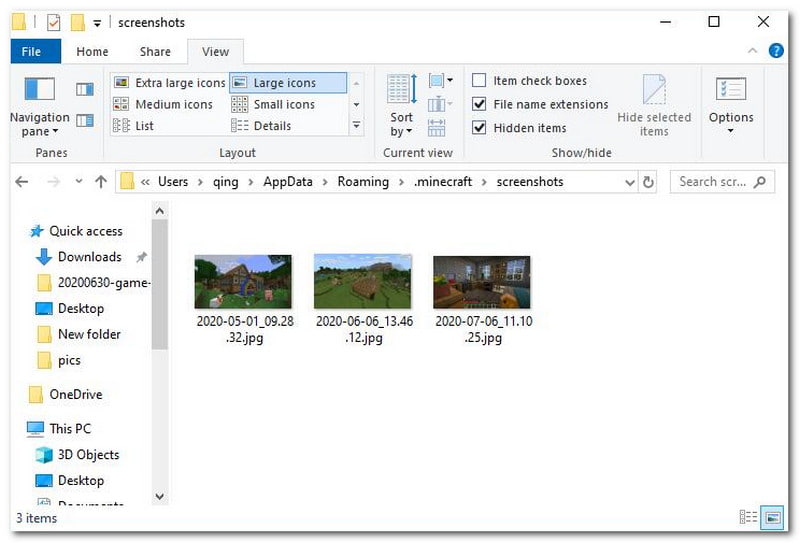
After taking the screenshot, you can access it from the chat. But if you missed it, go to the Search bar and type %アプリデータ%、次に .minecraft folder >> screenshots.
Windows 10/11 (Bedrock Edition)
The Minecraft screenshot gallery for Bedrock Edition on Windows can be found within the game, located on プロフィール >> Screenshot Gallery.
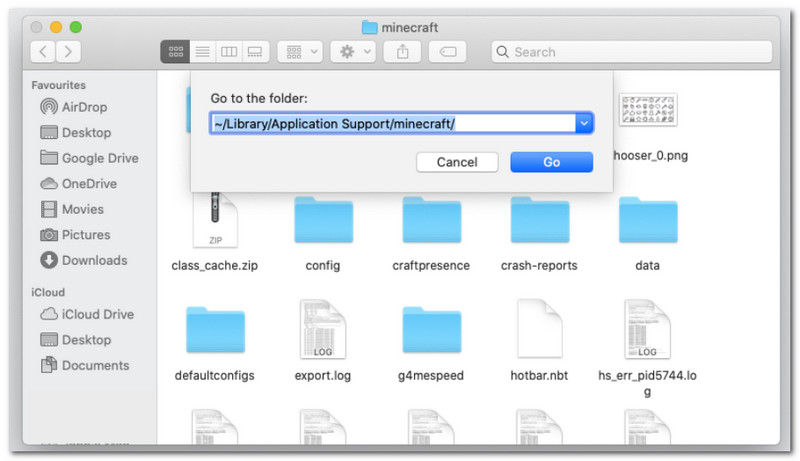
マック
If you play Minecraft and learn Macでスクリーンショットを撮る方法, it can be found in ~/Library/ApplicationSupport/minecraft/screenshots.
Linux
You can access the screenshots of the game from Minecraft's home directory ~/.minecraft/screenshots.
Chromebook
The Minecraft screenshot folder on Chromebook is the same as that from other OS when using the F2 method for taking screenshots. You can find the photos from the Screenshot Gallery in the game.
Part 3. Console & Mobile Screenshots
After learning how to find Minecraft screenshots on Windows 11 and other OS, you can also take screenshots on smaller devices and consoles. Follow the steps for the platform on which you play the game.
Nintendo Switch
ステップ1Use the left Joy-Con and press the カメラ button to take a screenshot of the game.
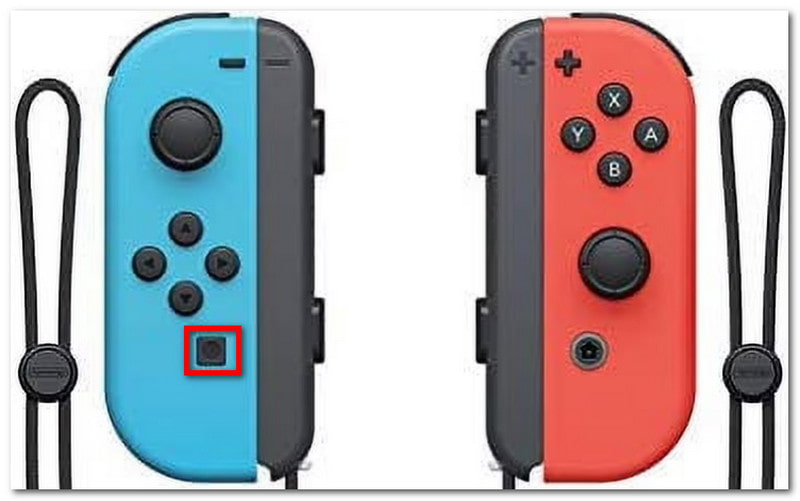
ステップ2To view the screenshot, exit the game and go to the アルバム where Minecraft screenshots are saved.
PlayStation
ステップ1How to take a Minecraft screenshot using PS4 DualShock 4? Press and hold the シェア button for about one second. If you have a PS5 DualSend, press the 作成 ボタン。
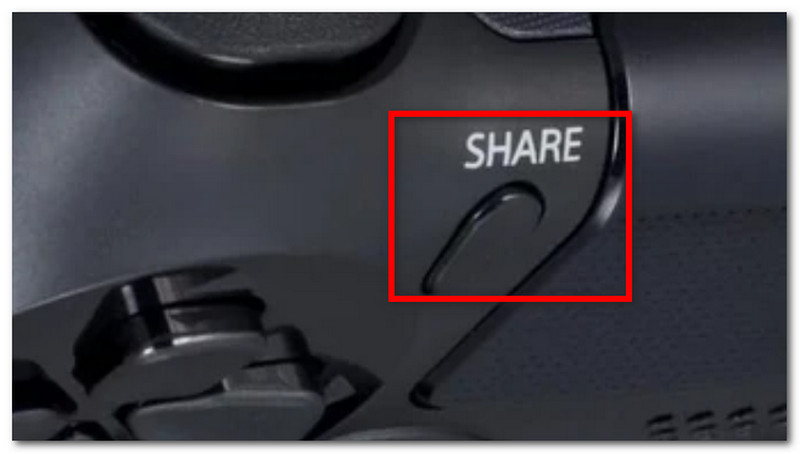
ステップ2You can view the screenshot by navigating to the キャプチャ ギャラリー app or using the PlayStation app to view on your phone.
Xbox
ステップ1For a standard Xbox controller, simply double-tap the Xbox button in the middle part and press Y to capture. For the Xbox Series, press the シェア button once to take a screenshot.
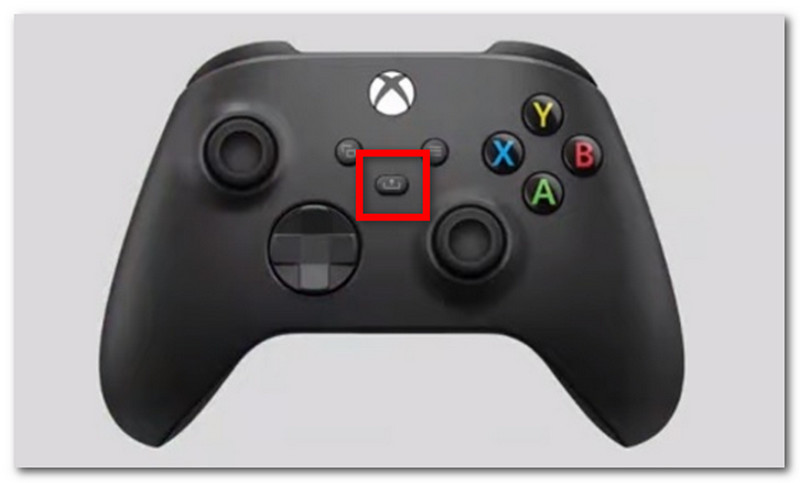
ステップ2If you're unfamiliar with how to access Minecraft screenshots, just press the Xbox ボタンを押して Capture & share タブ。
iOS
ステップ1を押します 力 と 音量を上げる buttons on your iPhone to take a screenshot.
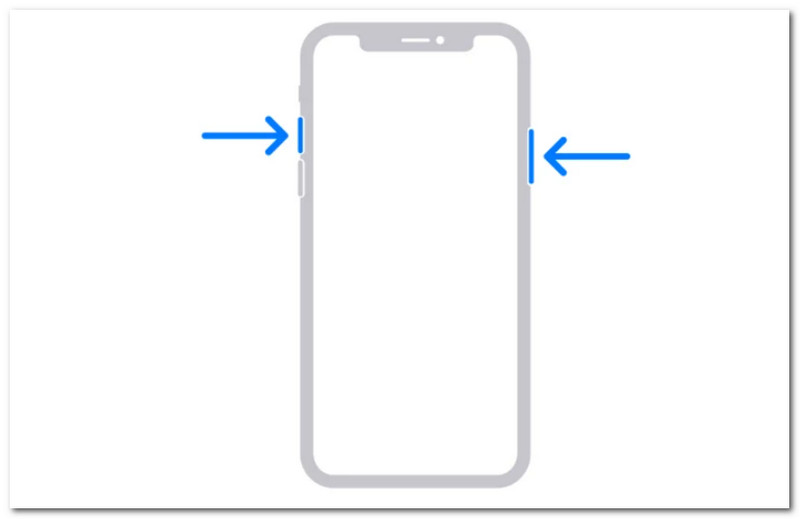
ステップ2How to find Minecraft screenshots on iPhone? You can locate the screenshots from the Photos app.
アンドロイド
ステップ1Prepare the game and the area you want to capture. Press and hold the 力 と 音量を下げる buttons on your phone.
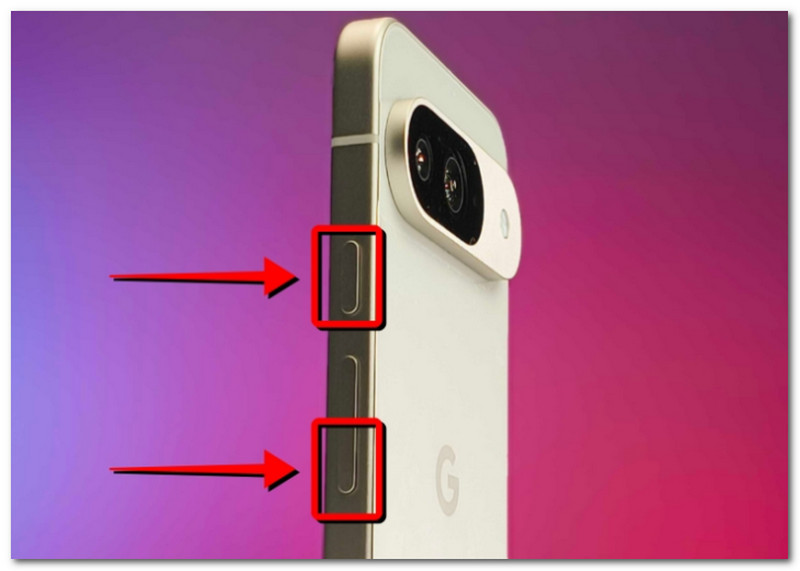
ステップ2When the screen flashes, the screenshot is ready, and you can locate it in the Gallery app.
Part 4. Managing Your Screenshot Collection
Other than sharing screenshots with your friends, you can also take this as an opportunity to track your world progression in Minecraft. But taking screenshots randomly will only lead to cluttered and confusing saved screenshots. If you don't know where to start, you can follow these basic rules to manage your screenshot collection.
1. Understanding File Names
When using the F2 method on Minecraft, it is important to understand the name, as it can help you define the date you took the screenshot. The default file name will be YYYY-MM-DD_HH.MM.SS.png, which translates to the year, month, day, hour, minute, and second when the screenshot was taken.
2. Create Subfolders
Don't leave your screenshots in one folder, as it will slow you down when finding specific screenshots. Make sure to create subfolders with categories like world-building, project, and function.
3. Rename Files
You can change the name of your Minecraft screenshots to identify them not only by the datestamp but through your actual progress in the game. Always pick a file name that highlights your development in Minecraft.
4. Backup Your Shots
To avoid losing the screenshots when your device crashes, make sure to back them up with a cloud service like OneDrive or an external hard drive.
5. Share Screenshots
After organizing, show off your Minecraft game progress on various platforms. Your viewers will appreciate the organized screenshots that track your game improvement.
Minecraft is a beloved game that anyone can enjoy, and learning how to take screenshots would allow you to save the highlights of your gameplay. This article not only shows the various methods for capturing the beautiful in-game world, but also shows how to view Minecraft screenshots on different platforms. For an alternative, this article recommends using AVAide Screen Recorder as it is flexible for taking screenshots on a computer, phone, and gaming consoles. Get one of the 最高のゲームレコーダー for free on Windows and Mac and begin the limitless game recording.
著者について

画面、オーディオ、ウェブカメラ、ゲームプレイ、オンライン会議、およびiPhone/Android画面をコンピューターに記録します。