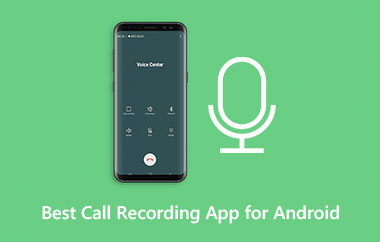
学びたいAndroidユーザー Androidで音声を録音する方法 この記事では必要なすべての簡単な方法を網羅しているので、あなたは正しい場所にいます。
本稿では、音声や環境音などの外部音声を録音する方法、および電話システムから内部音声をキャプチャする方法について解説します。また、よくある録音トラブルを解決するための基本的なトラブルシューティングガイドも掲載します。
パート1.外部音声の録音(音声と環境音)
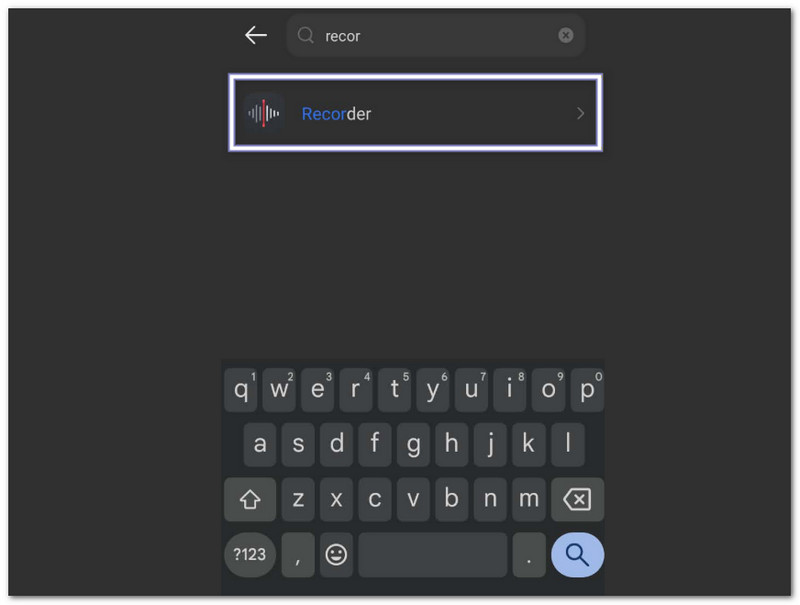
1. 内蔵ボイスレコーダーアプリを使用する
この方法は、ほとんどのAndroidスマートフォンに搭載されている基本的な機能を利用して音声を録音する方法を簡単に習得できる方法です。
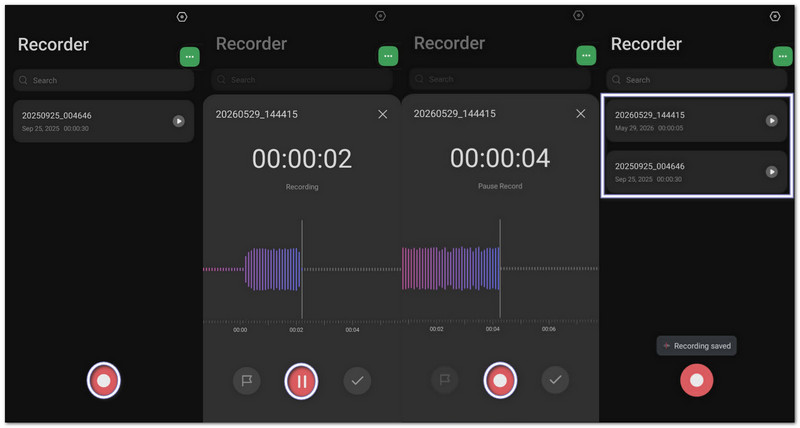
ステップ1アプリドロワーを開いて、 ボイスレコーダー.
ステップ2赤い部分をタップ 記録 ボタンを押して、自分の声や周囲の音の録音を開始します。
ステップ3タップ 一時停止 ちょっと休憩が必要な場合は、タップしてください。 再開する 続ける。
ステップ4タップ 保存する 録音が完了すると、音声ファイルは「ファイル」または「マイファイル」アプリに保存されます。ほとんどの録音はMP3またはM4Aファイルとして保存されます。
2. アプリを使わずに外部音声を録音する
この方法により、Android端末で音声録音が可能になり、インストール済みの録音アプリを開くことなく、電話の内蔵機能を使って即座に音声を録音できます。
A. Googleレコーダーウィジェット
ステップ1ホーム画面の空いている場所を長押ししてください。
ステップ2タップ ウィジェット を見つけて Googleレコーダー ウィジェット。
ステップ3ホーム画面にドラッグしてください。
ステップ4ウィジェットをいつでもタップするだけで、ワンタップで録画を開始できます。
B. Googleアシスタント
ステップ1言う "ねえ、Google「または保持する 力 ボタン。
ステップ2言う "私の声を録音してください" または "音声録音を開始します。「
ステップ3Googleアシスタントがレコーダーを開き、音声の録音を開始します。

C. クイック設定タイル
ステップ1画面上部から下にスワイプしてください。
ステップ2探す 録音機 また スクリーンレコーダー クイック設定で。
ステップ3タップするとすぐに録画が開始されます。
ステップ4録画が終了したら停止し、ファイルを保存してください。
3. サードパーティ製アプリを使った録画(より高画質・高機能な録画が可能)
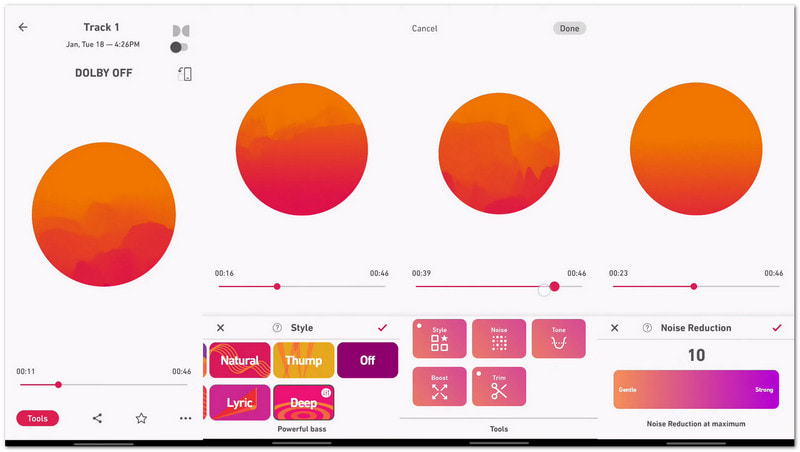
Dolby Onのようなサードパーティ製アプリを使って録音すると、音質が向上し、あらゆるオーディオニーズに対応できるより高度なコントロールが可能になります。スマートフォンが、音声、音楽、動画のためのシンプルな録音スタジオに早変わりします。
ノイズリダクション、イコライザー、スタジオエフェクトで音質を向上させ、よりクリアでプロフェッショナルなオーディオを実現します。Samsungやその他のAndroid端末でオーディオを録音する方法を学ぶ必要がある場合に非常に役立ちます。
ステップ1インストール Dolby On Google Playストアから。
ステップ2アプリを開いて、 記録 ボタン。
ステップ3音声、音楽、または背景音を録音できます。アプリが自動的にノイズを低減し、音質を向上させます。
ステップ4内蔵のオーディオツールで編集した後、録音を保存または共有できます。
パート2:内部音声の録音(スマートフォンのシステムからの録音)
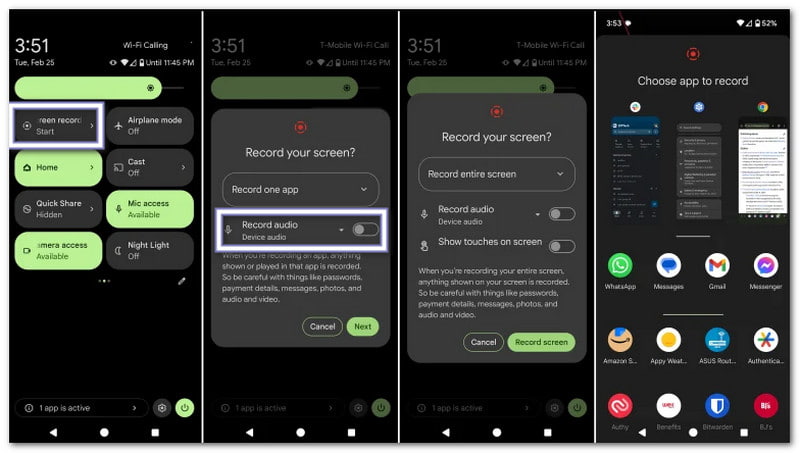
1. 内蔵スクリーンレコーダーの使用
これは公式のAndroid機能です Androidで内部音声を録音する方法また、システムサウンドと画面上のアクティビティを安定した方法で同時に記録します。
ステップ1画面上部から下に2回スワイプして開きます クイック設定.
ステップ2探す スクリーンレコーダー. 見つからない場合は、 鉛筆 また 編集 ボタンを押して、まずそれを追加します。
ステップ3タップ スクリーンレコーダー と選択します デバイスオーディオ また メディア と マイクロフォン 音源として。
ステップ4録画を開始し、キャプチャしたいアプリ、ゲーム、またはビデオを開きます。録画が終了したら停止します。
2. サードパーティ製アプリを使用して、内部音声のみを録音する(動画なし)
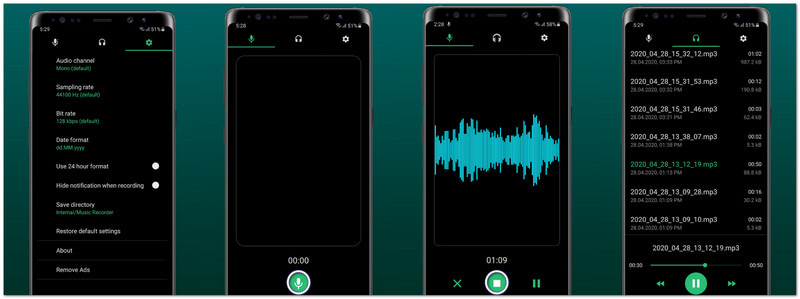
Androidで音声だけを録音する方法をお探しなら、Jaya Zone Techが開発したMusic Recorder - Song Recorderが簡単な解決策です。
この ボイスレコーダーアプリ アプリ、ゲーム、音楽プレーヤーから高音質な音声を録音します。ビットレートやサンプルレートの設定、モノラルまたはステレオの選択も可能で、より良い出力を実現します。一時停止、再開、編集、共有機能に加え、隠し録音モードも搭載しており、柔軟な使い方が可能です。
ステップ1インストール 音楽レコーダー - 楽曲レコーダー Google Playストアからアプリをダウンロードして開きます。
ステップ2必要な権限を許可します マイクロフォン と ストレージへのアクセス.
ステップ3開ける 設定 そして変更する 録音元 から マイク に 内蔵オーディオまた、選択することもできます。 MP3 また WAV フォーマット。
ステップ4タップ 記録 そして、録音したい音声、ゲーム、またはビデオを再生します。このアプリは内部音声のみを録音します。
パート3:Androidで外部マイクを使用する必要がある場合
スマートフォンのマイクは簡単な録音には十分ですが、よりクリアな音質、ノイズの少ない録音、またはより大きな音声録音を求める場合は、外付けマイクが非常に役立ちます。
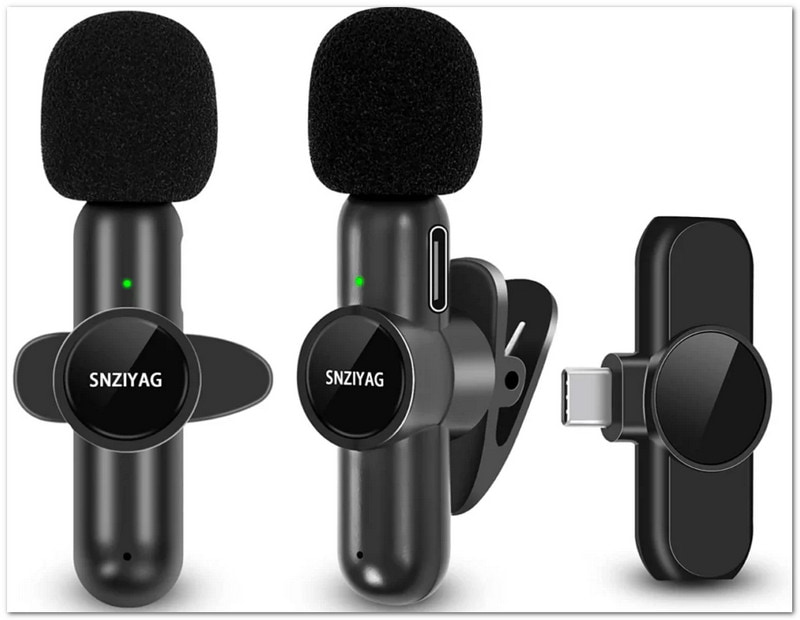
オプションA:USB-Cマイク
USB-Cマイクは、使い方が簡単でスピーディーです。スマートフォンのUSB-Cポートに差し込むだけで、すぐに録音を開始できます。ほとんどのAndroidスマートフォンは自動的に認識します。内蔵マイクよりもクリアな音質と明瞭な音声が得られることが多く、コンテンツクリエイター、学生、モバイルビデオ撮影に最適です。
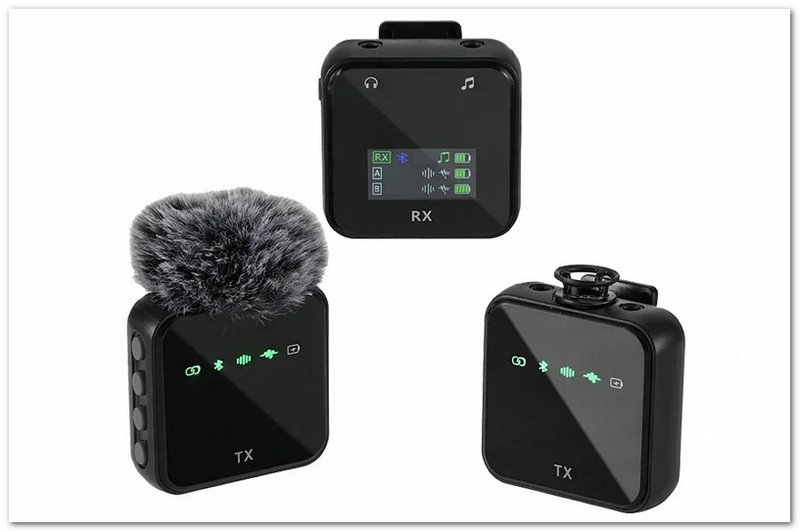
オプションB:ワイヤレスBluetoothマイク
Bluetoothマイクを使えば、ワイヤレスで録音できます。スマートフォンのBluetooth設定で接続するだけで、すぐに録音を開始できます。撮影や会話中に動き回る場合に便利です。持ち運びやすく携帯性に優れているため、多くの人がVlog、プレゼンテーション、屋外動画、インタビューなどで利用しています。
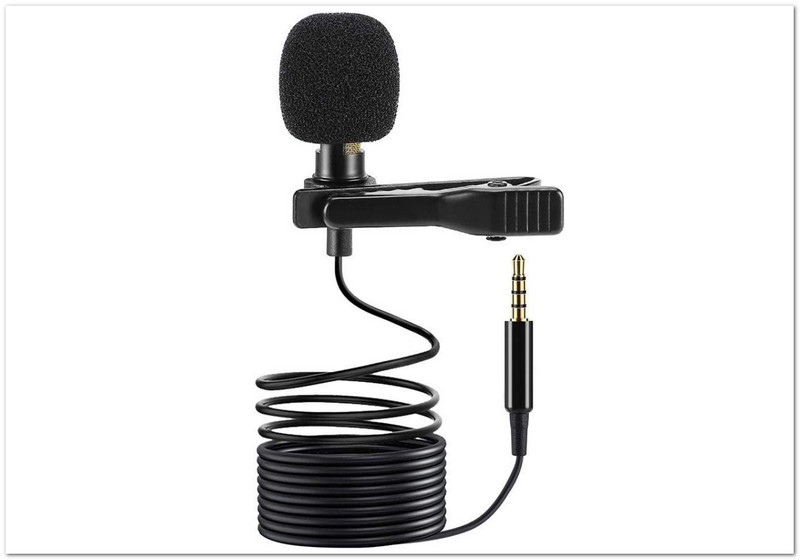
オプションC:3.5mmマイク
3.5mmマイクは、Androidスマートフォンのヘッドホンジャックに接続します。お使いのデバイスにヘッドホンジャックがない場合は、USB-C - 3.5mm変換アダプタを使用できます。これらのマイクは手頃な価格で、音声メモ、学校の課題、通話、簡単な録音などに簡単に使用できます。また、あまりお金をかけずに音質を向上させたい初心者にもおすすめです。
第4部 よくある問題のトラブルシューティング
Androidでの音声録音の学習はこれで完了です。しかし、予期せぬ問題が発生した場合はどうすればよいでしょうか?対処法をご存知ですか?
特に初心者の方にとっては難しく感じるかもしれません。しかし、ご安心ください。私たちはあなたを見捨てることはありません。以下のような問題に直面した場合でも、頼りになる簡単な解決策をご提供します。
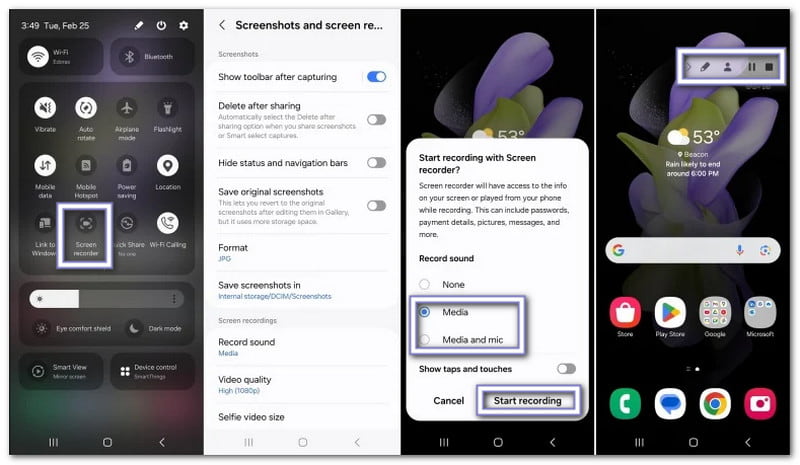
1. 内部オーディオオプションがグレー表示されています
Android は一部のアプリで内部オーディオをブロックします。著作権規則によって制限される場合もあります。内蔵の スクリーンレコーダー から クイック設定システムサウンドにはより効果的です。可能であれば、オーディオを次のように設定してください。 デバイスオーディオ また メディア と マイク.
2. 外部マイクが認識されない
電話がマイクを検出できない場合に発生します。 OTG の 設定 のために USB-Cマイク。 チェック ケーブル と アダプター サポートと DACチップアプリを開く前に、まずマイクを接続してください。 カメラを開く 必要に応じて。
3. ボイスレコーダーが表示されない
アプリが非表示または無効になっている可能性があります。開く アプリドロワー そして検索 レコーダー。に移動 設定 >> アプリ 無効になっている場合は有効にする。
4. バックグラウンド録音が停止します
Androidはバッテリーを節約するためにアプリを閉じることがあります。 バッテリー最適化 に 制限なしアプリをロックする 最近使用したアプリ だから、営業を続けているんです。
5. 録画が保存されない
ストレージまたは権限の問題であることが多いです。 ストレージ また ファイル権限ストレージがいっぱいかどうか確認してください。 キャッシュ そしてもう一度試してください。
ボーナス:より高品質な出力が可能なAndroid向け最高のスクリーンレコーダー
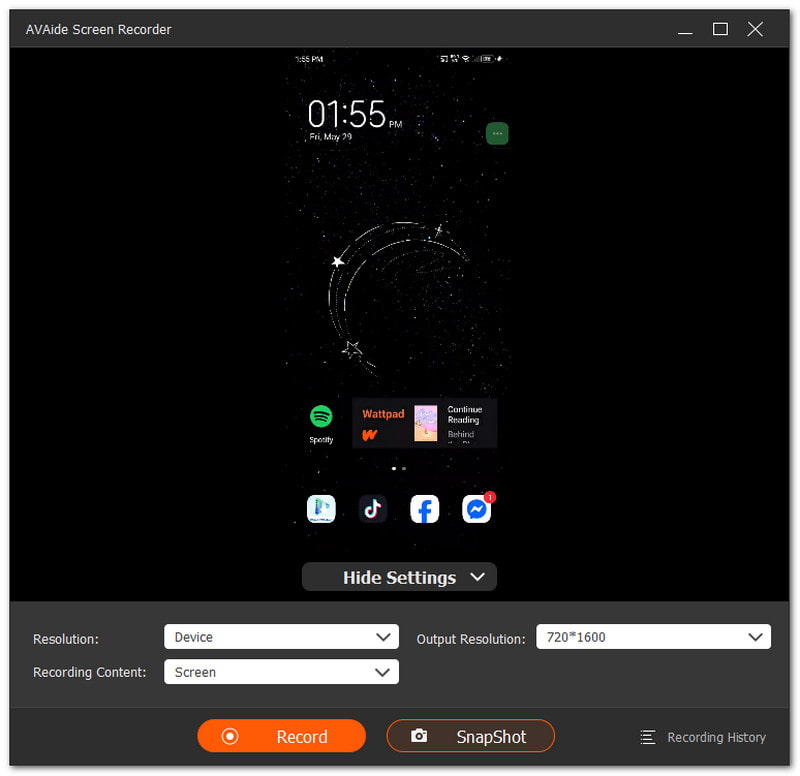
AVAideスクリーンレコーダー Android端末に対応した電話録音機能を搭載。最大4K解像度に対応し、鮮明でクリアな動画出力が可能です。また、スマートフォンのマイク、パソコンのスピーカー、またはその両方を同時に録音できます。さらに、録音中にスナップショットを撮って、すぐに録画することも可能です。モバイルアプリのゲーム、アプリのチュートリアル、ビデオ通話などに最適です。
- iPhoneで音声を録音するAndroid、Windows、Macに対応。
- スマートフォンの画面を高解像度でキャプチャします。
- トリミング、結合、変換、音声ブーストなどの編集が可能です。
- MP4、WMV、AVI、GIF、MP3などのフォーマットに対応しています。

 安全なダウンロード
これで分かったでしょう Androidで音声を録音する方法 問題が発生した場合の対処法も説明します。問題が発生した場合は、設定、権限、録画ツールを確認してください。
より良い結果を得るには、次のような強力なツールを使用することもできます。 AVAideスクリーンレコーダーAndroidユーザーはもちろん、WindowsやMacユーザーにも、スムーズな録音と高精細な出力を提供します。
著者について

オーディオ、オンライン会議、ゲームプレイビデオ、音楽、Webカメラなどで画面アクティビティをキャプチャします。