Bilo da ste igrač koji želi snimiti trčanje s visokim rezultatom, profesionalac koji stvara tutorial ili student koji snima predavanje na daljinu, znajući... kako snimiti ekran u sustavu Windows više nije luksuz, to je nužnost. Prošla su vremena kada vam je bio potreban skupi softver trećih strana samo za snimanje radne površine; Windows 10 i Windows 11 sada dolaze opremljeni moćnim, izvornim značajkama snimanja.
Od pojednostavljene Xbox Game Bara do ažuriranog alata za izrezivanje, pa čak i profesionalnih opcija poput OBS Studija, postoji nekoliko načina za snimanje zaslona i snimanje visokokvalitetnog videa i zvuka na vašem računalu. U ovom vodiču provest ćemo vas kroz najbolje metode za snimanje zaslona, podešavanje postavki zvuka i spremanje isječaka u pravom formatu za jednostavno dijeljenje.
- Dio 1: Ugrađeni načini snimanja zaslona u sustavu Windows
- 2. dio: Kako pregledati snimke zaslona u sustavu Windows
- Dio 3: Ograničenja zadanih snimača zaslona sustava Windows
- Dio 4: Lagan i učinkovit način snimanja zaslona na Windowsima
- Stavak 5: Često postavljana pitanja o snimanju ekrana u sustavu Windows
Dio 1: Ugrađeni načini snimanja zaslona u sustavu Windows
Postoje dva zadana načina snimanja zaslona na Windowsima, od Windowsa 7 do 11: Alat za izrezivanje i Xbox Game Bar. Možda niste primijetili njihovo postojanje, ali upravo sada možete naučiti kako ih koristiti za pokretanje snimanja zaslona.
1. Alat za izrezivanje
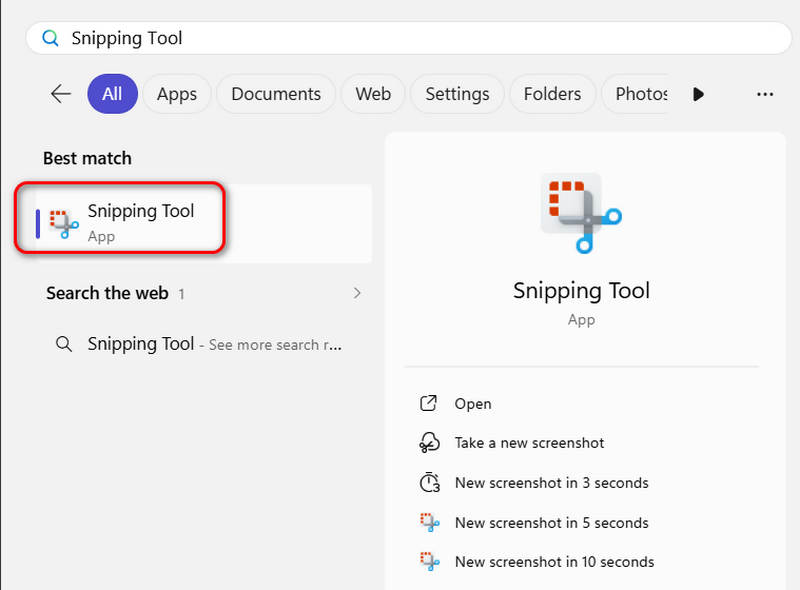
Korak 1Otvori traži okvir u donjem lijevom kutu radne površine i pretražite Alat za rezanjeZatim pronađite i otvorite ovaj program.
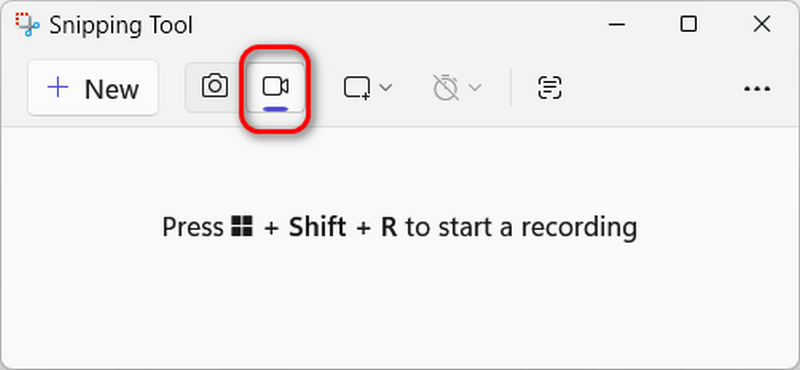
Korak 2Na sučelju programa odaberite Snimiti značajka s ikonom kamere. Zatim slijedite upute na zaslonu da biste pritisnuli Windows + Shift + RZatim morate povući dio na zaslonu i kliknuti Početak gumb za pokretanje snimanja zaslona na vašem Windows računalu.
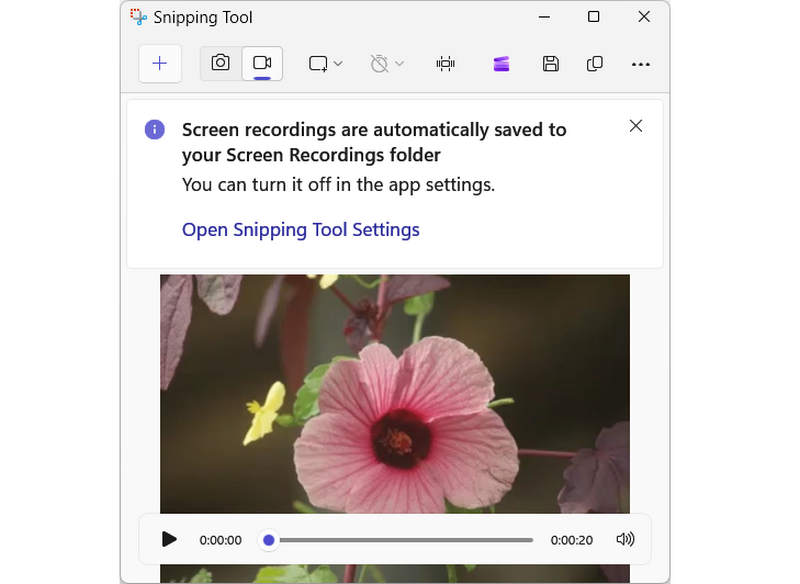
Korak 3Vaša snimka se automatski sprema u zadanu mapu Snimke zaslona u Videozapisima. Također možete otvoriti postavke Alata za izrezivanje da biste promijenili lokaciju.
2. Xbox traka za igre
Xbox Game Bar je moćan sloj za igranje integriran izravno u Windows 10 i 11, dizajniran da vam omogući pristup bitnim alatima bez prekidanja igranja. Jednostavnim pritiskom na Win + G možete prebacivati između raznih widgeta za snimanje visokokvalitetnih isječaka igara, snimke zaslona i praćenje performansi sustava u stvarnom vremenu. No, nije namjenski snimač igara, Xbox Game Bar možete koristiti i za snimanje s ekrana u Windowsima. Bez obzira koordinirate li s prijateljima ili upravljate resursima svog računala, ova ugrađena aplikacija osigurava da nikada ne morate pritisnuti Alt-Tab da biste se odmaknuli od akcije. Pogledajte videozapis u nastavku za detaljan vodič kroz njegove glavne značajke snimanja.
Korak 1Otvorite ugrađeni softver
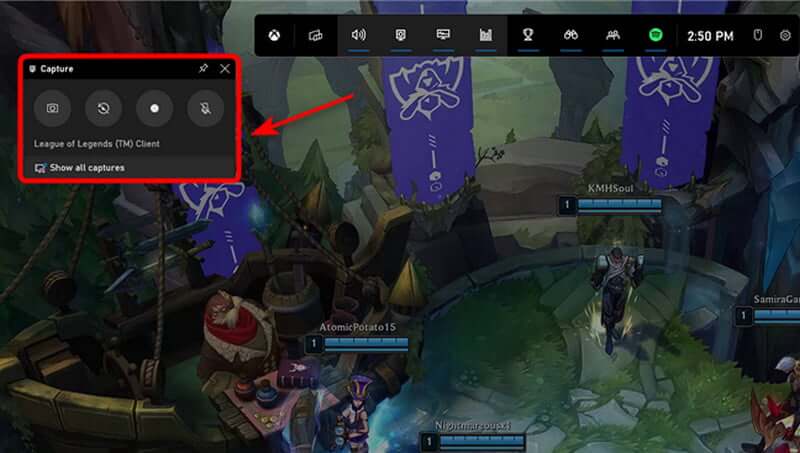
Prije svega, otvorite Xbox Game Bar i omogućite widget za snimanje. Možete spremiti svu svoju igru za potomke ili sačuvati najvažnije točke, kao što su vaše najnovije bitke sa šefovima ili Penta ubojstva.
Korak 2Započni snimanje
Snimanje zaslona u sustavu Windows možete odmah započeti odabirom Snimiti od sada. Ako želite napraviti snimku zaslona, to možete učiniti klikom na ikonu kamere i slikanjem onoga što se događa u igrici.
Korak 3Podesite glasnoću zvuka
Pokretanje alata prikazuje sve audio kanale koji reproduciraju zvuk na vašem Windows uređaju. Ako želite slušati glazbu dok igrate igrice, možete podesiti glasnoću svakog audio zapisa.

- Također možete koristiti audio widget za podešavanje glasnoće mikrofona ako želite snimati zaslon sa zvukom u sustavu Windows. U tom slučaju to može biti korisno jer možete kontrolirati koliko glasno ili tiho se vaš glas snima.
4. korakZaustavi snimanje
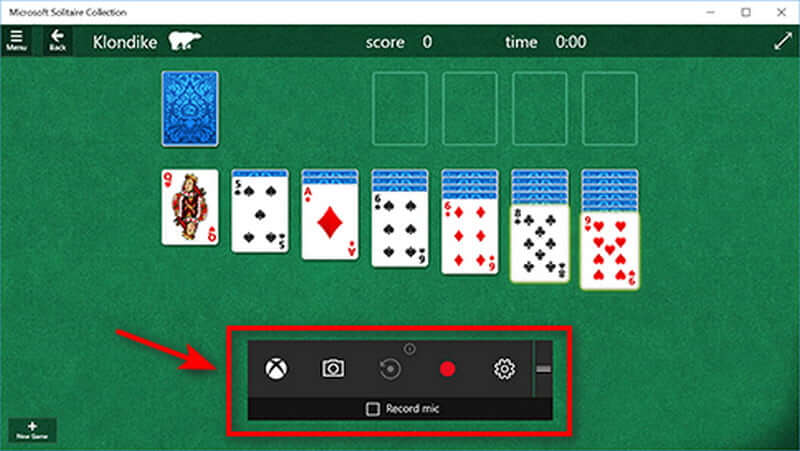
pritisni Windows tipka s logotipom + Alt + G ili kliknite ikonu kvadrata da biste zaustavili snimanje u PC igrama preko cijelog zaslona. Otvorite aplikaciju Xbox pritiskom na gumb Xbox i odabirom Snima za uređivanje isječka.
Kako urediti snimku zaslona iz Game Bara u sustavu Windows
Većina korisnika Windowsa vjeruje da je instaliranje softvera za snimanje zaslona na vaše računalo ili prijenosno računalo jedini način za snimanje video zaslona, ali to nije točno. Uz ugrađenu aplikaciju Xbox Game Bar, također možete početi uređivati snimke zaslona. Nadalje, ovaj alat je komponenta aplikacije Xbox, instalirana prema zadanim postavkama u sustavu Windows 10. Uključuje sve funkcije potrebne za brzo uređivanje snimke zaslona.
Korak 1Idite na Postavke
Korak 2Podesite pozadinsko snimanje
Ako se postavke promijene, to stvara 30-sekundni ili duži međuspremnik automatski snimljenog sadržaja. Dakle, ako igrate igru i upravo ste imali epsko ubojstvo, možete koristiti traku igre za spremanje zadnjih 30 sekundi, čak i ako niste aktivno snimali zaslon. Iako se naziv ove postavke razlikuje između Windows 11 i 10, funkcionalnost ostaje ista.
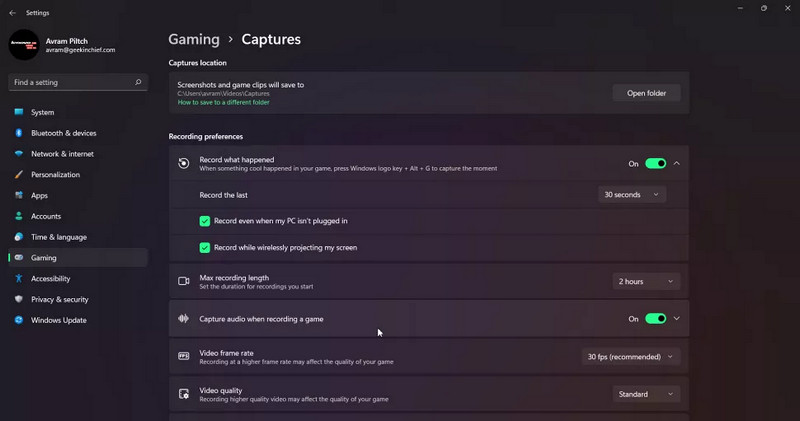
Korak 3Snimanje zvuka
Prema zadanim postavkama, oni snimaju samo zvuk s vašeg mikrofona i igre, a ne iz Windowsa ili drugih aplikacija. Možete potpuno onemogućiti snimanje zvuka, omogućiti snimanje zvukova sustava ili podesiti ravnotežu.

- Možete izmijeniti brzinu kadrova videa: ona je zadana na 30 sličica u sekundi, ali je možete promijeniti na 60 sličica u sekundi. Također, birajte između standardne i visoke kvalitete videa. Konačno, preporučujemo da ostavite opciju Snimanje pokazivača miša kada snimate igru, osobito ako snimate aplikaciju koja nije igra.
2. dio: Kako pregledati snimke zaslona u sustavu Windows
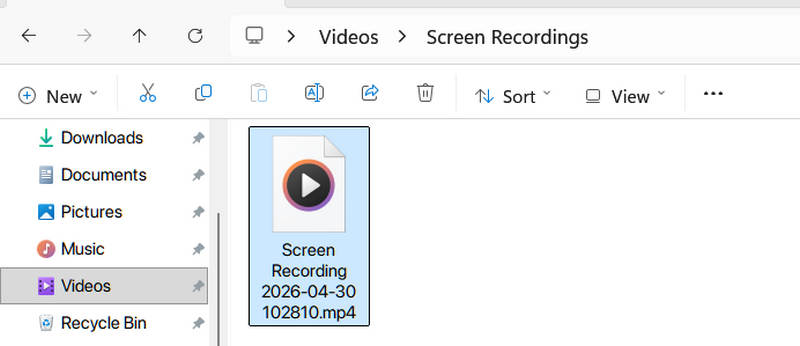
Nakon što završite sa snimanjem zaslona u sustavu Windows 10/11 pomoću alata za izrezivanje ili trake za igre, vjerojatno ćete htjeti urediti, preimenovati ili podijeliti datoteku. Ovisno o tome koji ste alat koristili, vaš će videozapis biti pohranjen u jednom od sljedećih direktorija.
1. Pronalaženje snimaka alata za izrezivanje
Prema zadanim postavkama, snimka zaslona alata za izrezivanje u sustavu Windows ide u određenu mapu unutar vašeg korisničkog profila.
Put mapeC:\Korisnici\[VašeKorisničkoIme]\Videozapisi\Snimke zaslona
Kako brzo doći tamo:
- 1.Otvorite Explorer datoteka (Windows + E).
- 2.Kliknite na Videozapisi u lijevoj bočnoj traci.
- 3.Otvori Snimke zaslona mapu.
Profesionalni savjet: Ako ste upravo završili snimanje zaslona u sustavu Windows, obično se u donjem desnom kutu pojavljuje obavijest. Klikom na tu obavijest otvorit će se pregled videozapisa u kojem možete kliknuti Više gumb i odaberite Otvori mapu.
2. Pronalaženje snimaka (captures) Xbox Game Bara
Xbox Game Bar sprema svoje snimke u mapu Captures, koja se također nalazi unutar vaše videoteke, ali u zasebnoj podmapi.
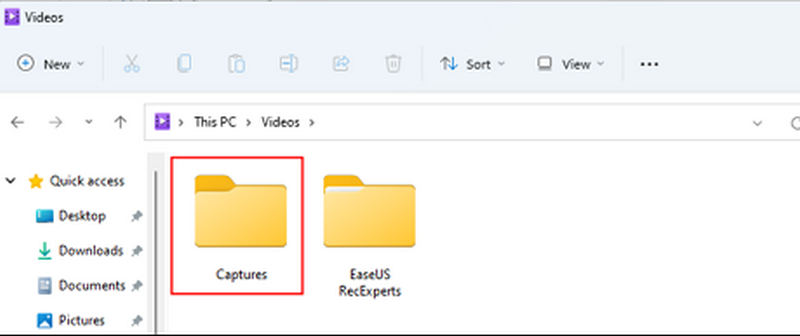
Putanja mape: C:\Korisnici\[VašeKorisničkoIme]\Videozapisi\Snimke
Kako doći tamo putem sučelja:
- 1.Pritisnite Windows + G za otvaranje prekrivanja trake za igru.
- 2.Kliknite na widget Galerija (izgleda kao mala ikona mape/slike).
- 3.U prozoru Galerija kliknite Otvori lokaciju datotekeOvo će odmah pokrenuti prozor Istraživača datoteka na točno određenoj putanji.
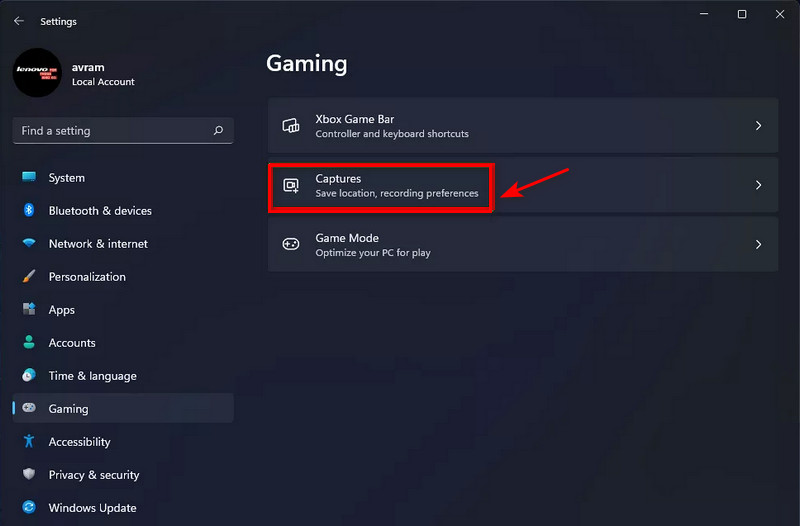
Prečac: Također možete otići na Postavke > Igre > Snima u glavnom izborniku postavki sustava Windows kako biste vidjeli točnu putanju, pa čak i promijenili mjesto spremanja tih datoteka u budućnosti.
Dio 3: Ograničenja zadanih snimača zaslona sustava Windows
Iako ugrađeni alati za snimanje videa čine snimanje videa na Windowsima nevjerojatno praktičnim bez preuzimanja dodatnog softvera, oni dolaze s određenim ograničenjima. Ovisno o složenosti vašeg projekta, bilo da se radi o profesionalnom webinaru ili vrhunskom kreativnom tutorialu, mogli biste naići na sljedeće prepreke:
1. Nedostatak naprednih programa za uređivanje: I alat za izrezivanje i Xbox Game Bar dizajnirani su za snimanje i pokretanje. Nedostaju im ugrađene vremenske crte, uređivanje zvuka na više traka ili mogućnost dodavanja oblačića (poput strelica i teksta) nakon što je snimanje završeno. Ako trebate poboljšati snimljeni videozapis zaslona u sustavu Windows, vjerojatno ćete morati uvesti RAW datoteku u zaseban video editor.
2. Fiksni broj sličica u sekundi i brzina prijenosa: Za napredne korisnike i igrače, kontrola nad kvalitetom ispisa je ključna. Zadani Windows snimači zaslona često koriste varijabilne brzine kadrova (VFR), što može dovesti do problema sa sinkronizacijom zvuka u profesionalnom softveru za uređivanje poput Premiere Pro. Za razliku od namjenskih alata za snimanje zaslona, imate ograničenu kontrolu nad točnom brzinom prijenosa ili unaprijed postavljenim postavkama kodiranja koje se koriste tijekom procesa.
3. Ograničenja radne površine i korisničkog sučelja:
- Xbox traka za igre: Primarno dizajniran za igre i pojedinačne aplikacije. Često ima problema sa snimanjem radne površine sustava Windows ili programa File Explorer, ponekad prekidajući snimanje ako se prebacujete između različitih aplikacija.
- Alat za izrezivanje: Iako je fleksibilniji za snimanje s računala, nedostaju mu značajke poput isticanja miša ili efekata klika, koje su ključne za snimanje videozapisa s uputama koje je lako pratiti.
4. Ograničenja audio ulaza: Iako možete snimati zaslon u sustavu Windows pomoću sistemskih zvukova i mikrofona, upravljanje više audio izvora (poput Discord poziva, igre i zasebne glazbene numere) je teško. Unutar ovih alata ne postoji izvorni audio mikser za balansiranje razina zvuka u stvarnom vremenu dok snimate videozapise na Windowsima.
Dio 4: Lagan i učinkovit način snimanja zaslona na Windowsima
AVAide Screen Recorder jedan je od najpreporučljivijih alata za snimanje zaslona za Windows zbog svojih naprednih značajki kao što su prilagođavanje područja snimanja, snimanje zvuka sustava i mikrofona, pa čak i podešavanje izlaznog video formata. Snima aktivnosti na ekranu, video pozive, TV emisije, ili igranje na više platformi bez gubitka kvalitete i čistog zvuka.
Snimač zaslona također se može kontrolirati pomoću prečaca. Također snima video visoke kvalitete, što je idealno za izlaz. Video se može snimati i karticom sustava i vanjskim uređajima.
- Snimite izvorni zaslon sustava Windows i po potrebi ga skalirajte na 4K.
- Omogućuje vam podešavanje postavki video i audio izlaza, uključujući kodek (HEVC, AV1, H.264), brzinu prijenosa, razlučivost, broj sličica u sekundi i još mnogo toga.
- Podržava AI skaliranje za povećanje i poboljšanje izlaznih snimaka.
- Podržava dugotrajno snimanje bez kašnjenja ili trzanja.
- Snimajte zaslon, prozor, igru i dio sa sistemskim zvukom, preklapanjem web kamere i mikrofonom bez problema.
- Jednostavno upravljajte svojim snimkama i dijelite ih na društvenim mrežama poput YouTubea i Instagrama.

 Sigurno preuzimanje
Korak 1Preuzmite softver za snimanje
Za početak preuzmite i instalirajte alat klikom na gornji gumb za preuzimanje. Instalacija softvera trajat će nekoliko minuta. Kliknite na Video snimač ikona za početak snimanja.

Korak 2Podesite okvir
Podesite područje koje želite snimiti oko prozora. Odaberi Prilagođen sa strelice padajućeg izbornika na prvom alatu za izrezivanje i unesite mjesto snimanja. Odaberi Puni zaslon uhvatiti cijeli prizor.

Korak 3Dodajte audio i zvučnu snimku
Možete snimiti video sa zvukom pomoću ugrađenog zvuka i mikrofona sustava ili vanjskog mikrofona spojenog na njega za snimanje zaslona radne površine s glasovnim naracijama. Kliknite na Mikrofon gumb za isključivanje glasovnog pripovijedanja tijekom snimanja.

4. korakZapočni snimanje
Za početak snimanja pritisnite REC dugme.

Korak 5Zaustavi i izvezi
Nakon što završite sa snimanjem, pritisnite Stop gumb za zaustavljanje, a zatim Isječak gumb za izrezivanje snimljenih isječaka prije spremanja. Zatim, da biste spremili svoj videozapis, kliknite na Izvoz dugme.

Korak 6Pogledajte video zapis
Nakon spremanja snimke sada možete vidjeti video zapis u povijesti snimanja. Oni su poredani kronološki, počevši od najnovijeg zapisa i napredujući do najstarije.

Stavak 5: Često postavljana pitanja o snimanju ekrana u sustavu Windows
Je li moguće pratiti snimke zaslona?
Web-mjesto može reći da li snimite snimku zaslona ili koristite preglednik za to. Web-mjesto također može znati jeste li snimili snimku zaslona pritiskom na tipku zaslona za ispis na tipkovnici. Međutim, ako koristite program kao što je Snipping Tool, web-mjesto neće znati da ste napravili snimku zaslona.
Koliko dugo će trajati snimanje zaslona?
Možete ekranizirati Snimanje na neodređeno vrijeme s odgovarajućim softverom za snimanje zaslona. Možete nastaviti snimati radnju sve dok je vidljiva na vašem zaslonu. To ne znači uvijek da ćete moći snimiti sate i sate snimke.
Zašto ne radi kombinacija tipki Alt+R u sustavu Windows?
Prečac Windows + Alt + R možda neće raditi iz nekoliko razloga, najčešće zato što je Xbox Game Bar onemogućen u postavkama sustava ili... Snimanje u pozadini je funkcija isključena. Osim toga, ovaj prečac je posebno dizajniran za snimanje aplikacija i igara; neće funkcionirati ako ste usredotočeni na radnu površinu sustava Windows ili Istraživač datoteka.
Kakav učinak ima snimanje zaslona?
Snimanje zaslona je ispravno kada nekome trebate pokazati nešto što vidite na monitoru vašeg računala. Ponekad je idealno snimanje zaslona mirne slike, poznato i kao screenshot. S druge strane, screencast može biti bolja opcija ako vaše snimanje zaslona zahtijeva mnoga objašnjenja.
U konačnici, savladavanje načina snimanje zaslona u sustavu Windows ovisi o vašim potrebama. Ugrađeni alati poput alata za izrezivanje i Xbox Game Bara savršeni su za brzo snimanje bez instalacije i ležerno igranje. Međutim, često im nedostaje napredno uređivanje, fleksibilno formatiranje i stabilnost na cijelom računalu potrebna za profesionalne projekte.
Za moćnije rješenje, AVAide Screen Recorder je naša najbolja preporuka. Prevladava izvorna ograničenja nudeći glatko preklapanje web kamere, bilješke u stvarnom vremenu i izlaz s visokom brzinom kadrova bez usporavanja vašeg sustava. Ako vam je potreban uglađen, profesionalni rezultat "jednim klikom" za tutorijale ili prezentacije, AVAide je vrhunski izbor za bilo koji video zapis s zaslona na Windowsima.
O AUTORU

Snimite aktivnosti na ekranu uz zvuk, sastanke na mreži, videozapise igranja, glazbu, web kameru itd.
Snimanje zaslona i videa
- Snimanje zaslona na Macu
- Snimanje zaslona u sustavu Windows
- Snimanje zaslona na iPhoneu
- Snimite audio na iPhone
- Snimajte TV emisije bez DVR-a
- Screen Record Snapchat na iPhoneu i Androidu
- Snimite FaceTime poziv
- Kako koristiti VLC za snimanje zaslona
- Ispravite Amazonov kod pogreške 1060
- Popravi OBS Window Capture Black
- Kako pretvoriti PowerPoint u video [potpuni vodič]
- Kako napraviti video s uputama: pripreme i smjernice
- Kako snimati zaslon sa zvukom na iOS-u 15 i novijim
- Kako snimati zaslon na TikToku: rješenja za stolna i mobilna računala
- Kako snimati zaslon na Samsungu na 2 provjerena načina [riješeno]
- Kako snimiti igru na PS4 bez kartice za snimanje
- Kako snimiti igranje igre na Xbox One [Cijeli vodič]