Step 1Download
Click the download button to download the setup file of AVAide DVD Ripper.
Step 2 Install
Double click the “dvd-ripper.exe” file and click the Install button toinstall it.
Click Start Now to start using AVAide DVD Ripper.
Double click the “dvd-ripper.dmg” file and drag the program icon to your application folder touse it.
Some features are limited in the trial version. In the trial version, you can convert a 5-minutetime length for each DVD ripping, and rip only 5 DVD discs to DVD folder/ISO file with 30 days.The additional tools like Media Metadata Editor, Video Compressor, GIF Maker, 3D Maker, VideoEnhancer are also limited to 5 files.
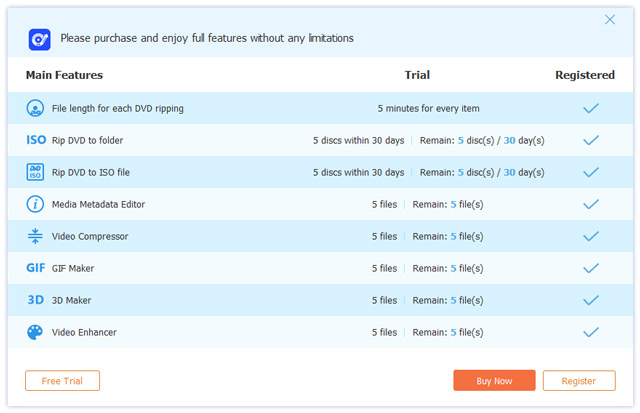
To enjoy full features without limitation, you can purchase AVAide DVD Ripper full version.
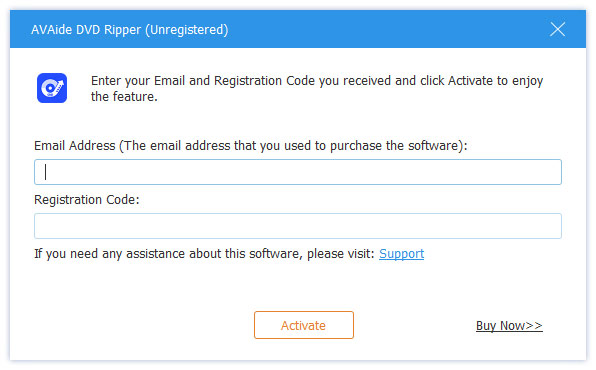
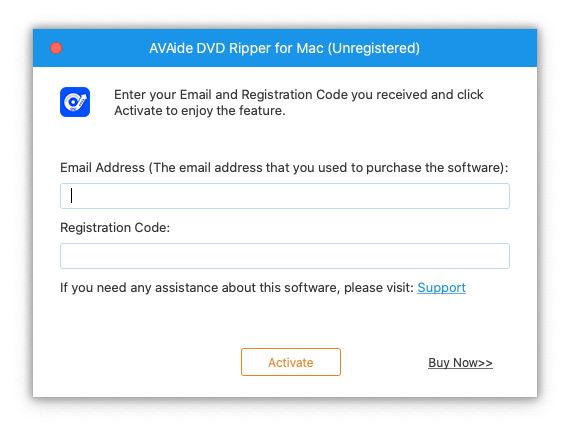
Step 1Enter register window
Launch AVAide DVD Ripper and click the Register button in the popup window.
Or click Register (the key icon) at the top right side of the interface to enter the register window.
You can also click Menu (the three horizontal lines icon) at the top right side of the interface.
Step 2Register
In the registration window, type the Email Address and Registration Code you received after a successful purchase. Click Activate button to register AVAide DVD Ripper.
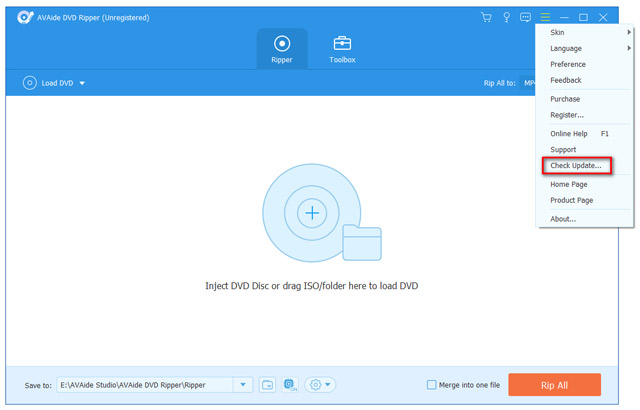
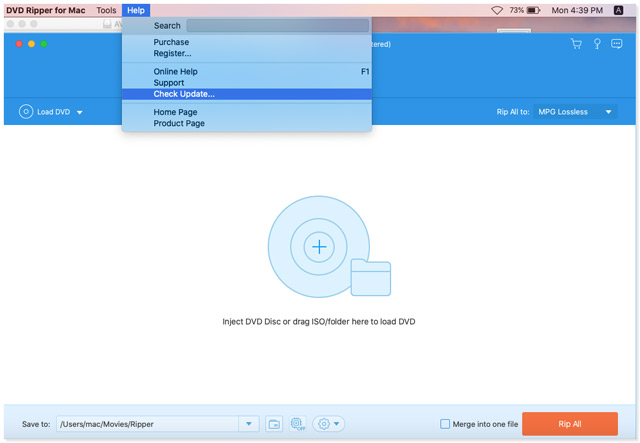
AVAide DVD Ripper will always be updated to improve its functions and fix bugs. You can update the software manually or automatically.
1. Go to the Menu icon and select Check Update to check the current version of AVAide DVD Ripper.
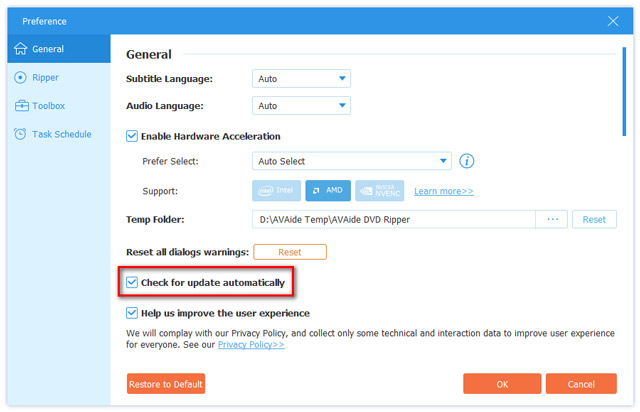
2. You can also go to Menu icon and select Preference. Tick Check for update automatically option in the General settings. Then your software will be updated automatically.
3. To make sure you are using the latest software, you can go to the official web page of AVAide DVD Ripper and download the latest version.
| Product Version | Supported OS | CPU/Processor | RAM |
| Windows | Windows 11/10/8.1/8/7 (32-bit/64-bit) | 1GHz Intel/AMD CPU or above | 2GB RAM or above |
| Mac | macOS 10.12 – 26 | 1GHz or above Intel and Apple Silicon processor | 2GB RAM or above |
| File Types | |
| DVD | DVD Disc, DVD Folder, ISO Files, AVCHD Disc, AVCHD Folder |
| 8K/5K Video | MP4, MKV |
| 8K/5K Video Encoding | H.265/HEVC |
| 4K UHD Video | MP4, AVI, FLV, WebM, TS, MKV, MOV, MXF |
| 4K UHD Encoding | H.265/HEVC, H.264, VP8, VP9, MPEG, XviD |
| HD Video | 3GP(*.3gp;*.3g2), AVI, DV Files (*.dv;*.dif), MOD, MJPEG (*.mjpg;*.mjpeg), Flash Files (*.flv;*.swf;*.f4v), MKV, MPEG (*.mpg;*.mpeg;*.mpeg2;*.vob;*.dat), MPEG4 (*.mp4;*.m4v), MPV, QuickTime Files (*.qt;*.mov), Real Media Files (*.rm;*.rmvb), TOD, Video Transport Stream Files (*.ts;*.trp;*.tp), Windows Media Files (*.wmv;*.asf) |
| Audio | AAC, AIFF Files (*.aif;*.aiff), CUE, FLAC, M4A, MPEG Files (*.mp3;*.mp2), Monkey’s Audio Files (*.ape), Ogg, Raw AC3 Files (*.ac3), Real Audio Files (*.ra;*.ram), SUN AU Files (*.au), WAV, WMA |
| Image | GIF |
| File Types | |
| DVD | DVD Disc, DVD Folder, DVD ISO File |
| Video | TS, MTS, M2TS, MXF, TRP, TP, MP4, M4V, QT, MOV, MPG, MPEG, MPEG2, MPEG4, MJPG,MJPEG, AVI, 3GP, 3G2, FLV, MOD, TOD, RM, RMVB, WMV, ASF, MKV, SWF, F4V, VOB,DAT, DV, DIF, WebM |
| 4K UHD | MP4, TS, MKV, AVI, FLV, WebM, MOV, MXF |
| HD Video | HD ASF Video(.asf), HD AVI Video(.avi), HD H.264/MPEG-4 AVC Video(.mp4), HD MKVVideo Format(.mkv), HD MOV Video(.mov), HD MPG(.mpg), HD TS(.ts), HD WMV(.wmv),HD MP4(.mp4), HD WebM(.webm) |
| Audio | FLAC, WAV, WMA, MP3, MP2, AAC, AC3, AIFF, APE, CAF, MPC, QCP, OGG, M4A, M4B,AUD, MKA, AIFC, RA, RAM, AU, AIF, CUE |
| Device Types | |
| Apple | iPhone 17, iPhone 17e, iPhone Air, iPhone 17 Pro, iPhone 17 Pro Max, iPhone 16, iPhone 16 Plus, iPhone 16 Pro, iPhone 16 Pro Max, iPhone 15, iPhone 15 Plus, iPhone 15 Pro, iPhone 15 Pro Max, iPhone 14, iPhone 14 Pro, iPhone 14 Pro Max, 14 Plus, iPhone 13, iPhone 13 Pro, iPhone 13 Pro Max, iPhone 13 mini, iPhone 12/12 Pro/12 Pro Max/12 mini, iPhone 11/11 Pro/11 Pro Max, iPhone XS/XSMax, iPhone XR, iPhone X, iPhone 8, iPhone 8 Plus, iPhone 7, iPhone 7 Plus,iPhone 6s, iPhone 6s Plus, iPhone 6, iPhone 6 Plus, iPhone SE, iPhone 5s, iPhone5c, iPhone 5, iPhone 4S, iPhone 4, iPhoneiPad Pro, iPad Air 2, iPad Air, iPad mini 4, iPad mini 3, iPad mini 2, iPadmini, iPad 4, iPad 3, iPad 2, iPadiPod Touch, iPod Nano, iPod Classic, iPodApple TV, Apple TV 2, Apple TV3 |
| Samsung | Samsung Galaxy S10, Samsung Galaxy S9, Samsung Galaxy S8, Samsung Galaxy S7,Samsung Galaxy S6, Samsung Galaxy S5, Samsung Galaxy S4, Samsung Galaxy S III,Samsung Galaxy S II, Samsung Galaxy S, Samsung Galaxy Note 9, Samsung GalaxyNote 8, Samsung Galaxy Note 5, Samsung Galaxy Note Edge, Samsung Galaxy Note 4,Samsung Galaxy Note 3, Samsung Galaxy Note II, Samsung Galaxy NoteSamsung GalaxyA series, Samsung Galaxy J series, Samsung Galaxy Tab series, Samsung TV |
| Pixel 3, Pixel 3 XL, Pixel 2, Pixel 2 XL, Pixel, Pixel XL | |
| HUAWEI | Huawei P30, Huawei P20, Huawei P10, Huawei P9/P8, Huawei Mate 20, Huawei Mate10, Huawei Mate 9/8, Huawei Ascend Y9, Huawei Ascend Y7, Huawei Nova 4, HuaweiNova 3, Honor 8A, Honor Magic 2, Honor 8X, Honor 8C, Honor 10, Honor Play |
| SONY | Xperia 10, Xperia XZ3, Xperia XZ2, Xperia XA2, Xperia XZ1, Xperia XA1, XperiaXZ, Xperia XA, Sony TV, PlayStation 4, PlayStation 3, PlayStation PortableM |
| LG | LG G8, LG G7, LG G6, LG G5, LG G4, LG V50, LG V40, LG V35, LG V30, LG TV |
| HTC | HTC U12 life, HTC U12+, HTC Desire 12, HTC U11 life, HTC U11+, HTC U11, HTCDesire 10 lifestyle |
| XIAOMI | Mi 9, Mi 8, Mi MIX 3, Mi Max 3, Mi A2, Mix 2S, Redmi 7, Redmi Note 7, Redmi 6,Redmi Note 6, Redmi 6A, Redmi S2, POCOPHONE F1 |
| Motorola | Moto G7, Moto Z3, Moto G6, Moto E5, Moto X4, Moto E4, Moto Z2, Moto G5, Moto Z |
| Game Console | Xbox One, Xbox One S, Xbox One X, Xbox 360, PS4, PS3, PSP, PS Vita, Wii |
AVAide DVD Ripper is the excellent DVD ripping software. It can rip DVD movies to digital video or audio files.
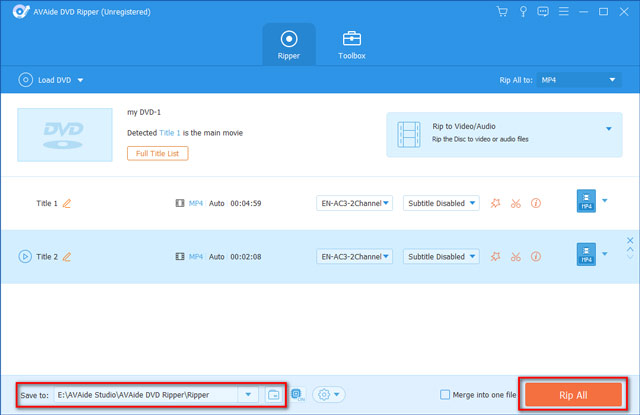
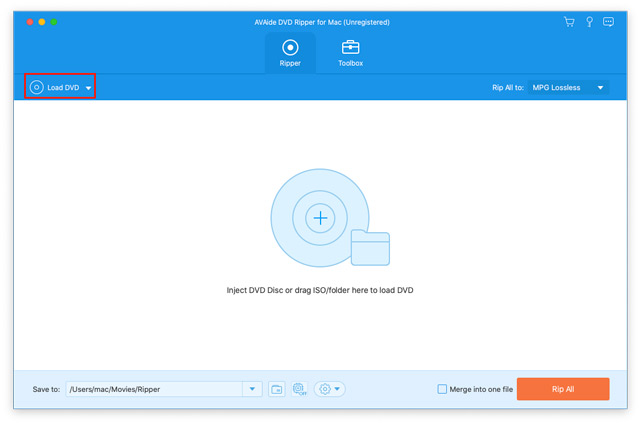
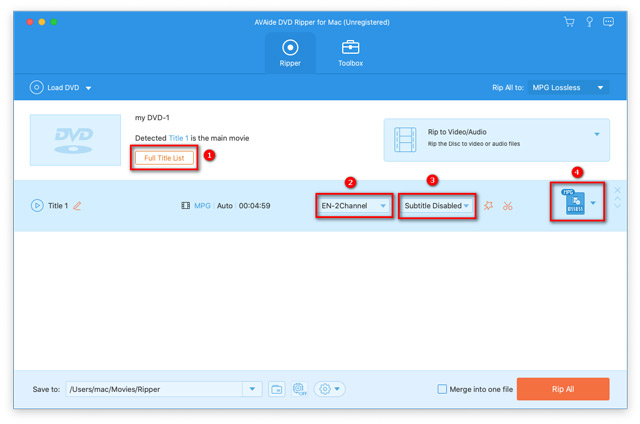
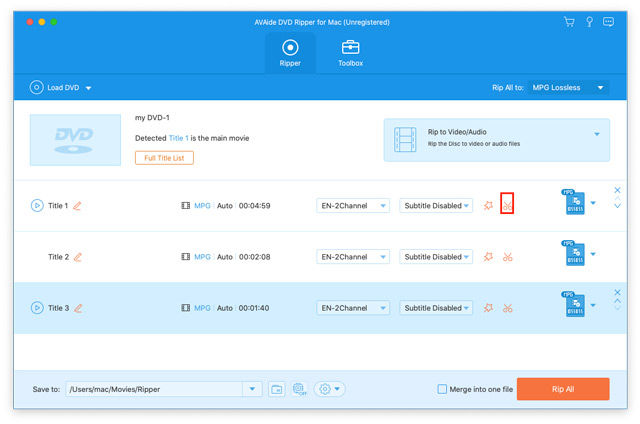
Step 1Load DVD
Insert the DVD disc into the computer drive. Launch AVAide DVD Ripper and click Load DVD button to load the DVD disc to the program. You can also click the drop-down arrow next to Load DVD to import the DVD disc, DVD ISO file, or DVD folder.
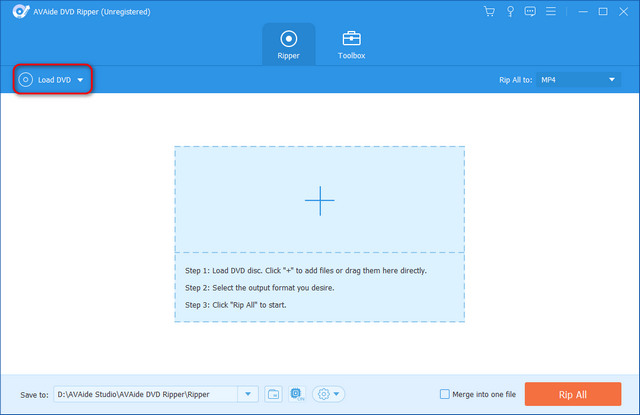
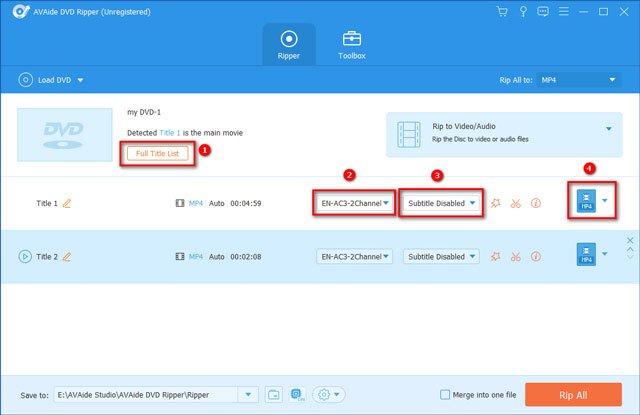
After loading the DVD, you learn more functions from its main interface.
1. You can click the Full Title List button to select the title youwant. Click Rename (the pen icon) to rename the title.
2. You can click Add Audio Track to add an audio track from local, orclick Audio Track Disabled to disable the audio track.
3. Click Add Subtitle to add an SRT, SSA, or ASS subtitle, or clickSubtitle Disabled to disable a subtitle.
4. The Format icon and the Rip All to optionboth enable you to select the output format for DVD ripping.
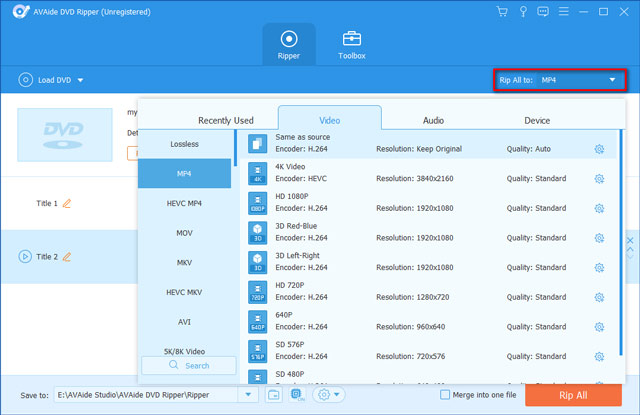
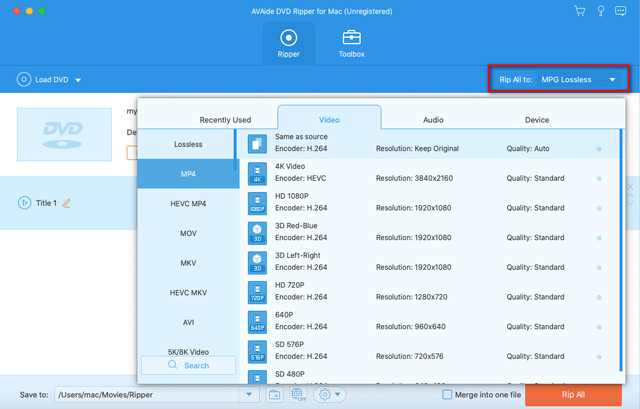
Step 2Select output format
Go to Rip All to area and click the drop-down arrow to select theoutput format. You can locate Video, Audio, or Device tab to select the output video formats, audio formats, or theproper format for playing on portable devices.
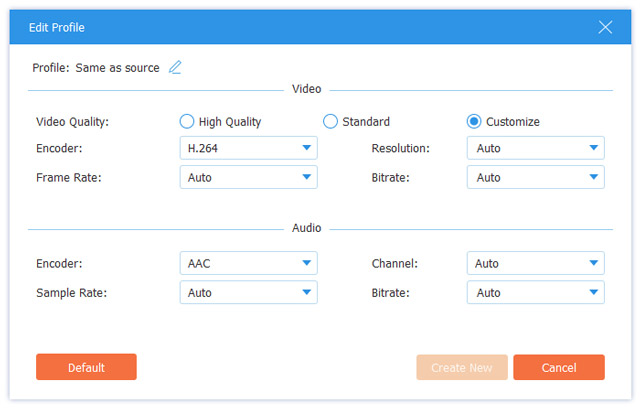
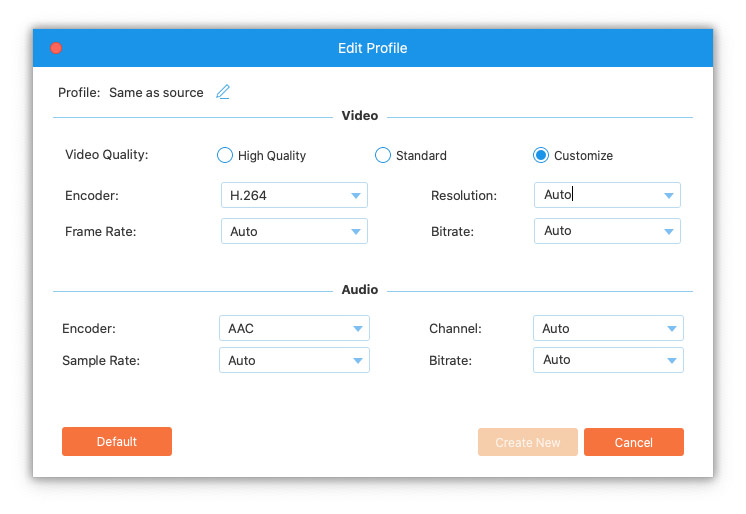
If needed, click Custom Profile (the gear icon) to customize the video settings like video quality, resolution, encoder, frame rate, and bitrate. You can also adjust the audio settings like encoder, channel, sample rate, and bitrate.
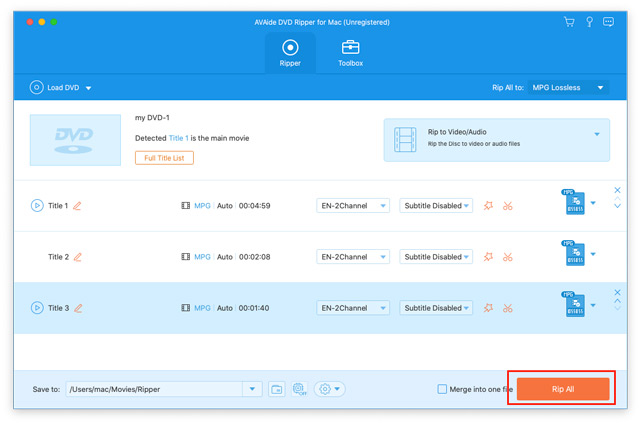
Step 3Rip DVD
Finally, go to the Save to area and select the output folder. Then click the Rip All button to start converting the DVD to video or audio.
Note: You can click the Enable Hardware Acceleration icon to make sure the DVD ripping has proceeded at a fast speed.
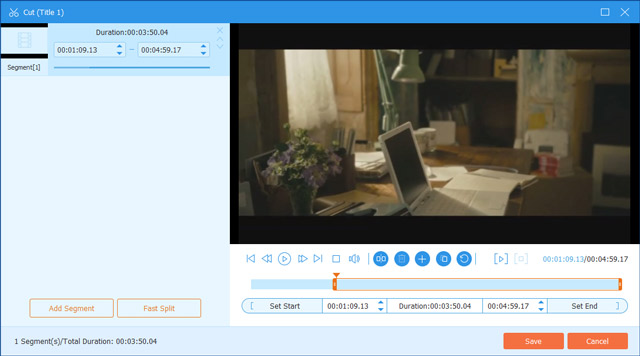
AVAide DVD Ripper is equipped with multiple editing features. You can customize DVD movies Cut video as per your needs. You can click Edit (the magic wand icon) or Cut (the scissor icon) to better polish your video.
To trim the unwanted part, you can use the Cut feature (the scissor icon). Then you can split video, copy and create a new segment, or delete the current segment.
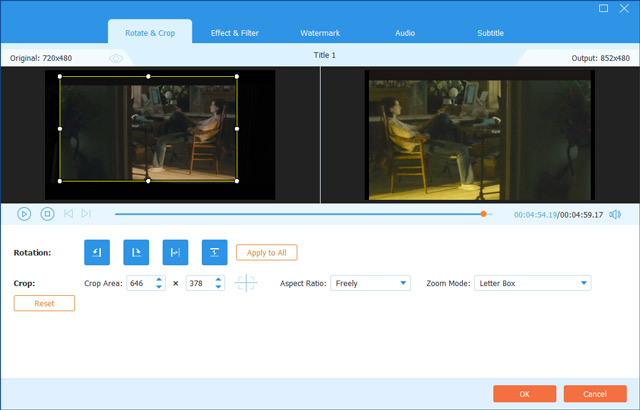
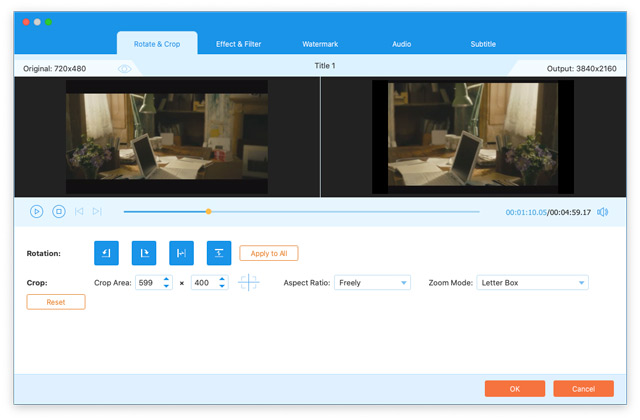
Click the Edit icon and locate Rotate & Crop tab in the editing window.
You can rotate the DVD title in 90 clockwise or counterclockwise, or flip the video horizontally or vertically.

You can drag the frame border to set the crop area, fine-tune the crop area, or make it sit in the center of the original frame. Besides, you can set a fixed aspect ratio from 16:9, 4:3, 21:9, 16:10, 5:4, 1:1, or 9:16. Also, you can select the zoom mode from Letter Box, Pan & Scan, or Full.
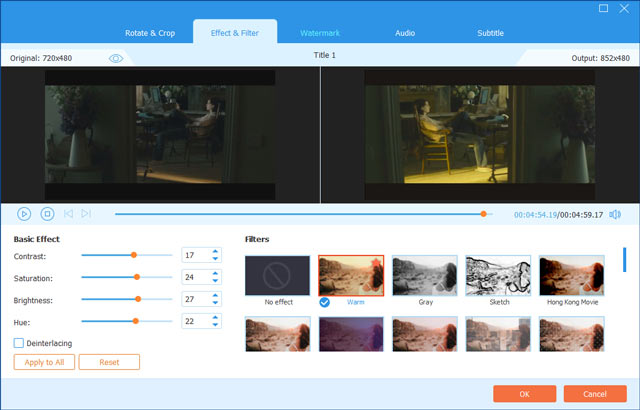
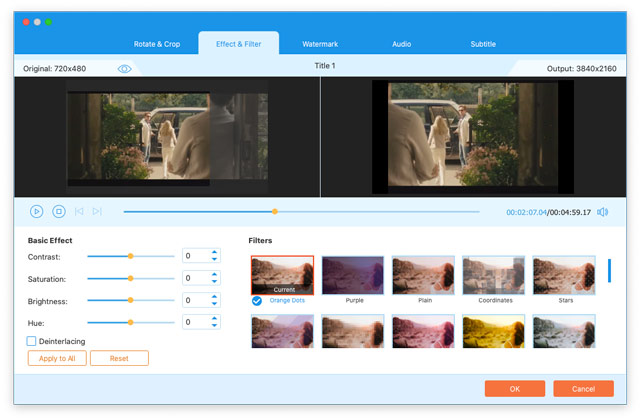
Switch to the Effect & Filter tab and adjust the basic effect like contrast, saturation, brightness, and hue.
It provides over 40 video effects that you can apply to your DVD video. You can choose video effects from Warm, Gray, Sketch, Hong Kong Movie, Orange Dots, Purple, Plain, Coordinates, Stars, Modern, Pink, Green, Dawn, etc.
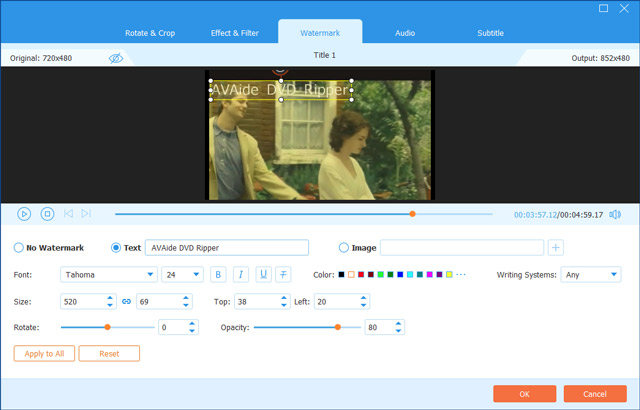
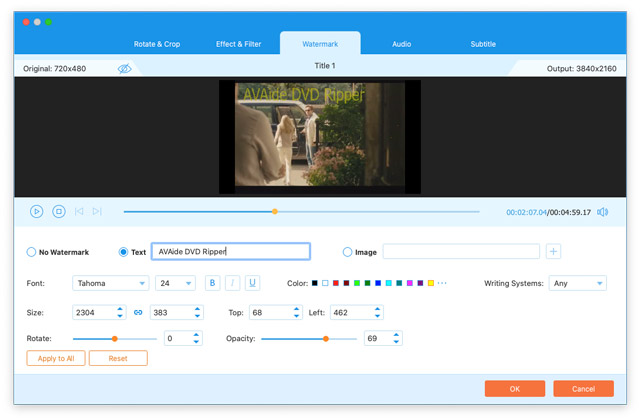
The Watermark feature lets you add your mark to the DVD video. You can add a text watermark or picture logo to the video. Meanwhile, you can adjust the font size, font style, font color, font area, or fine-tune rotation and opacity.
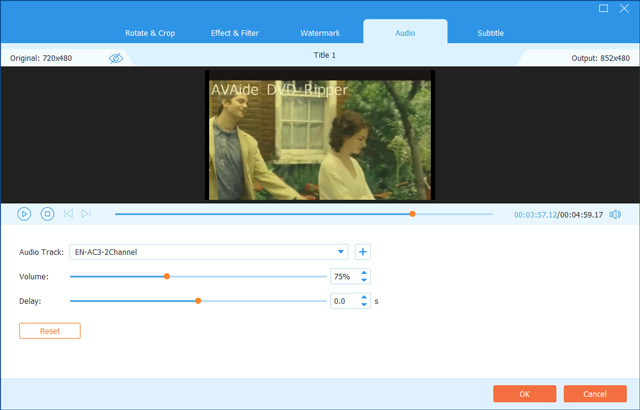
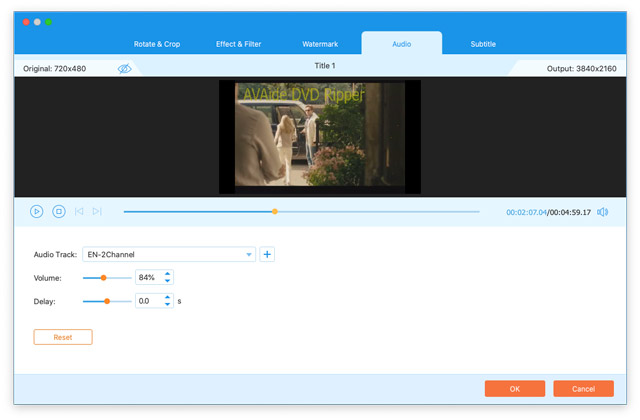
Go to the Audio tab, and click Add Audio (the plus icon) to select the audio track from your local computer. You can turn up/down by moving the slider left/right. And adjust the delay if the image doesn’t match with the sound.
Under the Subtitle tab, you can click Add Subtitle(s) (the plus icon) to add a subtitle (*.srt, *.ssa, *.ass) from local, or click Search Online (the magnifier icon) to download a subtitle online. After that, you can adjust the font size, font style, font color, add an outline, adjust the position of subtitle, fine-tune opacity, and delay time. You can click the OK button to apply the changes.
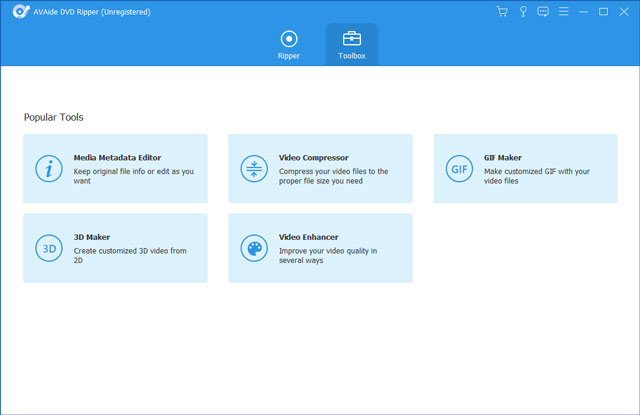
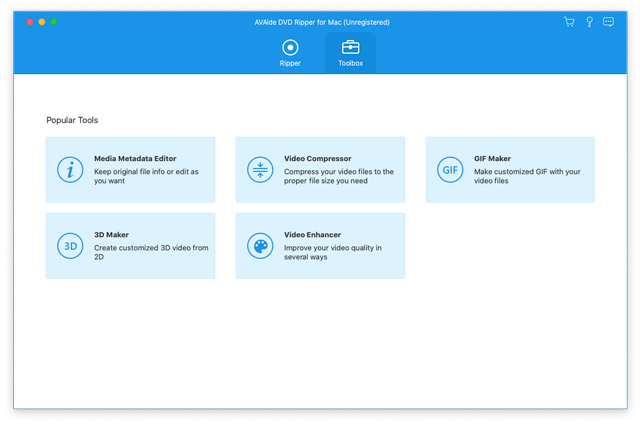
There are popular tools in the Toolbox of AVAide DVD Ripper. You can use the following tools for free.
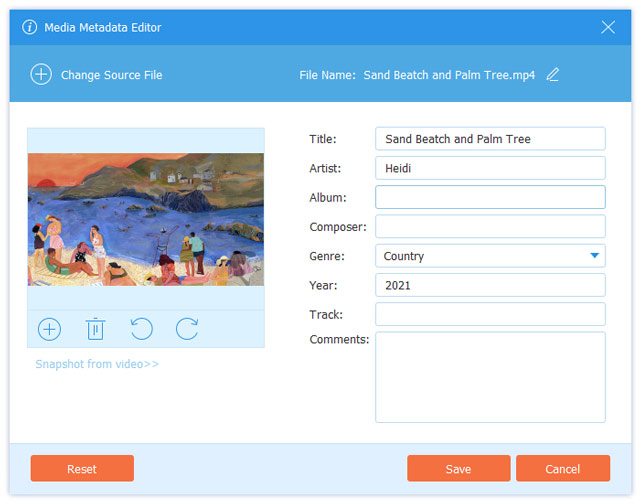
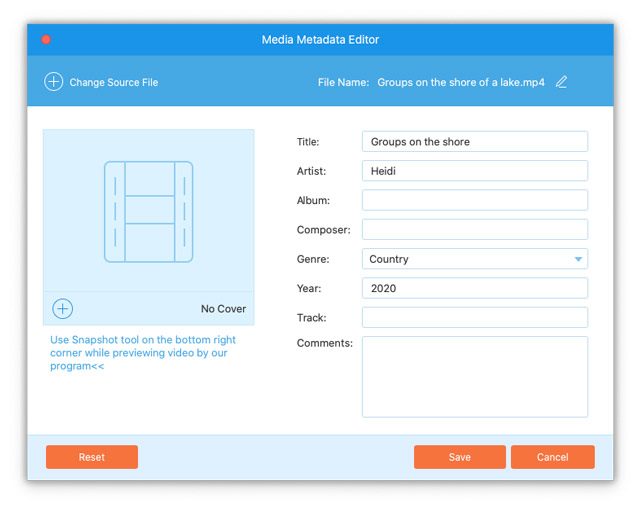
Step 1Click Media Metadata Editor inToolbox. You can add the media file (MP4, M4A, M4R, M4B, M4P, 3G2,M4V, MOV, MP3, WMA, ASF, WMV, WAV, AVI) you want to edit.
Step 2In the Media Metadata Editor window, you can adjust theinformation like title, artist, album, composer, genre, year, track and comment. Click theSave button to edit the metadata.
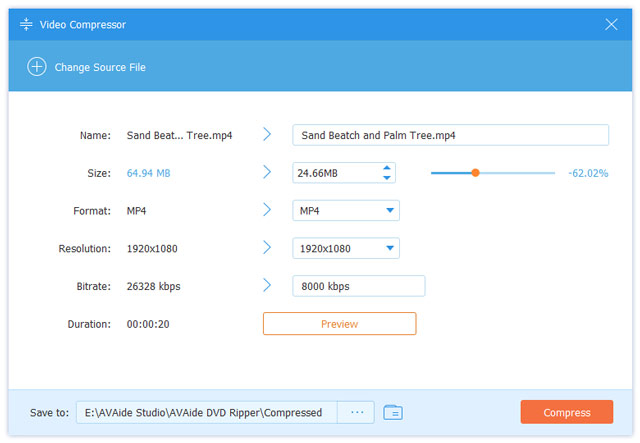
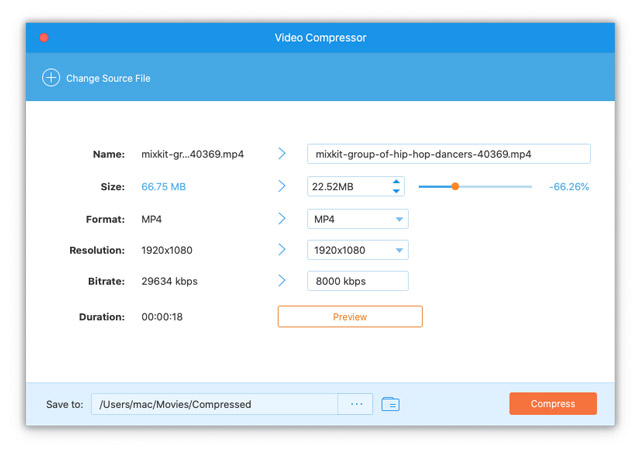
Step 1Open Video Compressor in Toolbox. You can click the big plus icon to add the video you wantto compress.
Step 2In the Video Compressor window, you can rename the video,select the size after compression, choose the compressed format, select the resolution, andpreview the compressed video.
Step 3Click the Compress button tocompress the video on computer.
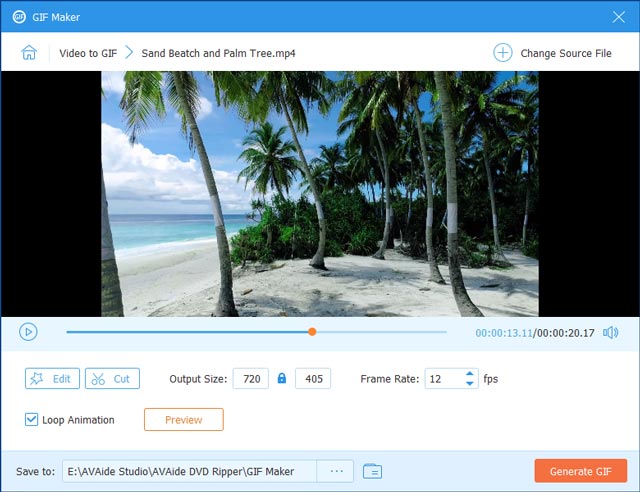
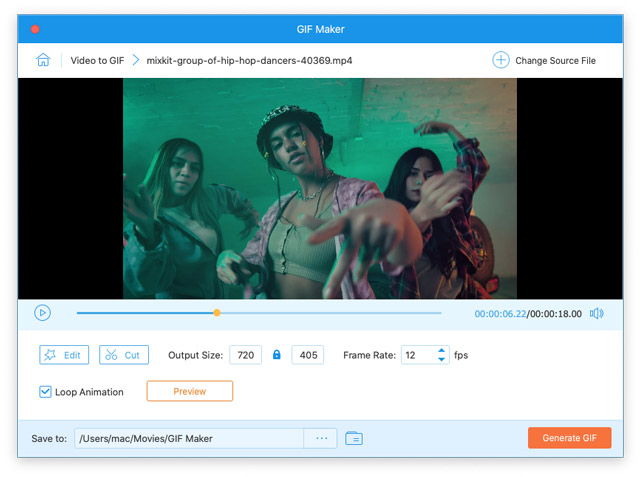
Step 1Select GIF Maker in Toolbox, and add the video you want to turn to GIF.
Step 2You can use the Edit or Cut feature to edit the video effects and cut off unwanted parts.Then select the output size and frame rate as you want.
Step 3Finally, click the Generate GIFbutton to create a GIF file from the video.
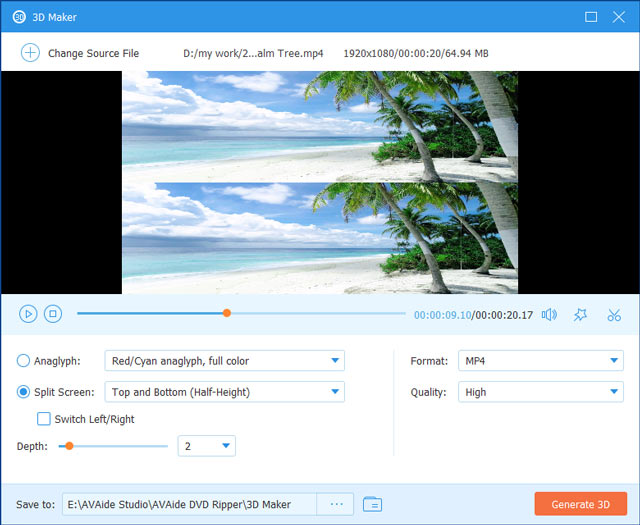
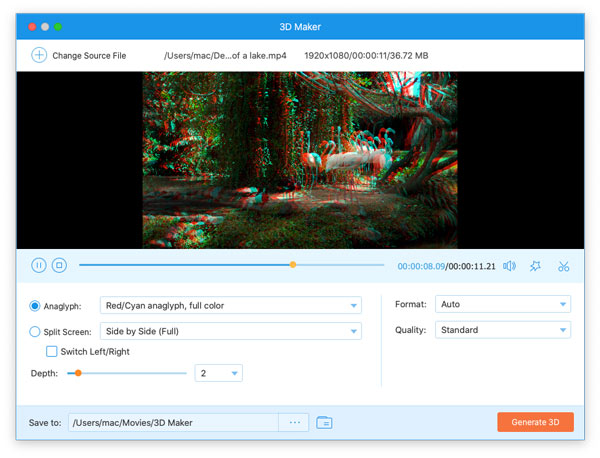
Step 1Select 3D Maker from Toolbox, and click the big plus button to add the video.
Step 2Choose the Anaglyph and Split Screen 3D effect. Thenselect the output format and quality for your 3D movie.
Step 3Finally, click Generate 3D tocreate a 3D video.
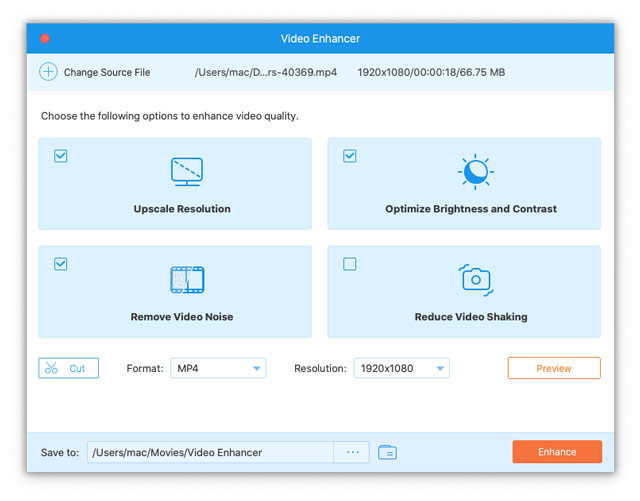
Step 1Locate the Toolbox tab andclick Video Enhancer. Click the big plus icon to add the video youwant to enhance.
Step 2You can choose Upscale Resolution,Optimize Brightness and Contrast, Remove Video Noise, or Reduce Video Shaking option to enhance your video.
Choose the output format, resolution and destinationfolder, and click the Preview button to view the enhanced video.Then click Enhance button to enhance the video.

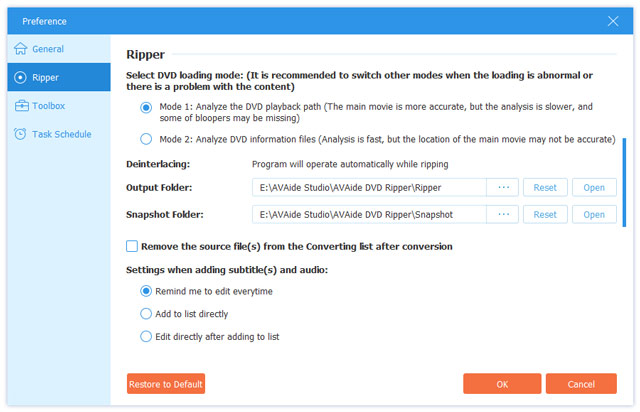
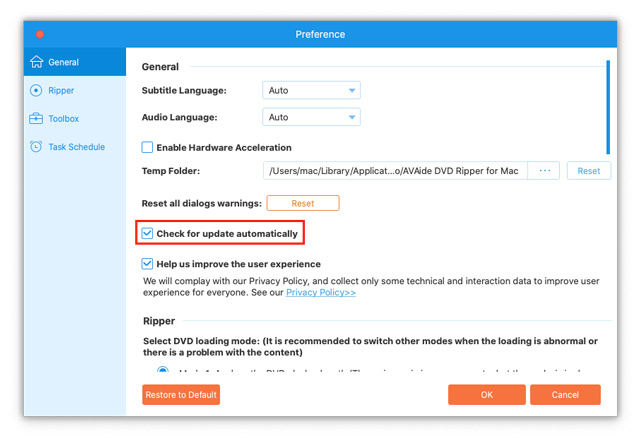
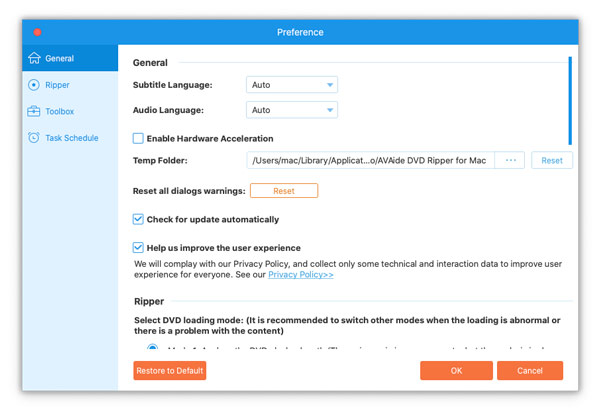
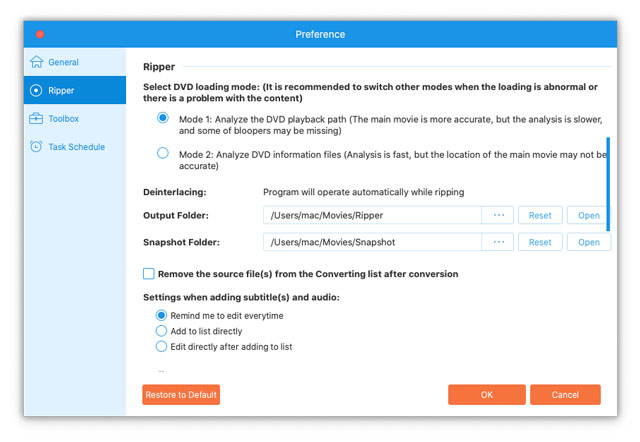
To adjust more settings, you can click Preference (the gear icon) in the main interface.
Here, you can set subtitle language, audio language, enable GPU acceleration, and check for update automatically.
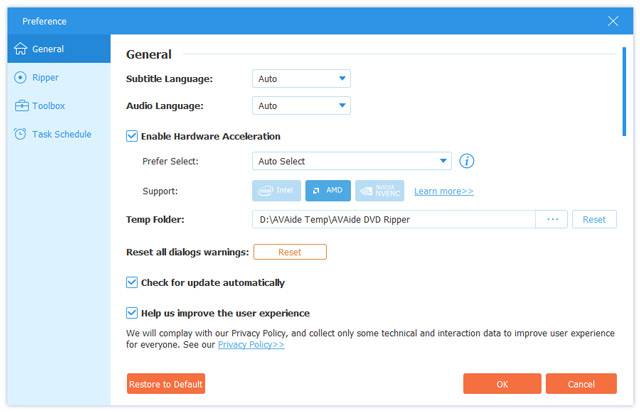
You can set the output folder, snapshot folder, remove the source file after conversion, or set the next move when adding subtitle and audio.
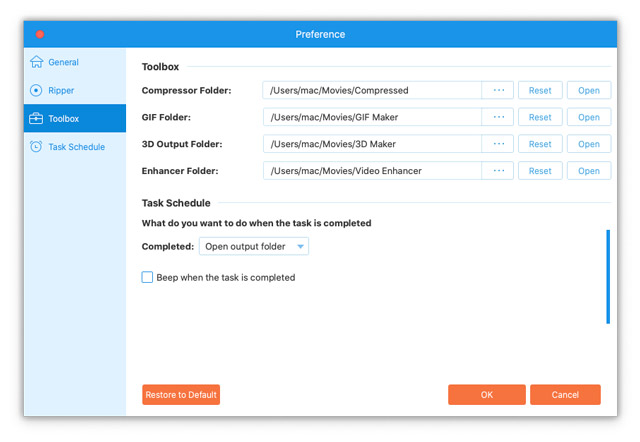
For adjusting toolbox settings, you can reset the output folders where to save the compressed video, new-generated GIF, new-created 3D video, and the enhanced video.
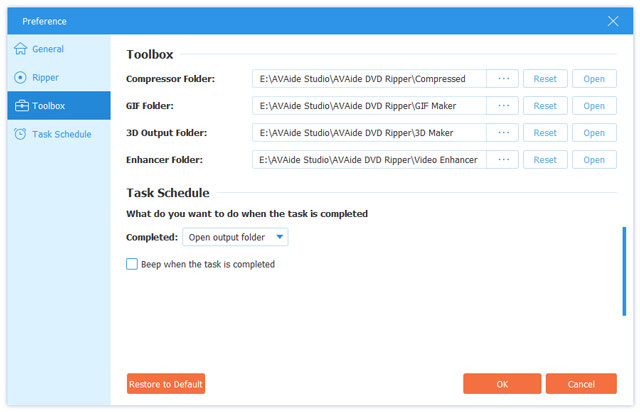
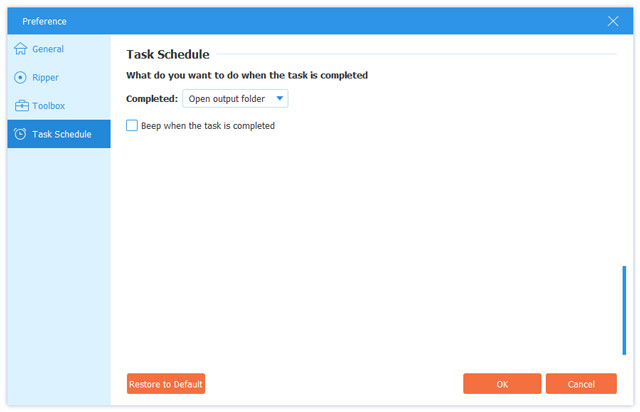
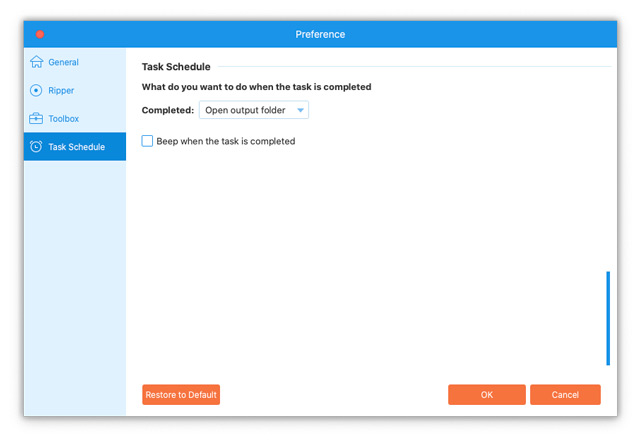
When you set a scheduled task, you can choose to open output folder, shut down computer, sleep computer, exit program, or do noting after the task is completed.
Step 1Download
Click the download button to download the setup file of AVAide DVD Ripper.
Step 2 Install
Double click the “dvd-ripper.exe” file and click the Install button to install it.
Click Start Now to start using AVAide DVD Ripper.
Double click the “dvd-ripper.dmg” file and drag the program icon to your application folder to use it.
Some features are limited in the trial version. In the trial version, you can convert a 5-minute time length for each DVD ripping, and rip only 5 DVD discs to DVD folder/ISO file with 30 days. The additional tools like Media Metadata Editor, Video Compressor, GIF Maker, 3D Maker, Video Enhancer are also limited to 5 files.
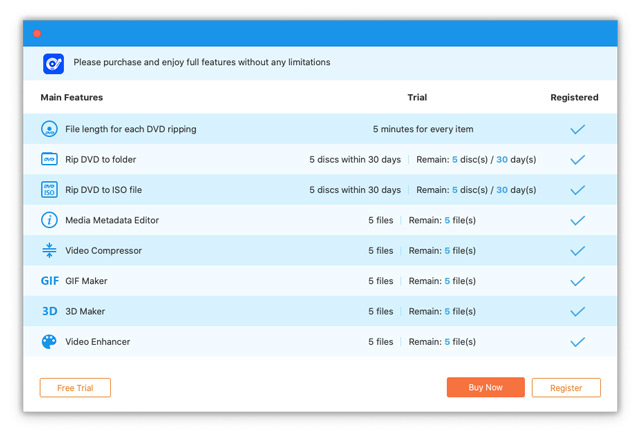
To enjoy full features without limitation, you can purchase AVAide DVD Ripper full version.
Step 1Enter register window
Launch AVAide DVD Ripper and click the Register button in the popup window.
Or click Register (the key icon) at the top right side of the interface to enter the register window.
You can also click Menu (the three horizontal lines icon) at the topright side of the interface.
Step 2Register
In the registration window, type the Email Address and Registration Code you received after a successful purchase. Click Activate button to register AVAide DVD Ripper.
AVAide DVD Ripper will always be updated to improve its functions and fix bugs. You can update the software manually or automatically.
1. Go to the Menu icon and select Check Update to check the current version of AVAide DVD Ripper.
2. You can also go to Menu icon and select Preference. Tick Check for update automatically option in the General settings. Then your software will be updated automatically.
3. To make sure you are using the latest software, you can go to the official web page of AVAide DVD Ripper and download the latest version.
| File Types | |
| DVD | DVD Disc, DVD Folder, DVD ISO File |
| Video | TS, MTS, M2TS, MXF, TRP, TP, MP4, M4V, QT, MOV, MPG, MPEG, MPEG2, MPEG4, MJPG,MJPEG, AVI, 3GP, 3G2, FLV, MOD, TOD, RM, RMVB, WMV, ASF, MKV, SWF, F4V, VOB,DAT, DV, DIF, WebM |
| 4K UHD | MP4, TS, MKV, AVI, FLV, WebM, MOV, MXF |
| HD Video | HD ASF Video(.asf), HD AVI Video(.avi), HD H.264/MPEG-4 AVC Video(.mp4), HD MKVVideo Format(.mkv), HD MOV Video(.mov), HD MPG(.mpg), HD TS(.ts), HD WMV(.wmv),HD MP4(.mp4), HD WebM(.webm) |
| Audio | FLAC, WAV, WMA, MP3, MP2, AAC, AC3, AIFF, APE, CAF, MPC, QCP, OGG, M4A, M4B,AUD, MKA, AIFC, RA, RAM, AU, AIF, CUE |
| Device Types | |
| Apple | iPhone 12/12 Pro/12 Pro Max/12 mini, iPhone 11/11 Pro/11 Pro Max, iPhone XS/XSMax, iPhone XR, iPhone X, iPhone 8, iPhone 8 Plus, iPhone 7, iPhone 7 Plus,iPhone 6s, iPhone 6s Plus, iPhone 6, iPhone 6 Plus, iPhone SE, iPhone 5s, iPhone5c, iPhone 5, iPhone 4S, iPhone 4, iPhoneiPad Pro, iPad Air 2, iPad Air, iPad mini 4, iPad mini 3, iPad mini 2, iPadmini, iPad 4, iPad 3, iPad 2, iPadiPod Touch, iPod Nano, iPod Classic, iPodApple TV, Apple TV 2, Apple TV3 |
| Samsung | Samsung Galaxy S10, Samsung Galaxy S9, Samsung Galaxy S8, Samsung Galaxy S7,Samsung Galaxy S6, Samsung Galaxy S5, Samsung Galaxy S4, Samsung Galaxy S III,Samsung Galaxy S II, Samsung Galaxy S, Samsung Galaxy Note 9, Samsung GalaxyNote 8, Samsung Galaxy Note 5, Samsung Galaxy Note Edge, Samsung Galaxy Note 4,Samsung Galaxy Note 3, Samsung Galaxy Note II, Samsung Galaxy NoteSamsung GalaxyA series, Samsung Galaxy J series, Samsung Galaxy Tab series, Samsung TV |
| Pixel 3, Pixel 3 XL, Pixel 2, Pixel 2 XL, Pixel, Pixel XL | |
| HUAWEI | Huawei P30, Huawei P20, Huawei P10, Huawei P9/P8, Huawei Mate 20, Huawei Mate10, Huawei Mate 9/8, Huawei Ascend Y9, Huawei Ascend Y7, Huawei Nova 4, HuaweiNova 3, Honor 8A, Honor Magic 2, Honor 8X, Honor 8C, Honor 10, Honor Play |
| SONY | Xperia 10, Xperia XZ3, Xperia XZ2, Xperia XA2, Xperia XZ1, Xperia XA1, XperiaXZ, Xperia XA, Sony TV, PlayStation 4, PlayStation 3, PlayStation PortableM |
| LG | LG G8, LG G7, LG G6, LG G5, LG G4, LG V50, LG V40, LG V35, LG V30, LG TV |
| HTC | HTC U12 life, HTC U12+, HTC Desire 12, HTC U11 life, HTC U11+, HTC U11, HTCDesire 10 lifestyle |
| XIAOMI | Mi 9, Mi 8, Mi MIX 3, Mi Max 3, Mi A2, Mix 2S, Redmi 7, Redmi Note 7, Redmi 6,Redmi Note 6, Redmi 6A, Redmi S2, POCOPHONE F1 |
| Motorola | Moto G7, Moto Z3, Moto G6, Moto E5, Moto X4, Moto E4, Moto Z2, Moto G5, Moto Z |
| Game Console | Xbox One, Xbox One S, Xbox One X, Xbox 360, PS4, PS3, PSP, PS Vita, Wii |
AVAide DVD Ripper is the excellent DVD ripping software. It can rip DVD movies to digital video or audio files.
Step 1Load DVD
Insert the DVD disc into the computer drive. Launch AVAide DVD Ripper and click Load DVD button to load the DVD disc to the program. You can also click the drop-down arrow next to Load DVD to import the DVD disc, DVD ISO file, or DVD folder.
After loading the DVD, you learn more functions from its main interface.
1. You can click the Full Title List button to select the title you want. Click Rename (the pen icon) to rename the title.
2. You can click Add Audio Track to add an audio track from local, or click Audio Track Disabled to disable the audio track.
3. Click Add Subtitle to add an SRT, SSA, or ASS subtitle, or click Subtitle Disabled to disable a subtitle.
4. The Format icon and the Rip All to option both enable you to select the output format for DVD ripping.
Step 2Select output format
Go to Rip All to area and click the drop-down arrow to select the output format. You can locate Video, Audio, or Device tab to select the output video formats, audio formats, or the proper format for playing on portable devices.
If needed, click Custom Profile (the gear icon) to customize the video settings like video quality, resolution, encoder, frame rate, and bitrate. You can also adjust the audio settings like encoder, channel, sample rate, and bitrate.
Step 3Rip DVD
Finally, go to the Save to area and select the output folder. Then click the Rip All button to start converting the DVD to video or audio.
Note: You can click the Enable Hardware Acceleration icon to make sure the DVD ripping has proceeded at a fast speed.
AVAide DVD Ripper is equipped with multiple editing features. You can customize DVD movies Cut video as per your needs. You can click Edit (the magic wand icon) or Cut (the scissor icon) to better polish your video.
To trim the unwanted part, you can use the Cut feature (the scissor icon). Then you can split video, copy and create a new segment, or delete the current segment.
Click the Edit icon and locate Rotate & Crop tab in the editing window.
You can rotate the DVD title in 90 clockwise or counterclockwise, or flip the video horizontally or vertically.
You can drag the frame border to set the crop area, fine-tune the crop area, or make it sit in the center of the original frame. Besides, you can set a fixed aspect ratio from 16:9, 4:3, 21:9, 16:10, 5:4, 1:1, or 9:16. Also, you can select the zoom mode from Letter Box, Pan & Scan, or Full.
Switch to the Effect & Filter tab and adjust the basic effect like contrast, saturation, brightness, and hue.
It provides over 40 video effects that you can apply to your DVD video. You can choose video effects from Warm, Gray, Sketch, Hong Kong Movie, Orange Dots, Purple, Plain, Coordinates, Stars, Modern, Pink, Green, Dawn, etc.
The Watermark feature lets you add your mark to the DVD video. You can add a text watermark or picture logo to the video. Meanwhile, you can adjust the font size, font style, font color, font area, or fine-tune rotation and opacity.
Go to the Audio tab, and click Add Audio (the plus icon) to select the audio track from your local computer. You can turn up/down by moving the slider left/right. And adjust the delay if the image doesn’t match with the sound.
Under the Subtitle tab, you can click Add Subtitle(s) (the plus icon) to add a subtitle (*.srt, *.ssa, *.ass) from local, or click Search Online (the magnifier icon) to download a subtitle online. After that, you can adjust the font size, font style, font color, add an outline, adjust the position of subtitle, fine-tune opacity, and delay time. You can click the OK button to apply the changes.
There are popular tools in the Toolbox of AVAide DVD Ripper. You can use the following tools for free.
Step 1Click Media Metadata Editor inToolbox. You can add the media file (MP4, M4A, M4R, M4B, M4P, 3G2,M4V, MOV, MP3, WMA, ASF, WMV, WAV, AVI) you want to edit.
Step 2In the Media Metadata Editor window, you can adjust theinformation like title, artist, album, composer, genre, year, track and comment. Click theSave button to edit the metadata.
Step 1Open Video Compressor in Toolbox. You can click the big plus icon to add the video you wantto compress.
Step 2In the Video Compressor window, you can rename the video,select the size after compression, choose the compressed format, select the resolution, andpreview the compressed video.
Step 3Click the Compress button tocompress the video on computer.
Step 1Select GIF Maker in Toolbox, and add the video you want to turn to GIF.
Step 2You can use the Edit or Cut feature to edit the video effects and cut off unwanted parts.Then select the output size and frame rate as you want.
Step 3Finally, click the Generate GIFbutton to create a GIF file from the video.
Step 1Select 3D Maker from Toolbox, and click the big plus button to add the video.
Step 2Choose the Anaglyph and Split Screen 3D effect. Thenselect the output format and quality for your 3D movie.
Step 3Finally, click Generate 3D tocreate a 3D video.
Step 1Locate the Toolbox tab andclick Video Enhancer. Click the big plus icon to add the video youwant to enhance.
Step 2You can choose Upscale Resolution,Optimize Brightness and Contrast, Remove Video Noise, or Reduce Video Shaking option to enhance your video.
Step 3Choose the output format, resolution and destinationfolder, and click the Preview button to view the enhanced video.Then click Enhance button to enhance the video.
To adjust more settings, you can click Preference (the gear icon) in the main interface.
Here, you can set subtitle language, audio language, enable GPU acceleration, and check for update automatically.
You can set the output folder, snapshot folder, remove the source file after conversion, or set the next move when adding subtitle and audio.
For adjusting toolbox settings, you can reset the output folders where to save the compressed video, new-generated GIF, new-created 3D video, and the enhanced video.
When you set a scheduled task, you can choose to open output folder, shut down computer, sleep computer, exit program, or do noting after the task is completed.
Copyright © 2026 AVAide. All rights reserved.