"My girlfriend takes dozens of screenshots a day. Our joint iCloud account is almost full only because of that. Is there an application (can be paid) or another easy way to go through all screenshots and convert them? Also, is there a way to force new screenshots to be saved as JPG?" - Reddit
Many people run into this problem. PNG files take up more space, and converting them to JPG can help save storage. If you have a lot of images, you might want an easy way to convert them in bulk. So, how do you turn PNG to JPG? This write-up will show you different ways to do it. You can convert images online, on Windows or Mac. Just pick the way that works best for you!
Part 1: Convert PNG to JPG Online with High Quality
If you prefer a no-installation way to convert PNG to JPG, we have an online tool to recommend: AVAide Image Converter. This free online converter makes image conversion simple and fast. It supports over 100 image formats. These include PNG, JPG, and GIF.
The impressive part is that you can turn PNG to JPG with just one click without losing clarity. It does not end there; you can also convert multiple images using it at once, saving time. Plus, you do not need to install it or pay for anything to do your task. Whether you use your mobile phone or computer, you can access it, making it convenient to use anywhere.
Check the steps below to find out how to convert PNG to JPG online with high quality:
Step 1Open a new tab on your browser and search for AVAide Image Converter. Click on its official website to access the online converter.
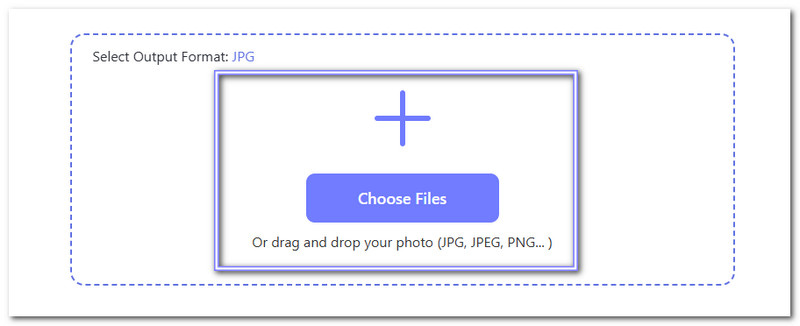
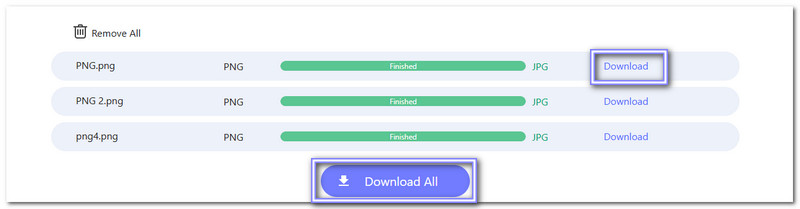
Step 2Head to the Select Output Format option. As you can see, JPG is already set as the default output format, so there is nothing to change here.
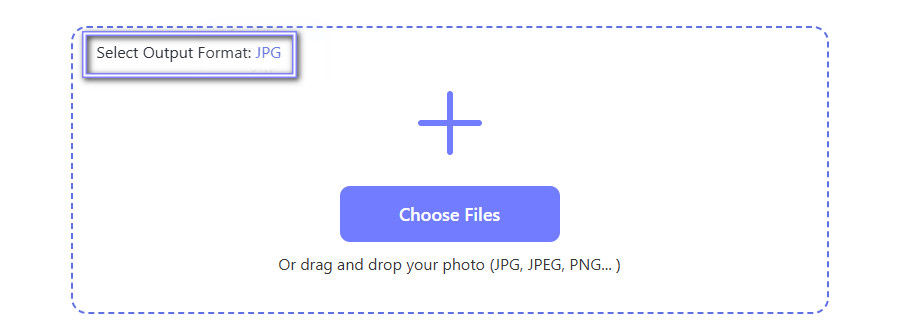
Step 3Click the + Choose Files button and locate the PNG file you want to convert. If you have many files to convert, you can add, drag, and drop them all at once.
Step 4Once the images are uploaded, the conversion will start automatically. Click the Download or Download All button to save your new JPG files.
Benefits of using AVAide Image Converter: Changing PNG to JPG with AVAide Image Converter is easy and hassle-free. Since it works online, you do not have to worry about downloading or installing anything. It keeps the image quality high, so your pictures stay sharp. The bulk conversion feature helps when you need to process many images simultaneously. You can also use it to convert SVG to JPG because it supports numerous image formats.
Part 2: How to Convert PNG to JPG on Windows
If you are a Windows computer user, you can check this part for simple approaches to convert PNG images into JPG.
1. Paint
Paint lets you do basic image editing without needing an extra program. One of the things that it can do is turn PNG to JPG. It is excellent when you need a smaller file or a format that works on more devices. Besides converting images, it lets you crop, resize, and rotate pictures. You can also draw, add text, and use basic color tools.
Step 1Hit on the Start button and type Paint in the search box. When you see Paint in the results, click to open it.
Step 2You can import your PNG file in two ways. First, you can drag and drop the image into the window. Second, go to the File menu, click Open, and browse the image you want to convert.
Step 3Before saving, ensure the image looks right. If you need to make changes, Paint has crop, resize, and rotate features.
Step 4Go back to the File menu. Hit Save As and choose JPEG Picture from the list. A window will appear or pop up, asking where to save the new JPG file. Pick a folder and give your file a name.
Step 5Check that the Save as type option is set to JPEG. Then, click Save. Your PNG file is now a JPG!

Benefits of using Paint: Using Paint to switch PNG to JPG is simple, fast, and free. It is lightweight, so it runs smoothly without slowing down your computer. Paint also keeps things easy with a simple layout. You do not have to deal with complex settings.
2. Batch Picture Resizer
Besides its resizing capabilities, you can also use Batch Picture Resizer to convert PNG to JPG format. As its name states, it supports batch resizing and conversion processes. You can also use its editing tools like crop, rotate, and effects. Plus, it lets you rename files and put watermarks on images. However, the conversion speed is not the fastest, but it still does the job well.
Step 1Go to the SoftOrbits main website to download, install, and use Batch Picture Resizer.
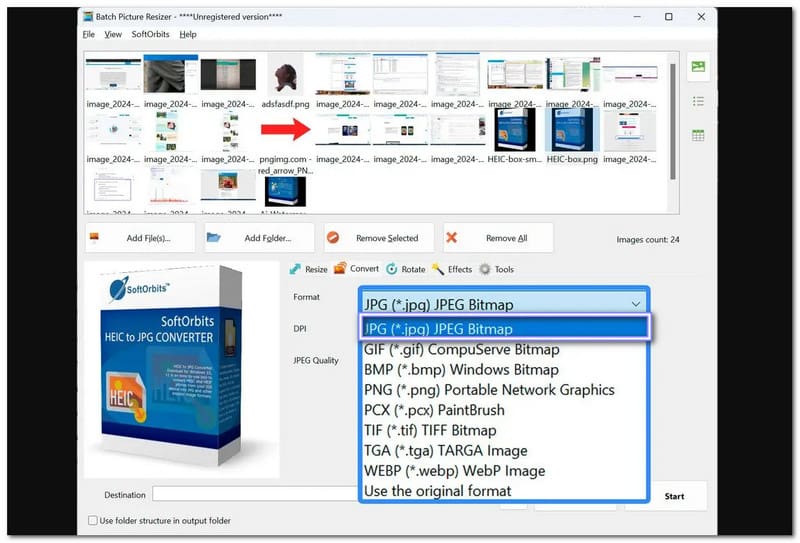
Step 2Import your PNG image by clicking the Add Files button. Then, a display will pop up where you can select your PNG file.
Step 3Once the PNG image is loaded, proceed to select the output format. Under Format, pick JPEG from the list.
Step 4Before converting, you can make small changes. You can resize the image, change its clarity, or fine-tune brightness. If you do not need any changes, you can skip this step.
Step 5Once everything is set, click the Start button. The program will begin converting your PNG file to JPG.
Benefits of Using Batch Picture Resizer: The resizing feature is helpful if you need to change the image size before saving it in a new format. Another benefit is the ability to add watermarks. It is useful if you want to protect your images from being copied.
Part 3: How to Convert PNG to JPG on Mac
If the above part is about converting PNG files to JPG on Windows, now this part will teach you how to do it on Mac.
1. Preview
You read it right: Preview can help you view, edit, and convert image files. It is advantageous since it is already installed on your device. It supports different image formats like PNG, JPG, TIFF, and PDF, making it useful for basic editing and conversion tasks. While it is not a dedicated converter, it still does a great job turning .png to .jpg with just a few clicks.
Step 1Go to Finder and locate the PNG image you want to change. Once you find it, double-click the file. It will open in Preview by default.
Note: If it opens in a different application, right-click the file, choose Open With, and select Preview from the list.
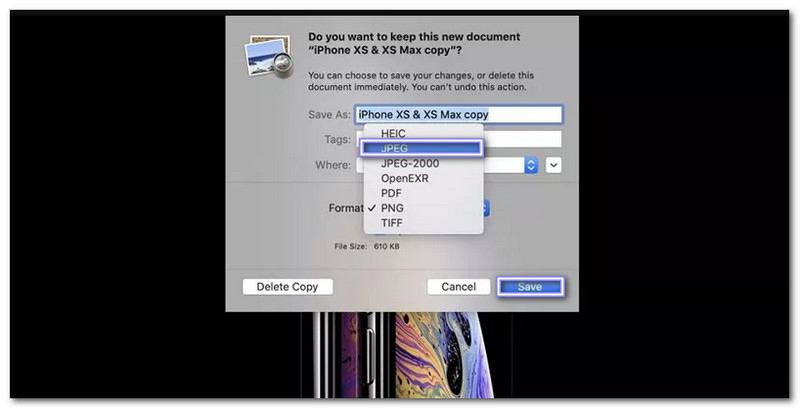
Step 2Go to the top menu bar and click on File. A list of options will appear or pop up; find and select Export.
Step 3In the Export window, look for the Format section. By default, PNG. Click the drop-down menu next to it, and a list of formats will appear. There, choose JPEG from the options.
Step 4Before saving, you can fine-tune the clarity of your image. Now, choose where to save the new file. You can pick a folder or keep it in the exact location as the original. Also, you can rename the file if you want.
Once everything looks good, click Save. Your PNG is now a JPG; you can use it as needed!
Benefits of Using Preview: Using Preview to convert PNG to JPG on a Mac is fast, simple, and hassle-free. Since it comes pre-installed, there is no need to download extra software, which saves time and storage space. Plus, it works smoothly without glitches or compatibility issues.
2. PDF Converter OCR
While it mainly works with PDF files and allows you to convert PDF to PNG, PDF Converter OCR can also change PNG images to JPG without losing quality. This software is simple to use, making it great for those who need quick conversions. One thing to note is that PDF Converter OCR does not work on Windows. It is only available for Mac devices. Even so, it is a free program you can download and use whenever you need to change your file format.
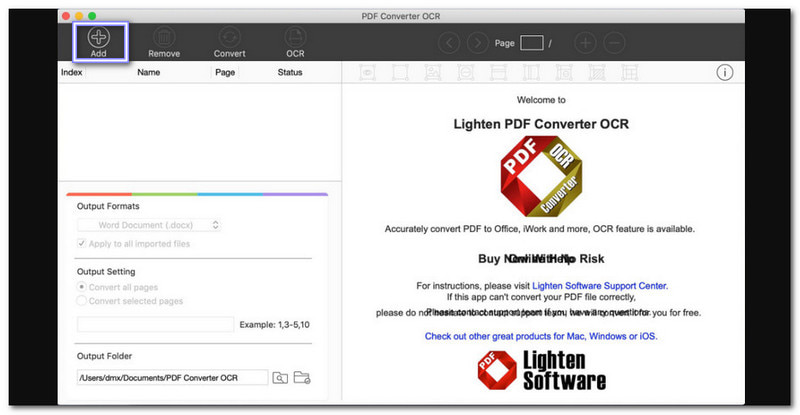
Step 1Head to the official PDF Converter OCR website and download the program for Mac. Once the download is complete, install it on your device. After installation, open the program to get started.
Step 2Add your PNG file by clicking the (+) button. Browse your file folder and select the PNG image you want to convert. You can also click and drop the file straight into the program for a quicker process.
Step 3Once your image is uploaded, choose the format you want. Find the drop-down menu under the Convert To section. Select Image and then choose JPEG as the final format.
Step 4Before converting, you can tweak some settings. You can change the image quality, resize it, or adjust color levels. These options are helpful if you want a smaller file size or better image clarity.
Step 5Once everything is settled, click the Convert button. The tool will process your image file and turn it into a JPG. After a few seconds, your new image will be saved. You can find it in the selected folder on your Mac.
Benefits of Using PDF Converter OCR: PDF Converter OCR can convert PNG to JPG with clear results, keeping the image sharp. The tool is also easy to use, with a clean interface that does not confuse beginners. Since it is designed for Mac, it works well with the system and does not slow down the device.
Which tool do you think is the outstanding PNG-to-JPG converter? Should you use a program for Windows or Mac, or is an online tool better? All the tools mentioned work well, but you should choose what is most convenient for you.
If you want an easy and quick solution, AVAide Image Converter is the best option. Why? It works online, so there is no need to install anything. It is free, fast, and can convert multiple images at once. You just upload your PNG files, pick JPG as the format, and download them in high quality!

You can easily convert your photo from any image format to a popular JPG, PNG, or GIF with no quality loss.
PROCESS NOW