If you need to convert an Adobe Illustrator file to a PNG image, you've bumped into the right page. As we know, PNG is one of those versatile image formats that offers high-quality exports. Not only can it export images in high quality, but it also lets you leverage the transparency feature. This feature is especially helpful for logos or products that need editing. However, since AI files are vector-based and require dedicated software to view, converting them to PNG can be tricky when you don't know the proper way of conversion. In this guide, you will learn the top Illustrator to PNG converters and how each of these tools works.
Part 1: What Is an AI File?
The AI file format is Adobe Illustrator's proprietary vector-based format that is used for designing illustrations, complex graphics, and logos. AI files store images as mathematical paths rather than pixels, unlike PNG or JPEG. With that, you can take advantage of scaling up and down without worrying about the quality. It has the capability to retain its original quality without losing quality. Therefore, designers use it for branding materials, digital artwork, and other multimedia works where precision and flexibility are crucial.
One of the key advantages of this format is its ability to preserve attributes, such as editable vector elements, text, and layers. Designers will have full control over adjustments with ease. Additionally, businesses rely on AI files for professional design work. The only drawback of the AI format is its lack of universal compatibility. It requires specialized software, such as Adobe Illustrator, to open and edit. Thus, you will find it challenging to share with collaborators or clients who don't have access to Illustrator.
This is where PNG conversion comes into play. PNGs are widely supported raster images that maintain high resolution and support transparency. By using an AI to PNG converter, you can retain visual quality while ensuring accessibility across platforms and devices.
Part 2: How to Convert AI to PNG in Adobe Illustrator
Converting AI to PNG using Adobe Illustrator will help you produce a quality conversion while preserving vibrant colors, transparency, and crisp edges from the AI file. One of the essential functions of this tool is to export graphics in many formats, like PNG and JPG, which are widely compatible with platforms and devices. Moreover, it is a renowned vector graphic software that allows users to create scalable artwork, illustrations, and logos. To find out the step-by-step process on how to save Adobe Illustrator as PNG, take a look at the tutorial below:
Step 1Begin by downloading Adobe Illustrator on your computer. If you have it already on your PC, proceed by launching the app.
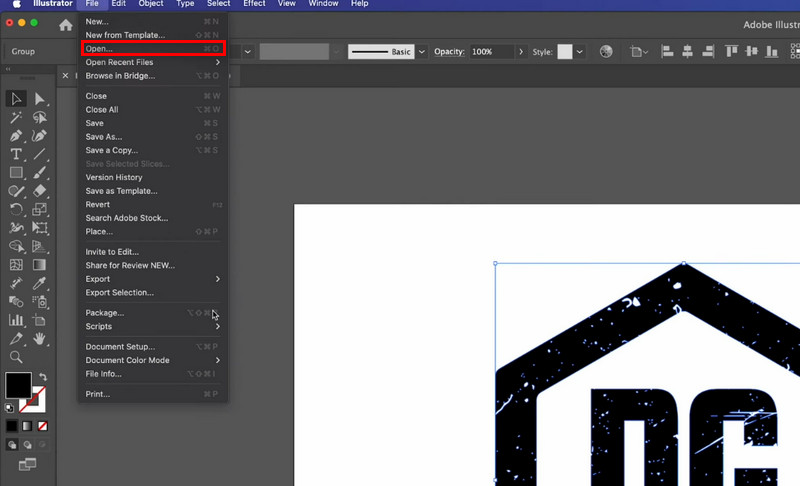
Step 2Next, open the AI file you wish to convert by going to File > Open and selecting your artwork. Also, you can just hit Ctrl/Cmd + O key combinations to open and browse your AI file.
Step 3Once done loading the file, inspect it and try making some adjustments by ensuring all elements are arranged properly. You may also check if the artboard matches your desired output size. If you wish, you could also resize the image in Illustrator.
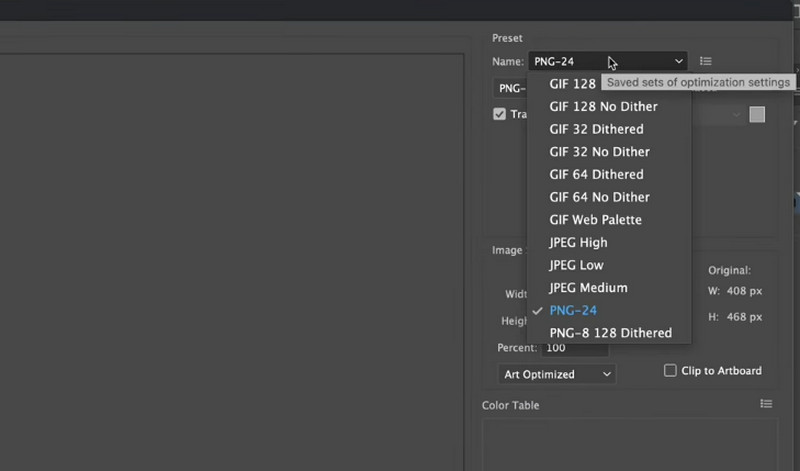
Step 4When everything is set, access the export options by going to File > Export > Save for Web (legacy). Then, a window will appear. On the Preset section on the right side of the interface, open the Name dropdown and choose PNG as the target format. Finally, click the Save button in the bottom right corner.
Part 3: How to Convert AI to PNG with Photoshop
While Adobe Illustrator is the native home for AI files, Adobe Photoshop offers advanced functions and tools for converting vector-based artwork into high-quality PNG images. Photoshop is, likewise, an industry-leading raster graphics editor where you can access tons of features, primarily control over optimization, transparency, and quality of images. Whether you are preparing graphics for social media, client presentations, or a website, this tool guarantees professional results. However, if you are a beginner at using this program, it may take you some time to use it. Therefore, it is ideal for advanced and professional users. Nevertheless, let us walk you through the process to save an AI file to PNG.
Step 1The same drill: get the app's installer from its official webpage and install it on your computer. After that, launch the app. If you have it already, launch and start using the program.
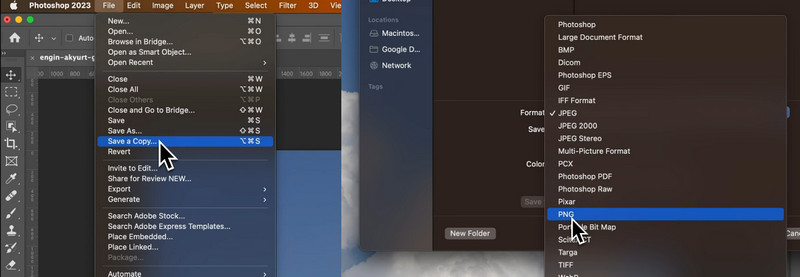
Step 2This time, load your AI file into the editor. Go to File > Open and browse for the AI file you wish to edit.
Step 3In the dialog that appears, choose Convert to Smart Object to maintain the editability of the image file. Then, set the resolution to 300 PPI for print or 72 PPI for web. Also, ensure to select an appropriate color mode, which is RGB for digital. Then, organize the layers in the AI file with multiple elements as needed.

Step 4To convert, go to File > Save a copy and choose PNG as the output format in the dialog box. What is good with this tool is that you can also convert Illustrator images to JPEG with ease using the same procedure.
Part 4: How to Convert AI to PNG Free Online
As a bonus, AVAide Image Converter lets you convert any image format to PNG for free and without any installation required. The program supports JPG, TIFF, GIF, BMP, and more. It works directly from your web browser without registration. All you need to do is upload, convert, and download. Additionally, this tool supports a batch conversion feature that allows users to upload and process multiple files simultaneously. You can use it when preparing a logo pack or marketing materials, as it also maintains transparency and high image quality. If you'd like to know how to convert .ai to PNG, follow the tutorial below.
Step 1First, you need to visit the program's official website using any browser on your computer. Type in the name of the tool in the address bar and hit Enter on your keyboard to search for it.
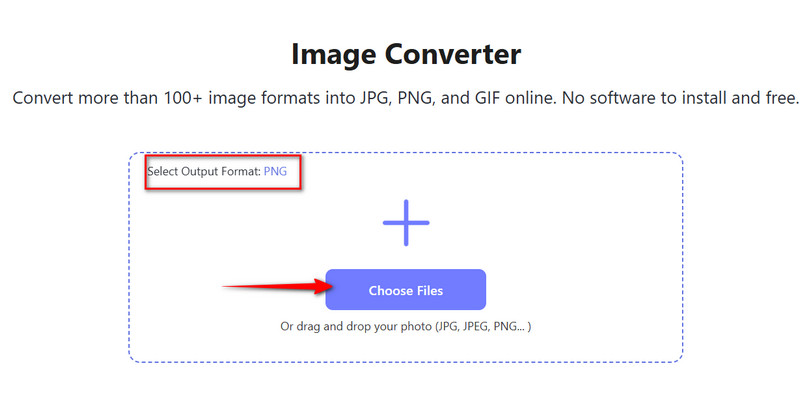
Step 2You will know you landed the right page if it looks like the interface below. From here, you can change the export format to your liking. You may choose between JPG, PNG, or GIF.
Step 3After choosing a target format, hit the Choose Files button and browse your desired images to convert. Alternatively, you can drag and drop the image files into the interface to load them.
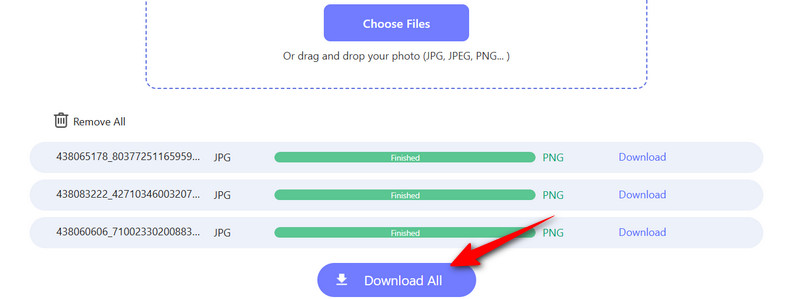
Step 4Right after uploading them, the tool will convert the uploaded files automatically. At last, click the Download All button to get the converted photos and save them to your local device.
You have just learned how to save an Adobe Illustrator file as a PNG using the tutorial provided. It will take you minutes if you are already used to the environment of Adobe Illustrator and Photoshop. On the other hand, it may pose a learning curve when it is your first time using them. Still, these are top and effective methods to do the conversion. Moreover, for your quick, daily conversions, consider the online tool and pair it with other programs for an efficient workflow.

You can easily convert your photo from any image format to a popular JPG, PNG, or GIF with no quality loss.
PROCESS NOW