You just downloaded a texture pack or received a graphics file, only to realize it is in DDS format, and now you are stuck figuring out how to view it. To make things easier, the best solution is to convert DDS to JPG, a more widely supported image format. Whether you are tweaking game visuals, editing 3D assets, or simply trying to preview an unfamiliar file, this guide will walk you through several simple methods. From online tools to professional software, here is how to get the job done quickly and easily.
Part 1. What Is a DDS File
Commonly, a DDS (DirectDraw Surface) file is a texture image format created by Microsoft. It is widely used in gaming, 3D modeling, and other real-time graphics applications. It is designed to hold surface textures that include complex elements, for example, mipmaps and cube maps, in both compressed and uncompressed forms. Because of this, it is optimal in aiding performance in graphics-heavy environments.
Although professional users may find the format advantageous, standard image viewers and editors will find it difficult to work with DDS files. Adobe Photoshop (with the right plugin) or game development tools are the only ones capable of working with DDS files. To reduce the chances of compatibility issues, DDS files are often converted to JPG or PNG.
DDS File Quick Facts
- Property
- Full Name
- File Extension
- MIME Type
- Developer
- Format Type
- Common Uses
- Key Features
- Opens With
- Main Limitation
- Suggested Conversions
| Detail |
| DirectDraw Surface |
| .dds |
| image/vnd.ms-dds |
| Microsoft |
| Texture file |
| Gaming, 3D modeling, real-time rendering |
| Compression, mipmaps, cube maps |
| Adobe Photoshop (plugin), game engines |
| Not supported by default image viewers |
| JPG, PNG, BMP |
Part 2. The Fastest Way to Convert DDS to JPG Free Online
AVAide Image Converter is probably the fastest way to change DDS files into JPGs. The good news is that this tool is completely free and online, so there is no need to download or install software. Aside from DDS, other formats are also supported, and the converter works with multiple files at the same time without a loss of quality. Whether you are a gamer working on textures or need images in a more usable format, AVAide delivers a simple and intuitive interface and a JPG converter that works quickly and accurately.
- Convert multiple DDS files at once for quicker results.
- Fully browser-based, no installation required.
- Maintains original image quality after conversion.
- Supports popular formats and works on all major browsers.
Step 1Image Converter of AVAide is in the same category as other image converters, so you can easily Google its webpage.
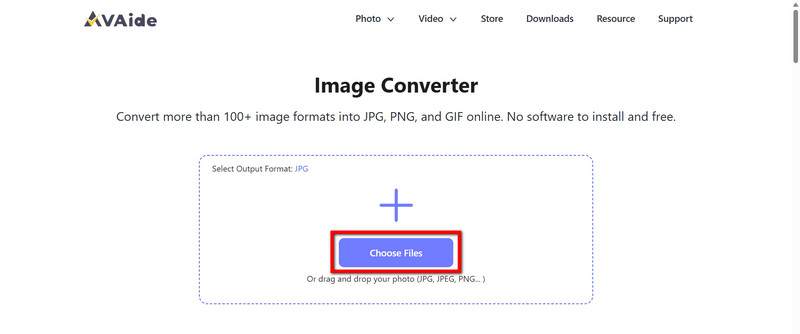
Step 2After you reach the webpage, look at the converter side. There is a box with a dropdown that says Select Output Format. Click on it and select JPG.
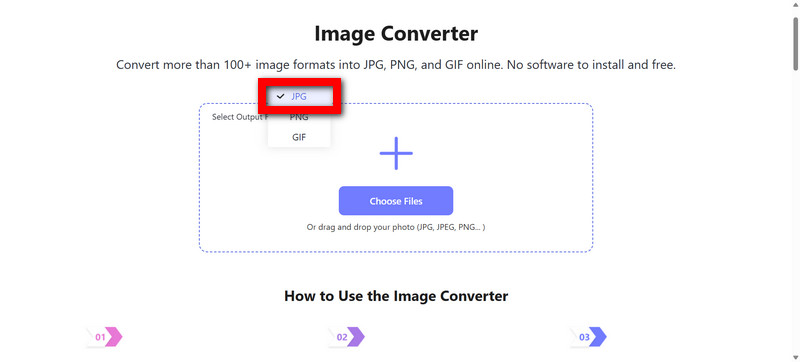
Step 3If you need to convert more than one DDS image to JPG, select the desired number in the circle to the left and click on Choose Files. If you do not feel like clicking, you can also just drag the images to the upload section.
Step 4After this step, the converter will begin working without you having to click any other buttons.
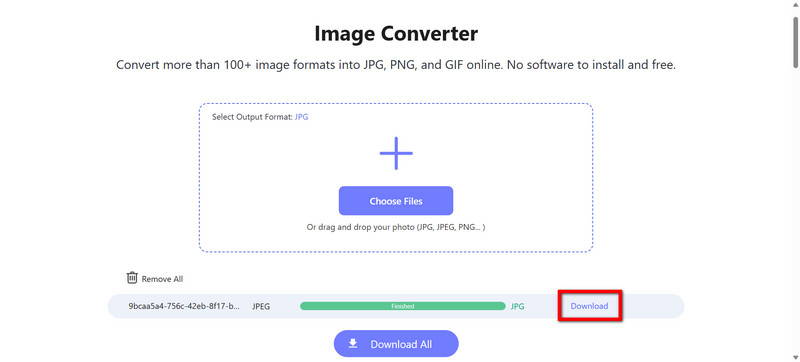
Step 5After the converter has done its magic and is ready with the file, you will see it next to the one you just uploaded. It will say Download next to it, and clicking on that will download the file. If you want to download more than one file at a time, just click on Download All, and the rest will follow.
Part 3. How to Convert DDS to JPG with GIMP
GIMP, or GNU Image Manipulation Program, is a free image editor software application that operates as an open-source program. It is well-suited for those who prefer a desktop application that incorporates image editing functions, including conversions like TIFF to JPG with ease. Its accessibility is an additional advantage, as it is downloadable for Windows, Mac, and Linux users. GIMP also supports a wide variety of image formats, and DDS is included.
Step 1Visit the official GIMP website and download the latest software version for your operating system.
Step 2Its interface is quite user-friendly. You can open your DDS image by clicking File, then Open, or by using the shortcut for opening files, which is Ctrl+O. After clicking open, just browse for your DDS image, and GIMP will open the image with all the layers, if there are any.
Step 3Save your changes after making any necessary basic edits, such as cropping, resizing, and color correction.
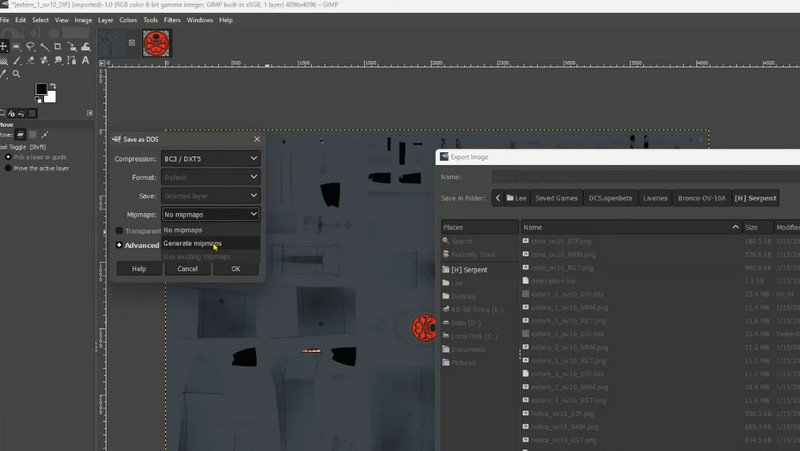
Step 4Click File, then Export. Remember to change the output format to JPG or JPEG. Set the filename and location to save the exported image.
Step 5After clicking Export, a box will open where you can add or remove compression. Adjust the image quality slider to your preference and click Export to finish.
Part 4. How to Convert DDS to JPG with XnViewer MP
XnView MP is a free image viewer and converter with additional functions such as batch processing. It is also available for Windows, Mac, and Linux. The software supports DDS and boasts over 500 image formats, which makes it stand out. For users searching for a fast and lightweight image format change, XnView MP is an excellent choice for desktop software.
Step 1Visit the official website of XnView MP to download the program that is suitable for your OS.
Step 2Launch the program and click on the File menu. Select Open and navigate to your DDS file.
Step 3Before converting, you can make minor edits, like viewed edits, including resizing and rotating.
Step 4Now, click on the File menu, hover Export, and select JPG in the dropdown menu.
Step 5After selecting the desired image quality and the target folder, click on Save to finish the process.
Part 5. How to Convert DDS to JPG with Photoshop
Adobe Photoshop is widely used for design and media work. With proper plugins, it lets users handle formats like DDS and perform conversions such as SVG to JPG smoothly. This approach works best for users already familiar with Adobe products.
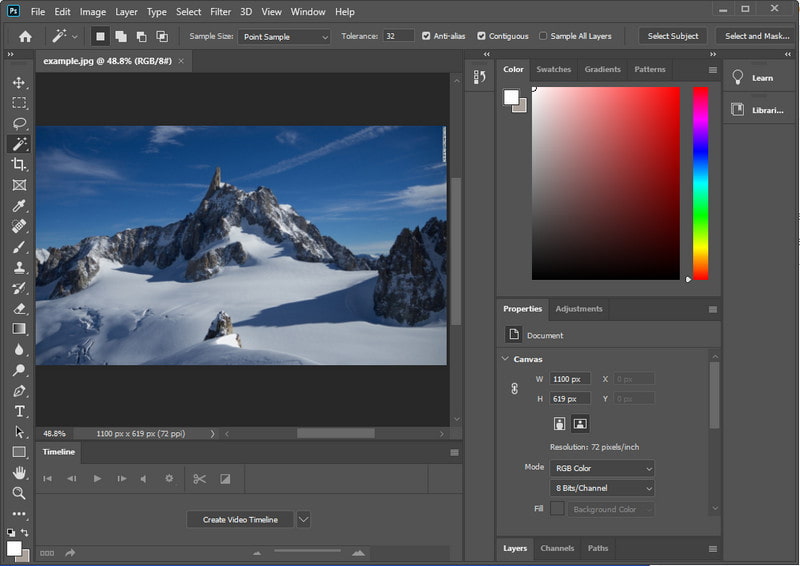
Step 1Photoshop users can open the file directly; however, if you are using Photoshop for the first time, it does not open DDS files out of the box, so download NVIDIA Texture Tools or Intel Texture Works for support of DDS files.
Step 2Open Photoshop, navigate to File, click Open, and select the DDS file from the folders.
Step 3You can edit the image by cropping it, changing the colors, or converting it to your preferred format.
Step 4Select either Save As or Export from the File menu and click Export As. Choose JPG as the file format.
Step 5Choose your desired image quality and file name, then click Save to complete the conversion.
Struggling with DDS files that would not open in your usual image viewer? Using the right DDS to JPG converter makes all the difference. From quick online solutions to powerful desktop programs, you have plenty of options to get the job done. Pick the tool that suits your setup and start converting your DDS files into accessible, shareable JPGs today.

You can easily convert your photo from any image format to a popular JPG, PNG, or GIF with no quality loss.
PROCESS NOW

