你想要的是獨一無二的個人化鈴聲,而不是從別處下載的現成鈴聲,而是你自己製作的來電和提示音。
我們來幫您解決這個問題。我們將向您展示不同的方法。 錄製鈴聲 適用於不同的系統。我們也會分享一些簡單的技巧,以獲得更好的效果。所以,準備好你的聲音,製作專屬鈴聲吧!
第一部:如何在 iPhone 上錄製鈴聲
1. 將語音備忘錄轉換為鈴聲(最簡單的方法)
語音備忘錄可以錄製聲音,並立即使用基本的剪輯工具將其轉換為可用的自訂鈴聲,本部分將教您如何在 iPhone 上將錄音製作成鈴聲。
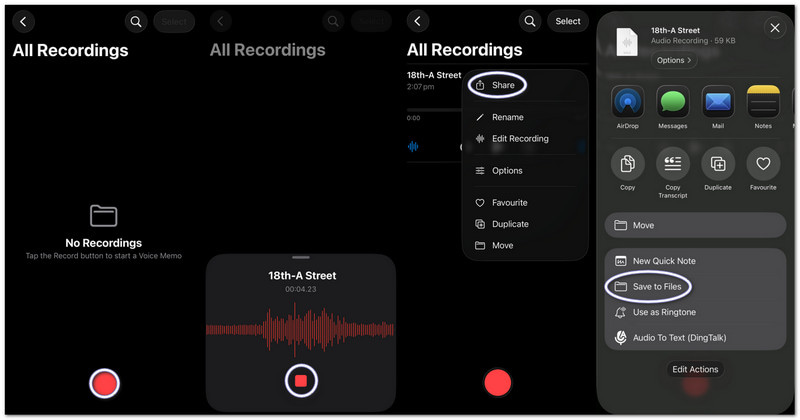
步驟1在 iPhone 上啟動語音備忘錄。
第2步點選紅色 記錄 按下按鈕,即可說話或播放音訊。
第 3 步輕敲 停止 當你完成時。
步驟4點擊 三個點(……) 在你的錄音中。
第 5 步選擇 儲存到文件 儲存您的音頻,以便稍後將其用作鈴聲。
2. 將任何音訊檔案(MP3/M4A)轉換為鈴聲
用戶可以選擇從下載或音樂應用程式中儲存的 MP3 或 M4A 音訊文件,並將其設定為 iPhone 上的鈴聲。
步驟1下載您的 MP3 或 M4A 檔案並儲存到指定位置。 文件 應用程式.
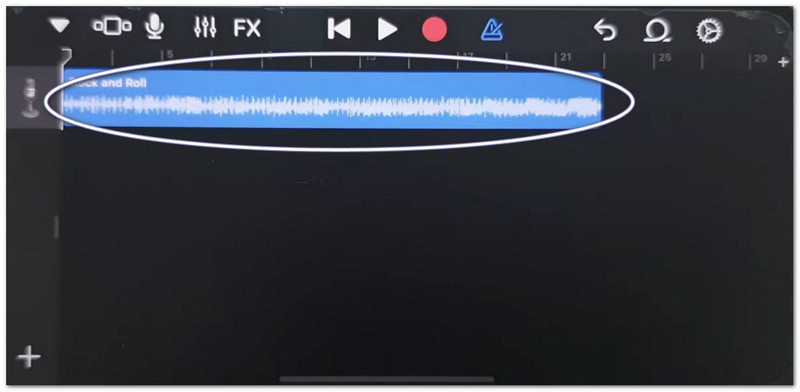
第2步跑步 車庫樂隊 並選擇 錄音機.
第 3 步在以下位置找到您的音訊: 文件然後將其拖到時間軸上。
步驟4去 文件找到你的音訊文件,然後將其拖到時間軸上。
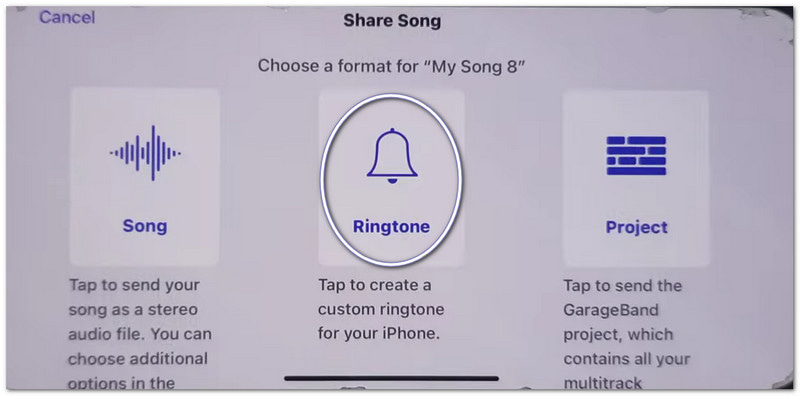
第 5 步將其縮短至 30 秒以內,然後輕敲 分享 > 鈴聲 > 出口.
3. 使用 GarageBand(適用於舊版 iOS)
GarageBand 提供精確的音訊剪輯控制,使用戶能夠輕鬆剪切、排列和匯出自訂鈴聲,輕鬆了解如何在 iPhone 上將錄音設定為鈴聲。
步驟1打開 車庫樂隊 並選擇 錄音機.
第2步點擊 軌道視圖然後打開 循環瀏覽器.
第 3 步匯入您儲存的語音備忘錄或音訊檔案。
步驟4將其拖曳到時間軸上,並剪輯到 30 秒或更短。
第 5 步輕敲 我的歌曲, 然後 分享 > 鈴聲 > 出口.
故障排除:“iPhone 上的‘共享備忘錄’功能無法正常工作”
如果共用表單在共用語音備忘錄或 GarageBand 檔案時凍結、崩潰或不顯示應用程序,請嘗試以下修復方法。
快速修復:
- 強制重啟:按 音量調高 和 音量調低然後,按住電源按鈕,直到出現蘋果標誌。
- 更新 iOS:前往 設置 > 一般的 > 軟件更新安裝所有更新。這可以修復系統錯誤。
- 切換 AirDrop:打開 控制中心 關閉隔空投送。關閉隔空投送後再重新開啟。共享功能將恢復正常。
系統修復
- 釋放儲存空間:至少保留 2 GB 的可用空間。刪除不常用的檔案或影片。儲存空間不足可能會導致共用表單無法正常運作。
最終定稿
- 重置所有設定:前往 設置 > 一般的 > 轉移 或者 重置 iPhone > 重置所有設定它不會刪除您的數據,只會重置系統設置,並可以修復共享表單問題。
第二部分:如何在安卓手機上錄製鈴聲
1. 使用鈴聲製作應用程式(強烈建議)
如果你想學習如何錄製自己的鈴聲,可以使用 Google Play 商店中的「Maker: Music Cutter」應用程式。它的主要功能是幫助你剪輯歌曲,精確剪切音訊片段,並立即將其設定為安卓手機的自訂鈴聲。
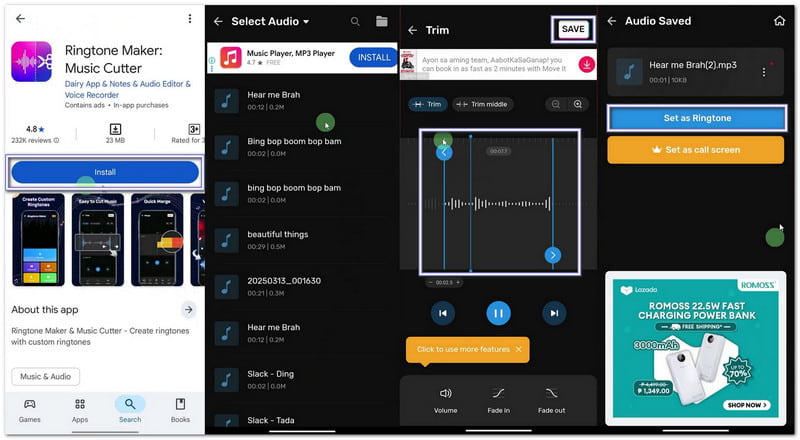
步驟1開啟 Google Play 商店。搜尋 鈴聲製作器:音樂剪輯器安裝它。然後,按 打開.
第2步輕敲 開始使用。選擇 音訊修剪允許應用程式存取您的檔案。
第 3 步從手機中選擇一首歌曲或音訊檔案。移動滑桿來選擇鈴聲的開始和結束部分。
步驟4 輕敲 切 或者 保存如果需要,請選擇清晰度。按下 確認。然後,點擊 設定為鈴聲允許存取系統設定並選擇預設鈴聲。
2. 內建設定(針對下載的音訊)
Android 設定允許直接選擇已儲存的音訊檔案並將其設為鈴聲,而無需額外的應用程式或工具。
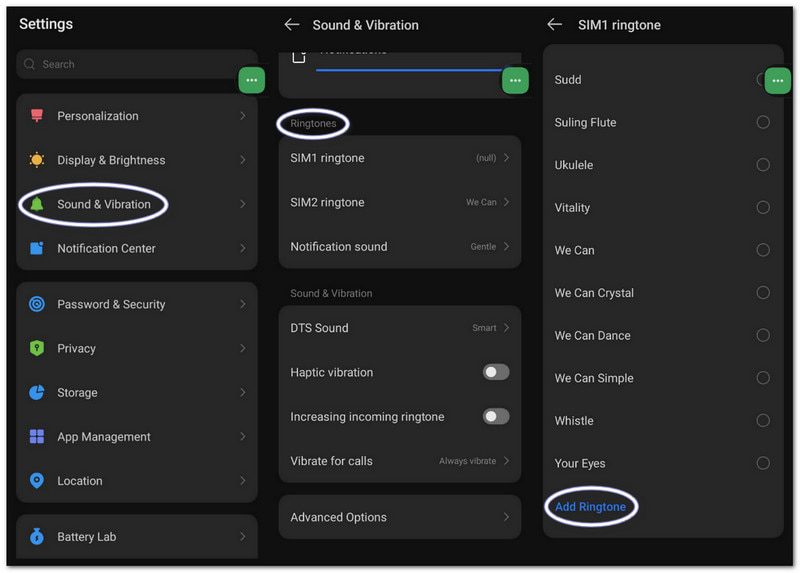
步驟1進入手機設定。點選 聲音和振動 或者 聲音.
第2步輕敲 電話鈴聲 查看可用選項。
第 3 步點擊 加 按鈕或 添加鈴聲 頂部的按鈕。
步驟4瀏覽您的儲存空間。選擇您的音訊檔案。點選 完畢然後,確認將其設為預設鈴聲。
第三部分:如何將螢幕錄製內容轉換為鈴聲
您也可以使用以下方法在 Windows 或 Mac 電腦上將螢幕錄製內容轉換為鈴聲: AVAide 屏幕錄像它具有錄音模式,可捕捉系統聲音和您的聲音,從而輕鬆錄製鈴聲。
它還提供聲音設置,您可以調整音量大小、啟用降噪功能,並在未偵測到音訊時顯示警告。當然,您也可以將鈴聲匯出為 MP3 和 M4A 等支援的格式,這些格式非常適合行動裝置。
步驟1在您的 Windows 或 Mac 電腦上取得並安裝 AVAide 螢幕錄影機。

 安全下載
安全下載
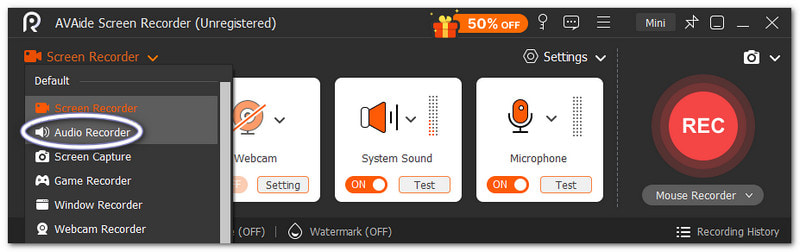
第2步它啟動時會進入螢幕錄製模式。點選下拉選單。選擇 錄音機 為了更好地捕捉聲音。
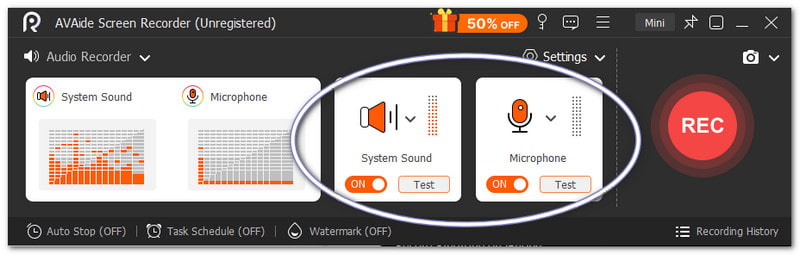
第 3 步打開 系統聲音 錄製內部音訊。打開 麥克風 如果你想加入自己的聲音,也可以根據需要微調音量。
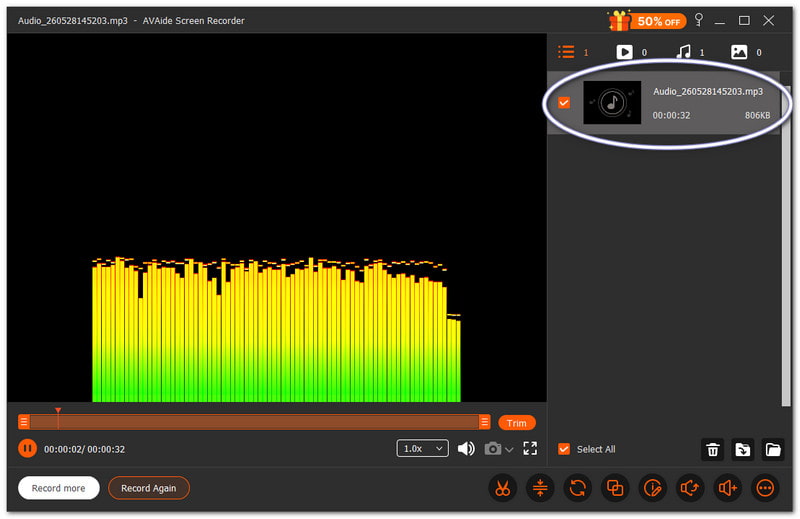
步驟4打 錄音 開始播放,請等待倒數結束。倒數結束後,播放您想要的聲音。按下 停止 完成後點擊按鈕。之後,文件會自動儲存。但您也可以在使用前進行剪輯或編輯,然後再用作鈴聲。
毫無疑問,這台Mac和 Windows音訊錄影器 可以幫助您為您的裝置創建您個人想要和喜歡的鈴聲。
第四部分:三星特有步驟
1. 使用內建螢幕錄影功能
三星螢幕錄影機可以錄製影片中的音頻,並幫助將錄製的聲音轉換成可用的鈴聲。
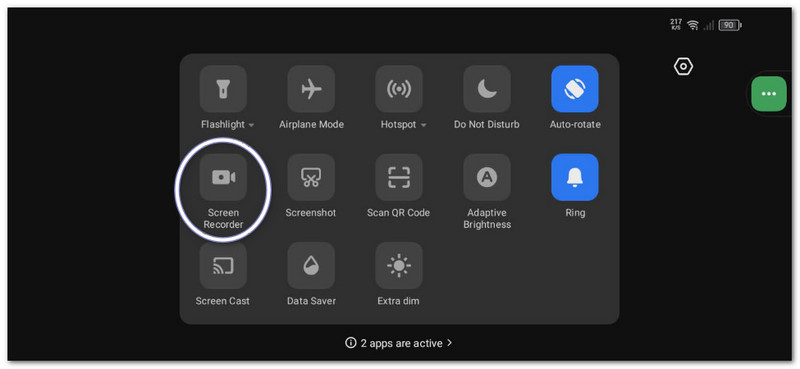
步驟1在裡面 快速面板向下滑動。按下 屏幕錄像 按鈕。開始之前,請選擇 媒體聲音.
第2步播放你想錄製的影片或音樂。讓螢幕錄製程式同時錄製聲音。
第 3 步錄製完成後請停止錄製。文件將保存在您的圖庫中。使用視訊轉MP3應用擷取音訊。
步驟4將 MP3 檔案移到您的 內部儲存 > 鈴聲資料夾 這樣以後就可以用了。
這種方法表明 三星螢幕錄製所以,請務必將錄製的視訊轉換為純音頻,以便用作鈴聲。
2. 內建鈴聲製作器
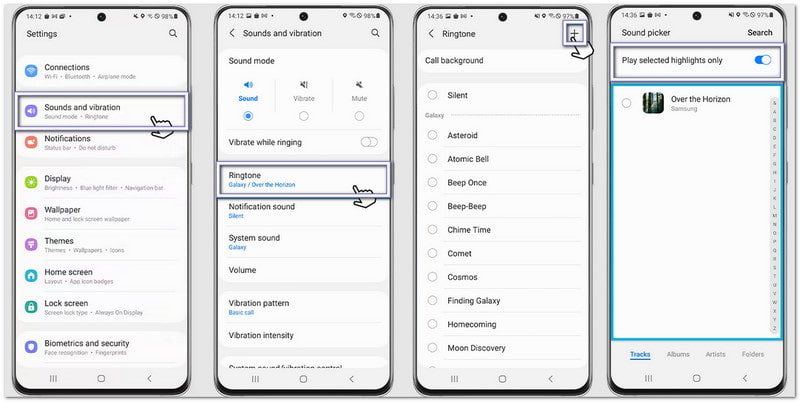
三星鈴聲設定允許用戶選擇歌曲、剪輯精彩片段,並立即將其設定為預設手機鈴聲。
步驟1打開手機並前往 設置。輕敲 聲音和振動。然後,選擇 鈴聲.
第2步點擊 添加 按下按鈕,從手機中選擇已儲存的歌曲或錄音。
第 3 步使能夠 僅播放精選集錦 如果可用,三星會自動剪輯音訊的最佳部分。
步驟4確認您的選擇,該聲音將被設定為您的預設鈴聲。
3. 文件管理器方法
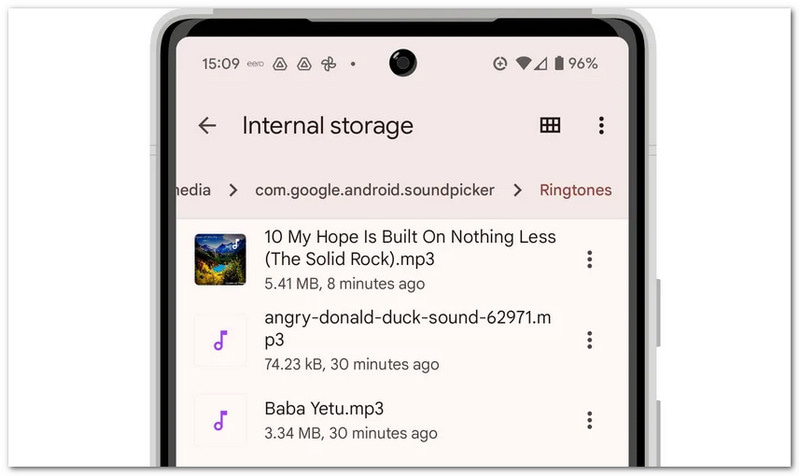
三星檔案管理器可以整理音訊文件,並允許直接複製到鈴聲資料夾以進行自動鈴聲檢測。
步驟1啟動 我的文件 安裝到您的三星手機。
第2步去 下載 或者 聲音的 資料夾。找到您錄製或下載的音訊檔案。
第 3 步長按文件。點選 複製然後,前往 內部儲存 > 鈴聲.
步驟4將檔案貼到「鈴聲」資料夾中。然後,返回聲音設定。您的檔案現在應該會出現在鈴聲清單中。
第五部分:獲得最佳效果的專業技巧
在設定鈴聲之前,遵循以下幾個簡單的小技巧會很有幫助。這些技巧能讓你的鈴聲聽起來更清晰,並在你的手機上更好地運作。
提示 #1:保持簡潔。
將鈴聲時長設定為 30 到 40 秒。這樣既能保持流暢,又能完全相容於安卓手機。
提示 #2:使用正確的格式。
盡量使用 MP3 或 M4A 檔案。這些格式在大多數安卓裝置上都能流暢播放,不會出錯。
提示 #3:先檢查音量。
設定鈴聲前先試聽一下,確保音量適中,既不太大也不太小。這樣可以避免來電時會被突如其來的鈴聲嚇到。
你已經學會了 如何在iPhone上錄製鈴聲它支援iOS、Android和桌上型電腦。所以,無論你使用什麼設備,都可以隨時創建自己的自訂鈴聲。
適用於 Windows 和 Mac 用戶 AVAide 屏幕錄像 它讓整個過程變得簡單。您可以錄製自己的聲音,也可以從系統中錄製音訊。錄製完成後,您也可以對檔案進行剪輯,只保留最適合作為鈴聲的部分。
關於作者

通過音頻、在線會議、遊戲視頻、音樂、網絡攝像頭等捕捉屏幕活動。