Làm cách nào để chỉnh sửa bản ghi âm giọng nóiChỉnh sửa bản ghi âm giọng nói là một cách hiệu quả để nâng cao nhiều khía cạnh của tệp âm thanh. Bạn có thể cải thiện độ rõ nét, cắt bớt các đoạn, tăng giảm âm lượng, thêm hiệu ứng, v.v., dẫn đến chất lượng phát lại âm thanh tốt hơn. Cho dù là phỏng vấn, ghi chú cá nhân hay podcast, việc học các phương pháp chỉnh sửa tốt nhất là cần thiết để đạt được kết quả như mong muốn. Trong hướng dẫn này, chúng tôi sẽ hướng dẫn bạn cách chỉnh sửa bản ghi âm giọng nói bằng các công cụ chỉnh sửa âm thanh tốt nhất. Hãy cùng tìm hiểu thêm về quy trình này.
Phần 1. Chỉnh sửa bản ghi âm giọng nói trên iPhone
Bạn muốn học cách chỉnh sửa bản ghi âm giọng nói trên iPhone? iPhone có ứng dụng hỗ trợ chỉnh sửa bản ghi âm giọng nói, đặc biệt là cắt, ghép lớp và xóa một đoạn. Để bắt đầu, bạn có thể tham khảo tất cả các bước được hướng dẫn trong phần này.
Cắt bớt bản ghi âm trên ứng dụng Ghi âm giọng nói
Bản ghi nhớ giọng nói không chỉ là một trong số ứng dụng ghi âm tốt nhấtỨng dụng này cũng cung cấp các công cụ chỉnh sửa đáng tin cậy để bạn chỉnh sửa âm thanh. Với ứng dụng ghi âm/chỉnh sửa này, bạn có thể cắt bớt âm thanh để loại bỏ những phần không cần thiết. Thêm vào đó, ứng dụng có giao diện đơn giản, giúp người dùng dễ dàng truy cập, đặc biệt là những người không chuyên.
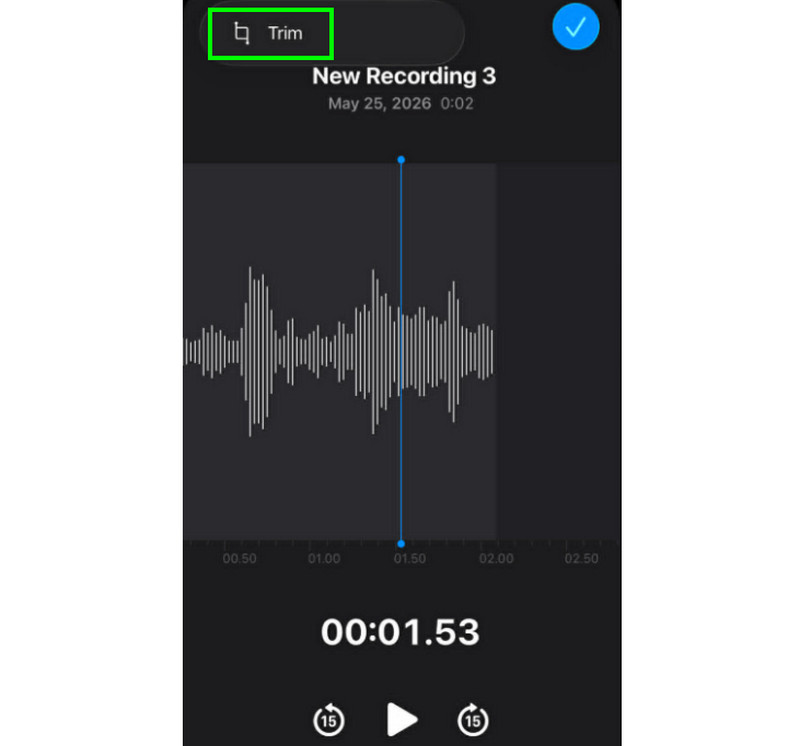
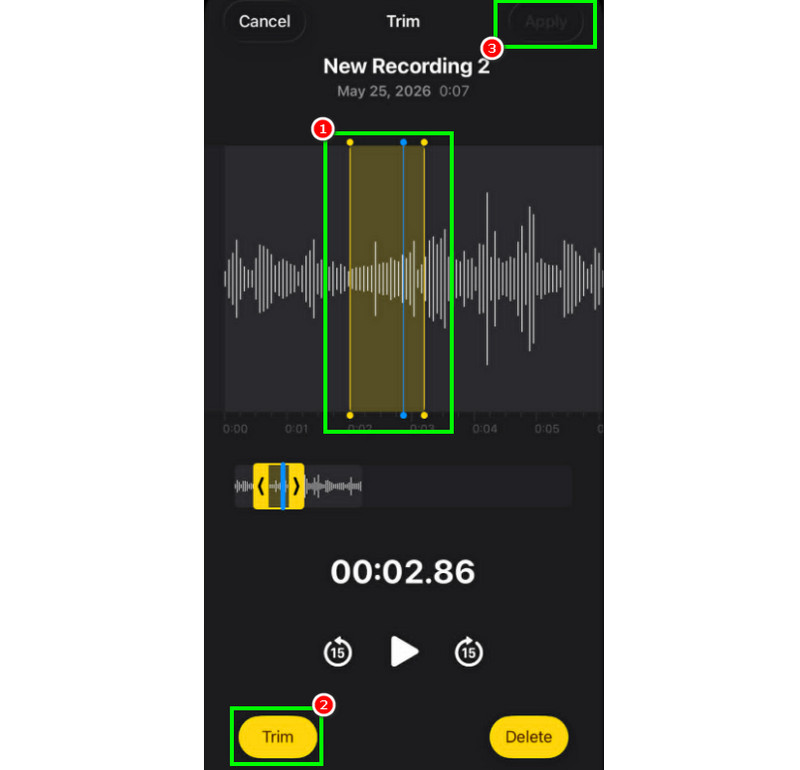
Bước 1Khởi chạy Bản ghi nhớ giọng nói Mở ứng dụng và tìm bản ghi âm giọng nói bạn muốn chỉnh sửa. Sau đó, nhấp vào Xén chức năng.
Bước 2Sau đó, bạn có thể bắt đầu cắt âm thanh. Tiếp theo, nhấn vào nút Xén Nhấn nút bên dưới để bắt đầu loại bỏ các phần không mong muốn khỏi bản ghi âm.
Bước 3Sau khi cắt tỉa, bạn có thể nhấn Áp dụng Nhấn nút phía trên để lưu các thay đổi.
Cách xóa một phần ở giữa
Trong quá trình cắt ghép, có thể bạn nghĩ rằng chỉ cần cắt phần đầu hoặc phần cuối của đoạn ghi âm. Ưu điểm của ứng dụng Ghi âm giọng nói là bạn cũng có thể xóa một đoạn ở giữa. Với khả năng này, bạn có thể dễ dàng loại bỏ những phần không cần thiết khỏi đoạn ghi âm.
Bước 1Sau khi chọn Xén Với tính năng này, bạn có thể chạm và điều khiển đường kẻ có thể điều chỉnh từ thanh ray.
Bước 2Chèn hoặc điều chỉnh đường kẻ vào phần giữa nơi bạn muốn xóa đoạn nhạc. Sau đó, nhấn nút Xén nút phía dưới.
Bước 3Vô nhẹ Áp dụng để lưu bản ghi âm đã chỉnh sửa.
Cách xếp lớp các bản nhạc trong ứng dụng ghi âm
Ứng dụng Ghi âm giọng nói là một công cụ lý tưởng để ghi âm giọng nói và bất kỳ nội dung âm thanh nào. Nó thậm chí có thể chỉnh sửa bản ghi âm, chẳng hạn như cắt hoặc xóa một phần nhất định. Tuy nhiên, nếu bạn muốn ghép nhiều lớp âm thanh, thật đáng tiếc là công cụ này không hỗ trợ. Để ghép lớp tốt hơn, bạn nên sử dụng một ứng dụng chỉnh sửa âm thanh tiên tiến hơn, như GarageBand. Ứng dụng này đảm bảo bạn có thể ghép các lớp âm thanh và tạo một tệp duy nhất.
Cách chia sẻ và xuất bản bản ghi âm đã chỉnh sửa
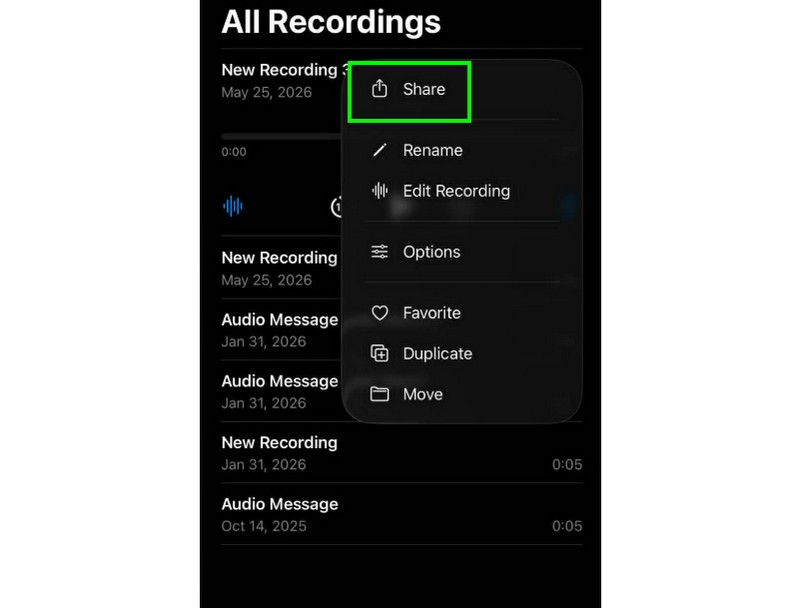
Việc chia sẻ và xuất bản bản ghi âm đã chỉnh sửa rất đơn giản. Tất cả những gì bạn cần làm là tìm bản ghi âm trong ứng dụng Ghi âm và nhấn vào nút ba chấm. Sau đó, nhấn vào chức năng Chia sẻ. Như vậy, bạn có thể bắt đầu chia sẻ bản ghi âm trên nhiều nền tảng khác nhau. Bạn thậm chí có thể lưu nó vào thư mục mong muốn.
Ứng dụng chỉnh sửa ảnh được đề xuất cho iPhone
Bạn có muốn tìm phần mềm ghi âm và chỉnh sửa giọng nói khác không? Vì ứng dụng Ghi âm có những hạn chế nhất định trong việc chỉnh sửa bản ghi âm, đôi khi bạn cần sử dụng một công cụ chỉnh sửa khác. Trong trường hợp đó, để chỉnh sửa tốt hơn, bạn có thể thử sử dụng GarageBand, Ferrite Recording Studio và Hokusai Audio Editor.
Phần 2. Chỉnh sửa bản ghi âm giọng nói trên Android
Bạn là người dùng Android và muốn chỉnh sửa bản ghi âm giọng nói của mình? Vậy thì bạn có thể sử dụng ứng dụng này. Máy ghi âm SamsungĐây là một ứng dụng miễn phí mà bạn có thể sử dụng để chỉnh sửa bản ghi âm giọng nói của mình. Nó có thể giúp bạn cắt bớt bản ghi âm dựa trên sở thích của bạn. Ứng dụng này có giao diện người dùng đơn giản, dễ sử dụng.
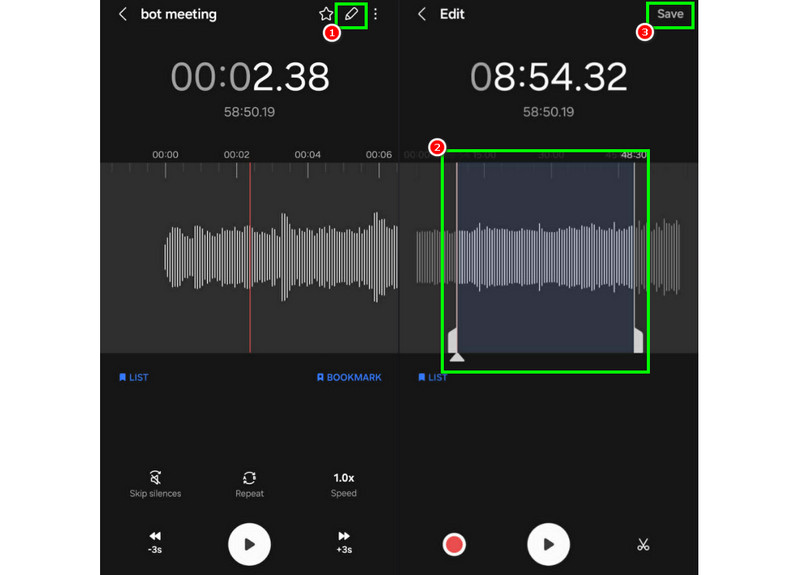
Bước 1Khởi chạy Máy ghi âm SamsungSau đó, hãy chuyển sang các bản ghi âm mà bạn muốn chỉnh sửa.
Bước 2Sau đó, mở phần ghi âm và nhấn vào nút. Biên tập hàm ở trên.
Bước 3Bạn có thể bắt đầu quá trình cắt tỉa bằng cách điều chỉnh các đường kẻ từ các rãnh. Sau khi hoàn tất, bạn có thể đánh dấu vào ô thích hợp. Cứu nút ở trên.
Phần 3. Cách chỉnh sửa bản ghi âm giọng nói trên máy tính để bàn
Bạn muốn chỉnh sửa bản ghi âm giọng nói trên máy tính để bàn? Vậy thì hãy đọc bài viết này, chúng tôi sẽ cung cấp những phương pháp tốt nhất để bạn có thể chỉnh sửa bản ghi âm một cách hiệu quả.
Phương pháp 1. Chỉnh sửa bản ghi âm giọng nói bằng Audacity
Audacity là một trong những trình chỉnh sửa miễn phí trên máy tính để bàn mà bạn có thể tin cậy để chỉnh sửa bản ghi âm của mình. Bạn có thể cắt âm thanh, thêm hiệu ứng và đính kèm các bản nhạc khác. Bạn thậm chí có thể... Ghi âm âm thanh máy tính bằng Audacity và chỉnh sửa theo sở thích của bạn. Vấn đề duy nhất ở đây là bố cục không đủ hấp dẫn.
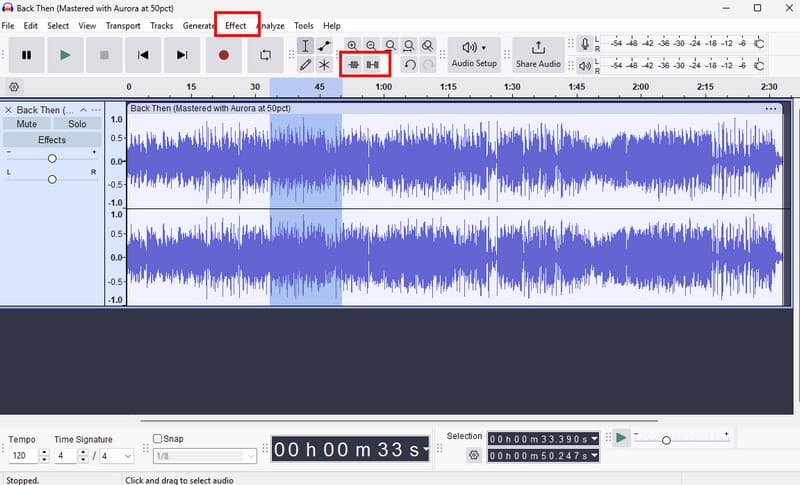
Bước 1Tải xuống Audacity trên máy tính của bạn. Sau đó, tiến hành các bước tiếp theo. Tập tin > Mở Các tùy chọn để thêm bản ghi âm của bạn.
Bước 2Bạn có thể bắt đầu chỉnh sửa tệp của mình. Bạn có thể cắt bớt đoạn nhạc, thêm hiệu ứng, điều chỉnh nhịp độ, và nhiều hơn nữa.
Bước 3Sau khi hoàn tất, hãy nhấn Tập tin > Lưu Dự án Để lưu trữ nó trên thiết bị của bạn.
Phương pháp 2. Chỉnh sửa bản ghi âm giọng nói bằng phần mềm chuyển đổi video AVAide
Nếu bạn muốn một trình soạn thảo chuyên nghiệp, hãy thử truy cập AVAide Video ConverterChương trình này cho phép bạn chỉnh sửa âm thanh theo nhiều cách. Bạn có thể cắt hoặc tỉa một đoạn nhạc cụ thể từ bản ghi âm, tách chúng và ghép lại. Điều tuyệt vời ở đây là bạn thậm chí có thể chèn hiệu ứng làm mờ dần vào và ra âm thanh. Thêm vào đó, bạn có thể chuyển đổi bản ghi âm của mình sang bất kỳ định dạng âm thanh nào, chẳng hạn như MP3, AAC, ALAC, M4A, WAV, và nhiều hơn nữa. Điều này đảm bảo bạn sẽ không gặp bất kỳ vấn đề tương thích nào trong quá trình phát lại. Bạn thậm chí có thể lưu bản ghi âm với chất lượng tốt nhất lên đến 320 kbps, khiến chương trình này trở nên lý tưởng cho tất cả những người đam mê âm thanh.
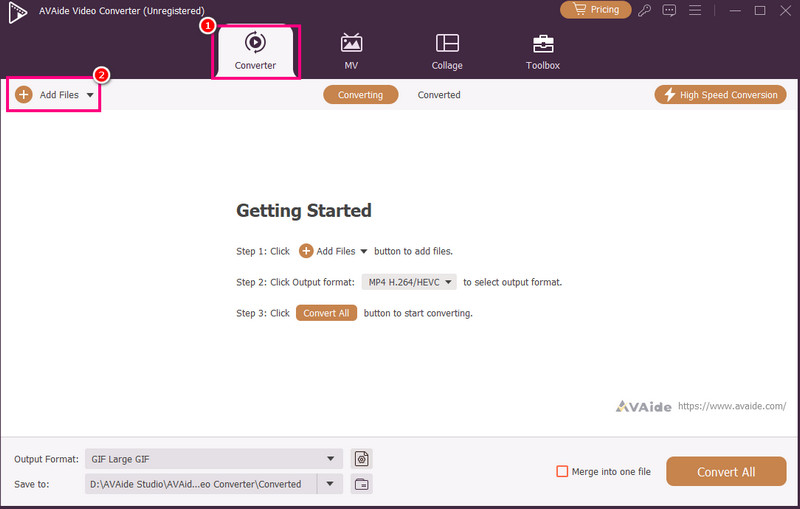
Bước 1Tải xuống AVAide Video Converter Trên máy Mac hoặc Windows của bạn, hãy cài đặt và khởi chạy chương trình để bắt đầu quá trình chỉnh sửa.

TẢI VỀ MIỄN PHÍ Đối với Windows 7 trở lên
 An toàn tải
TẢI VỀ MIỄN PHÍ Dành cho Mac OS X 10.13 trở lên
An toàn tảiBước 2Từ Bộ chuyển đổi Tính năng này cho phép thêm bản ghi âm giọng nói bằng cách nhấn vào nút. Thêm các tập tin Tùy chọn. Bạn thậm chí có thể thêm nhiều tệp nếu muốn.
Bước 3Sau đó, nhấp vào Cắt tùy chọn để bắt đầu quá trình chỉnh sửa. Bạn có thể cắt và xóa một phần nhất định khỏi bản nhạc. Bạn cũng có thể sử dụng Tách ra Chức năng tách các bản nhạc.
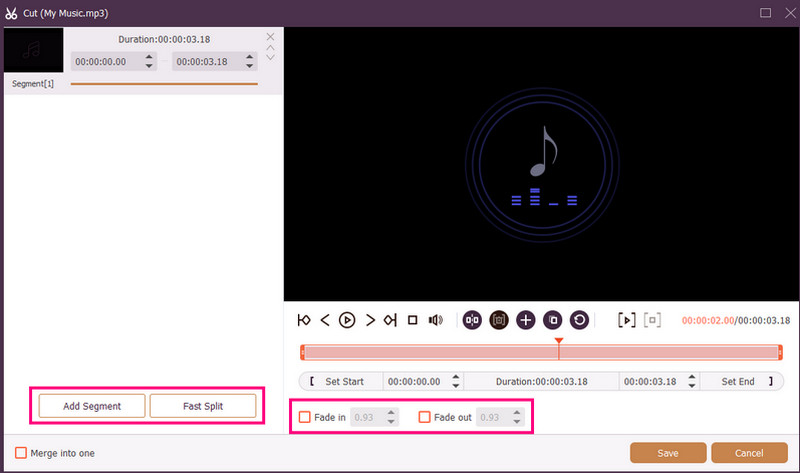
Bạn cũng có thể đính kèm Mờ dần vào và Mờ dần thêm hiệu ứng vào bản ghi âm của bạn. Sau khi hoàn tất, hãy nhấn Cứu.
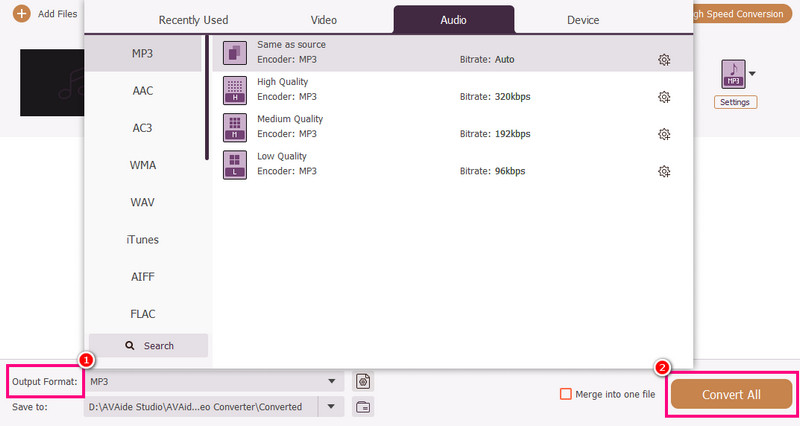
Bước 4Bạn cũng có thể đi đến Định dạng đầu ra Chọn định dạng âm thanh mong muốn trong phần này. Cuối cùng, đánh dấu chọn. Chuyển đổi tất cả để bắt đầu quá trình lưu.
Phương pháp 3. Chỉnh sửa bản ghi âm giọng nói bằng Adobe Audition
Adobe Audition Đây là một công cụ đáng tin cậy mà bạn có thể sử dụng để chỉnh sửa bản ghi âm giọng nói của mình. Nó thậm chí còn cung cấp cả các công cụ chỉnh sửa cơ bản và nâng cao, lý tưởng cho tất cả người dùng, đặc biệt là các chuyên gia. Bạn có thể cắt bản ghi âm, áp dụng hiệu ứng, xếp lớp các bản nhạc, và nhiều hơn nữa. Tuy nhiên, bạn phải đủ kỹ năng để sử dụng công cụ này vì giao diện người dùng của nó khá khó làm quen.
Bước 1Tải xuống Adobe Audition trên máy tính của bạn. Sau đó, bắt đầu thêm bản ghi âm giọng nói mà bạn muốn chỉnh sửa.
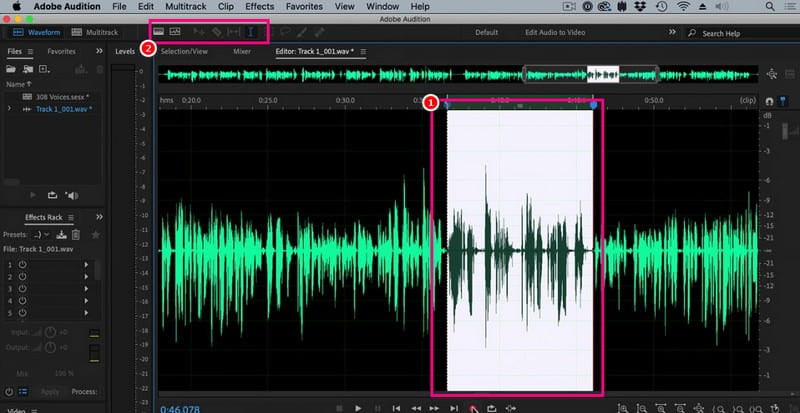
Bước 2Bạn có thể sử dụng chuột/con trỏ để chọn một phần cụ thể của bản nhạc và chỉnh sửa nó. Bạn có thể cắt, thêm hiệu ứng và tách âm thanh bằng cách sử dụng tất cả các công cụ chỉnh sửa từ giao diện phía trên.
Bước 3Sau khi chỉnh sửa âm thanh, bạn có thể chuyển đến... Tập tin > Cứu Chọn các tùy chọn ở trên để bắt đầu quá trình lưu.
Phần 4. Chỉnh sửa bản ghi âm trực tuyến
Chỉnh sửa bản ghi âm giọng nói trực tuyến cũng là một lựa chọn. Hãy đọc chi tiết bên dưới và tìm hiểu cách chỉnh sửa tệp âm thanh trên trình duyệt của bạn.
Phương pháp 1. Chỉnh sửa bản ghi âm giọng nói bằng 123APPS
Công cụ này rất phù hợp nếu bạn muốn chỉnh sửa âm thanh miễn phí. Nó cho phép bạn cắt âm thanh, loại bỏ tiếng ồn nền, thêm hiệu ứng mờ dần và nhiều hơn nữa. Nó cũng rất dễ sử dụng, lý tưởng cho người mới bắt đầu.
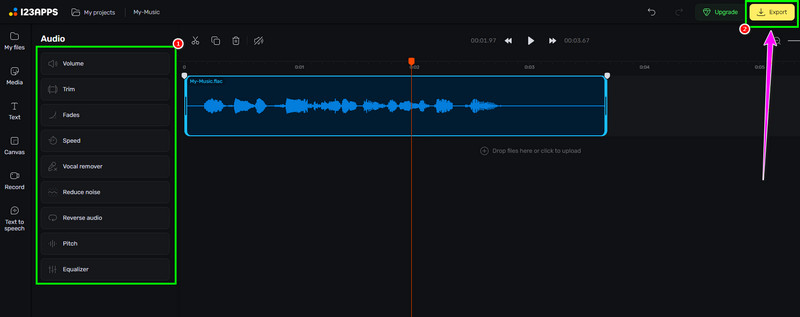
Bước 1Truy cập trang web của 123ỨNG DỤNG và tiến hành nó Trình chỉnh sửa âm thanh tính năng đó. Sau đó, nhấn vào Chọn tệp Tải bản ghi âm của bạn lên.
Bước 2Tiếp theo, hãy bắt đầu chỉnh sửa âm thanh của bạn. Bạn có thể cắt bớt đoạn ghi âm, thêm hiệu ứng, loại bỏ tiếng ồn, và nhiều hơn nữa.
Bước 3Sau khi quá trình chỉnh sửa hoàn tất, hãy nhấp chuột. Xuất khẩu (Lưu ảnh ở trên vào thiết bị của bạn.)
Phương pháp 2. Chỉnh sửa bản ghi âm bằng trình chỉnh sửa âm thanh trực tuyến.
Nếu bạn muốn tìm một trình chỉnh sửa âm thanh trực tuyến xuất sắc có thể chỉnh sửa bản ghi âm giọng nói của mình, bạn có thể thử sử dụng... Trình chỉnh sửa âm thanh trực tuyếnCông cụ này cung cấp nhiều chức năng khác nhau mà bạn có thể sử dụng. Một số trong đó là bộ cắt, bộ lọc, bộ khử nhiễu, bộ tăng tốc và nhiều hơn nữa. Hãy xem các bước bên dưới và tìm hiểu cách chỉnh sửa bản ghi âm giọng nói.
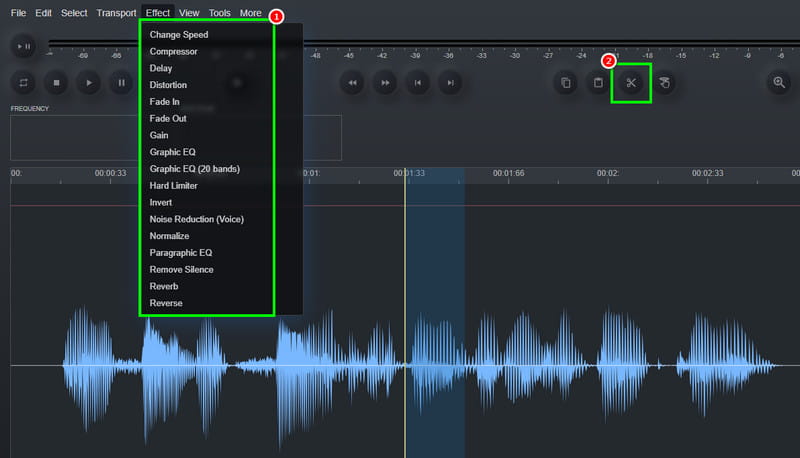
Bước 1Sau khi truy cập Trình chỉnh sửa âm thanh trực tuyến công cụ, nhấp vào Tập tin > Mở Tùy chọn tải lên bản ghi âm giọng nói.
Bước 2Bạn có thể bắt đầu với quá trình chỉnh sửa. Hãy vào... Hiệu ứng Phần này cho phép thay đổi tốc độ âm thanh, thêm hiệu ứng, điều chỉnh độ trễ, v.v. Bạn cũng có thể sử dụng... Cắt Công cụ để loại bỏ phần không cần thiết khỏi đường ray.
Bước 3Đối với quá trình cuối cùng, nhấn Tập tin > Cứu Nút này dùng để lưu bản ghi đã chỉnh sửa vào máy tính của bạn.
Phần 5. Bạn nên chọn phương pháp nào?
Bạn đang phân vân không biết nên chọn phương pháp nào? Nếu vậy, chúng tôi đặc biệt khuyên bạn nên sử dụng phương pháp này. AVAide Video ConverterKhi nói đến chỉnh sửa, bạn có thể đảm bảo đạt được kết quả mong muốn. Bạn có thể cắt, chia nhỏ và ghép nhiều đoạn âm thanh để tạo thành một tệp duy nhất. Bạn thậm chí có thể sử dụng tính năng Nén âm thanh của chương trình để cân bằng kích thước tệp và chất lượng bản ghi âm của mình. Chương trình còn cho phép bạn chuyển đổi âm thanh sang các định dạng khác, giúp bạn tránh gặp phải các vấn đề tương thích. Vì vậy, hãy tin tưởng vào chương trình này và đạt được đầu ra âm thanh như ý muốn.
Nhờ bài hướng dẫn này, bạn đã học được Cách chỉnh sửa bản ghi âmVì vậy, hãy xem xét các phương pháp chúng tôi đã đề xuất và xử lý bản ghi âm giọng nói của bạn theo sở thích. Thêm vào đó, nếu bạn muốn quá trình chỉnh sửa âm thanh diễn ra suôn sẻ, chúng tôi khuyên bạn nên sử dụng... AVAide Video ConverterPhần mềm này đảm bảo bạn có thể chỉnh sửa và lưu video với chất lượng tốt nhất, biến nó trở thành một trình chỉnh sửa hàng đầu dành cho người dùng.
GIỚI THIỆU VỀ TÁC GIẢ

Hộp công cụ video hoàn chỉnh của bạn hỗ trợ hơn 350 định dạng để chuyển đổi với chất lượng không mất dữ liệu.