Bạn muốn có nhạc chuông cá nhân hóa riêng. Không phải nhạc chuông ngẫu nhiên từ bất kỳ đâu. Mà là nhạc chuông do chính bạn tạo ra cho các cuộc gọi và thông báo.
Chúng tôi ở đây để giúp bạn việc đó. Chúng tôi sẽ chỉ cho bạn những cách khác nhau để ghi âm nhạc chuông trên các hệ thống khác nhau. Chúng tôi cũng sẽ chia sẻ những mẹo đơn giản để có kết quả tốt hơn. Vì vậy, hãy chuẩn bị giọng nói hoặc âm thanh của bạn để tạo nhạc chuông tùy chỉnh.
Phần 1. Cách ghi âm nhạc chuông trên iPhone
1. Chuyển bản ghi âm giọng nói thành nhạc chuông (Cách dễ nhất)
Ứng dụng Ghi âm giọng nói ghi lại âm thanh và ngay lập tức chuyển nó thành nhạc chuông tùy chỉnh có thể sử dụng được với các công cụ cắt ghép cơ bản, và phần này sẽ hướng dẫn bạn chính xác cách biến bản ghi âm giọng nói thành nhạc chuông trên iPhone.
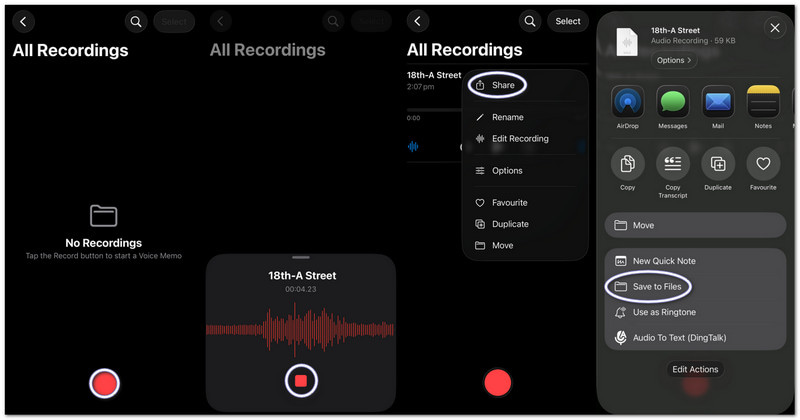
Bước 1Khởi động ứng dụng Ghi âm giọng nói trên iPhone của bạn.
Bước 2Chạm vào màu đỏ Ghi nhấn nút và nói hoặc phát âm thanh của bạn.
Bước 3Vô nhẹ Ngừng lại khi bạn hoàn thành.
Bước 4Chạm vào ba dấu chấm (...) trên bản ghi âm của bạn.
Bước 5Lựa chọn Lưu vào Tệp Để lưu trữ âm thanh của bạn và sử dụng sau này làm nhạc chuông.
2. Biến bất kỳ tệp âm thanh nào (MP3/M4A) thành nhạc chuông
Bạn có thể chọn và đặt các tệp âm thanh MP3 hoặc M4A đã lưu từ các bản tải xuống hoặc ứng dụng nghe nhạc làm nhạc chuông trên iPhone.
Bước 1Tải xuống tệp MP3 hoặc M4A của bạn và lưu vào thư mục tương ứng. Các tập tin ứng dụng.
Bước 2Chạy Ban nhạc tại gia và chọn Máy thu âm.
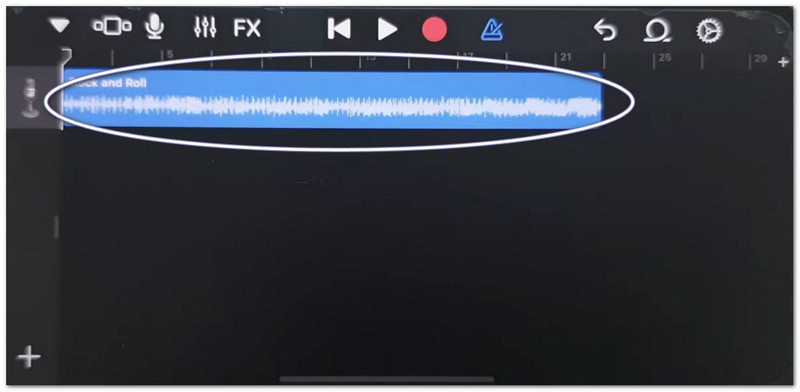
Bước 3Tìm tệp âm thanh của bạn ở đâu? Các tập tinSau đó, kéo nó vào dòng thời gian.
Bước 4Đi đến Các tập tinTìm tệp âm thanh của bạn và kéo nó vào dòng thời gian.
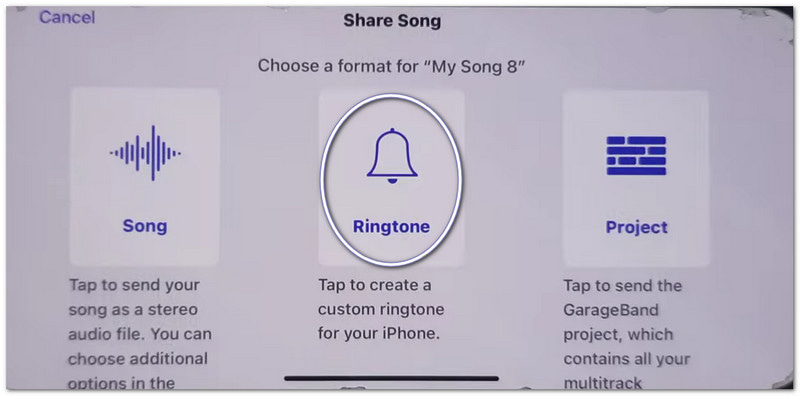
Bước 5Cắt ngắn video xuống dưới 30 giây, sau đó nhấn vào. Chia sẻ > Nhạc chuông > Xuất khẩu.
3. Sử dụng GarageBand (Đối với các phiên bản iOS cũ hơn)
GarageBand chỉnh sửa các đoạn âm thanh với các điều khiển chính xác, cho phép người dùng dễ dàng cắt, sắp xếp và xuất nhạc chuông tùy chỉnh, giúp việc thiết lập bản ghi âm giọng nói làm nhạc chuông trên iPhone trở nên đơn giản hơn.
Bước 1Mở Ban nhạc tại gia và chọn Máy thu âm.
Bước 2Chạm vào Chế độ xem theo dõisau đó mở ra Trình duyệt vòng lặp.
Bước 3Nhập bản ghi âm giọng nói hoặc tệp âm thanh đã lưu của bạn.
Bước 4Kéo nó vào dòng thời gian và cắt ngắn sao cho thời lượng không quá 30 giây.
Bước 5Vô nhẹ Bài hát của tôi, sau đó Chia sẻ > Nhạc chuông > Xuất khẩu.
Khắc phục sự cố "Chia sẻ ghi chú trên iPhone không hoạt động"
Nếu bảng chia sẻ bị treo, gặp sự cố hoặc không hiển thị ứng dụng khi chia sẻ bản ghi âm giọng nói hoặc tệp GarageBand, hãy thử các cách khắc phục sau.
Giải pháp nhanh:
- Buộc khởi động lại: Nhấn Tăng âm lượng và Giảm âm lượngSau đó, giữ nút Nguồn cho đến khi biểu tượng Apple xuất hiện.
- Cập nhật iOS: Truy cập vào Cài đặt > Tổng quan > Cập nhật phần mềmHãy cài đặt bất kỳ bản cập nhật nào. Việc này sẽ khắc phục các lỗi hệ thống.
- Bật/tắt AirDrop: Mở Trung tâm điều khiển Để tắt AirDrop, hãy tắt rồi bật lại AirDrop. Quá trình chia sẻ sẽ được làm mới.
Sửa lỗi hệ thống
- Giải phóng dung lượng lưu trữ: Luôn giữ ít nhất 2 gigabyte dung lượng trống. Xóa các tệp hoặc video không sử dụng. Dung lượng lưu trữ thấp có thể khiến Share Sheet không hoạt động.
Sửa chữa cuối cùng
- Khôi phục tất cả cài đặt: Vào Cài đặt > Tổng quan > Chuyển khoản hoặc là Khôi phục cài đặt gốc iPhone > Đặt lại tất cả cài đặtThao tác này không xóa dữ liệu của bạn. Nó chỉ đặt lại cài đặt hệ thống và có thể khắc phục sự cố khi chia sẻ bảng tính.
Phần 2. Cách ghi âm nhạc chuông trên Android
1. Sử dụng ứng dụng tạo nhạc chuông (Phương pháp được khuyến nghị nhất)
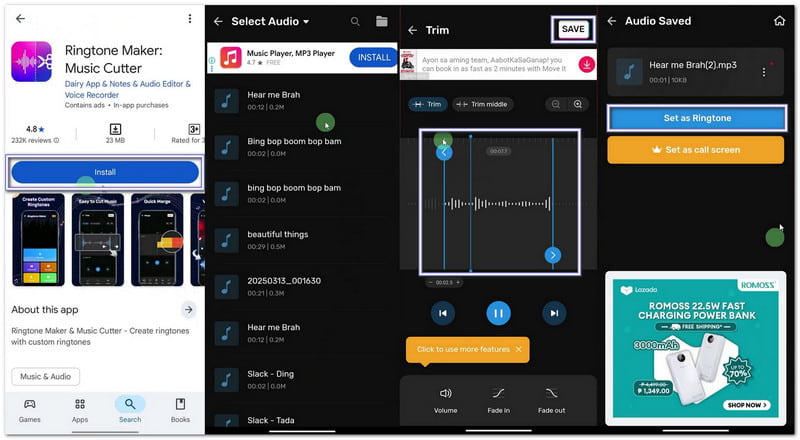
Nếu bạn muốn học cách tự ghi âm nhạc chuông, bạn có thể sử dụng Maker: Music Cutter trên Google Play Store. Mục tiêu chính của ứng dụng này là giúp bạn cắt bài hát, chọn lọc các đoạn âm thanh chính xác và ngay lập tức đặt chúng làm nhạc chuông tùy chỉnh trên điện thoại Android.
Bước 1Mở Google Play Store. Tìm kiếm Ứng dụng tạo nhạc chuông: Music Cutter. Cài đặt nó. Sau đó, nhấn Mở.
Bước 2Vô nhẹ Bắt đầu. Chọn Trim AudioCho phép quyền truy cập để ứng dụng có thể truy cập vào tệp của bạn.
Bước 3Chọn một bài hát hoặc tệp âm thanh từ điện thoại của bạn. Di chuyển các thanh trượt để chọn điểm bắt đầu và kết thúc của nhạc chuông.
Bước 4 Vô nhẹ Cắt hoặc là CứuChọn độ rõ nét nếu cần. Nhấn Xác nhận. Sau đó nhấn vào Đặt làm nhạc chuôngCho phép truy cập cài đặt hệ thống và chọn nhạc chuông mặc định.
2. Cài đặt tích hợp sẵn (Đối với âm thanh đã tải xuống)
Cài đặt Android cho phép chọn trực tiếp các tệp âm thanh đã lưu và gán chúng làm nhạc chuông mà không cần ứng dụng hoặc công cụ bổ sung.
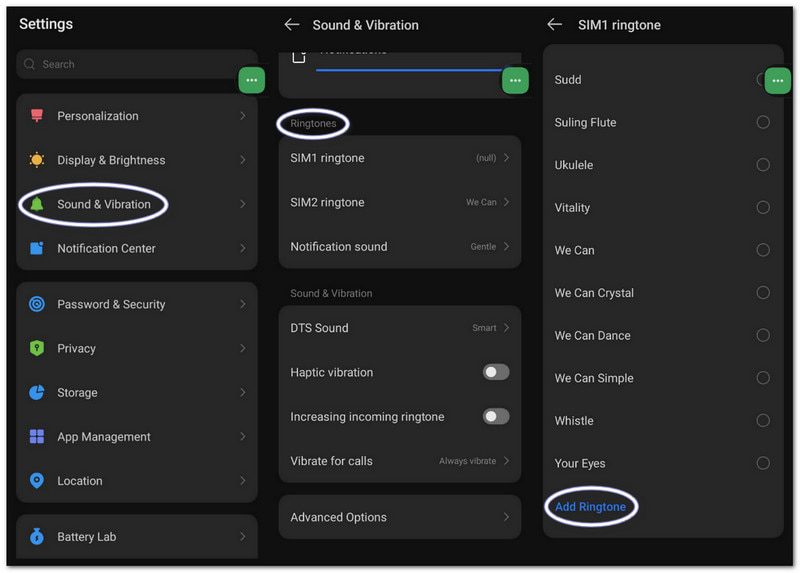
Bước 1Vào phần cài đặt trên điện thoại của bạn. Chạm vào... Âm thanh và rung động hoặc là Âm thanh.
Bước 2Vô nhẹ Nhạc chuông điện thoại Để xem các tùy chọn có sẵn.
Bước 3Chạm vào Thêm nút hoặc Thêm nhạc chuông nút ở trên cùng.
Bước 4Duyệt qua bộ nhớ của bạn. Chọn tệp âm thanh của bạn. Chạm vào Làm xongSau đó, xác nhận để đặt nó làm nhạc chuông mặc định.
Phần 3. Cách biến bản ghi màn hình thành nhạc chuông
Bạn cũng có thể biến bản ghi màn hình thành nhạc chuông trên máy tính Windows hoặc Mac bằng cách sử dụng... AVAide Screen RecorderNó có chế độ ghi âm, thu âm thanh từ hệ thống và giọng nói của bạn, giúp bạn dễ dàng ghi âm nhạc chuông.
Ứng dụng cũng cung cấp các cài đặt âm thanh, nơi bạn có thể giảm hoặc tăng âm lượng, bật tính năng khử tiếng ồn và hiển thị cảnh báo khi không phát hiện thấy âm thanh. Tất nhiên, bạn có thể xuất nhạc chuông của mình ở các định dạng được hỗ trợ như MP3 và M4A, hoạt động tốt trên các thiết bị di động.
Bước 1Tải xuống và cài đặt AVAide Screen Recorder trên máy tính Windows hoặc Mac của bạn.

TẢI VỀ MIỄN PHÍ Đối với Windows 7 trở lên
 An toàn tải
TẢI VỀ MIỄN PHÍ Dành cho Mac OS X 10.13 trở lên
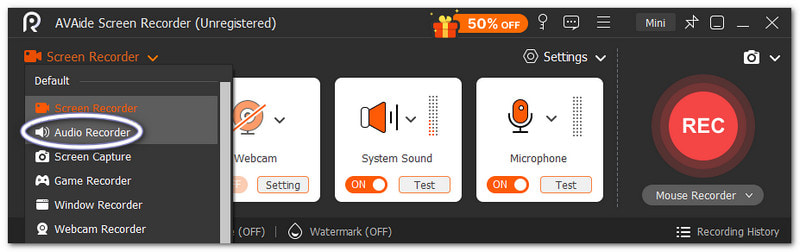
An toàn tảiBước 2Ứng dụng khởi động ở chế độ ghi màn hình. Nhấp vào menu thả xuống. Chọn Máy thu âm Để thu âm tốt hơn.
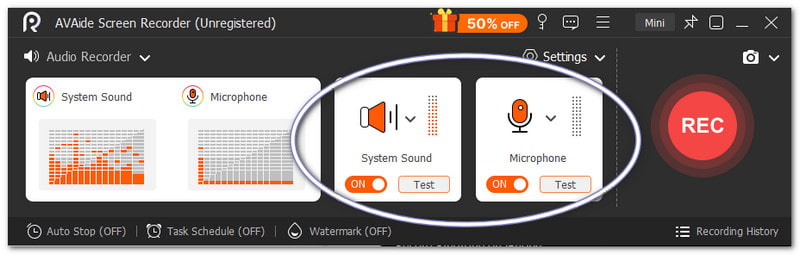
Bước 3Bật Hệ thống âm thanh Để ghi âm thanh nội bộ. Bật lên Cái mic cờ rô Nếu bạn muốn thêm giọng nói của mình vào. Bạn cũng có thể điều chỉnh âm lượng nếu cần.
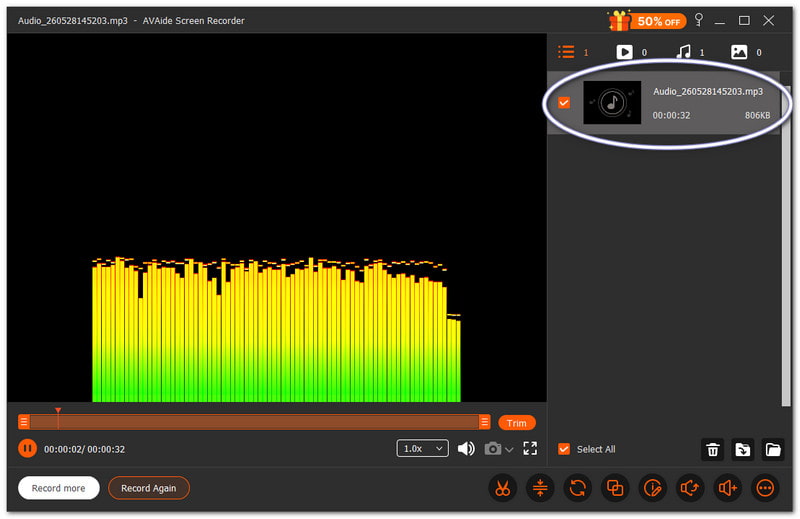
Bước 4Đánh GHI Để bắt đầu, vui lòng chờ đếm ngược. Sau khi bắt đầu, hãy phát âm thanh bạn muốn. Nhấn nút Ngừng lại Nhấn nút sau khi hoàn tất. Sau đó, tệp sẽ tự động lưu. Nhưng bạn cũng có thể cắt hoặc chỉnh sửa nó trước khi sử dụng làm nhạc chuông.
Không còn nghi ngờ gì nữa, chiếc Mac này và Trình ghi âm Windows Có thể giúp bạn tạo nhạc chuông theo sở thích cá nhân cho thiết bị của mình.
Phần 4. Các bước dành riêng cho Samsung
1. Sử dụng trình ghi màn hình tích hợp sẵn
Ứng dụng Samsung Screen Recorder ghi âm từ video và giúp chuyển đổi âm thanh đã ghi thành nhạc chuông hữu ích.
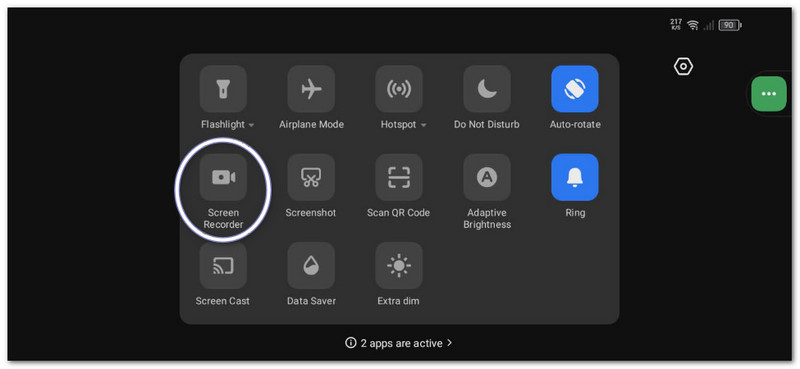
Bước 1bên trong Bảng điều khiển nhanh, vuốt xuống. Nhấn vào Trình ghi màn hình nút. Trước khi bắt đầu, hãy chọn Âm thanh truyền thông.
Bước 2Hãy phát video hoặc nhạc bạn muốn ghi lại. Cho phép trình ghi màn hình ghi lại cả âm thanh.
Bước 3Dừng ghi hình khi hoàn tất. Tệp sẽ được lưu trong thư viện ảnh của bạn. Sử dụng ứng dụng chuyển đổi video sang MP3 để trích xuất âm thanh.
Bước 4Di chuyển tệp MP3 đến thư mục của bạn. Bộ nhớ trong > Thư mục nhạc chuông để có thể sử dụng sau này.
Phương pháp này cho thấy Ghi hình màn hình SamsungVì vậy, hãy đảm bảo chuyển đổi video đã ghi thành chỉ âm thanh để có thể sử dụng làm nhạc chuông.
2. Trình tạo nhạc chuông tích hợp
Cài đặt nhạc chuông của Samsung cho phép người dùng chọn bài hát, cắt đoạn nổi bật và ngay lập tức đặt chúng làm nhạc chuông mặc định của điện thoại.
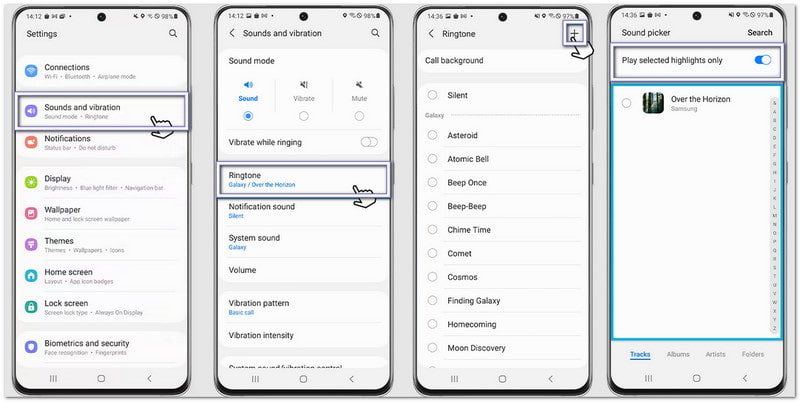
Bước 1Mở điện thoại của bạn và vào Cài đặt. Vỗ nhẹ Âm thanh và rung động. Sau đó, chọn Nhạc chuông.
Bước 2Chạm vào cộng Nhấn nút và chọn bài hát hoặc bản ghi âm đã lưu từ điện thoại của bạn.
Bước 3Cho phép Chỉ phát những đoạn nổi bật đã chọn Nếu có sẵn, Samsung sẽ tự động cắt bỏ phần hay nhất của đoạn âm thanh.
Bước 4Xác nhận lựa chọn của bạn, và âm thanh đó sẽ được đặt làm nhạc chuông mặc định của bạn.
3. Phương pháp quản lý tập tin
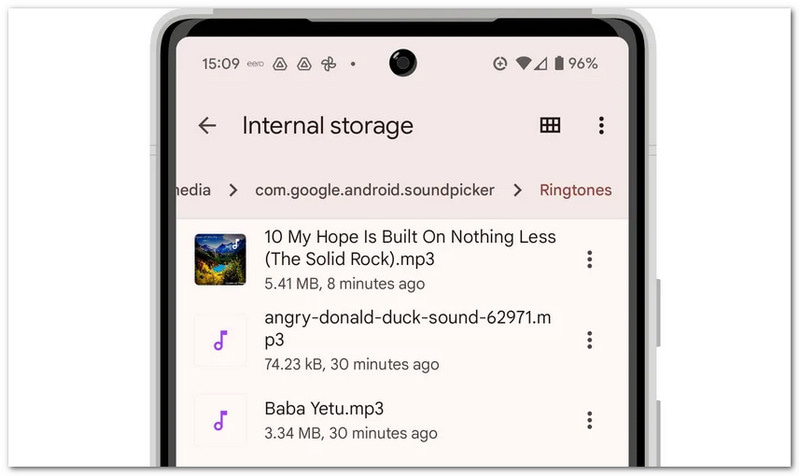
Ứng dụng Quản lý Tệp của Samsung giúp sắp xếp các tệp âm thanh và cho phép sao chép trực tiếp vào thư mục Nhạc chuông để tự động nhận diện nhạc chuông.
Bước 1Khởi chạy Tệp của tôi ứng dụng trên điện thoại Samsung của bạn.
Bước 2Đi đến Tải xuống hoặc là Âm thanh Thư mục. Tìm tệp âm thanh bạn đã ghi hoặc tải xuống.
Bước 3Nhấn giữ tệp. Chạm Sao chépSau đó, hãy đi đến... Bộ nhớ trong > Nhạc chuông.
Bước 4Sao chép tệp tin vào thư mục Nhạc chuông. Sau đó, quay lại phần Cài đặt âm thanh. Tệp tin của bạn giờ sẽ xuất hiện trong danh sách nhạc chuông.
Phần 5. Mẹo chuyên nghiệp để đạt kết quả tốt nhất
Trước khi cài đặt nhạc chuông, bạn nên làm theo một vài mẹo đơn giản. Những mẹo này sẽ giúp nhạc chuông của bạn nghe rõ ràng hơn và hoạt động tốt hơn trên điện thoại.
Mẹo #1: Hãy viết ngắn gọn.
Hãy đặt nhạc chuông của bạn chỉ từ 30 đến 40 giây. Điều này giúp âm thanh mượt mà và hoàn toàn tương thích với điện thoại Android.
Mẹo #2: Sử dụng đúng định dạng.
Hãy sử dụng các tệp MP3 hoặc M4A nếu có thể. Các định dạng này hoạt động tốt trên hầu hết các thiết bị Android mà không gặp lỗi.
Mẹo #3: Kiểm tra âm lượng trước.
Hãy nghe thử nhạc chuông trước khi cài đặt. Đảm bảo âm lượng không quá to hoặc quá nhỏ. Điều này giúp bạn tránh bị bất ngờ khi có người gọi đến.
Bạn đã từng học Cách ghi âm nhạc chuông trên iPhone, Android và máy tính để bàn. Vì vậy, bất kể bạn sử dụng thiết bị nào, bạn đều có thể tạo nhạc chuông tùy chỉnh của riêng mình bất cứ lúc nào.
Dành cho người dùng Windows và Mac, AVAide Screen Recorder Ứng dụng này giúp quá trình ghi âm trở nên dễ dàng hơn. Bạn có thể ghi âm giọng nói của chính mình hoặc thu âm từ hệ thống. Bạn cũng có thể cắt bớt file sau khi ghi âm. Điều này giúp bạn chỉ giữ lại phần hay nhất để làm nhạc chuông.
GIỚI THIỆU VỀ TÁC GIẢ

Ghi lại các hoạt động trên màn hình bằng âm thanh, cuộc họp trực tuyến, video trò chơi, nhạc, webcam, v.v.