콘서트장의 빠르게 변하는 조명을 스마트폰 카메라가 따라잡기는 어렵습니다. 스트로보, 레이저, 갑작스러운 정전 때문에 카메라가 촬영 도중 초점을 다시 맞추고 노출을 재조정해야 하죠. 결국 공연이 끝날 무렵에는 길고 흔들리고, 과도하게 확대되고, 계속해서 초점이 바뀌는 영상만 남게 됩니다. 물론 그 추억은 잊을 수 없겠지만, 영상은? 차마 볼 수가 없죠. 하지만 좋은 소식이 있습니다. 대부분의 문제는 사실 고칠 수 있습니다. 적절한 도구와 흔히 발생하는 실수를 피하는 방법에 대한 지식만 있다면, 여러분은 만족스러운 영상을 만들 수 있을 겁니다. 영상을 더 선명하게 만들기 위해 편집하는 방법.
파트 1. 최고의 도구를 사용하여 영상을 더욱 선명하게 만드는 방법
뛰는 인파 속에서 흔들림 없는 영상을 얻는 것은 매우 어렵습니다. 하지만 여러분의 영상은 여전히 두 번째 기회를 가질 수 있습니다. AVAide 비디오 컨버터 AVAide는 강력한 비디오 향상을 위한 최고의 파트너입니다. 노이즈 제거, 흐림 제거, 흔들림 보정, 해상도 향상 등 모든 기능을 하나의 도구에 담았습니다. 단 한 번의 클릭으로 모든 작업을 완료할 수 있습니다. 내보내기 버튼을 누르는 순간 AVAide가 마법을 부립니다. 무엇보다 Windows와 Mac 모두에서 실행되므로 누구나 쉽게 사용할 수 있습니다.
1 단계먼저, 아래 링크를 클릭하여 프로그램을 다운로드하세요. 무료 다운로드 아래에 제공된 버튼을 클릭하세요. 앱을 열고 앱을 탐색하세요.

 안전한 다운로드
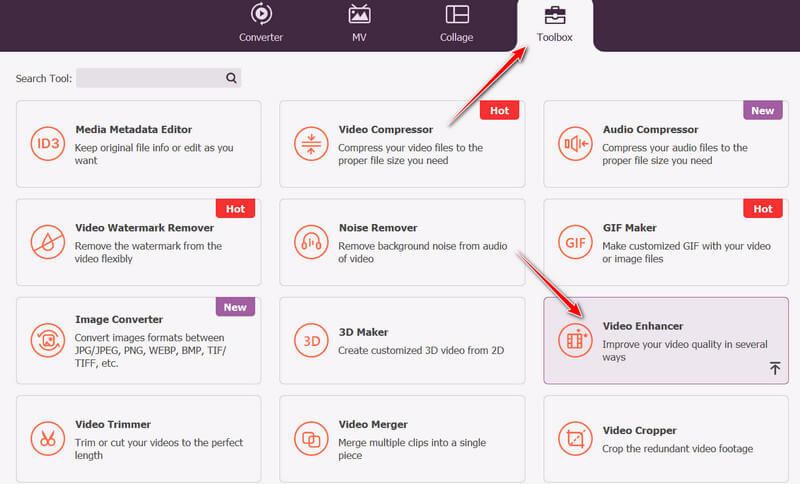
2 단계프로그램을 실행한 후, 다음으로 이동하세요. 공구 상자 탭을 클릭하면 동영상 향상 기능을 포함한 다양한 옵션이 표시됩니다. 이제 선택하세요. 비디오 인핸서 옵션을 선택하거나, 검색창에 입력하여 해당 도구를 찾을 수도 있습니다.
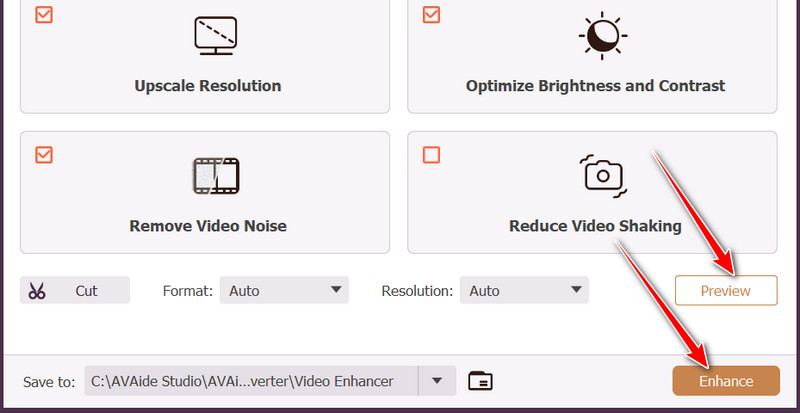
3단계완료되면 더하기(+) 버튼을 누르세요. (+) 인터페이스 중앙에 있는 아이콘을 클릭한 다음 선명도를 높일 비디오를 선택하세요. 비디오를 불러온 후 체크 표시를 하세요. 고급 해상도 상자. 또한 다른 옵션에도 동일한 작업을 수행할 수 있습니다.
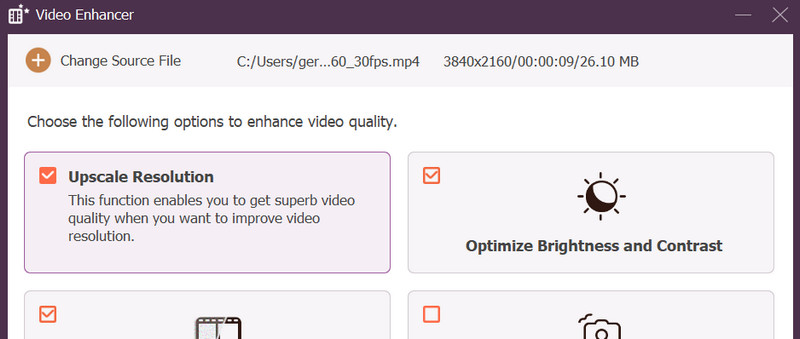
4단계클릭 시사 개선 도구를 적용한 후 변경 사항을 확인하세요. 결과가 만족스러우면 클릭하세요. 향상시키다 버튼을 클릭하십시오.
파트 2. CapCut에서 동영상을 더 선명하게 만드는 방법
CapCut은 인기 있는 동영상 편집 앱입니다. 사용자들이 이 도구를 좋아하는 이유는 바로 인터페이스 때문입니다. 쉽고 초보자도 사용하기 편리하여 효율적이고 간편하게 동영상을 편집할 수 있습니다. 또한, 텍스트 음성 변환 및 배경 제거와 같은 AI 기반 기능은 경쟁 앱보다 뛰어난 장점입니다. 무엇보다 중요한 것은 이 앱이 무료이며, 일부 프리미엄 기능은 유료 구독을 통해 이용할 수 있다는 점입니다. 동영상에 워터마크를 추가해도 괜찮다면 CapCut을 사용하여 영상을 선명하게 만들 수 있습니다. 자, 그럼 이 프로그램을 사용하여 흐릿한 영상을 선명하게 만드는 간단한 방법을 알아보겠습니다.
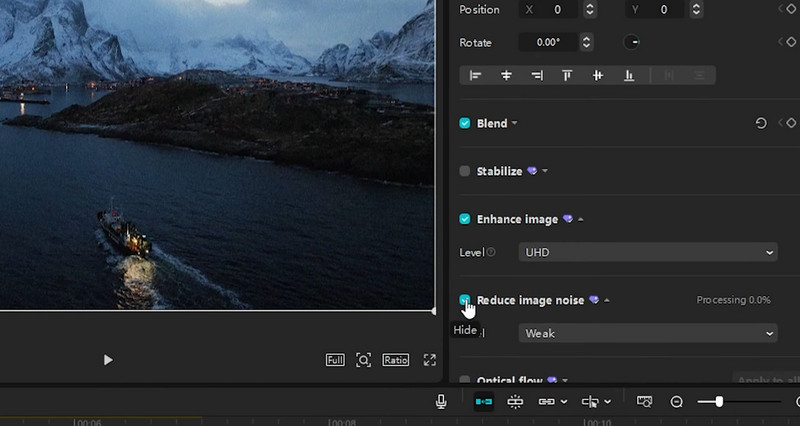
1 단계CapCut을 기기에 다운로드 및 설치하고 새 프로젝트를 시작하세요. 그런 다음 원하는 비디오를 불러오고 클립을 클릭하여 선택하세요.
2 단계이번에는 가보세요 조정 도구 모음에서 옵션을 스크롤하여 선명도 옵션을 찾으세요.
3단계다음으로 슬라이더를 드래그하여 비디오의 선명도를 높이세요. 선명도 슬라이더를 특정 범위 내에서 조정하면 원하는 만큼 선명한 영상을 얻을 수 있습니다. 10+ 에게 +20위로 올라가다 +30 인공적인 후광을 피하는 것은 권장되지 않습니다.
파트 3. 무료로 영상을 더 선명하게 만드는 방법
완전히 무료로 동영상을 더 선명하게 만드는 방법으로는 VLC와 같은 무료 프로그램을 사용하는 것이 있습니다. 구독이나 회원가입이 필요 없지만 강력한 기능을 제공합니다. 이 도구에는 전반적인 영상의 선명도와 또렷함을 향상시키는 데 탁월한 내장 비디오 필터가 포함되어 있습니다. 또한, 가장자리를 선명하게 해주는 샤프닝 필터와 디테일을 유지하면서 노이즈를 줄여주는 디노이즈 필터도 있습니다. 자, 이제 무료로 동영상을 더 선명하게 만드는 방법을 알아보겠습니다.
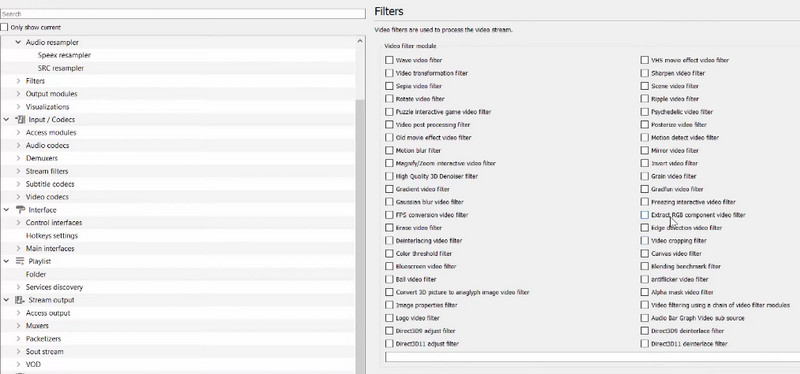
1 단계컴퓨터에 앱을 설치하고 비디오를 로드하세요. 그런 다음 다음으로 이동하세요. 도구 > 효과 및 필터여기에서 클릭하세요. 비디오 효과 탭.
2 단계밝기, 대비, 색조 및 선명도 슬라이더를 조정할 수 있습니다. 필수적인 탭하여 영상을 선명하게 만드세요.
3단계이제 가세요 고급의 탭을 누르고 체크하세요 갈다 영상을 더 선명하게 만들기 위해 상자를 조정합니다. 그런 다음 시그마 값을 조정하여 특정 범위 내에 유지합니다. 0.05와 0.15 자연스러운 시각적 결과를 얻으려면 마지막으로 클릭하세요. 닫다.
파트 4. 아이폰에서 동영상을 더 선명하게 만드는 방법
Apple의 사진 앱은 사진과 비디오를 편집할 수 있는 무료 내장 앱입니다. 이 다재다능한 앱을 사용하면 필터 추가, 자르기, 오디오 믹싱, 트리밍 등 다양한 기능을 활용하여 비디오를 향상시킬 수 있습니다. 특히 노이즈를 제거하고 비디오 해상도를 개선하는 데 탁월합니다. iPhone에서 비디오를 더욱 선명하게 만드는 간단한 방법을 아래에서 확인해 보세요.
1 단계 아이폰에서 사진 앱을 열고 선명하게 만들고 싶은 흐릿한 동영상을 선택하세요.
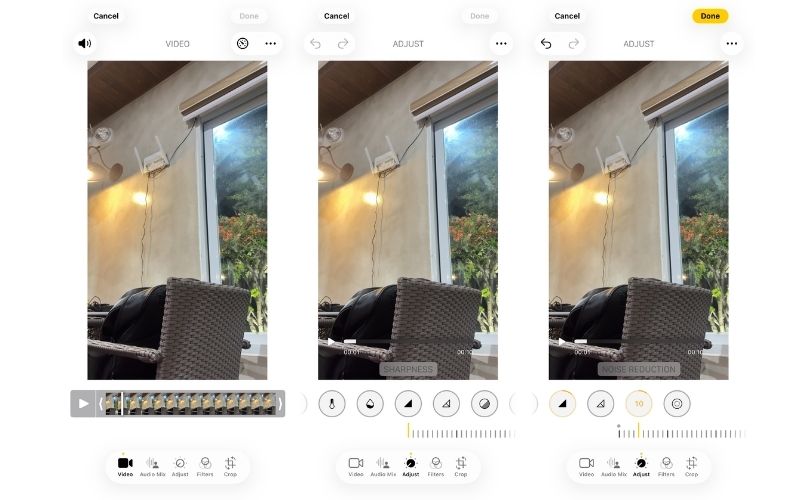
2 단계탭 편집하다 하단의 버튼을 누르고 선택하세요 조정하다 옵션.
3단계그런 다음 왼쪽으로 스와이프하여 찾으세요. 날카로움 옵션을 선택하고 강도를 높일 수 있습니다. 또한 여기에서 다음을 찾을 수 있습니다. 소음 감소 옵션을 선택하고 그 강도를 높이세요.
4단계모든 변경 사항을 적용한 후 탭하세요. 완료 저축하기 위해서요. 마찬가지로, 당신도 할 수 있습니다. 스마트폰 영상 화질 향상아이폰이나 안드로이드 기기처럼요.
파트 5. 더 선명한 영상을 위해 피해야 할 일반적인 실수
선명하고 깨끗한 영상을 제작하고 싶다면, 영상 품질을 떨어뜨리는 습관을 피하는 것이 매우 중요합니다. 어떤 기기로 촬영하든, 저화질 영상으로 이어지는 흔한 실수와 영상을 더욱 선명하게 만드는 방법을 알아보겠습니다.
1. 저조도 환경에서 동영상 촬영
빛이 부족할 때 카메라가 ISO를 높이면 영상에 노이즈와 입자가 생깁니다. 또한, 조명 부족은 영상 선명도를 떨어뜨리는 가장 큰 적입니다. 가능하면 직각 조명을 사용하거나 창가에서 촬영하세요. 어두운 환경에서 촬영할 때 장면을 자연스럽게 밝히려면 외장 LED 조명이나 스마트폰 플래시를 사용하는 것을 고려해 보세요.
2. 녹화 중 디지털 줌인
물론 스마트폰 화면에서 손가락으로 확대/축소하는 것이 편리해 보일 수 있습니다. 하지만 이 기능은 실제로 확대하는 것이 아니라 기존 픽셀을 늘리거나 잘라내는 것일 뿐입니다. 그 결과 영상이 픽셀화되고 흐릿하게 보입니다. 가능하면 디지털 줌에 의존하기보다는 피사체에 직접 다가가 촬영하는 것이 좋습니다.
3. 더러운 카메라 렌즈를 끼고 줄넘기하기
흐릿한 영상의 가장 흔한 원인 중 하나는 렌즈의 오염입니다. 렌즈에 얼룩, 지문, 먼지가 쌓이면 빛이 산란되어 영상 전체가 흐릿해질 수 있습니다. 녹화 버튼을 누르기 전에 극세사 천으로 렌즈를 부드럽게 닦아주세요.
4. 안정화 단계를 무시함
많은 크리에이터들이 영상 안정화는 완전히 간과하고 선명도와 색감에만 치중하는 경향이 있습니다. 아무리 선명도를 높여도 흔들리는 영상은 매끄럽게 만들 수 없습니다. 따라서 항상 영상 안정화 필터를 먼저 적용한 후 선명도와 색감을 조정하는 습관을 들이세요.
5. 잘못된 설정으로 내보내기
영상 편집을 완벽하게 했더라도 잘못된 내보내기 설정 때문에 영상이 흐릿하게 나올 수 있습니다. 많은 초보자들이 높은 압축률이나 낮은 해상도로 내보내는 경향이 있는데, 이렇게 하면 미세한 디테일이 손실됩니다. 이를 방지하려면 항상 가능한 최고 해상도로 내보내세요. 더 높은 화질로 영상을 제작하세요또한, 선명도를 유지하려면 압축 수준을 낮추십시오.
이 가이드 전반에 걸쳐 사용하기 가장 좋은 도구들을 살펴보았습니다. 어두운 영상을 더 밝고 선명하게 만드는 방법 아이폰에서 이러한 도구들을 사용하는 것 외에도, 선명한 영상의 기초는 녹화 버튼을 누르기 전부터 시작된다는 것을 알게 되었습니다.
저자 소개

무손실 품질의 변환을 위해 350개 이상의 형식을 지원하는 완벽한 비디오 도구 상자입니다.