Windowsパソコンで画面と音声を録画したいですか?パソコンの画面と音声を録画する必要がある理由はたくさんあります。ゲームプレイの録画、チュートリアルの作成、コンテンツや製品のレビュー、コンテンツ制作など、さまざまな用途に活用できます。クリアで途切れのない映像と音声は、優れた録画につながります。この記事で紹介する5つの方法に従えば、効果的に録画できます。 Windowsで画面と音声を録画する.
パート1. Windowsは音声付きで画面を録画できるか
はい、Windowsではデスクトップ画面をシステムオーディオとマイクで録画できます。画面と音声をスムーズにキャプチャするには、適切な画面録画ソフトと音声録音ソフトを選ぶことが重要です。ゲーム用の高性能レコーダーが必要な場合でも、チュートリアル用のクリアな録画ソフトが必要な場合でも、最適なツールを使えば映像と音声が完璧に同期します。面倒な作業はすべて弊社が行いました!次のセクションでは、プロのようにWindows画面を音声付きで録画するための最適な方法と手順を詳しく解説します。
パート 2. Windows で音声付きで画面を録画する 3 つの方法
1. WindowsでAVAideスクリーンレコーダーを使用して音声付き画面を録画する
Windowsで音声付き画面録画に使用できる、マイクとシステムオーディオを備えた最も効果的なスクリーンレコーダーの1つは AVAideスクリーンレコーダーこの画面・音声レコーダーを使えば、より簡単に目的を達成できます。さらに、Windows 用のこの画面・音声レコーダーでは、2 つの方法でコンピューター画面を録画できます。コンピューター画面全体、または画面の特定の部分を瞬時に録画できます。ビデオ通話、動画、Zoom 会議、ゲームプレイ、チュートリアル動画など、さまざまなコンテンツを録画することも可能です。また、トラブルのない録画プロセスを提供します。プロでも熟練者でも、このレコーダーを簡単かつスムーズに使用できます。
さらに、画面とオーディオの録画処理後にファイルを強化できます。圧縮、切り取り、トリミング、ビデオ形式の変更が可能です。これにより、コンピューターにビデオを保存する前に、希望どおりの結果を得ることができます。Windows でオーディオ付きの画面録画を行う方法については、以下の手順を確認してください。
ステップ1アクセス AVAideスクリーンレコーダー Windows コンピューターで実行します。下のボタンをクリックして、ソフトウェアをコンピューターにすぐにダウンロードしてインストールしてください。

 安全なダウンロード
ステップ2その後、画面を録画する方法を選択します。 満杯 また カスタム次に、 サウンドシステム 音声付きで画面を録画します。

ステップ3音声付きで画面を録画するには、 REC ボタンをクリックします。3秒後にプログラムが記録処理を開始します。その後、 やめる 画面の録画を終了します。

ステップ4クリック 輸入 録画した画面を保存するには、下部のインターフェイスからボタンをクリックします。

2. OBSを使用してWindowsで音声付き画面録画を行う
オブザーバー は、 最高のオープンソーススクリーンレコーダー 音声付きで画面を録画するためのプログラムです。これは、希望通りの結果を得るために頼りになる人気のプログラムの1つです。さらに、画面上のさまざまなメディアファイルを録画できます。さまざまなタブ、ウィンドウ、ゲームなどを録画することもできます。コンピューターの画面を音声付きで完璧に録画し、優れた品質を得たいなら、すぐにOBSを使用してください。唯一の欠点は、インターフェースがもう少し分かりやすいと良いということです。初心者の方は、この音声付きスクリーンレコーダーの使い方を学ぶのに時間をかけることをお勧めします。Windows 10で音声付きで画面を録画する方法を学びたい場合は、以下の手順に従ってください。
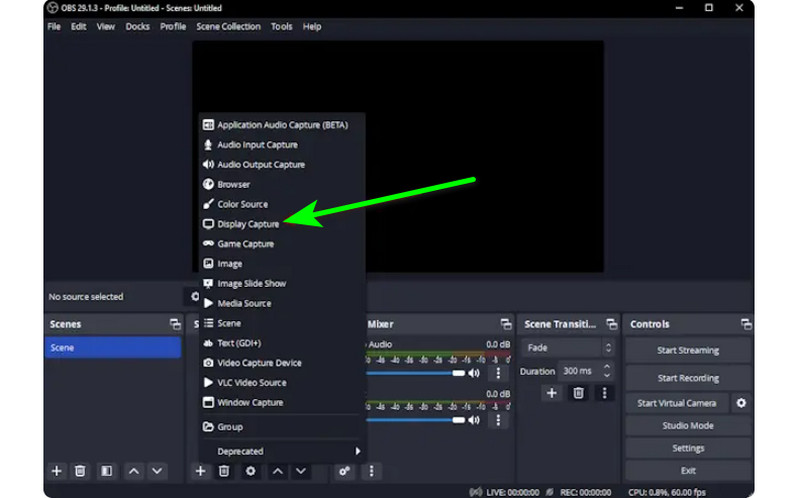
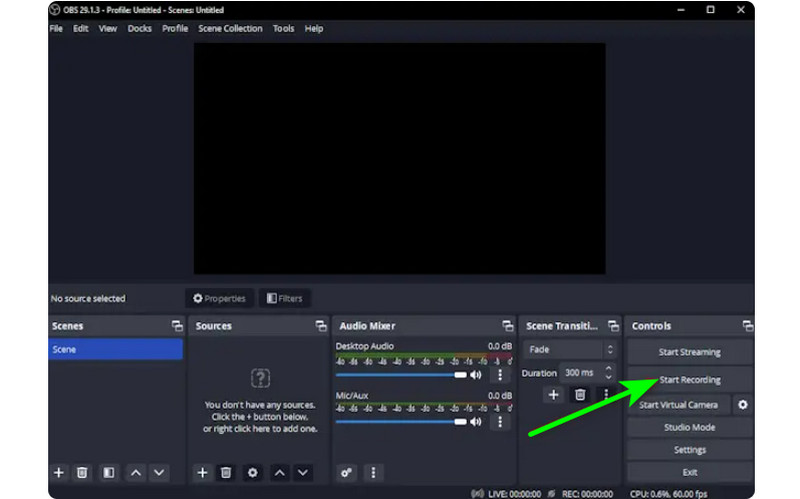
ステップ1を起動します オブザーバー インストールプロセス後にプログラムが終了します。その後、 プラス 下のシンボルを選択し、 ディスプレイキャプチャ オプション。画面に記録するコンテンツを選択できます。
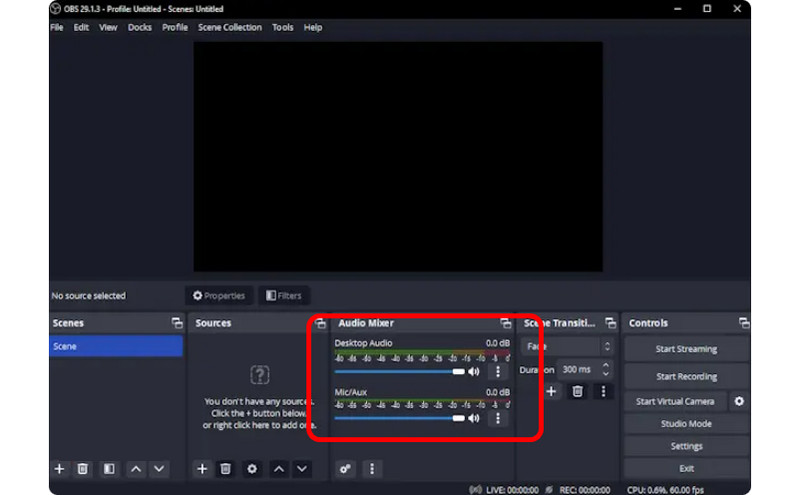
ステップ2次に、に移動します オーディオミキサー 音声をオンにすると、画面を音声付きで録画できるようになります。
ステップ3クリック 録音開始 右側のインターフェースのオプションをクリックして画面の録画を開始します。録画プロセスを停止したい場合は、 録音を停止します ボタン。
3. WindowsでClipchampを使って音声付き画面録画を行う
Windows 11で音声付きで画面を録画する方法を学びたいですか?それなら、 Clipchamp 優れたスクリーン レコーダーとして。この便利なソフトウェアは、簡単なプロセスで音声付きでスムーズに画面を録画できます。必要に応じて、Web カメラをオンにすることもできます。特定のコンテンツにコメントしたり、説明ビデオを作成したりするのに最適です。Windows で画面を録画する方法を学ぶには、以下の方法を参照してください。
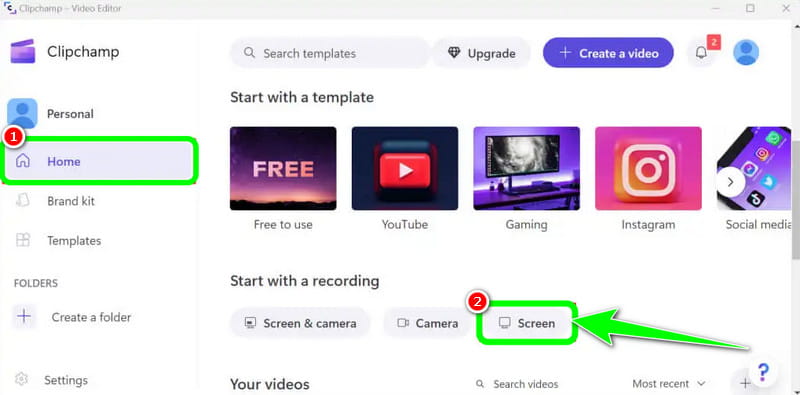
ステップ1メインインターフェースから Clipchamp、 ホーム セクションをクリックして 画面 オプション。すると、別の Web ページが画面に表示されます。
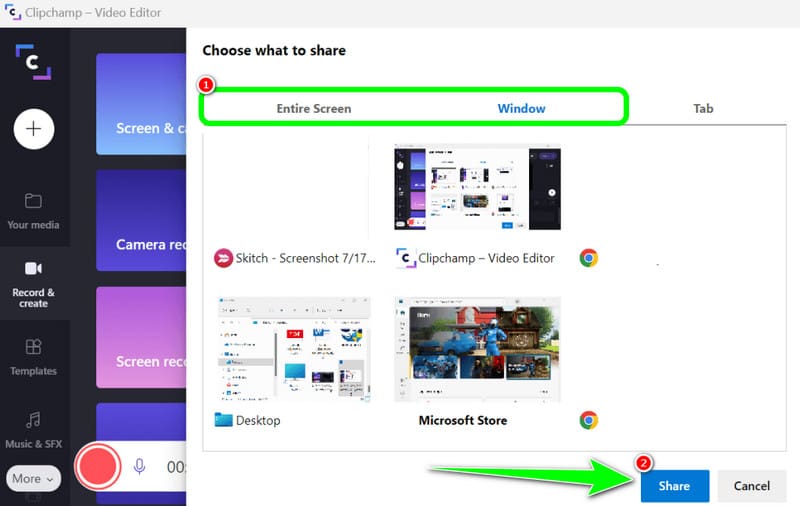
ステップ2その後、をクリックします 赤 左側のインターフェースからボタンをクリックします。すると、タブ、ウィンドウなど、すべてのコンテンツが画面に表示されます。
ステップ3画面全体、ウィンドウ、タブなど、録画したい画面をクリックします。録画を開始するには、 シェア ボタンをクリックします。その後、処理が完了したら 録音を停止します 録画した画面をコンピューターに保存します。
パート3. Windows 10と11で音声を録音する2つの方法
1. WindowsでAudacityを使って音声を録音する
Windows 10 でオーディオを録音する方法を知りたいですか? そうであれば、Audacity を使用してください。このオフライン ソフトウェアは、コンピューターからあらゆるサウンドを録音するのに役立ちます。さらに、このソフトウェアは簡単なプロセスを提供するため、難しいと感じることはなく、すべてのユーザーにとって理想的なオーディオ レコーダーになります。オーディオの録音を開始するには、以下に示す手順を参照してください。
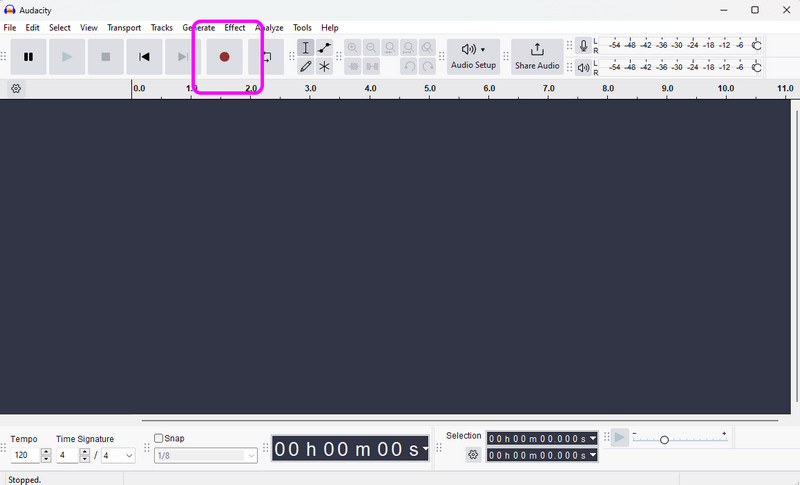
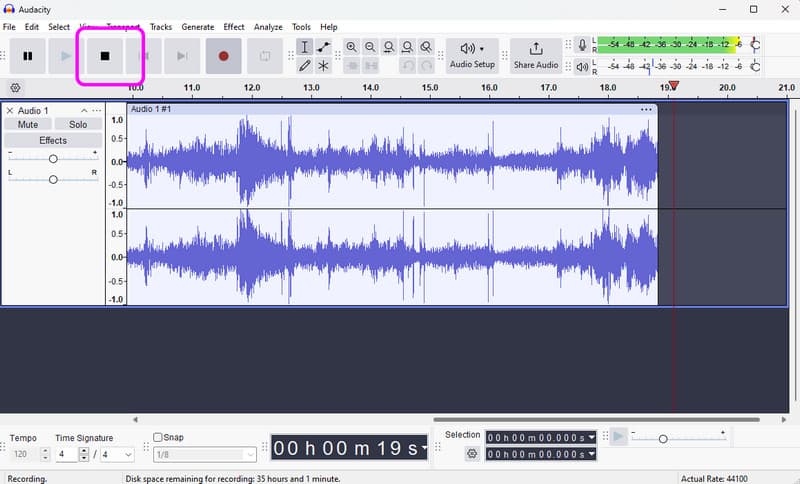
ステップ1インストールして実行する 大胆さ Windowsで、メインインターフェースから 記録 上部のインターフェースから ボタンをクリックしてください。これで、オーディオ録音プロセスが開始されます。
ステップ2その後、録音が終わったら、 やめる ボタンをクリックします。その後、保存手順に進むことができます。
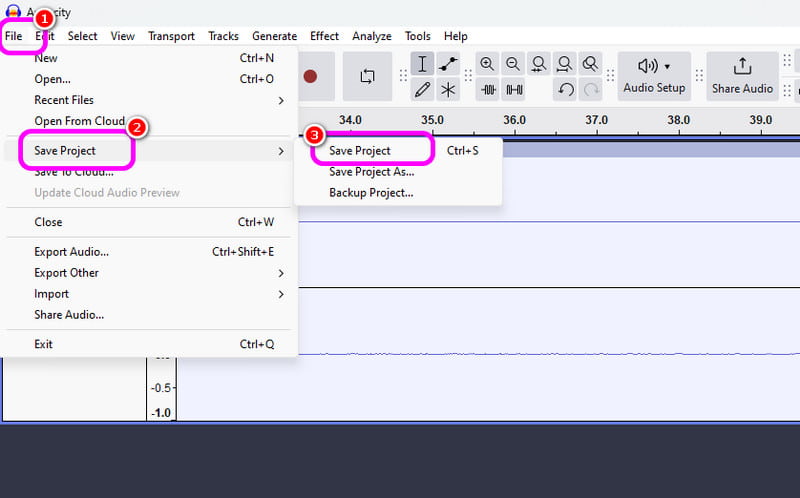
ステップ3録音した音声を保存するには、 ファイル >> プロジェクトを保存 セクションで、最終的なオーディオ ファイルをデバイスに保存します。
2. Windowsボイスレコーダーを使用してWindowsで音声を録音する
スムーズなWindowsオーディオ録音プロセスを実現するもう1つのソフトウェアは Windowsボイスレコーダーこのオーディオ レコーダーにアクセスすると、デバイスからあらゆるオーディオ コンテンツの録音を開始できます。インターフェイスがシンプルなので、オーディオを簡単かつ迅速に録音できるのが気に入っています。唯一の欠点は、録音したオーディオを強化するための編集ツールが提供されていないことです。
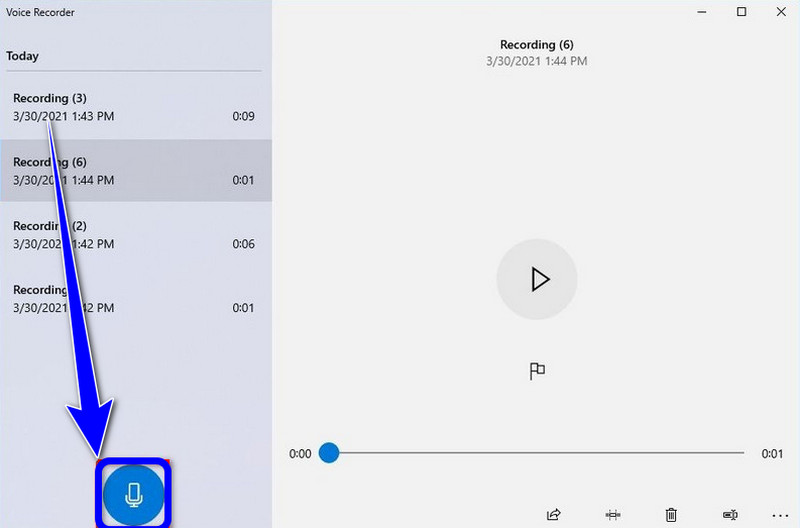
ステップ1ダウンロード Windowsボイスレコーダー デバイス上で起動してプロセスを開始します。
ステップ2メインインターフェースから、 マイクロフォン 録音プロセスを開始するには、記号をクリックします。
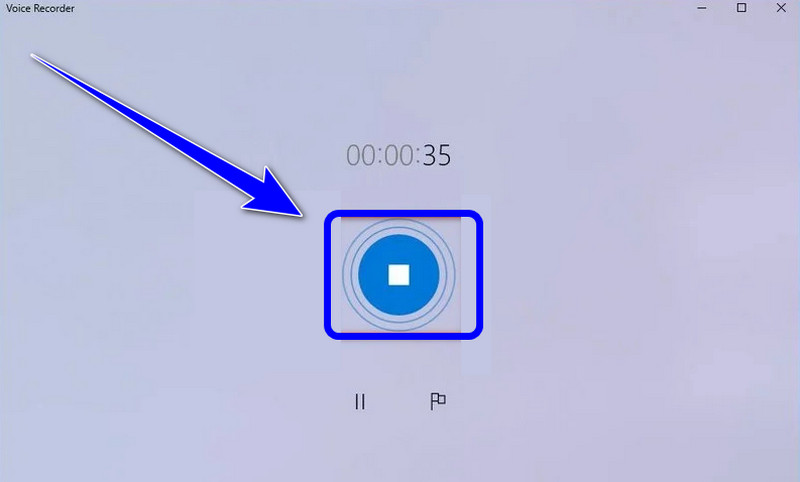
ステップ3オーディオ録音プロセスを停止するには、 やめる ボタンを押します。これで、録音した音声を聞くことができます。
第4部 5つのスクリーン&オーディオレコーダーの比較
| 特徴 | AVAideスクリーンレコーダー | OBSスタジオ | Clipchamp | 大胆さ | Windowsボイスレコーダー |
| 主要カテゴリ | オールインワンキャプチャースイート | プロフェッショナル放送 | 基本的なブラウザエディタ | プロのオーディオエディター | 基本的な音声メモ |
| ビデオ録画 | 対応解像度(最大4K/60fps) | サポート対象(上級者向け) | サポート対象(基本) | サポートされていません | サポートされていません |
| 録音 | システムとマイクの同時録音 | マルチトラック対応 | 基本的な入力のみ | 高度なオーディオキャプチャ | マイクのみ |
| ユーザーインターフェース | 直感的で使いやすい | 急な学習曲線 | シンプルなブラウザベース | 技術的/伝統的 | 極めてミニマル |
| 組み込み編集機能 | リアルタイム注釈/トリミング | なし(外部接続が必要) | フルタイムラインエディター | 高度な音声編集 | 基本的なトリミングのみ |
| 独自のセールスポイント | 専用ゲームモードと電話モード | シーンレイヤーは無制限 | ストックメディア統合 | ノイズ低減/ミキシング | ネイティブシステムユーティリティ |
| 総合的な価値 | 効率性と品質において最高 | 上級技術者に最適 | 短いソーシャルメディア動画に最適 | 純粋なオーディオ作業に最適 | シンプルなメモに最適 |
パート5:Windowsでの画面と音声の録画に関するよくある質問
WindowsのAlt+Rが機能しないのはなぜですか?
Alt + R ショートカット(Windows Xbox ゲームバーの標準キーバインド)が機能しない場合は、通常、ソフトウェアの競合、設定の無効化、またはハードウェアの制限が原因です。画面録画機能を持つ他のプログラムを終了してください。
Windowsで画面録画をすると、なぜ音声が入らないのですか?
録音時に音声が聞こえない最も一般的な原因は、音声入力設定の誤りです。これを解決するには、録音ソフトウェアでシステムオーディオ(内蔵サウンド)とマイクの両方が有効になっていることを確認してください。Windows 11 の場合は、プライバシーとセキュリティの設定を確認し、アプリがマイクにアクセスする権限を持っていることを確認してください。さらに、Windows のサウンドコントロールパネルで再生デバイスが「既定のデバイス」に設定されていることを確認してください。多くの録音ソフトは、特別な設定を行わない限り、「仮想」または「Bluetooth」出力からの音声をキャプチャできないためです。
マイクを使わずにWindowsで内部音声を録音するにはどうすればよいですか?
マイクからの背景雑音を拾わずにシステム内部の音声を録音するには、画面録音および音声録音プログラムの「システムサウンド」または「内部音声」オプションをオフにする必要があります。
学びたいなら Windowsで音声付きで画面を録画する方法、この投稿からすべての詳細を入手できます。したがって、すべての情報を確認し、効果的な画面とオーディオの録音プロセスを実行するプロセスを試してください。また、音声付きの画面を完璧に録画するのに役立つ最も信頼性の高いソフトウェアが必要な場合は、AVAide Screen Recorder が利用できる最高のプログラムであることに疑いの余地はありません。したがって、Windows でソフトウェアを実行して、その全体的な機能をお楽しみください。
著者について

画面、オーディオ、ウェブカメラ、ゲームプレイ、オンライン会議、およびiPhone/Android画面をコンピューターに記録します。