“Gambarnya tidak seharusnya buram. Powerpoint melakukannya secara otomatis saat Anda memperbesarnya, dan hasilnya terlihat buruk. Apakah ada cara agar tidak terlihat seperti itu?”-Reddit
Nah, jika Anda ingin mengatasi masalah Anda, kami siap membantu Anda. Dalam postingan ini, kami akan memberikan petunjuk terperinci tentang cara menghilangkan blur pada gambar di PowerPoint. Dengan begitu, Anda tetap bisa mendapatkan kualitas gambar terbaik. Selain itu, Anda juga akan mempelajari berbagai alasan mengapa gambar menjadi buram pada perangkat lunak. Kami menganjurkan Anda untuk membaca semua hal dalam postingan ini dan mempelajari lebih lanjut tentang cara paling efektif untuk menghilangkan blur pada gambar di PowerPoint.
Bagian 1. Mengapa Gambar Menjadi Buram di PowerPoint
Before fixing the issue, it helps to understand why PowerPoint degrades your visuals:
- Automatic Compression: To keep presentation file sizes low, PowerPoint compresses images automatically during the saving process.
- Low Source Resolution: Stretching a small or low-resolution image across a large slide forcibly introduces pixelation.
- Copy-and-Paste Degradation: Dragging or pasting images directly from the web to PowerPoint often copies lower-quality cache files rather than the original source asset.
- Lossy Formats: Formats like JPEG degrade with every save. Lossless formats (like PNG) hold their crispness much better.
Bagian 2. Cara Menghilangkan Keburaman Gambar di PowerPoint
Jika Anda ingin menghilangkan keburaman pada gambar di PowerPoint, ada berbagai metode yang dapat Anda gunakan. Jadi, untuk menemukan solusi terbaik guna mencapai tujuan Anda, lihat semua tutorial di bagian ini.
Metode 1: Nonaktifkan opsi Jangan kompres
As we have discussed, the PowerPoint program can automatically compress the image you inserted. So, if you want to prevent this type of action, you should prevent it from compressing photos. To do that, you can follow the simple steps below.
Langkah 1Bukalah Power Point perangkat lunak dan lanjutkan ke Mengajukan > Pilihan bagian. Setelah itu, Opsi PowerPoint Jendela akan muncul di layar Anda.
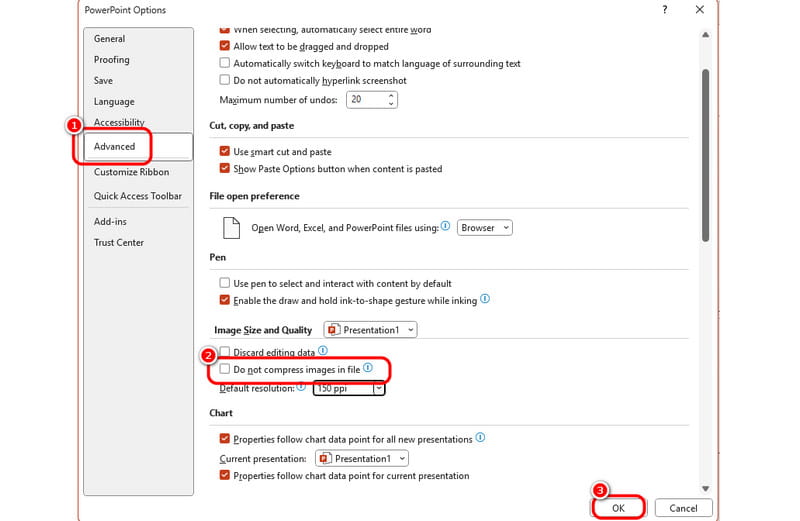
Langkah 2Setelah itu, pergi ke Canggih > Ukuran dan Kualitas Gambar options. Then, enable the Jangan kompres gambar pilihan.
Langkah 3Centang Oke tombol di bawah untuk menyimpan dan menerapkan perubahan pada proses akhir.
Metode 2: Ubah Resolusi Default
For the second method to unblur an image on PowerPoint, we will change the default resolution. To unblur the photo in PowerPoint, the best thing to do is to set the resolution setting to a High Fidelity option. So, if you want to proceed with the process, see the method below.
Langkah 1After you launch the PowerPoint software, click the Mengajukan button in the top left corner and select Pilihan dari antarmuka kiri.
Langkah 2Ketika Opsi PowerPoint window appears, click the Canggih tombol dan pilih Ukuran dan Kualitas Gambar pilihan.
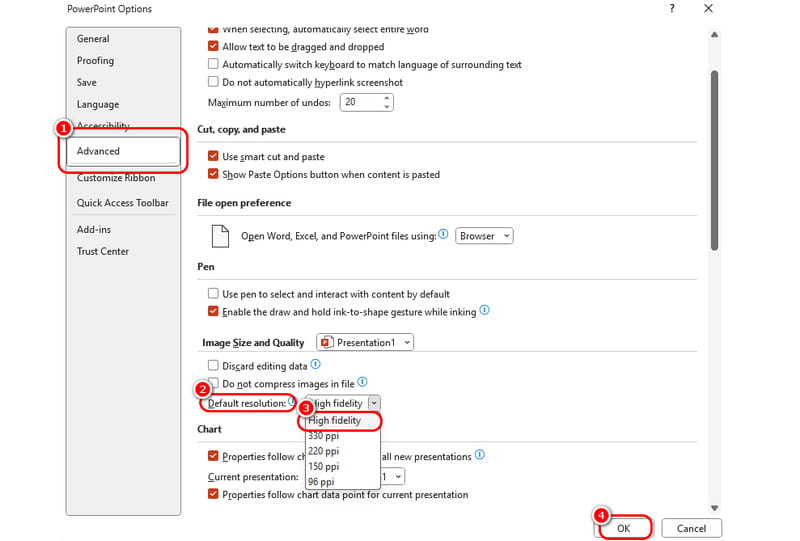
Langkah 3Klik Resolusi Default button and choose the High-Fidelity option. Once done, click the Oke button to apply the changes. If you want to meningkatkan resolusi gambar, Anda dapat menggunakan metode ini.
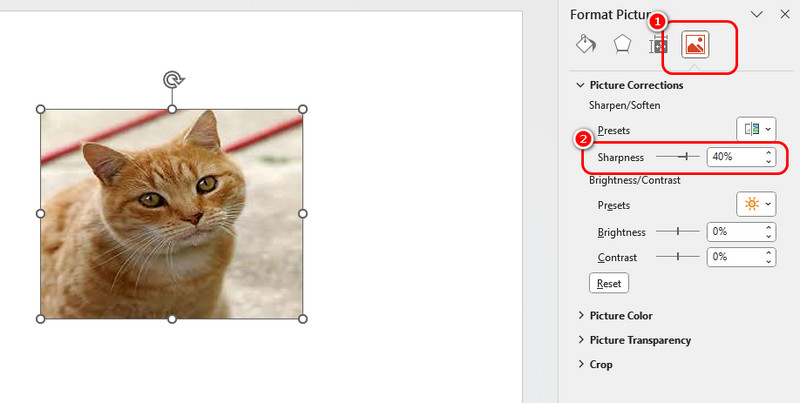
Metode 3: Sesuaikan Ketajaman Gambar
For our last method, you can use the sharpness feature to improve your blurry image. It has a simple process, making it an ideal way for beginners. Follow the steps below to start fixing blurry images in PowerPoint.
Langkah 1The first thing to do is to insert the image into PowerPoint. Locate your presentation, go to the Menyisipkan > Gambar > Alat ini opsi untuk menambahkan gambar.
Langkah 2Klik kanan gambar dan tekan Format Gambar pilihan. Dengan itu, berbagai fungsi akan muncul di antarmuka sebelah kanan.
Langkah 3Klik Gambar button and proceed to the Koreksi Gambar bagian. Kemudian, pilih Ketajaman fungsi dan gunakan slider untuk menyesuaikan tingkat ketajaman gambar. Setelah selesai, Anda dapat menyimpan presentasi Anda ke Mengajukan > Simpan sebagai pilihan.
Pro-Tips to Maintain Crisp Presentation Visuals
- Use Lossless Formats: Always lean toward PNG atau BERTENGKAR files when transparency and sharp lines are critical.
- Insert, Don't Paste: Menggunakan Menyisipkan > Foto-foto > Alat ini instead of Ctrl+C / Ctrl+V from a browser to preserve original metadata and quality.
- Match Aspect Ratios: Avoid stretching images manually via the side handles. Hold Shift while dragging corners to scale proportionally.
- Enhance Before Adding: You can use an Penguat piksel AI to enhance the photo before adding it to PowerPoint. It will make the visual better.
Bagian 3. Metode Online untuk Menghilangkan Keburaman Gambar Secara Gratis
What if the image itself is too small or blurry? Tweak all the settings you want in PowerPoint, but it won’t recreate missing pixels. Moreover, it is too complicated to adjust each photo one by one on PowerPoint.
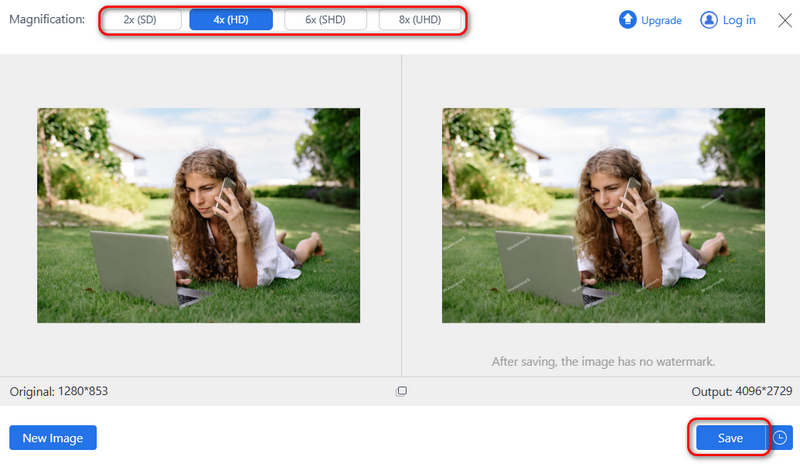
That's where Penambah Gambar AVAide Online comes in. It's a free, browser-based tool that uses AI to fix blurry photos for PowerPoint instantly.
Fitur Utama AVAide Image Upscaler:
- 8× Enhancement: It doesn't just stretch your photo; it uses AI Upscaling to upscale it up to 2×, 4×, 6×, or 8× its original size.
- 100% Free & No Watermarks: You get clean, high-resolution downloads without any hidden costs or annoying logos.
- Super Simple: You don't need photo editing skills. The AI handles the heavy lifting in one click.
Langkah 1Mengakses Peningkatan Gambar AVAide Online di browser Anda. Klik Unggah Gambar Anda button to add your photos to this online tool. You can also click the Kelompok button to add multiple photos.

Langkah 2Now, you can select a desired magnification, like 2X, 4X, 6X, and even 8x. Then, click the Menyimpan button to fix your blurry photo for PowerPoint and save the photo to your local storage.
Part 4. FAQs of Unblurring Image in PowerPoint
How do I uncompress a picture in PowerPoint?
Launch your PowerPoint software, and then click Mengajukan > Pilihan > Canggih > Ukuran dan Kualitas Gambar. Then, enable Do not compress images in file.
Can a blurred photo be unblurred?
If a photo is manually blurred, it is very difficult to unblur it. Simply upscaling the resolution or increasing sharpness may not help, and you may need to use AI tools to "create" new pixels for the photo.
How do I soften an image in PowerPoint?
Click on the image to select it. Go to the Format Gambar tab at the top of your screen. Click Picture Effects (in the Picture Styles group), hover over Soft Edges, and choose a preset percentage (e.g., 5 Point, 10 Point, etc.) to see it blend instantly.
This post shows you three official ways to fix blurry images in PowerPoint. You can also learn some tips to keep the high quality of your photos. However, if your photo is too small, those features in PowerPoint cannot help you, so you can use Penambah Gambar AVAide to directly upscale photos before you add them to your presentation.
TENTANG PENULIS


Teknologi AI kami akan secara otomatis meningkatkan kualitas gambar Anda, menghilangkan noise, dan memperbaiki gambar buram secara online.
PROSES SEKARANG