When attending a meeting or a class online with Zoom, you probably want to take screenshots on Zoom for later use. Here we offer a complete guide on taking screenshots on Zoom with the default features of Windows, Mac, and mobile devices, or with the built-in features of Zoom itself. Also, we will talk about a reasonable concern by many: Can Zoom tell if you screenshot? You'll find the answer in the article.
Part 1. How to Screenshot on Zoom on a PC (Windows)
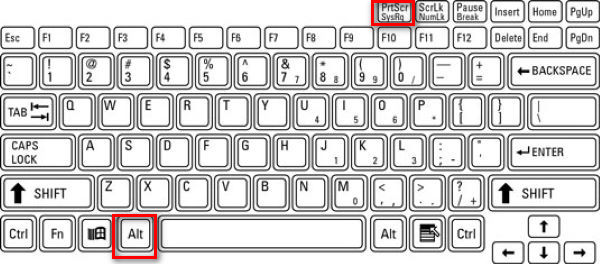
1. Using the Print Screen Key (Full Screen)
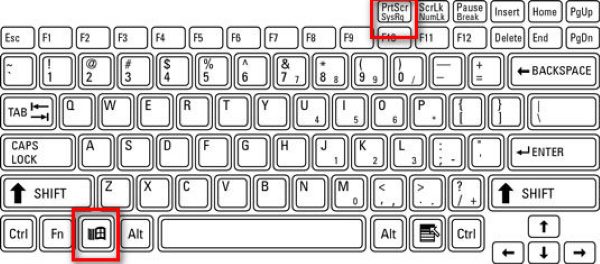
Use the screenshot hotkey on Windows for the entire screen. With the Zoom meeting going, press les fenêtres along with the PrtScn key (which is usually located beside the function keys).
A copy of everything visible on your screen will be immediately taken and saved at C:\Users\YOUR_USERNAME\Pictures\Screenshots (in Win 10 and 11).
2. Using Snipping Tool / Snip & Sketch (Best for Zoom)
Presse Gagner + Changement + S to gray out the desktop and show a capture toolbar at the top. You can then draw a rectangle, or choose free-form, window, or full-screen snips.
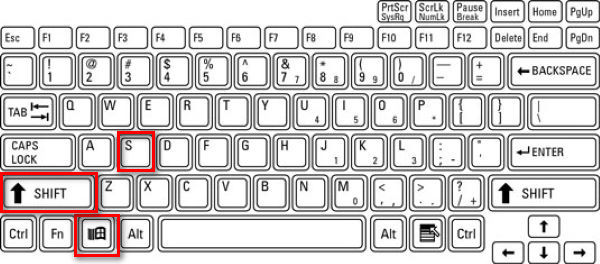
This is ideal for Zoom because you can capture just the Zoom window or part of it. After snipping, the image is copied to the clipboard, and a notification pops up. Click on the notification to edit the screenshot.
3. Using Alt + PrtScn (Active Window Only)
Étape 1Click the Zoom window to make sure it is active.
Étape 2Presse Alt + PrtScn.
This captures only the active window, which is the Zoom meeting, and puts it to the clipboard.
4. Using a Third-Party Tool
I prefer using a third-party tool to screenshot on Zoom, because the images are thus saved at a specific location I set up, separated from other screenshots taken by Windows, making it easier to look for certain pictures.
There are a variety of screenshot tools to take Zoom call screenshots, like ShareX, Icecream Screen Recorder, Snagit, and AVAide Enregistreur d'écran. Like with AVAide Screen Recorder, you can put the images in the same folder, making it easy for you to keep all the screenshots in order. I'll show you how to do it step by step.
Étape 1Download and install the recorder

TÉLÉCHARGEMENT GRATUIT Pour Windows 7 ou version ultérieure
 Téléchargement sécurisé
TÉLÉCHARGEMENT GRATUIT Pour Mac OS X 10.13 ou version ultérieure
Téléchargement sécuriséÉtape 2Launch the recorder
Étape 3Enter a Zoom meeting
Étape 4Clique le caméra button at the top right of the AVAide Screen Recorder window.
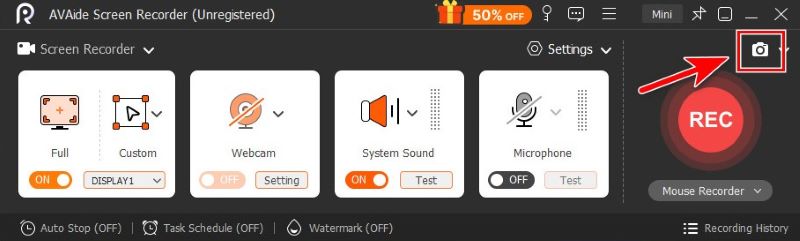
Étape 5Snip free-form by dragging your mouse, or hover the pointer on Zoom to capture its window.
Étape 6When you're satisfied with the snip, click Sauvegarder, and choose the folder you want it to be saved in.
Part 2. How to Screenshot on Zoom on a Mac
The built-in features of the system are enough for us to screenshot on Mac.
1. Full Screen Capture
To capture the entire screen on a Mac, press Commander + Changement + 3.

2. Selective Capture (Best for Zoom)
If you need to capture a certain rectangular region on the meeting screen, press Commander + Changement + 4.

3. Capture a Specific Window
Étape 1press Commander + Changement + 4
Étape 2Hit the Space.

The cursor then becomes a camera icon. Click on the Zoom window to capture just that window.
4. Using the Screenshot App
Étape 1 Presse Commander + Changement + 5 to open Apple's Screenshot toolbar.

Étape 2Select the tool you prefer.

I would recommend Capture a Window et Capture a Portion, suitable for taking only the Zoom window with no distractions.

- You can also use Mac's default features or a third-party tool to edit your screenshot on Mac as you prefer.
Part 3. How to Screenshot on Zoom on Mobile (iPhone & Android)
1. On iPhone / iPad
The method depends on your device model.
Étape 1Start your Zoom meeting.
Étape 2Take a screenshot.
- For iPhones with Face ID and no Home button (iPhone X and later, except iPhone SE) and iPads with no Home button:
appuie sur le Bouton latéral + Augmenter le volume. - For iPhones or iPads with a Accueil button (iPhone SE, 8 and earlier, older iPads):
appuie sur le Side / Top Button + Accueil.
Quickly release both. You'll see the screen flash, capturing your whole screen, and a thumbnail appears to edit or save.
2. Sur Android
Raccourci: Most Android phones use the classic Pouvoir + Baisser le volume shortcut. It varies depending on the specific brand of your device, though. So if this shorcut doesn't work, which is normal, I suggest you check your phone model and look it up.
With your Zoom meeting on, press and hold the buttons together for about 1-2 seconds until the screen flashes. The screenshot is saved in your Gallery or Photos app.
Toolbar: Drag out the menu by swiping down on your screen. Find the Capture d'écran button on the menu and tap on it to select from full-screen, free-form, and scrolling screenshots.
Part 4. Using Zoom's Built-in Features
Zoom's "Take a Snapshot" (For Screen Sharing Only)
Zoom's built-in screenshot feature is easy to use with only a few clicks.
Étape 1Cliquez sur Chat at the bottom of the Zoom window
Étape 2Clique le Capture d'écran icon below the chat box.
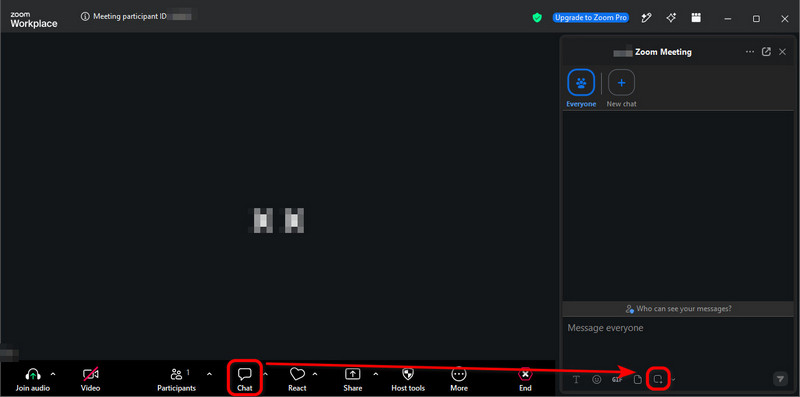
Étape 3Drag your mouse over the part of your screen that you want, and then click Capture.
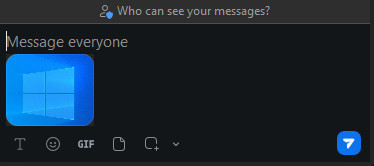
The screenshot is now in the chat box. You can send it to other participants of the meeting by a single click on the paper plane icon at the bottom-right.
- The screenshot in the chat box is NOT automatically saved on your computer. If you want to save it, right-click the image and select Save as….
- Although this method is very simple and fast, it sometimes fails because the host can disable Meeting Chat or Chat Saving. When it happens, you know what to do: use operating system features or a third-party tool like AVAide Screen Recorder instead.
What is a "Zoom Meeting Screenshot Generator"?
It sounds like a screenshot tool, right? Fooled me at first, but in fact, it is a third-party tool that creates fake Zoom call images.
They offer Zoom-call mockups, where you upload pictures and enter names to generate a realistic meeting screenshot with dummy participants.
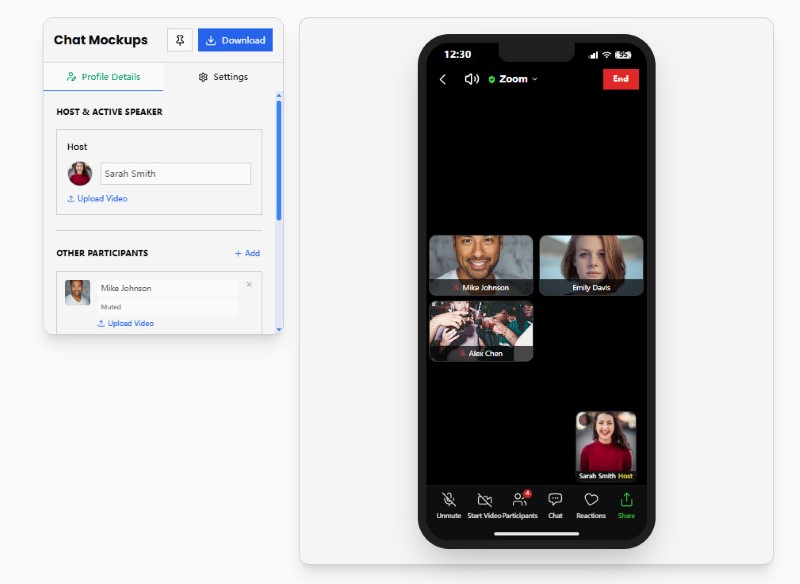
Zoom Meeting Screenshot Generators are not what we look for in this article. But if you're interested in generating fake Zoom memes, try sites like Pradoy or Kapwing. They are a lot of fun.
Part 5. Does Zoom Notify Screenshots?
To put it briefly, Zoom does NOT tell you when a participant takes screenshots, whether they use the operating system's features, a third-party tool, or Zoom's built-in snapshot..
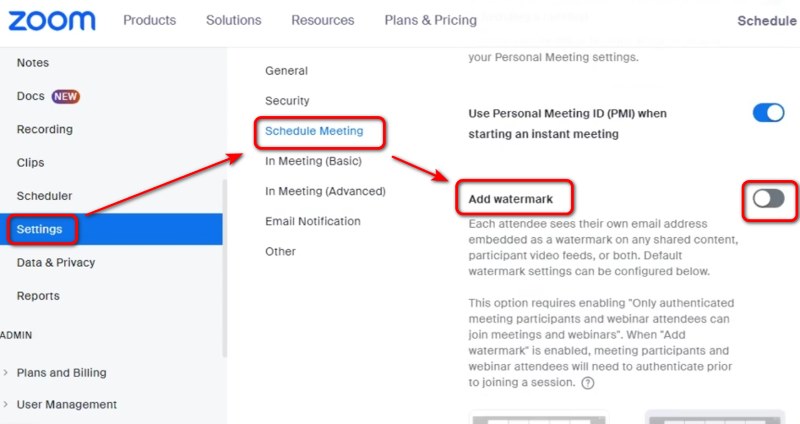
As a host or a screen sharer, you may worry that what's on your screen will go into the wild without you knowing it. So far, there's been no particular way to prevent this, except for adding a watermark on your screen – enter the Zoom web portal Settings and switch on Add watermark to do it.
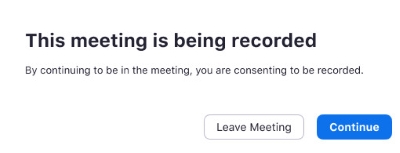
But Zoom does notify when someone records the Zoom meeting. When joining a meeting that is being recorded, or when the host starts to record, you will receive a consent notification. You can either offer consent or leave the meeting.
Taking screenshots on Zoom is easy on Windows, Mac, iPhone, and Android using device features, third-party tools, or Zoom's own features. Zoom does not notify hosts or participants when you take a standard screenshot. However, it's still important to respect privacy, copyright, and any meeting rules before capturing or sharing Zoom content. If you worry about privacy, make it clear to the participants that you do not appreciate screenshots before sharing your screen.
À PROPOS DE L'AUTEUR

Capturez le meilleur moment avec AVAide Screen Recorder. Screencastez, personnalisez et partagez en quelques secondes.
Enregistrement d'écran
- Enregistrement d'écran sous Windows
- Enregistrer un live sur Instagram
- Extraire des vidéos de Tubi
- Convertir des vidéos YouTube en MP3
- Téléchargez des vidéos depuis Fansly
- Téléchargement de vidéos JW Player
- Télécharger les vidéos Bilibili
- Télécharger des vidéos Patreon
- Télécharger les vidéos SpankBang
- Télécharger des vidéos Discord
- Télécharger la vidéo DoodSream