Vous revenez d'une aventure épique, c'est certain. Vous avez filmé les meilleurs moments : les vagues, la descente de la montagne, la randonnée au lever du soleil… Mais en appuyant sur lecture, vous constatez que vos images manquent de relief, qu'il leur manque quelque chose, rien à voir avec le montage cinématographique que vous aviez imaginé. Si vos vidéos GoPro ressemblent à ce que nous décrivons, il existe des solutions. Stabilisation, netteté et correction des couleurs sont des étapes essentielles. Vous pourriez ainsi obtenir un résultat encore plus impressionnant avec vos clips GoPro. Ce guide vous explique comment faire. Comment améliorer la qualité vidéo d'une GoPro Hero 2 ?.
Partie 1. Pourquoi mes vidéos GoPro sont-elles de mauvaise qualité ?
Si vous cherchez une caméra d'action conçue pour filmer vos activités physiques, la GoPro est un excellent choix. Optimisée pour un grand angle de vue et une robustesse à toute épreuve, elle est conçue pour résister aux conditions difficiles que vous pourriez rencontrer lors de vos sorties sportives. C'est pourquoi elle supporte parfaitement la poussière, la boue et les températures extrêmes. De plus, cette caméra est résistante aux chocs, étanche et à l'eau. Contrairement à un appareil photo classique, une GoPro peut être immergée sans boîtier.
Bien sûr, les caméras GoPro sont excellentes, mais elles ont leurs limites. Leurs petits capteurs d'image limitent leur capacité à capter efficacement la lumière. Il en résulte des images granuleuses et bruitées, surtout en basse lumière. Elles disposent de réglages automatiques de couleur et d'exposition, mais ces réglages ont tendance à produire des images trop saturées et contrastées. Les vidéos paraissent alors artificielles plutôt que naturelles.
Un autre facteur important expliquant la mauvaise qualité de vos vidéos GoPro est leur utilisation. Les GoPro sont fixées à des endroits fixes, comme un harnais de poitrine, un casque ou un guidon. De ce fait, la caméra enregistre passivement, sans cadrage ni composition actifs, contrairement à ce qui se fait avec un appareil photo traditionnel. Il en résulte des images monotones et tremblantes, avec un cadrage médiocre. Bien qu'elle dispose de la stabilisation HyperSmooth, celle-ci ne peut remplacer les mouvements volontaires d'un cadreur expérimenté. De plus, le grand angle de la GoPro crée une distorsion en barillet caractéristique qui déforme les lignes droites, donnant à l'image un aspect courbé. Sans correction, les vidéos peuvent paraître peu professionnelles.
Partie 2. Comment améliorer ses vidéos GoPro en 3 étapes faciles
Même si vous possédez d'anciens modèles GoPro comme la Hero 2 et la Hero 5, vous pouvez toujours améliorer la qualité vidéo grâce aux outils et programmes appropriés.
1. AVAide Video Converter
AVAide Convertisseur vidéo AVAide est bien plus qu'un simple convertisseur. Il fait office à la fois d'éditeur et d'améliorateur vidéo, prenant en charge la sortie vidéo jusqu'à 1080p et 4K en un clic. Il intègre une boîte à outils complète comprenant la réduction du bruit, la mise à l'échelle, la stabilisation et l'optimisation de la luminosité et du contraste. Ces outils permettent d'éliminer le bruit vidéo, de réduire les tremblements, d'améliorer la qualité vidéo et de produire des séquences de qualité professionnelle. De plus, le programme peut convertir la vidéo et l'audio dans de multiples formats, jusqu'à 120 fois plus rapidement que les outils standards. Vous pouvez ainsi partager vos vidéos sur différents appareils et plateformes sans vous soucier des problèmes de lecture. Un outil performant et impressionnant. Disponible sur Windows et macOS, AVAide répond à tous vos besoins. Pour découvrir comment améliorer la qualité vidéo de votre GoPro, suivez les étapes ci-dessous :
Étape 1Pour commencer, rien de plus simple. Déclenchez le téléchargement en cliquant sur le Téléchargement Gratuit Cliquez sur les boutons ci-dessous et lancez AVAide Video Converter sur votre ordinateur.

TÉLÉCHARGEMENT GRATUIT Pour Windows 7 ou version ultérieure
 Téléchargement sécurisé
TÉLÉCHARGEMENT GRATUIT Pour Mac OS X 10.13 ou version ultérieure
Téléchargement sécuriséÉtape 2Après avoir ouvert l'application, dirigez-vous directement vers le Boîte à outils Sélectionnez l'onglet dans le menu du haut. Une fois dans la Boîte à outils, vous aurez un accès instantané à une gamme d'outils. Choisissez Optimiseur vidéo pour améliorer votre vidéo GoPro.
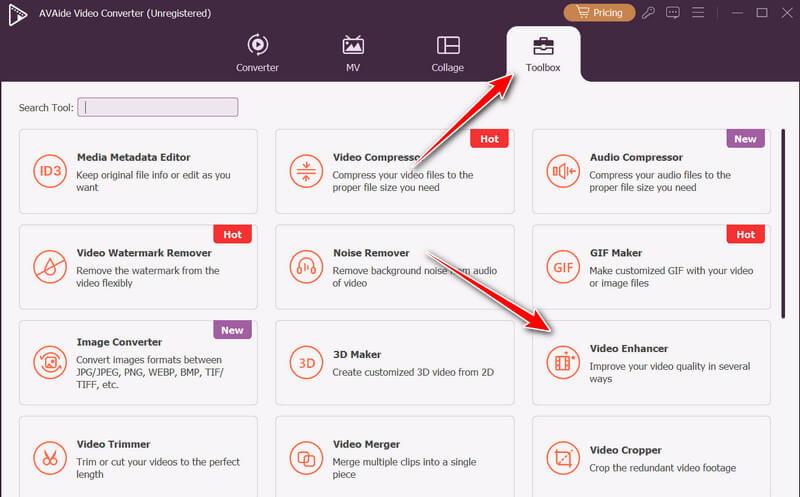
Étape 3Cette fois-ci, ajoutez la vidéo que vous souhaitez améliorer et sélectionnez les options d'amélioration qui vous conviennent le mieux en cochant les cases correspondantes. Vous pouvez également personnaliser le format et la résolution de sortie, et prévisualiser le fichier avant de valider le résultat final.
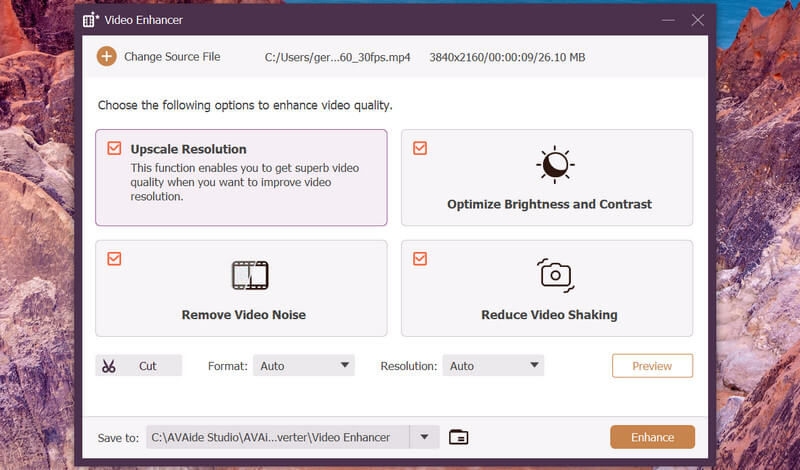
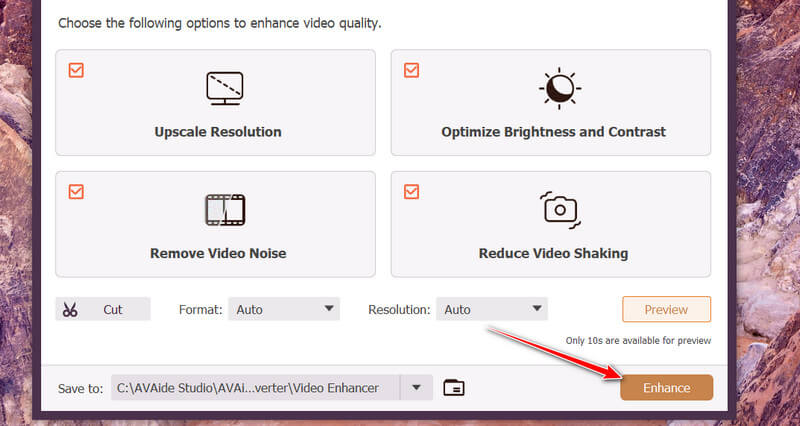
Étape 4Satisfait(e) de la qualité améliorée ? Alors cliquez sur Améliorer Cliquez sur le bouton en bas à droite pour enregistrer et profiter de votre vidéo améliorée.
2. Picwand
Picwand est une plateforme d'amélioration vidéo réputée, basée sur l'IA et offrant de nombreuses fonctionnalités. Elle propose notamment plusieurs modes d'IA, tels que l'amélioration en basse lumière, la colorisation, l'amélioration générale, la réduction du bruit et la réparation de la qualité vidéo. Son outil d'IA en super-résolution vous permet de : Conversion ascendante de 1080p à 4KPicwand permet de reconstruire les pixels manquants et de restaurer les textures. Cependant, contrairement à l'application précédente, elle ne propose pas de fonctionnalités de montage vidéo telles que le recadrage, le découpage ou l'étalonnage des couleurs. Si vous souhaitez apprendre à améliorer la qualité vidéo de votre GoPro en post-production grâce à l'IA, voici un tutoriel.
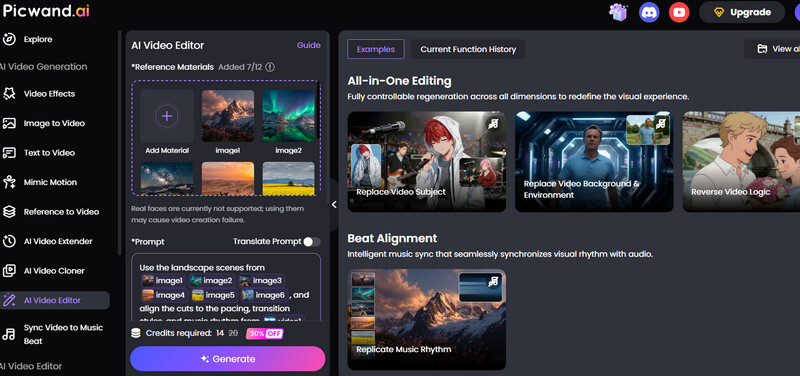
Étape 1Visitez le site officiel de Picwand AI Video Enhancer et placez votre curseur de souris sur le Vidéo IA option et choix Améliorateur vidéo IA.
Étape 2Une fois dans l'éditeur vidéo, cliquez sur le mode IA ou les scènes que vous souhaitez appliquer à votre vidéo GoPro. Le programme vous invitera ensuite à ajouter le fichier à améliorer.
Étape 3Vous pourrez ensuite prévisualiser pendant 3 secondes une comparaison côte à côte avant/après. Si le résultat vous convient, cliquez sur le bouton. Télécharger la vidéo complète bouton.
3. Premiere Pro
Si vous souhaitez rendre une vidéo plus claireVous pouvez utiliser Adobe Premiere Pro pour améliorer la qualité vidéo de votre GoPro. Ce logiciel prend en charge de nombreux formats de fichiers, permettant ainsi de partager vos vidéos sur différentes plateformes et appareils. De plus, il intègre des effets qui offrent un large choix d'effets vidéo à appliquer à vos clips, comme le stabilisateur de déformation pour des vidéos plus fluides. Vous pouvez également affiner les paramètres de chaque effet, ce qui vous permet de contrôler précisément son application. Cependant, la prise en main peut s'avérer complexe pour les débutants en raison de la multitude de fonctionnalités et d'un temps de rendu pouvant atteindre deux à trois heures, selon les effets appliqués. Voici comment utiliser Premiere Pro pour améliorer la qualité de vos vidéos GoPro :
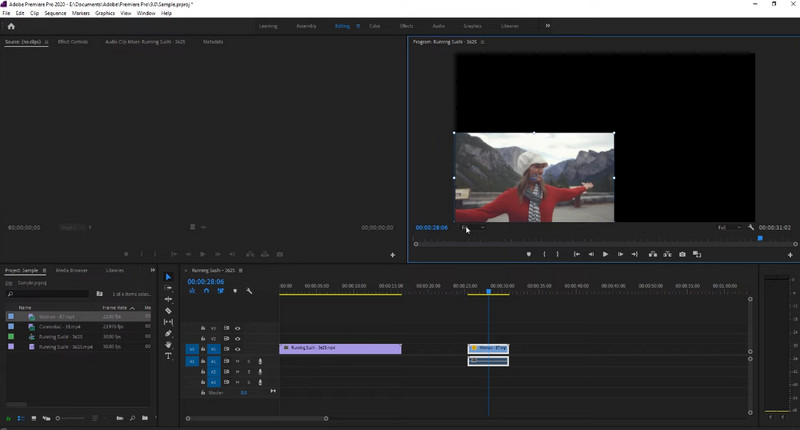
Étape 1Téléchargez et lancez le programme sur votre ordinateur. Une fois l'application ouverte, importez votre vidéo, puis faites glisser le clip dans la timeline.
Étape 2Cette fois-ci, créez un calque de réglage et ajoutez-le à la timeline. Ensuite, accédez à… Effets panneau. Sélectionnez le Aiguiser Appliquez l'effet, puis faites-le glisser sur le calque de réglage dans la timeline vidéo.
Étape 3Après cela, allez au Contrôles d'effet Le panneau affichera ensuite les propriétés des effets ajoutés. À partir de là, ajustez les paramètres. Quantité d'affûtage jusqu'à 50 ou selon les besoins.
Étape 4Pour le résultat final, rendez-vous sur Déposer > Exportation > MédiasMaintenant, vous avez le Exportation menu. Assurez-vous que le format de fichier est défini sur H.264, puis sélectionnez Source de correspondance pour exporter la vidéo en qualité maximale. Enfin, cliquez sur Exportation bouton.
Partie 3. Comment éviter une vidéo GoPro de mauvaise qualité
Si vous craignez que votre vidéo soit de mauvaise qualité dès sa sortie de la caméra, voici quelques-uns des meilleurs réglages que vous pouvez utiliser.
- Optimisez les réglages de votre appareil photo en passant du mode Facile au mode Pro. Cette fonction vous offre un contrôle total sur tous les paramètres de l'appareil.
- Lors de la prise de vue avec la GoPro Hero 13, vous pouvez ajuster la résolution jusqu'à 5,3K.
- Il est également recommandé de régler la profondeur de bits de 8 à 10 bits. Ce réglage offre une plus grande profondeur de couleur en postproduction et un spectre plus large, pour une plus grande flexibilité lors des retouches ultérieures.
- Pour le débit binaire, passez de Standard à Débit binaire élevé pour obtenir la meilleure qualité d'image possible.
- Il ne faut pas régler la sensibilité ISO de votre caméra sur Auto. C'est l'un des facteurs qui donnent un aspect amateur à vos images et qui entraînent beaucoup de vert et de bruit dans la vidéo. Essayez de la régler entre 400 et 800 ISO maximum.
Compréhension Comment améliorer la qualité vidéo en post-production La maîtrise de l'image est essentielle pour tout créateur de contenu. De la réduction du bruit à la correction des couleurs, en passant par la mise à l'échelle et la stabilisation, voici les solutions complètes disponibles aujourd'hui.
À PROPOS DE L'AUTEUR

Votre boîte à outils vidéo complète prenant en charge plus de 350 formats pour une conversion en qualité sans perte.
Éditer vidéo
- Vidéo IA haut de gamme
- Supprimer le filigrane de la vidéo
- Supprimer le texte de la vidéo
- Réduction de 4K à 1080p/720p
- Supprimer le bruit de fond de la vidéo
- Éditeur de métadonnées MP4
- Améliorer la qualité vidéo
- Vidéo inversée
- Correction d'une vidéo de mauvaise qualité
- Supprimer les métadonnées de la vidéo/audio
- Miroir/Désmiroir vidéo de la caméra frontale