Comment modifier un enregistrement vocalL'édition de vos enregistrements vocaux est un moyen efficace d'améliorer différents aspects de votre fichier audio. Vous pouvez optimiser la clarté, couper des passages, ajuster le volume, ajouter des effets et bien plus encore, pour une meilleure écoute. Que ce soit pour des interviews, des notes personnelles ou des podcasts, maîtriser les bonnes pratiques d'édition est essentiel pour obtenir le résultat souhaité. Ce guide vous apprendra à éditer vos enregistrements vocaux à l'aide des meilleurs outils de montage audio. Découvrez-en plus sur le processus.
Partie 1. Modifier un enregistrement vocal sur iPhone
Vous souhaitez apprendre à modifier un enregistrement vocal sur iPhone ? L’iPhone propose une application fiable pour éditer vos enregistrements vocaux, notamment pour les découper, superposer des pistes et supprimer des sections. Pour commencer, suivez les étapes décrites dans cette section.
Couper l'enregistrement dans Dictaphone
Mémos vocaux n'est pas seulement l'un des meilleures applications d'enregistrement vocalElle propose également des outils d'édition fiables pour modifier vos fichiers audio. Grâce à cette application d'enregistrement et de montage, vous pouvez découper vos fichiers audio pour supprimer les parties inutiles. De plus, son interface simple la rend particulièrement intuitive et facile d'utilisation, notamment pour les utilisateurs non professionnels.
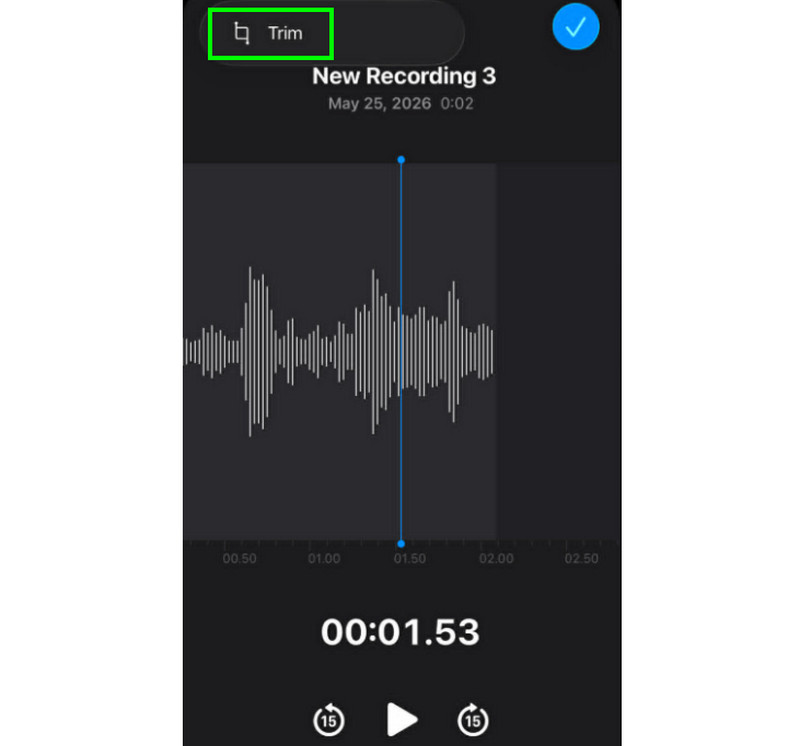
Étape 1Lancez le Mémos vocaux Ouvrez l'application et recherchez l'enregistrement vocal que vous souhaitez modifier. Ensuite, cliquez sur Garniture fonction.
Étape 2Ensuite, vous pouvez commencer à découper l'audio. Puis, appuyez sur Garniture Cliquez sur le bouton ci-dessous pour commencer à supprimer les parties indésirables de l'audio.
Étape 3Après avoir taillé, vous pouvez appuyer sur Appliquer Cliquez sur le bouton ci-dessus pour enregistrer les modifications.
Comment supprimer une section au milieu
Lors du découpage, vous pourriez penser qu'il suffit de supprimer le début ou la fin de la piste audio. L'avantage de l'application Dictaphone est qu'elle permet également de supprimer une section au milieu. Grâce à cette fonctionnalité, supprimer les parties inutiles de la piste audio devient un jeu d'enfant.
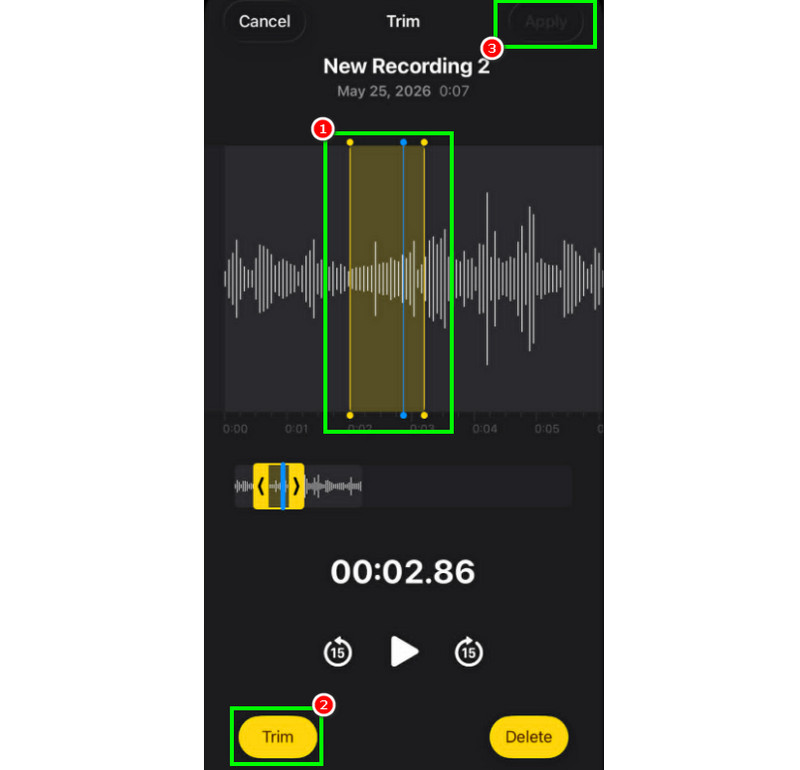
Étape 1Après avoir sélectionné le Garniture Grâce à cette fonctionnalité, vous pouvez toucher et contrôler la ligne réglable depuis le rail.
Étape 2Insérez ou ajustez la ligne au centre, à l'endroit où vous souhaitez supprimer le rail. Ensuite, appuyez sur Garniture bouton ci-dessous.
Étape 3Robinet Appliquer pour enregistrer l'enregistrement vocal modifié.
Comment superposer des pistes dans les mémos vocaux
Dictaphone est un outil idéal pour enregistrer la voix et tout type de contenu audio. Il permet même de modifier un enregistrement, par exemple en le coupant ou en supprimant une section. Cependant, si vous souhaitez superposer des pistes, il est regrettable de constater que l'outil ne le permet pas. Pour une meilleure superposition, il est préférable d'utiliser une application de montage audio plus avancée, comme GarageBand. Cette application vous permet de superposer vos pistes et de créer un seul fichier.
Comment partager et exporter des mémos vocaux modifiés
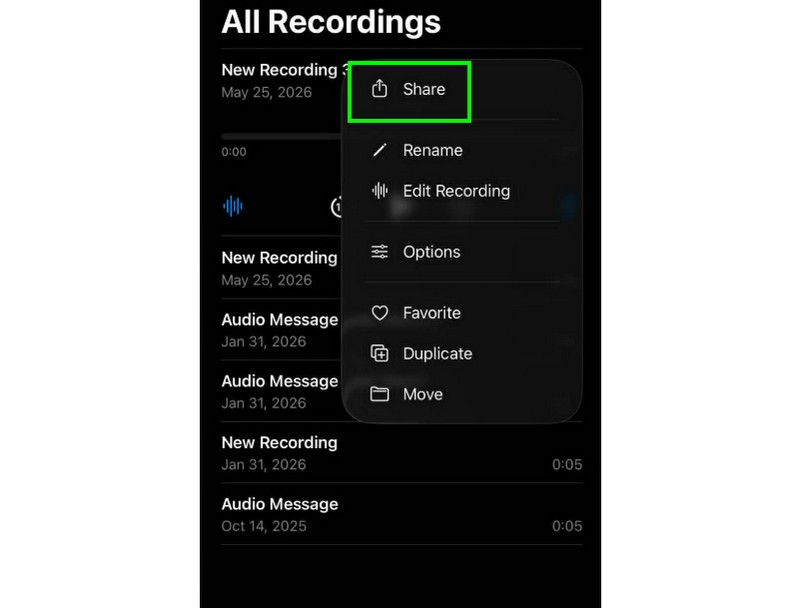
Partager et exporter un enregistrement vocal modifié est simple. Il vous suffit de localiser l'enregistrement dans l'application Dictaphone et d'appuyer sur le bouton à trois points. Ensuite, sélectionnez « Partager ». Vous pouvez alors partager l'enregistrement sur différentes plateformes et l'enregistrer dans le dossier de votre choix.
Applications de montage recommandées pour iPhone
Vous cherchez un autre logiciel d'enregistrement et de montage vocal ? L'application Dictaphone présentant des limitations pour le montage de vos enregistrements vocaux, il est parfois nécessaire d'utiliser un autre outil. Dans ce cas, pour un montage plus performant, vous pouvez essayer GarageBand, Ferrite Recording Studio ou Hokusai Audio Editor.
Partie 2. Modifier un enregistrement vocal sur Android
Vous êtes un utilisateur Android et vous souhaitez modifier vos enregistrements vocaux ? Alors, vous pouvez utiliser… Enregistreur vocal SamsungC'est une application gratuite qui vous permet de modifier vos enregistrements vocaux. Elle vous aide à les raccourcir selon vos préférences. Son interface utilisateur simple la rend facile à utiliser.
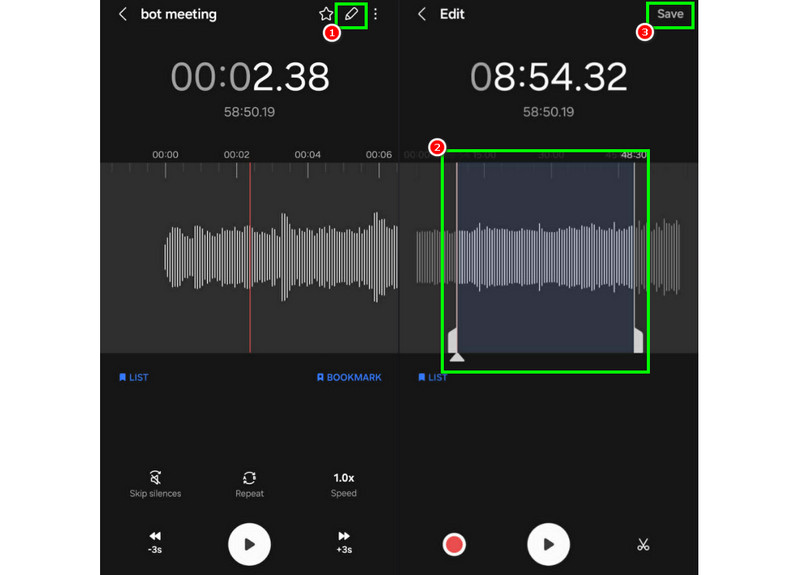
Étape 1Lancez le Enregistreur vocal SamsungEnsuite, passez aux enregistrements que vous souhaitez modifier.
Étape 2Ensuite, ouvrez les enregistrements et appuyez sur Éditer fonction ci-dessus.
Étape 3Vous pouvez commencer le processus de découpe en ajustant les lignes des rails. Une fois terminé, vous pouvez cocher la case. Sauvegarder bouton ci-dessus.
Partie 3. Comment modifier un enregistrement vocal sur ordinateur
Vous souhaitez gérer vos enregistrements vocaux modifiables sur ordinateur ? Lisez la suite : nous vous proposons les meilleures méthodes pour un processus de montage vocal efficace.
Méthode 1. Modifier les enregistrements vocaux à l'aide d'Audacity
Audace fait partie des logiciels de montage gratuits pour ordinateur sur lesquels vous pouvez compter pour éditer vos enregistrements. Vous pouvez découper l'audio, ajouter des effets et lier d'autres pistes. Vous pouvez même enregistrer le son de l'ordinateur avec Audacity Vous pouvez ensuite le modifier selon vos préférences. Le seul problème, c'est que la mise en page n'est pas assez attrayante.
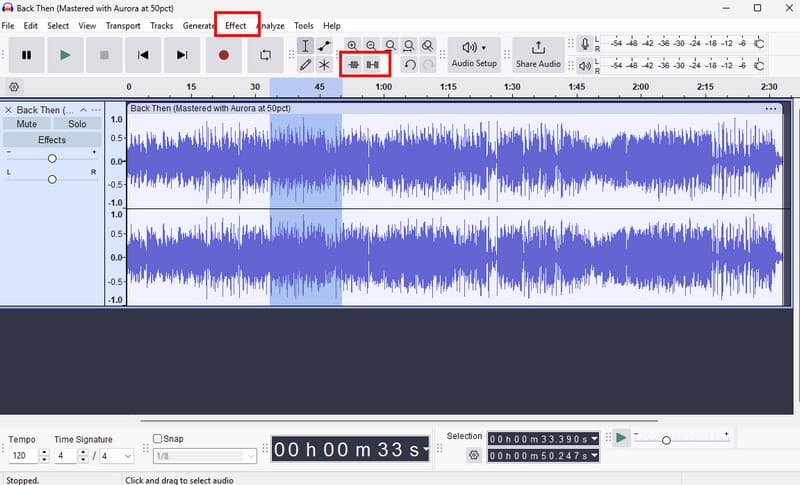
Étape 1Télécharger Audace sur votre ordinateur. Ensuite, passez à la suite Déposer > Ouvert options pour ajouter vos enregistrements.
Étape 2Vous pouvez commencer à modifier votre fichier. Vous pouvez raccourcir la piste, ajouter des effets, ajuster le tempo, et bien plus encore.
Étape 3Une fois terminé, appuyez Déposer > Enregistrer le projet pour le conserver sur votre appareil.
Méthode 2. Modifier les enregistrements vocaux à l'aide d'AVAide Video Converter
Si vous souhaitez un éditeur de qualité professionnelle, essayez d'accéder à AVAide Convertisseur vidéoCe programme vous permet de modifier vos fichiers audio de multiples façons. Vous pouvez couper ou rogner une piste, les diviser et les fusionner. L'avantage principal est la possibilité d'ajouter un fondu en entrée et en sortie. De plus, vous pouvez convertir vos enregistrements dans n'importe quel format audio, comme MP3, AAC, ALAC, M4A, WAV, etc. Vous êtes ainsi assuré de ne rencontrer aucun problème de compatibilité lors de la lecture. Vous pouvez même enregistrer vos fichiers en haute qualité jusqu'à 320 kbps, ce qui rend ce programme idéal pour tous les passionnés d'audio.
Étape 1Télécharger AVAide Convertisseur vidéo Sur votre Mac ou Windows. Ensuite, installez-le et lancez-le pour commencer le processus d'édition.

TÉLÉCHARGEMENT GRATUIT Pour Windows 7 ou version ultérieure
 Téléchargement sécurisé
TÉLÉCHARGEMENT GRATUIT Pour Mac OS X 10.13 ou version ultérieure
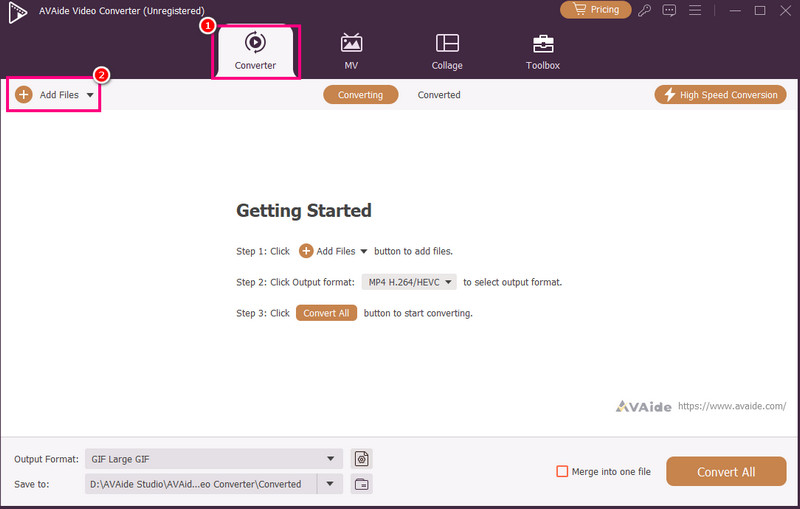
Téléchargement sécuriséÉtape 2Du Convertisseur Pour ajouter des enregistrements vocaux, appuyez sur la touche correspondante. Ajouter des fichiers Vous pouvez même ajouter plusieurs fichiers si vous le souhaitez.
Étape 3Ensuite, cliquez sur le Couper l'option permettant de démarrer le processus d'édition. Vous pouvez couper et supprimer une partie du morceau. Vous pouvez également utiliser la Diviser fonction permettant de séparer les pistes.
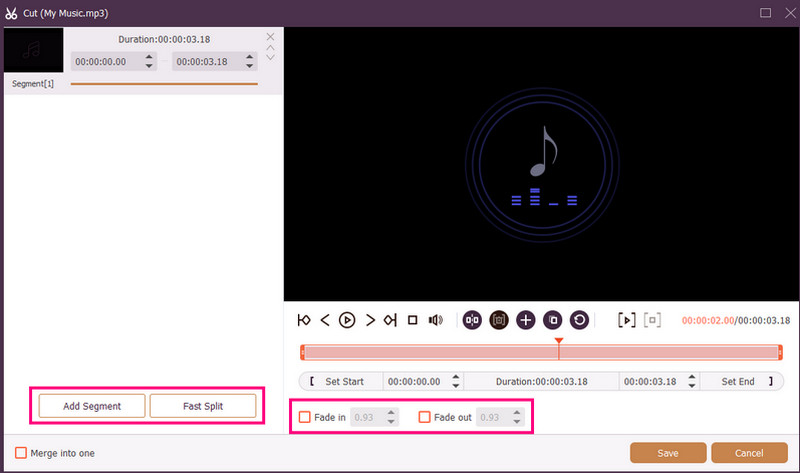
Vous pouvez également joindre Fondu enchaîné et Disparaître des effets à vos enregistrements. Une fois terminé, appuyez sur Sauvegarder.
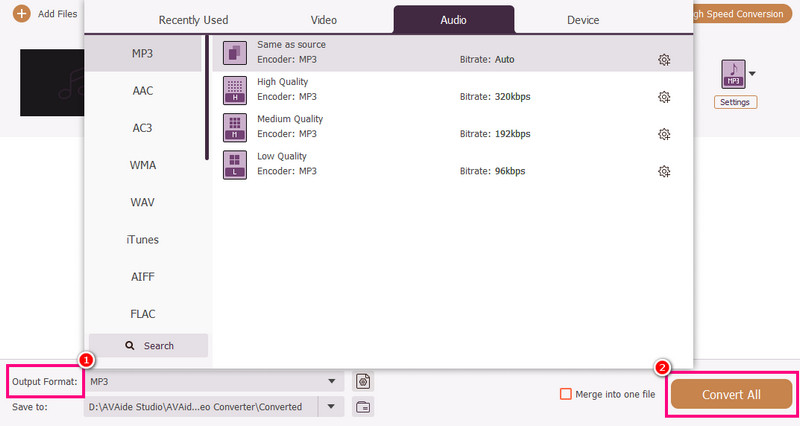
Étape 4Vous pouvez également vous rendre à la Format de sortie section pour choisir le format audio souhaité. Enfin, cochez la case. Tout convertir pour commencer le processus de sauvegarde.
Méthode 3. Modifier les enregistrements vocaux à l'aide d'Adobe Audition
Adobe Audition est un outil fiable pour l'édition de vos enregistrements vocaux. Il propose des fonctionnalités d'édition basiques et avancées, ce qui le rend idéal pour tous les utilisateurs, notamment les professionnels. Vous pouvez découper les enregistrements, appliquer des effets, superposer des pistes et bien plus encore. Cependant, son interface utilisateur complexe nécessite une certaine maîtrise.
Étape 1Télécharger Adobe Audition sur votre ordinateur. Ensuite, commencez à ajouter l'enregistrement vocal que vous souhaitez modifier.
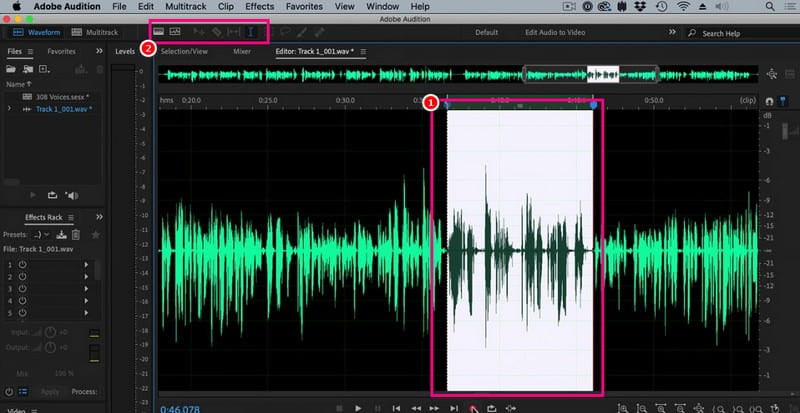
Étape 2Vous pouvez utiliser votre souris/curseur pour sélectionner une partie du morceau et la modifier. Vous pouvez découper, ajouter des effets et diviser l'audio grâce aux outils d'édition disponibles dans l'interface supérieure.
Étape 3Après avoir modifié l'audio, vous pouvez accéder à Déposer > Sauvegarder Utilisez les options ci-dessus pour démarrer le processus d'enregistrement.
Partie 4. Modifier un enregistrement vocal en ligne
Vous pouvez également modifier vos enregistrements vocaux en ligne. Consultez les détails ci-dessous pour découvrir comment modifier votre fichier audio directement dans votre navigateur.
Méthode 1. Modifier les enregistrements vocaux à l'aide de 123APPS
Cet outil est idéal pour éditer gratuitement vos fichiers audio. Il vous permet de les découper, de supprimer les bruits de fond, d'ajouter un fondu et bien plus encore. De plus, sa simplicité d'utilisation le rend parfait pour les débutants.
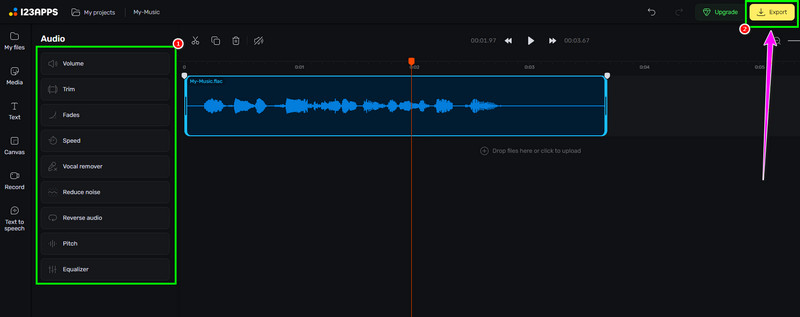
Étape 1Visitez le site Web de 123APPS et procéder à son Éditeur audio fonction. Ensuite, appuyez sur Choisir les fichiers pour télécharger votre enregistrement.
Étape 2Ensuite, commencez à éditer votre enregistrement audio. Vous pouvez le raccourcir, ajouter des effets, supprimer le bruit, et bien plus encore.
Étape 3Après le processus de modification, cliquez Exportation ci-dessus pour l'enregistrer sur votre appareil.
Méthode 2. Modifier les enregistrements vocaux à l'aide d'un éditeur audio en ligne
Si vous recherchez un excellent éditeur audio en ligne pour modifier vos enregistrements vocaux, vous pouvez essayer d'utiliser Éditeur audio en ligneCet outil propose diverses fonctionnalités, notamment un coupe-bande, un rogneur, un suppresseur de bruit, un chargeur rapide, et bien plus encore. Consultez les étapes ci-dessous pour apprendre à éditer un enregistrement vocal.
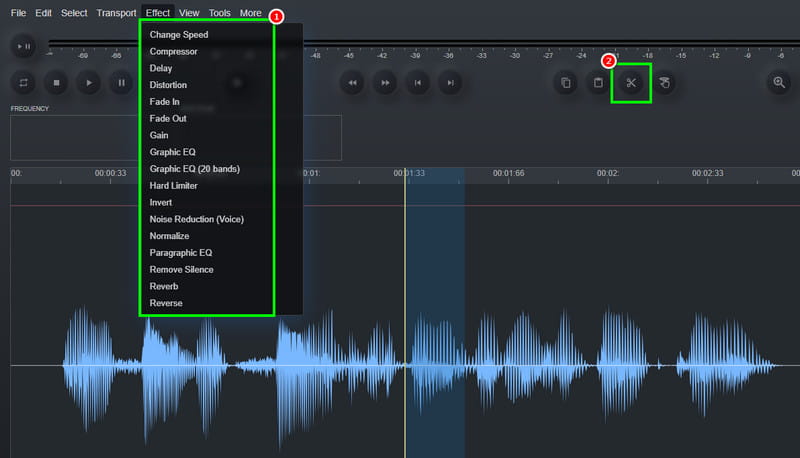
Étape 1Après avoir accédé au Éditeur audio en ligne outil, cliquez sur le Déposer > Ouvert option permettant de télécharger l'enregistrement vocal.
Étape 2Vous pouvez commencer par le processus d'édition. Allez à la section Effet Cette section permet de modifier la vitesse audio, d'ajouter un effet, de régler le délai, et bien plus encore. Vous pouvez également utiliser… Couper outil permettant de retirer la partie inutile du rail.
Étape 3Pour le dernier processus, appuyez sur le bouton Déposer > Sauvegarder bouton pour enregistrer l'enregistrement modifié sur votre ordinateur.
Partie 5. Quelle méthode choisir ?
Vous vous demandez quelle méthode choisir ? Dans ce cas, nous vous recommandons vivement d’utiliser AVAide Convertisseur vidéoEn matière de montage, vous avez la garantie d'obtenir le résultat souhaité. Vous pouvez découper, diviser et fusionner plusieurs segments audio pour créer un seul fichier. La fonction de compression audio intégrée vous permet d'optimiser la taille et la qualité de votre enregistrement. De plus, vous pouvez convertir votre audio dans d'autres formats, évitant ainsi tout problème de compatibilité. Alors, faites confiance à ce programme et obtenez le rendu audio que vous recherchez.
Grâce à ce tutoriel, vous avez appris comment modifier des enregistrements audioAlors, consultez les méthodes que nous proposons et traitez vos enregistrements vocaux selon vos préférences. De plus, pour un montage audio fluide, nous vous suggérons d'utiliser AVAide Convertisseur vidéoCe logiciel vous permet de monter et d'enregistrer vos vidéos avec une qualité optimale, ce qui en fait un outil de montage de premier ordre pour les utilisateurs.
À PROPOS DE L'AUTEUR

Votre boîte à outils vidéo complète prenant en charge plus de 350 formats pour une conversion en qualité sans perte.