Do you want to record your screen and audio on your Windows computer? There are many reasons why you need to record your computer screen and audio. You can record your games, make a tutorial, review content or products, create content, and more. Clear and seamless visuals and audio can make your recordings excellent. You can follow the 5 methods in this post to effectively tallentaa näyttöä ja ääntä Windowsissa.
Osa 1. Voiko Windows tallentaa näytön äänen kanssa
Yes, Windows lets you record the desktop screen with system audio and a microphone. Having the right screen and voice recorder is the key to seamless screen and audio capture. Whether you need a high-performance recorder for gaming or a crisp solution for tutorials, the perfect tool ensures your visuals and sound are perfectly synced. We've done the heavy lifting for you! Dive into the next section to explore the best methods and step-by-step insights for recording your Windows screen with audio like a pro.
Osa 2. 3 tapaa näytön tallentamiseen Windowsissa äänen avulla
1. Record Screen with Audio on Windows using AVAide Screen Recorder
One of the most effective screen recorders with mic and system audio you can use to record your screen with audio on Windows is AVAide Screen Recorder. This screen and audio recorder can help you achieve your objective more easily. Plus, this screen and audio recoder on Windows allows you to record your computer screen in two ways. You can instantly record the entire computer screen or a particular part of your screen. You can even record various content, such as video calls, videos, Zoom meetings, gameplay, instructional videos, and more. Plus, it can provide a trouble-free recording process. You can use this recorder easily and smoothly if you are a non-professional or skilled user.
Lisäksi voit parantaa tiedostoasi näytön ja äänen tallennusprosessin jälkeen. Voit pakata, rajata, leikata ja muuttaa videomuotoa. Sen avulla voit saada haluamasi lopputuloksen ennen videon tallentamista tietokoneellesi. Joten jos haluat oppia näytön tallentamisesta äänen kanssa Windowsissa, tarkista alla olevat vaiheet.
Vaihe 1Pääsy AVAide Screen Recorder Windows-tietokoneellasi. Lataa ja asenna ohjelmisto tietokoneellesi välittömästi napsauttamalla alla olevia painikkeita.

ILMAINEN LATAAUS Windows 7 tai uudempi
 Suojattu lataus
ILMAINEN LATAAUS Mac OS X 10.13 tai uudempi
Suojattu latausVaihe 2Valitse sen jälkeen tapa, jolla haluat tallentaa näytön. Voit valita Koko tai Mukautettu. Kytke sitten päälle Äänijärjestelmä tallentaaksesi näytön äänellä.

Vaihe 3Aloita näytön äänitys äänen kanssa napsauttamalla REC -painiketta. Kolmen sekunnin kuluttua ohjelma aloittaa tallennusprosessin. Napsauta sitten Lopettaa lopettaa näytön tallennus.

Vaihe 4Klikkaa Tuonti -painiketta alhaalta käyttöliittymästä tallentaaksesi tallennetun näytön.

2. Use OBS to Record Screen with Audio on Windows
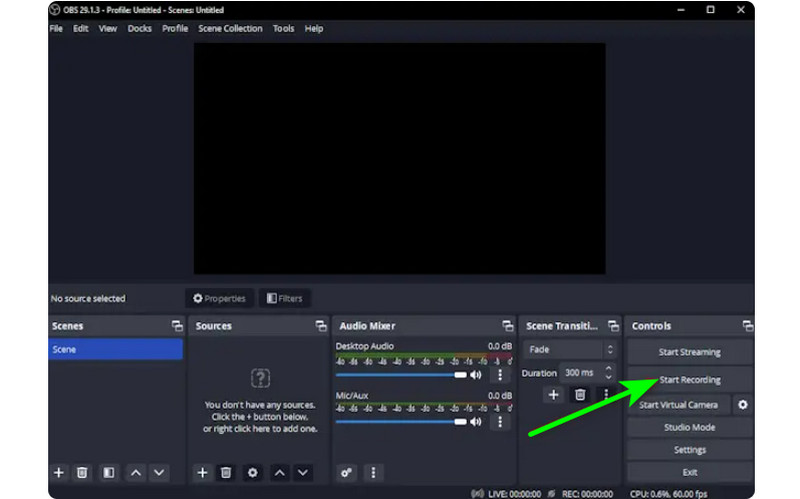
OBS kuuluu joukkoon parhaat avoimen lähdekoodin näytön tallentimet for recording your screen with audio. It is among the popular programs you can rely on for your preferred outcome. Plus, it is capable of recording various media files on your screen. You can even record different tabs, windows, games, and more. If you want to record your computer screen with voice perfectly while getting excellent quality, use OBS immediately. The only drawback here is that the interface could be clearer. If you are a beginner, you'd better take time to learn to use this screen recorder with voice. If you want to learn how to screen record on Windows 10 with audio, follow the procedure below.
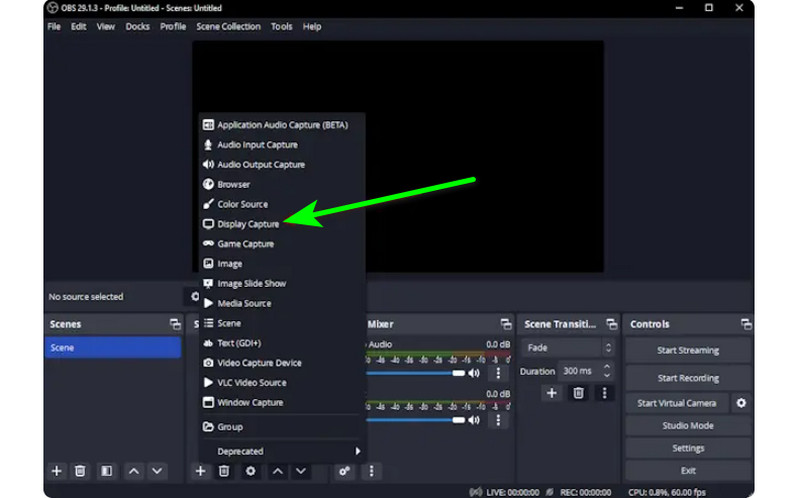
Vaihe 1Käynnistä OBS ohjelma asennuksen jälkeen. Siirry sen jälkeen osoitteeseen Plus symboli alla ja valitse Display Capture vaihtoehto. Voit valita, mitä sisältöä haluat tallentaa näytölle.
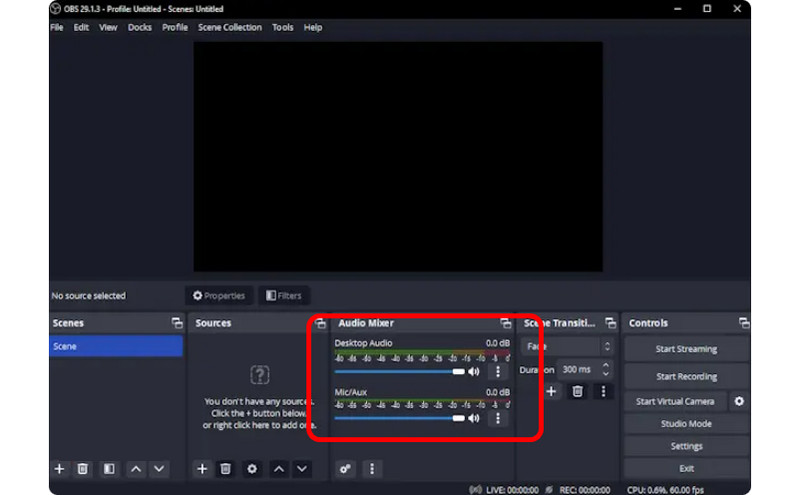
Vaihe 2Siirry sitten kohtaan Audio mikseri ja kytke Ääni päälle, jotta voit tallentaa näytön äänen kanssa.
Vaihe 3Klikkaa Aloita nauhottaminen -vaihtoehto oikeassa käyttöliittymässä aloittaaksesi näytön tallentamisen. Jos haluat lopettaa tallennusprosessin, napsauta Lopeta tallennus -painiketta.
3. Use Clipchamp to Record Screen with Audio on Windows
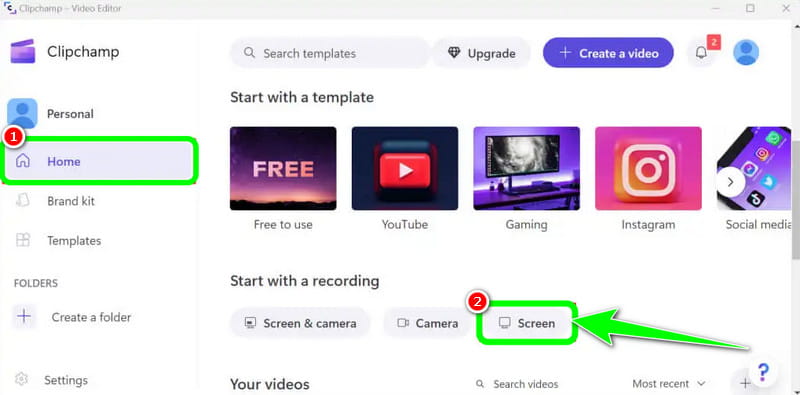
Haluatko oppia nauhoittamaan näyttöjä Windows 11:ssä äänen kanssa? Käytä sitten Clipchamp erinomaisena näytön tallentimena. Tämän hyödyllisen ohjelmiston avulla voit tallentaa näytön äänen sujuvasti, koska siinä on yksinkertainen prosessi, josta saatat nauttia. Voit jopa kytkeä verkkokamerasi päälle, jos haluat. Se sopii erinomaisesti tietyn sisällön kommentoimiseen tai opetusvideoiden luomiseen. Joten aloittaaksesi näytön tallennuksen oppimisen Windowsissa, katso alla olevat menetelmät.
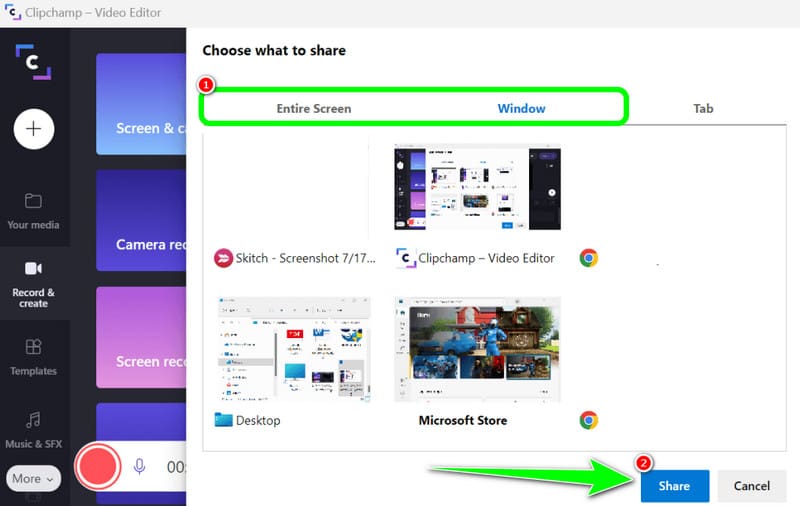
Vaihe 1Pääliittymästä Clipchamp, siirry kohtaan Koti -osio ja napsauta Näyttö vaihtoehto. Sitten näytölle tulee toinen verkkosivu.
Vaihe 2Napsauta sen jälkeen Punainen -painiketta vasemmasta käyttöliittymästä. Sitten näet näytölläsi kaiken sisältösi, kuten välilehdet, ikkunat ja paljon muuta.
Vaihe 3Napsauta näyttöä, jonka haluat tallentaa, kuten Koko näyttö, Ikkuna ja Välilehti. Aloita tallennus napsauttamalla Jaa -painiketta. Napsauta sitten prosessin jälkeen Lopeta tallennus tallentaaksesi tallennetun näytön tietokoneellesi.
Osa 3. 2 tapaa tallentaa ääntä Windows 10:ssä ja 11:ssä
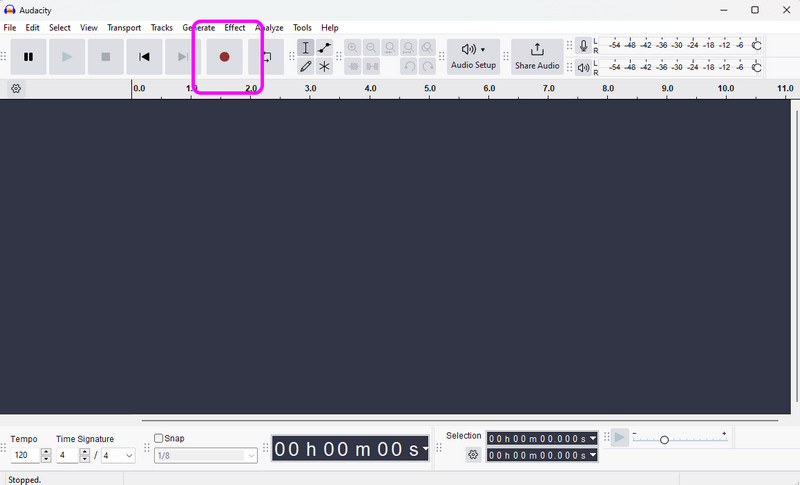
1. Record Audio on Windows using Audacity
Haluatko oppia tallentamaan ääntä Windows 10:ssä? Jos näin on, käytä Audacityä. Tämän offline-ohjelmiston avulla voit tallentaa minkä tahansa äänen tietokoneeltasi. Lisäksi et koe sitä haastavana, koska ohjelmisto voi tarjota helpon prosessin, mikä tekee siitä ihanteellisen äänitallentimen kaikille käyttäjille. Aloita äänen tallentaminen noudattamalla alla olevia ohjeita.
Vaihe 1Asenna ja suorita Audacity Windowsissasi. Napsauta sitten pääliittymästä Ennätys -painiketta ylärajapinnasta. Tämän jälkeen äänen tallennusprosessi alkaa.
Vaihe 2Tämän jälkeen, jos olet lopettanut tallennuksen, napsauta Lopettaa -painiketta. Tämän jälkeen voit jatkaa tallennusprosessia.
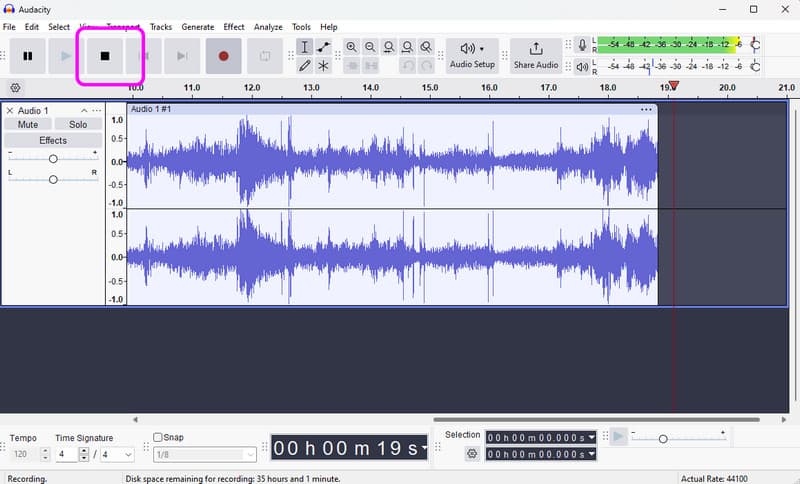
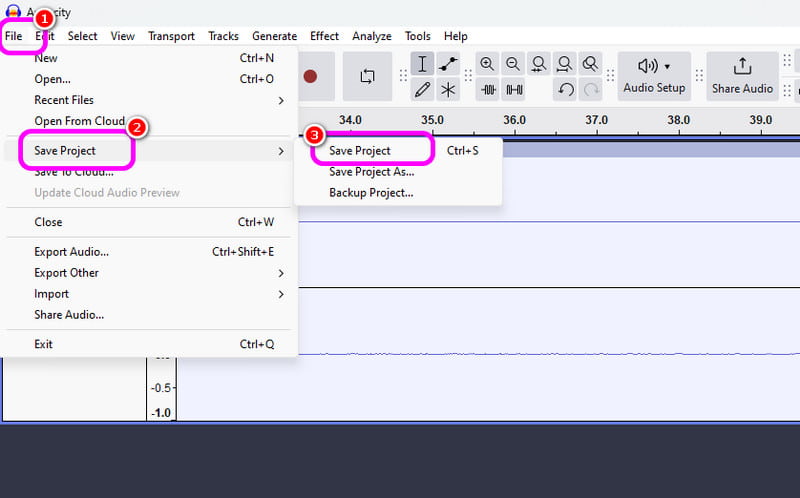
Vaihe 3Tallenna äänitetty ääni siirtymällä kohtaan Tiedosto > Tallenna projekti -osio tallentaaksesi lopullisen äänitiedoston laitteellesi.
2. Record Audio on Windows using Windows Voice Recorder
Toinen ohjelmisto, joka voi tarjota sinulle sujuvan Windowsin äänentallennusprosessin, on Windowsin äänitallennin. Kun käytät tätä äänitallenninta, voit aloittaa minkä tahansa äänisisällön tallentamisen laitteestasi. Pidämme siitä, että käyttöliittymä on yksinkertainen, joten voit tallentaa ääntä helposti ja nopeasti. Ainoa haittapuoli on, että se ei tarjoa muokkaustyökaluja tallennetun äänen parantamiseksi.
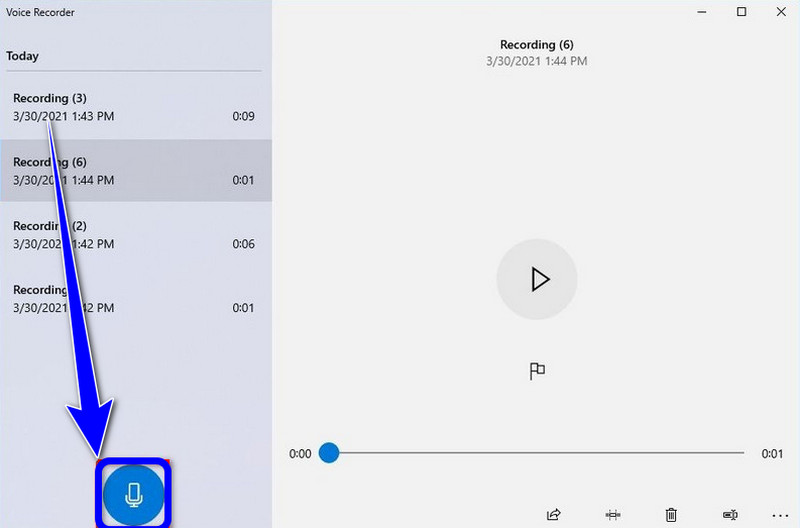
Vaihe 1Lataa Windowsin äänitallennin laitteellasi. Tämän jälkeen käynnistä se aloittaaksesi prosessin.
Vaihe 2Napsauta pääliittymästä Mikrofoni symboli aloittaaksesi tallennusprosessin.
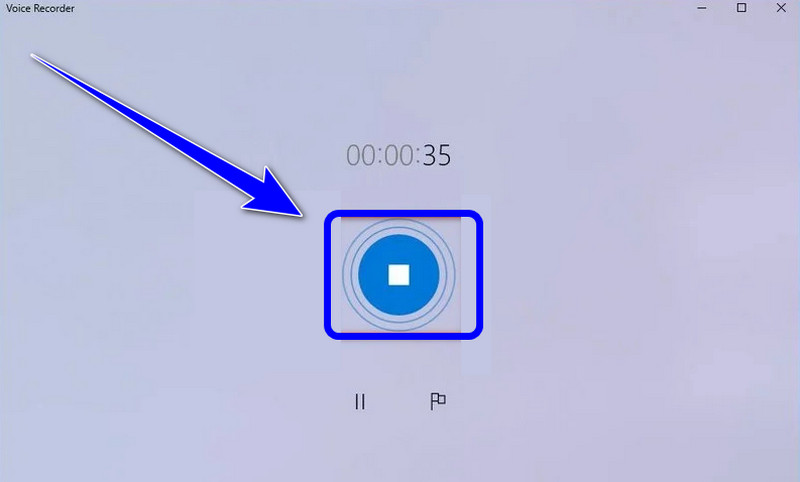
Vaihe 3Voit lopettaa äänen tallennusprosessin napsauttamalla Lopettaa -painiketta. Sitten voit jo kuunnella nauhoittamaasi ääntä.
Part 4. Comparison of the 5 Screen and Audio Recorders
| Ominaisuus | AVAide Screen Recorder | OBS Studio | Clipchamp | Audacity | Windowsin äänitallennin |
| Primary Category | All-in-One Capture Suite | Professional Broadcast | Basic Browser Editor | Professional Audio Editor | Basic Voice Memo |
| Video Recording | Supported (Up to 4K/60fps) | Supported (Advanced) | Supported (Basic) | Ei tueta | Ei tueta |
| Äänitys | System & Mic Simultaneous | Multi-track Support | Basic Input Only | Advanced Audio Capture | Microphone Only |
| Käyttöliittymä | Intuitive & User-Friendly | Steep Learning Curve | Simple Browser-based | Technical/Traditional | Extremely Minimalist |
| Built-in Editing | Real-time Annotation/Trim | None (External required) | Full Timeline Editor | Advanced Audio Editing | Basic Trimming Only |
| Unique Selling Point | Dedicated Game & Phone Modes | Unlimited Scene Layers | Stock Media Integration | Noise Reduction/Mixing | Native System Utility |
| Overall Value | Best for Efficiency & Quality | Best for Advanced Techs | Best for Quick Social Clips | Best for Pure Audio Work | Best for Simple Notes |
Part 5: FAQs of Recording Screen and Audio on Windows
Miksi Windowsin Alt+R-näppäinyhdistelmä ei toimi?
If the Alt + R shortcut (the standard keybind for Windows Xbox Game Bar) isn't working, it’s usually due to a software conflict, a disabled setting, or hardware limitations. You should exit other programs that have screen recording features.
Why is there no sound when I screen record on Windows?
The most common reason for silent recordings is incorrect audio input settings. To fix this, ensure that your system audio (internal sound) and microphone are both enabled in your recording software. On Windows 11, check your Privacy & Security settings to ensure the app has permission to access the microphone. Additionally, verify that your playback device is set as the 'Default Device' in the Windows Sound Control Panel, as many recorders cannot capture audio from 'Virtual' or 'Bluetooth' outputs unless specifically configured.
How can I record internal audio on Windows without a microphone?
To record internal system audio without picking up background noise from a microphone, you should turn off the 'System Sound' or 'Internal Audio' option on your screen and audio recorder program.
Jos haluat oppia kuinka näytön tallennus Windowsissa äänen kanssa, saat kaikki tiedot tästä viestistä. Joten katso kaikki tiedot ja kokeile prosessia saadaksesi tehokkaan näytön ja äänen tallennusprosessin. Lisäksi, jos haluat luotettavimman ohjelmiston auttamaan sinua nauhoittamaan näytön ääntä täydellisesti, ei ole epäilystäkään siitä, että AVAide Screen Recorder on paras ohjelma, jota voit käyttää. Suorita siis ohjelmisto Windowsissasi ja nauti sen yleisistä ominaisuuksista.
TIETOA KIRJOITTAJASTA

Tallenna näyttö, ääni, web-kamera, pelattavuus, online-kokoukset sekä iPhone/Android-näyttö tietokoneellesi.
Näytön tallennus