Wil je je scherm en audio opnemen op je Windows-computer? Er zijn veel redenen waarom je je computerscherm en audio zou willen opnemen. Je kunt je games opnemen, een tutorial maken, content of producten beoordelen, content creëren en nog veel meer. Heldere en vloeiende beelden en audio zorgen voor uitstekende opnames. Je kunt de 5 methoden in dit artikel volgen om dit effectief te doen. scherm en audio opnemen op Windows.
- Deel 1. Kan Windows het scherm opnemen met audio?
- Deel 2. 3 manieren om schermopnames te maken op Windows met audio
- Deel 3. 2 manieren om audio op te nemen op Windows 10 en 11
- Deel 4. Vergelijking van de 5 scherm- en audio-recorders
- Deel 5: Veelgestelde vragen over het opnemen van scherm en audio op Windows
Deel 1. Kan Windows het scherm opnemen met audio?
Ja, met Windows kun je je bureaubladscherm opnemen met systeemgeluid en een microfoon. De juiste scherm- en spraakrecorder is essentieel voor een naadloze opname van scherm en geluid. Of je nu een krachtige recorder nodig hebt voor gaming of een heldere oplossing voor tutorials, de perfecte tool zorgt ervoor dat je beeld en geluid perfect gesynchroniseerd zijn. Wij hebben het zware werk al voor je gedaan! Lees verder en ontdek de beste methoden en stapsgewijze instructies om je Windows-scherm als een professional met geluid op te nemen.
Deel 2. 3 manieren om schermopnames te maken op Windows met audio
1. Schermopname met audio op Windows met AVAide Screen Recorder
Een van de meest effectieve schermrecorders met microfoon en systeemgeluid die je kunt gebruiken om je scherm met geluid op te nemen in Windows is AVAide-schermrecorderDeze scherm- en audiorecorder kan u helpen uw doel gemakkelijker te bereiken. Bovendien kunt u met deze scherm- en audiorecorder voor Windows uw computerscherm op twee manieren opnemen. U kunt direct het hele computerscherm opnemen of een specifiek gedeelte ervan. U kunt zelfs diverse soorten content opnemen, zoals videogesprekken, video's, Zoom-vergaderingen, games, instructievideo's en meer. Het opnameproces verloopt bovendien probleemloos. U kunt deze recorder gemakkelijk en soepel gebruiken, of u nu een beginnende of ervaren gebruiker bent.
Bovendien kunt u uw bestand verbeteren na het scherm- en audio-opnameproces. U kunt comprimeren, bijsnijden, trimmen en het videoformaat wijzigen. Daarmee kunt u het gewenste resultaat krijgen voordat u de video op uw computer opslaat. Dus, om te leren hoe u een schermopname met audio op Windows kunt maken, bekijkt u de onderstaande stappen.
Stap 1Toegang AVAide-schermrecorder op uw Windows-computer. Klik op de onderstaande knoppen om de software direct op uw computer te downloaden en te installeren.

GRATIS DOWNLOAD Voor Windows 7 of hoger
 Veilige download
GRATIS DOWNLOAD Voor Mac OS X 10.13 of hoger
Veilige downloadStap 2Selecteer daarna de manier waarop u uw scherm wilt opnemen. U kunt kiezen Vol of Aangepast. Schakel vervolgens de Geluidssysteem om uw scherm op te nemen met audio.

Stap 3Om uw schermopname met audio te starten, klikt u op REC knop. Na drie seconden start het programma het opnameproces. Klik vervolgens op Hou op om de schermopname te voltooien.

Stap 4Klik op de Importeren knop onderaan de interface om uw opgenomen scherm op te slaan.

2. Gebruik OBS om je scherm met geluid op te nemen op Windows.
OBS is een van de beste open-source schermrecorders Voor het opnemen van je scherm met audio is OBS een van de populaire programma's waarop je kunt vertrouwen voor het gewenste resultaat. Bovendien kan het verschillende mediabestanden op je scherm opnemen. Je kunt zelfs verschillende tabbladen, vensters, games en meer opnemen. Als je je computerscherm perfect wilt opnemen met audio en een uitstekende kwaliteit wilt, gebruik dan direct OBS. Het enige nadeel is dat de interface wat overzichtelijker zou kunnen zijn. Als je een beginner bent, is het raadzaam om de tijd te nemen om te leren hoe je deze schermrecorder met audio gebruikt. Wil je leren hoe je je scherm opneemt in Windows 10 met audio? Volg dan de onderstaande stappen.
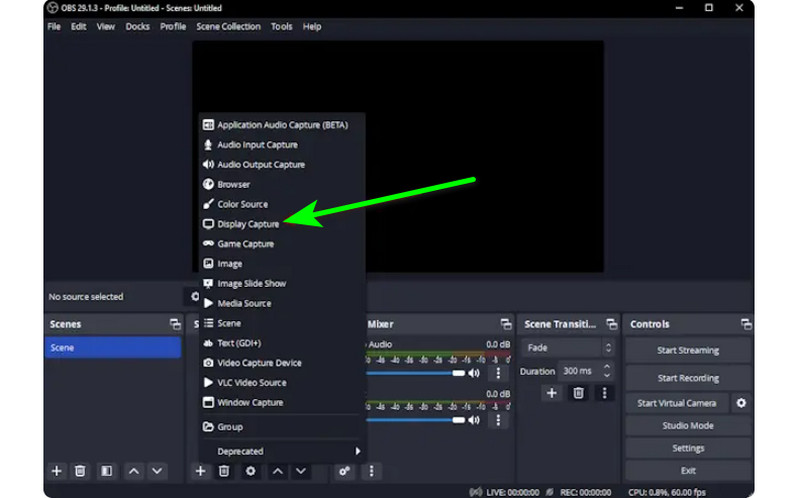
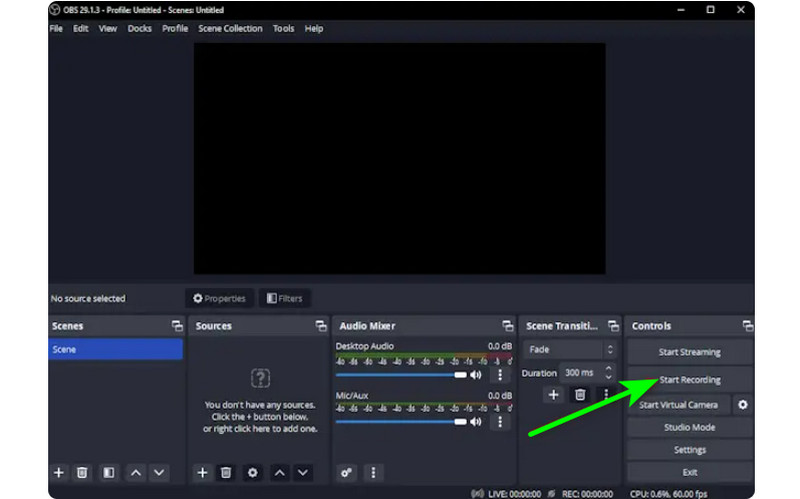
Stap 1Start de OBS programma na het installatieproces. Ga daarna naar de Plus symbool hieronder en selecteer de Weergave vastleggen optie. U kunt kiezen welke inhoud u op uw scherm wilt opnemen.
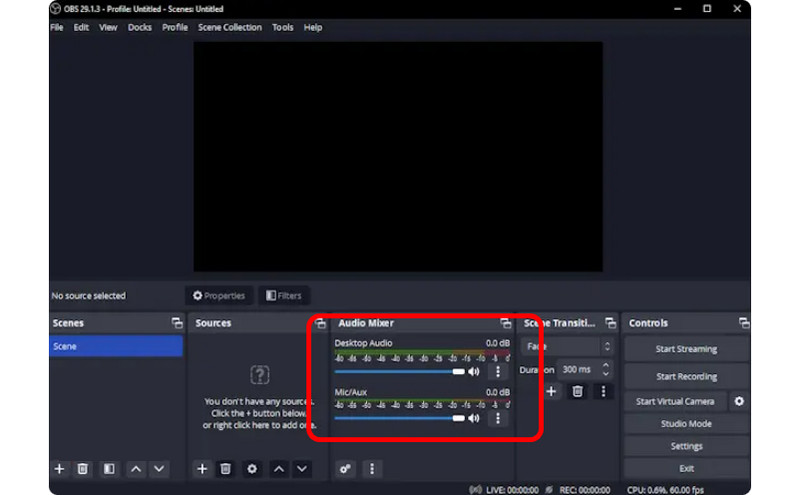
Stap 2Ga dan naar de Audiomixer en schakel Audio in, zodat u het scherm met geluid kunt opnemen.
Stap 3Klik op de Beginnen met opnemen optie op de rechterinterface om te beginnen met het opnemen van uw scherm. Als u het opnameproces wilt stoppen, klikt u op de Stop met opnemen knop.
3. Gebruik Clipchamp om je scherm met geluid op te nemen op Windows
Wil je leren hoe je schermen op Windows 11 met audio kunt opnemen? Gebruik dan Clipchamp als uw uitstekende schermrecorder. Deze handige software stelt u in staat om uw scherm soepel op te nemen met audio, omdat het een eenvoudig proces heeft dat u wellicht leuk vindt. U kunt zelfs uw webcam aanzetten als u dat wilt. Het is perfect voor het geven van commentaar op specifieke content of het maken van instructievideo's. Dus, om te beginnen met leren hoe u schermopnames kunt maken op Windows, bekijk de onderstaande methoden.
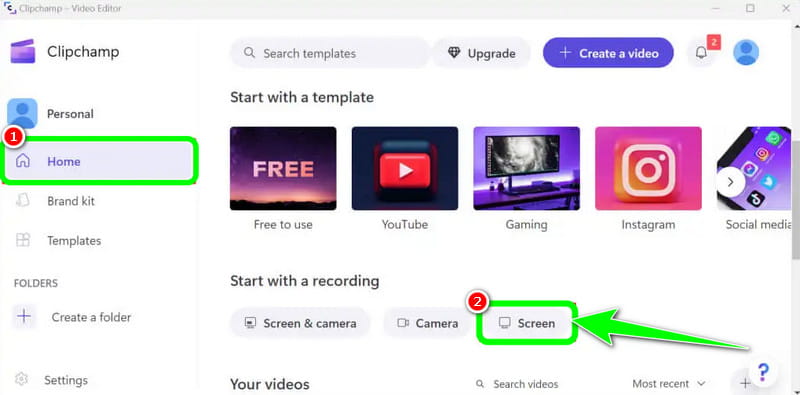
Stap 1Vanuit de hoofdinterface van Clipchamp, navigeer naar de Huis sectie en klik op de Scherm optie. Vervolgens verschijnt er een andere webpagina op uw scherm.
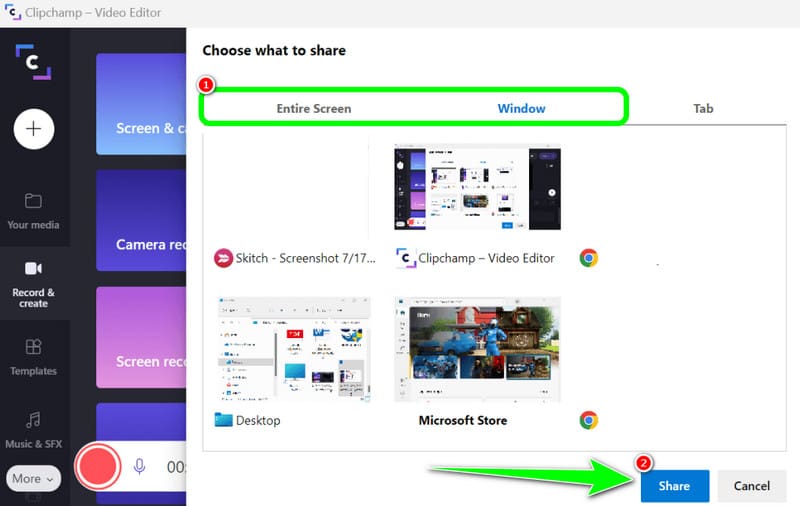
Stap 2Klik daarna op de Rood knop van de linker interface. Vervolgens ziet u al uw content op uw scherm, zoals tabbladen, vensters en meer.
Stap 3Klik op het scherm dat u wilt opnemen, zoals Volledig scherm, Venster en Tab. Om de opname te starten, klikt u op Deel knop. Klik vervolgens na het proces op Stop met opnemen om het opgenomen scherm op uw computer op te slaan.
Deel 3. 2 manieren om audio op te nemen op Windows 10 en 11
1. Audio opnemen in Windows met Audacity
Wilt u leren hoe u audio opneemt op Windows 10? Gebruik dan Audacity. Deze offline software kan u helpen om elk geluid van uw computer op te nemen. Bovendien zult u het niet moeilijk vinden, omdat de software een eenvoudig proces biedt, waardoor het een ideale audiorecorder is voor alle gebruikers. Bekijk dus de stappen die we hieronder hebben gegeven om te beginnen met het opnemen van uw audio.
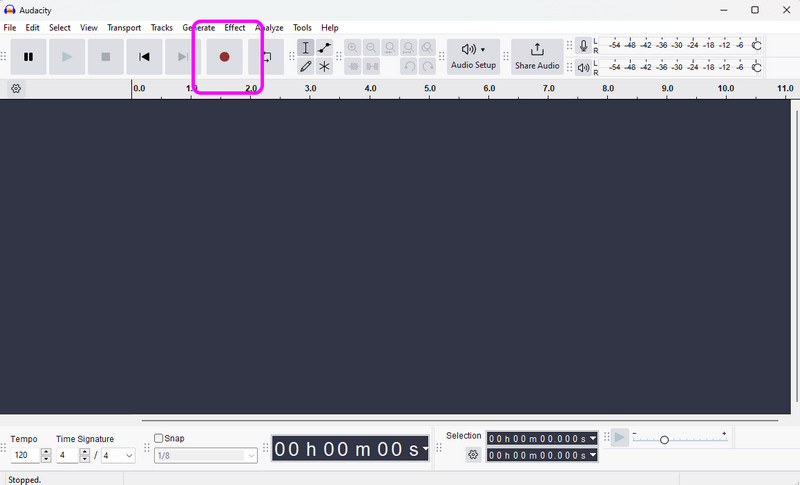
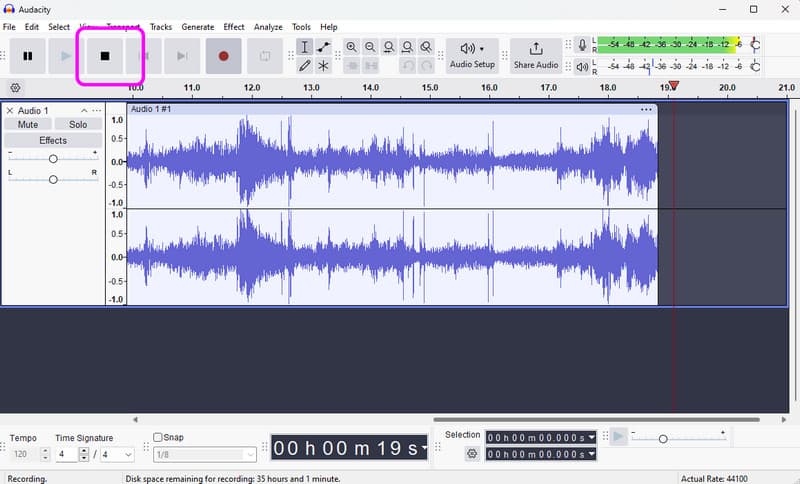
Stap 1Installeren en uitvoeren Durf op uw Windows. Klik vervolgens vanuit de hoofdinterface op de Vermelding knop van de bovenste interface. Daarmee start het audio-opnameproces.
Stap 2Als u klaar bent met opnemen, klikt u op Hou op knop. Vervolgens kunt u doorgaan met de opslagprocedure.
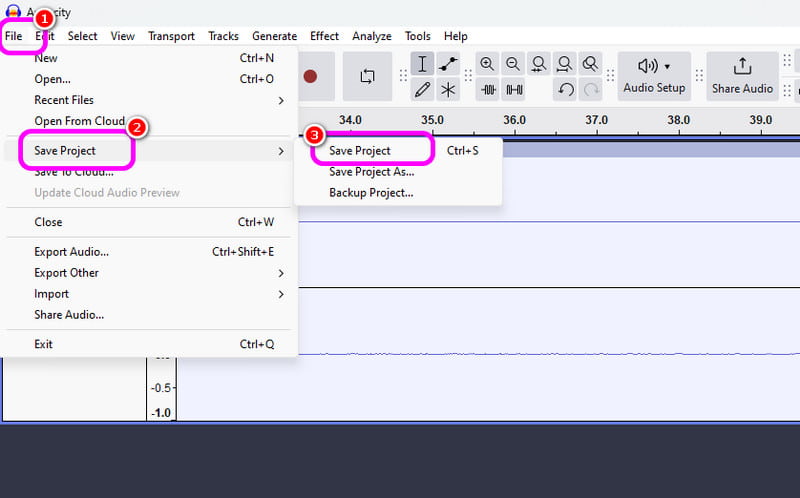
Stap 3Om de opgenomen audio op te slaan, gaat u naar de Bestand > Project opslaan gedeelte om het uiteindelijke audiobestand op uw apparaat op te slaan.
2. Audio opnemen in Windows met Windows Voice Recorder
Een andere software die u een soepel Windows-audio-opnameproces kan bieden is Windows-spraakrecorder. Nadat u deze audiorecorder hebt geopend, kunt u beginnen met het opnemen van audio-inhoud vanaf uw apparaat. Wat we hier leuk vinden, is dat de interface eenvoudig is, zodat u eenvoudig en snel audio kunt opnemen. Het enige nadeel is dat het geen bewerkingstools biedt om uw opgenomen audio te verbeteren.
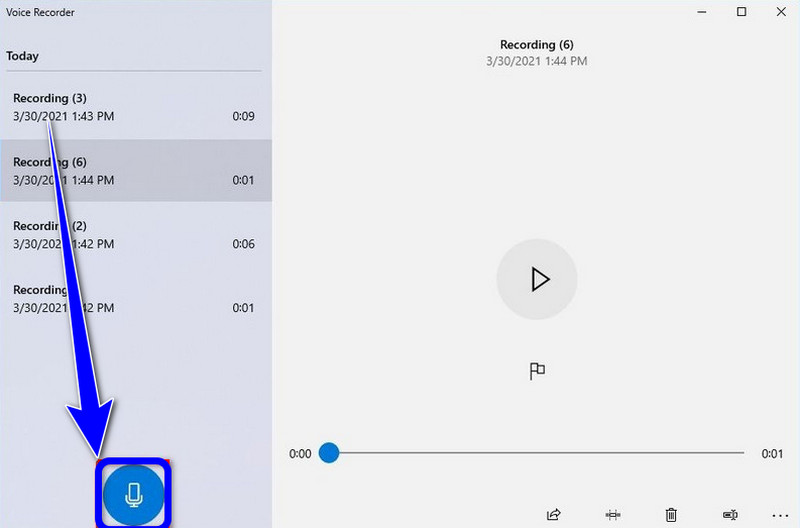
Stap 1Download de Windows-spraakrecorder op uw apparaat. Start het daarna om het proces te starten.
Stap 2Klik in de hoofdinterface op Microfoon symbool om het opnameproces te starten.
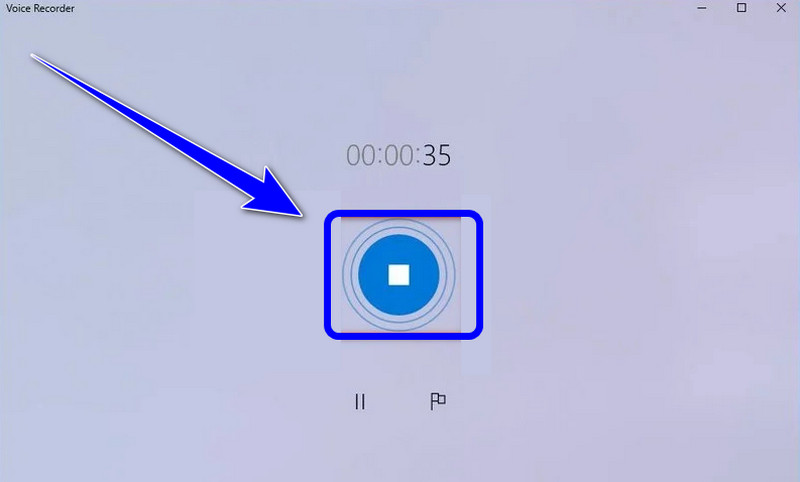
Stap 3Om het audio-opnameproces te stoppen, klikt u op Hou op knop. Vervolgens kunt u alvast luisteren naar de audio die u hebt opgenomen.
Deel 4. Vergelijking van de 5 scherm- en audio-recorders
| Voorzien zijn van | AVAide-schermrecorder | OBS Studio | Clipchamp | Durf | Windows-spraakrecorder |
| Primaire categorie | Alles-in-één opnamesuite | Professionele uitzending | Basisbrowser-editor | Professionele audio-editor | Basis spraakmemo |
| Video-opname | Ondersteund (tot 4K/60fps) | Ondersteund (Geavanceerd) | Ondersteund (Basis) | Niet ondersteund | Niet ondersteund |
| Geluidsopname | Systeem & microfoon gelijktijdig | Ondersteuning voor meerdere sporen | Alleen basisinvoer | Geavanceerde audio-opname | Alleen microfoon |
| Gebruikersomgeving | Intuïtief en gebruiksvriendelijk | Steile leercurve | Eenvoudig, browsergebaseerd | Technisch/Traditioneel | Extreem minimalistisch |
| Ingebouwde bewerking | Realtime annotatie/trimmen | Geen (externe gegevens vereist) | Volledige tijdlijn-editor | Geavanceerde audiobewerking | Alleen basis snoeien |
| Uniek verkoopargument | Speciale spel- en telefoonmodi | Onbeperkt aantal scènelagen | Integratie van stockmedia | Ruisonderdrukking/mixen | Native systeemhulpprogramma |
| Totale waarde | Het beste qua efficiëntie en kwaliteit. | Het meest geschikt voor geavanceerde technologieën. | Ideaal voor korte filmpjes op sociale media. | Het meest geschikt voor puur audiowerk. | Het meest geschikt voor eenvoudige notities |
Deel 5: Veelgestelde vragen over het opnemen van scherm en audio op Windows
Waarom werkt Alt+R in Windows niet?
Als de sneltoets Alt + R (de standaardtoetscombinatie voor de Xbox Game Bar in Windows) niet werkt, komt dit meestal door een softwareconflict, een uitgeschakelde instelling of hardwarebeperkingen. Sluit andere programma's af die schermopnamefuncties hebben.
Waarom is er geen geluid als ik mijn scherm opneem in Windows?
De meest voorkomende reden voor stille opnames is een onjuiste audio-ingangsinstelling. Om dit op te lossen, moet u ervoor zorgen dat zowel uw systeemgeluid (intern geluid) als uw microfoon zijn ingeschakeld in uw opnamesoftware. Controleer in Windows 11 uw privacy- en beveiligingsinstellingen om er zeker van te zijn dat de app toestemming heeft om toegang te krijgen tot de microfoon. Controleer bovendien of uw afspeelapparaat is ingesteld als het 'Standaardapparaat' in het Windows-configuratiescherm voor geluid, aangezien veel recorders geen audio kunnen opnemen van 'virtuele' of 'Bluetooth'-uitgangen, tenzij dit specifiek is geconfigureerd.
Hoe kan ik intern geluid opnemen in Windows zonder microfoon?
Om interne systeemaudio op te nemen zonder achtergrondgeluid van een microfoon op te pikken, moet u de optie 'Systeemgeluid' of 'Interne audio' uitschakelen in uw scherm- en audio-opnameprogramma.
Als je wilt leren Hoe je een schermopname maakt op Windows met audio, kunt u alle details uit dit bericht halen. Bekijk dus alle informatie en probeer het proces om een effectief scherm en audio-opnameproces te hebben. Ook, als u de meest betrouwbare software wilt om u te helpen een scherm met audio perfect op te nemen, is er geen twijfel dat AVAide Screen Recorder het beste programma is dat u kunt gebruiken. Voer de software dus uit op uw Windows en geniet van de algehele mogelijkheden.
OVER DE AUTEUR

Opnamescherm, audio, webcam, gameplay, online vergaderingen, evenals iPhone/Android-scherm op uw computer.
Schermopname