Anda mahukan nada dering peribadi anda sendiri. Bukan sesuatu dari mana-mana sahaja. Sesuatu yang anda buat sendiri untuk panggilan dan makluman.
Kami sedia membantu anda. Kami akan menunjukkan pelbagai cara untuk rakam nada dering pada sistem yang berbeza. Kami juga akan berkongsi petua mudah untuk hasil yang lebih baik. Jadi, sediakan suara atau bunyi anda untuk nada dering tersuai.
Bahagian 1. Cara Merakam Nada Dering pada iPhone
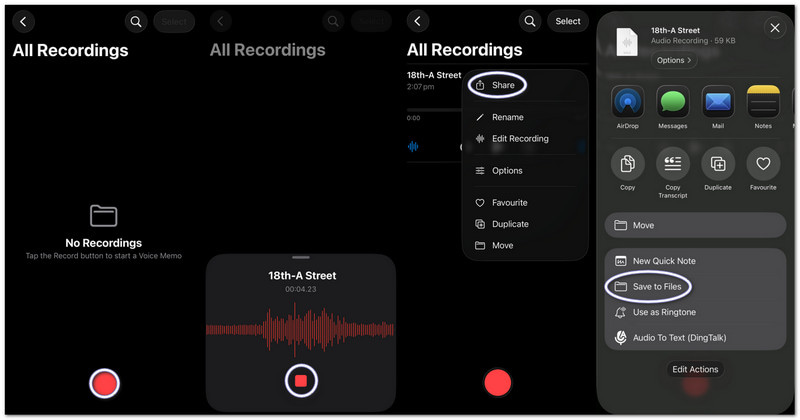
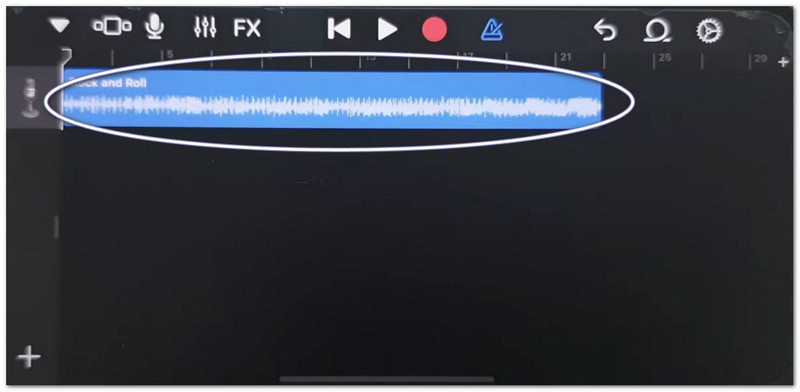
1. Memo Suara ke Nada Dering (Cara Paling Mudah)
Memo Suara merakam bunyi dan serta-merta mengubahnya menjadi nada dering tersuai yang boleh digunakan dengan alat pemangkasan asas, dan bahagian ini akan mengajar anda dengan tepat cara menjadikan rakaman suara menjadi nada dering pada iPhone.
Langkah 1Lancarkan Memo Suara pada iPhone anda.
Langkah 2Ketik yang merah Rekod butang dan sebutkan atau mainkan audio anda.
Langkah 3Ketik Berhenti apabila anda selesai.
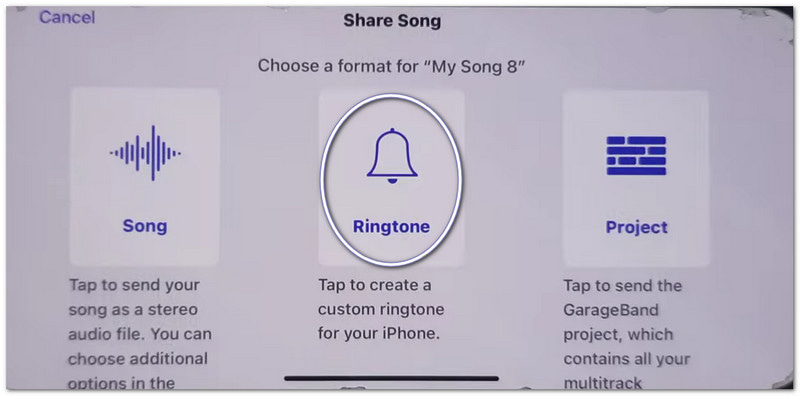
Langkah 4Ketik pada tiga titik (...) pada rakaman anda.
Langkah 5pilih Simpan ke Fail untuk menyimpan audio anda dan menggunakannya kemudian sebagai nada dering.
2. Sebarang Fail Audio (MP3/M4A) ke Nada Dering
Fail audio MP3 atau M4A yang disimpan daripada muat turun atau aplikasi muzik boleh dipilih dan ditetapkan sebagai nada dering pada iPhone.
Langkah 1Muat turun fail MP3 atau M4A anda dan simpannya dalam Fail apl.
Langkah 2Lari GarageBand dan pilih Perakam audio.
Langkah 3Cari audio anda di Fail, kemudian seretnya ke garis masa.
Langkah 4Pergi ke Fail, cari audio anda dan seretnya ke garis masa.
Langkah 5Potong kepada kurang daripada 30 saat, kemudian ketik Kongsi > Nada dering > Eksport.
3. Menggunakan GarageBand (Untuk Versi iOS yang Lebih Lama)
GarageBand mengedit klip audio dengan kawalan yang tepat, membolehkan pengguna memotong, menyusun dan mengeksport nada dering tersuai dengan mudah, yang memudahkan untuk memahami cara menetapkan rakaman suara sebagai nada dering pada iPhone.
Langkah 1Buka GarageBand dan pilih Perakam audio.
Langkah 2Ketik pada Paparan trek, kemudian buka Pelayar Gelung.
Langkah 3Import Memo Suara atau fail audio anda yang disimpan.
Langkah 4Seretnya ke garis masa dan potong kepada 30 saat atau kurang.
Langkah 5Ketik Lagu Saya, kemudian Kongsi > Nada dering > Eksport.
Penyelesaian Masalah "Kongsi Nota pada iPhone Tidak Berfungsi"
Jika Helaian Kongsi membeku, ranap atau tidak memaparkan aplikasi semasa berkongsi Memo Suara atau fail GarageBand, cuba pembetulan ini.
Pembaikan Pantas:
- Paksa Mula Semula: Tekan Kelantangan Naik dan Kelantangan KurangKemudian, tekan dan tahan butang Kuasa sehingga simbol Apple muncul.
- Kemas kini iOS: Pergi ke tetapan > Umum > Kemas Kini PerisianPasang sebarang kemas kini. Ia membetulkan ralat sistem.
- Togol AirDrop: Buka Pusat Kawalan untuk mematikan AirDrop. Matikan dan hidupkan semula AirDrop. Perkongsian telah dimuat semula.
Pembaikan Sistem
- Kosongkan Storan: Kekalkan sekurang-kurangnya 2 gigabait ruang kosong. Padam fail atau video yang tidak digunakan. Storan yang rendah boleh menghalang Helaian Kongsi daripada berfungsi.
Pembaikan Akhir
- Tetapkan Semula Semua Tetapan: Pergi ke tetapan > Umum > Pemindahan atau Tetapkan Semula iPhone > Tetapkan Semula Semua TetapanIa tidak memadamkan data anda. Ia hanya menetapkan semula tetapan sistem dan boleh membetulkan isu Helaian Kongsi.
Bahagian 2. Cara Merakam Nada Dering pada Android
1. Menggunakan Aplikasi Pembuat Nada Dering (Paling Disyorkan)
Jika anda ingin mempelajari cara merakam nada dering anda sendiri, anda boleh menggunakan Maker: Music Cutter di Google Play Store. Matlamat utamanya adalah untuk membantu anda memangkas lagu, memotong bahagian audio yang tepat dan menetapkannya serta-merta sebagai nada dering tersuai pada telefon Android.
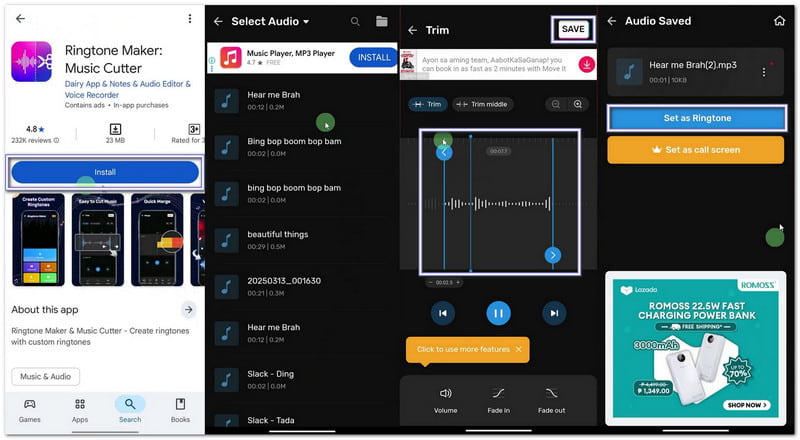
Langkah 1Buka Gedung Google Play. Cari Pembuat Nada Dering: Pemotong Muzik. Pasangkannya. Kemudian, tekan Buka.
Langkah 2Ketik Mulakan. pilih Pangkas AudioBenarkan kebenaran supaya aplikasi boleh mengakses fail anda.
Langkah 3Pilih lagu atau fail audio daripada telefon anda. Gerakkan gelangsar untuk memilih bahagian mula dan tamat nada dering anda.
Langkah 4 Ketik potong atau JimatPilih kejelasan jika perlu. Tekan sahkan. Kemudian, klik Tetapkan sebagai nada deringBenarkan tetapan sistem akses dan pilih nada dering lalai.
2. Tetapan Terbina Dalam (Untuk Audio yang Dimuat Turun)
Tetapan Android membenarkan pemilihan terus fail audio yang disimpan dan menetapkannya sebagai nada dering tanpa memerlukan aplikasi atau alat tambahan.
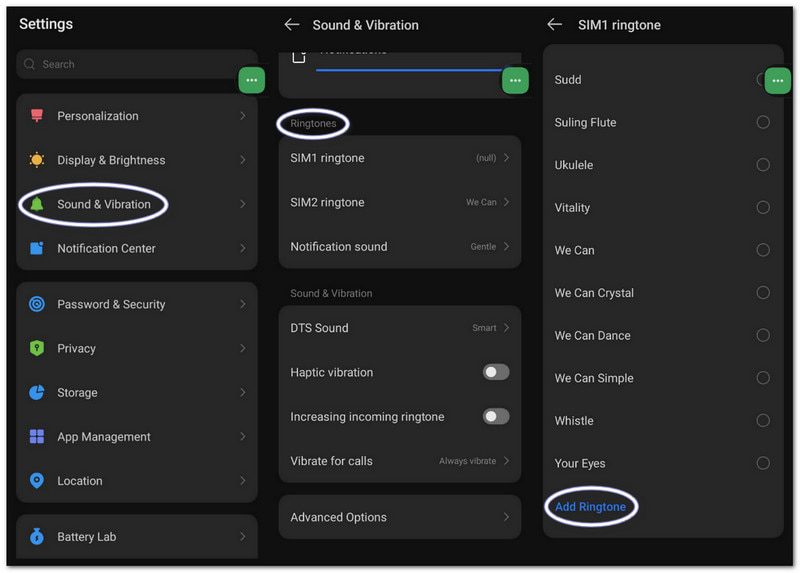
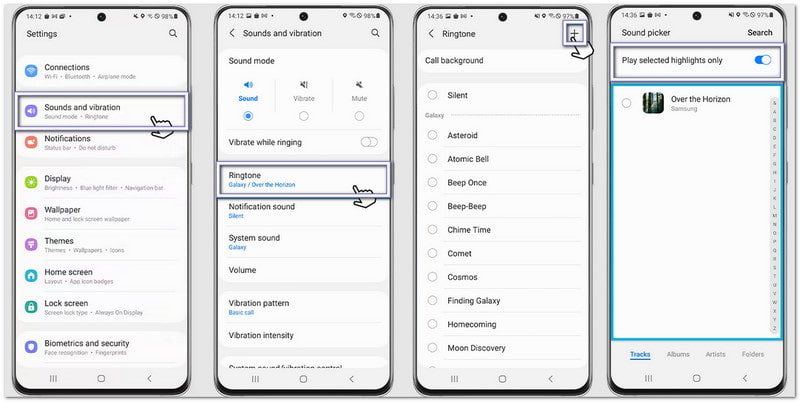
Langkah 1Pergi ke tetapan telefon anda. Ketik Bunyi dan getaran atau Bunyi.
Langkah 2Ketik Nada dering telefon untuk melihat pilihan yang tersedia.
Langkah 3Ketik pada Tambahan pula butang atau Tambah nada dering butang di bahagian atas.
Langkah 4Layari storan anda. Pilih fail audio anda. Ketik SelesaiKemudian, sahkan untuk menetapkannya sebagai nada dering lalai anda.
Bahagian 3. Cara Menukar Rakaman Skrin menjadi Nada Dering
Anda juga boleh menukar rakaman skrin menjadi nada dering pada komputer Windows atau Mac menggunakan Perakam Skrin AVAideIa mempunyai mod perakam audio yang menangkap bunyi daripada sistem dan suara anda, yang memudahkan untuk merakam nada dering.
Ia juga menawarkan tetapan bunyi, di mana anda boleh menurunkan atau meningkatkan kelantangan, mendayakan pembatalan hingar dan menunjukkan amaran apabila tiada audio dikesan. Sudah tentu, anda boleh mengeksport nada dering anda dalam format yang disokong seperti MP3 dan M4A, yang berfungsi dengan baik untuk peranti mudah alih.
Langkah 1Dapatkan dan sediakan Perakam Skrin AVAide pada komputer Windows atau Mac anda.

MUAT TURUN PERCUMA Untuk Windows 7 atau lebih baru
 Muat Turun Selamat
MUAT TURUN PERCUMA Untuk Mac OS X 10.13 atau lebih baru
Muat Turun SelamatLangkah 2Ia bermula dalam mod Perakam Skrin. Klik menu lungsur turun. Pilih Perakam audio untuk penangkapan bunyi yang lebih baik.
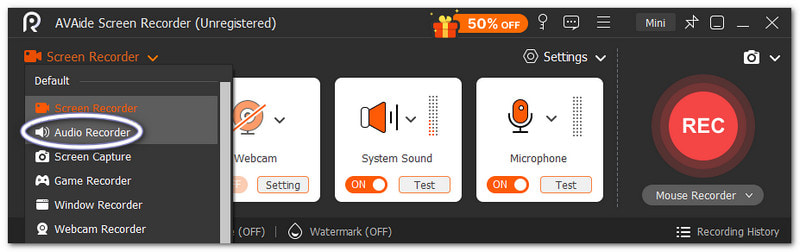
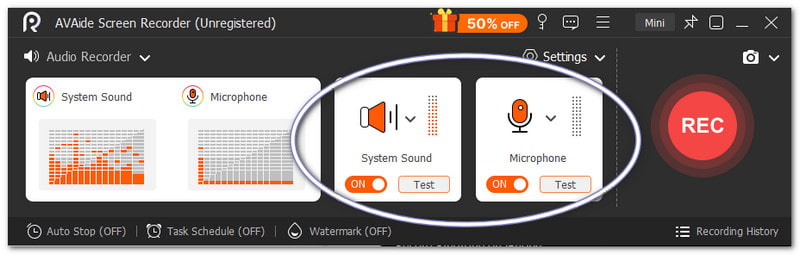
Langkah 3Hidupkan Bunyi Sistem untuk merakam audio dalaman. Hidupkan Mikrofon jika anda mahu suara anda ditambah. Anda juga boleh memperhalusi kelantangan jika perlu.
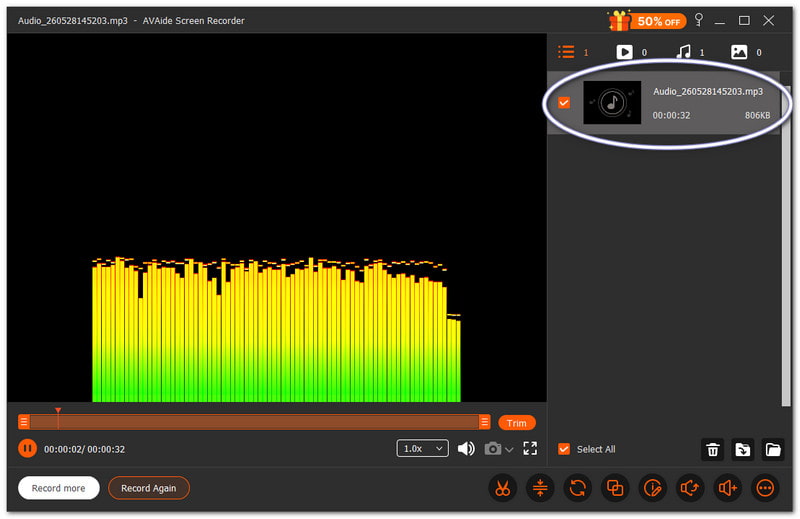
Langkah 4Pukul REC untuk bermula, dan sila tunggu kira detik. Setelah bermula, mainkan bunyi yang anda inginkan. Tekan butang Berhenti butang setelah selesai. Selepas itu, fail akan disimpan secara automatik. Tetapi anda juga boleh memangkas atau mengeditnya sebelum menggunakannya sebagai nada dering.
Tidak syak lagi bahawa Mac ini dan Perakam audio Windows boleh membantu anda mencipta nada dering yang anda inginkan dan sukai secara peribadi untuk peranti anda.
Bahagian 4. Langkah Khusus Samsung
1. Menggunakan Perakam Skrin Terbina Dalam
Perakam Skrin Samsung merakam audio daripada video dan membantu menukar bunyi yang dirakam menjadi nada dering yang boleh digunakan.
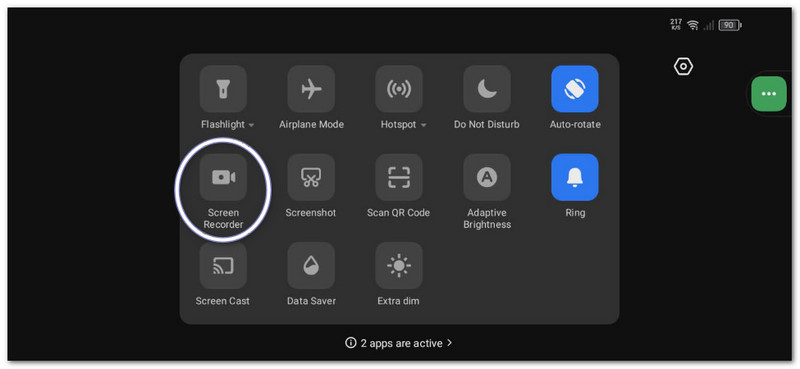
Langkah 1Di dalam Panel Pantas, leret ke bawah. Tekan Perakam Skrin butang. Sebelum bermula, pilih Bunyi media.
Langkah 2Mainkan video atau muzik yang anda ingin rakam. Biarkan perakam skrin merakamnya dengan bunyi.
Langkah 3Hentikan rakaman setelah selesai. Fail tersebut akan disimpan di galeri anda. Gunakan aplikasi video-ke-MP3 untuk mengekstrak audio.
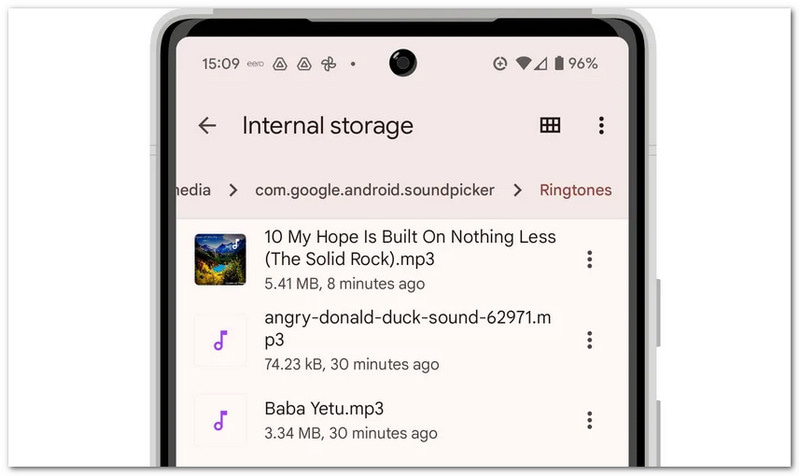
Langkah 4Alihkan fail MP3 ke Storan Dalaman > Folder nada dering supaya ia boleh digunakan kemudian.
Kaedah ini menunjukkan Rakaman skrin SamsungJadi, sila pastikan anda menukar video yang dirakam kepada audio sahaja supaya ia boleh digunakan sebagai nada dering.
2. Pembuat Nada Dering Terbina Dalam
Tetapan nada dering Samsung membolehkan pengguna memilih lagu, memangkas sorotan dan menetapkannya serta-merta sebagai nada dering telefon lalai.
Langkah 1Buka telefon anda dan pergi ke tetapan. Ketik Bunyi dan getaran. Kemudian, pilih Nada dering.
Langkah 2Ketik pada Tambah butang dan pilih lagu atau rakaman yang disimpan daripada telefon anda.
Langkah 3Dayakan Mainkan sorotan terpilih sahaja jika tersedia. Samsung akan memangkas bahagian audio yang terbaik secara automatik.
Langkah 4Sahkan pilihan anda, dan bunyi kini akan ditetapkan sebagai nada dering lalai anda.
3. Kaedah Pengurus Fail
Pengurus Fail Samsung mengatur fail audio dan membenarkan penyalinan terus ke dalam folder Nada Dering untuk pengesanan nada dering automatik.
Langkah 1Lancarkan Fail Saya aplikasi pada telefon Samsung anda.
Langkah 2Pergi ke Muat turun atau Audio folder. Cari bunyi yang dirakam atau dimuat turun anda.
Langkah 3Tekan lama fail tersebut. Ketik SalinanKemudian, pergi ke Storan dalaman > Nada dering.
Langkah 4Tampal fail tersebut di dalam folder Nada Dering. Kemudian, kembali ke tetapan Bunyi. Fail anda kini akan muncul dalam senarai nada dering.
Bahagian 5. Petua Profesional untuk Hasil Terbaik
Sebelum anda menetapkan nada dering anda, adalah berguna untuk mengikuti beberapa petua mudah. Ini akan menjadikan nada dering anda kedengaran jelas dan berfungsi dengan lebih baik pada telefon anda.
Petua #1: Pastikan ia pendek.
Jadikan nada dering anda hanya 30 hingga 40 saat. Ia memastikan ia lancar dan serasi sepenuhnya dengan telefon Android.
Petua #2: Gunakan format yang betul.
Gunakan fail MP3 atau M4A jika boleh. Format ini berfungsi dengan baik pada kebanyakan peranti Android tanpa ralat.
Petua #3: Periksa kelantangan terlebih dahulu.
Mainkan nada dering anda sebelum menetapkannya. Pastikan ia tidak terlalu kuat atau terlalu lembut. Ia membantu anda mengelakkan kejutan apabila seseorang memanggil.
Anda telah belajar cara merakam nada dering pada iPhone, Android dan desktop. Jadi, tidak kira peranti apa yang anda gunakan, anda boleh mencipta nada dering tersuai anda sendiri pada bila-bila masa.
Bagi pengguna Windows dan Mac, Perakam Skrin AVAide memudahkan prosesnya. Anda boleh merakam suara anda sendiri atau menangkap audio daripada sistem anda. Anda juga boleh memangkas fail selepas rakaman. Ia membantu anda menyimpan hanya bahagian terbaik untuk nada dering anda.
TENTANG PENGARANG

Tangkap aktiviti skrin dengan audio, mesyuarat dalam talian, video permainan, muzik, kamera web, dsb.