Sie möchten Ihren eigenen, personalisierten Klingelton. Nicht irgendeinen von irgendwoher. Etwas, das Sie selbst für Anrufe und Benachrichtigungen erstellt haben.
Wir sind hier, um Ihnen dabei zu helfen. Wir zeigen Ihnen verschiedene Wege auf, einen Klingelton aufnehmen auf verschiedenen Systemen. Wir geben Ihnen außerdem einfache Tipps für bessere Ergebnisse. Bereiten Sie also Ihre Stimme oder Ihren Sound für einen individuellen Klingelton vor.
Teil 1. So nehmen Sie einen Klingelton auf dem iPhone auf
1. Sprachmemo als Klingelton (Der einfachste Weg)
Die Sprachmemos-App nimmt Töne auf und wandelt sie mithilfe einfacher Bearbeitungswerkzeuge sofort in einen verwendbaren, individuellen Klingelton um. In diesem Abschnitt erfahren Sie genau, wie Sie eine Sprachaufnahme auf einem iPhone in einen Klingelton umwandeln.
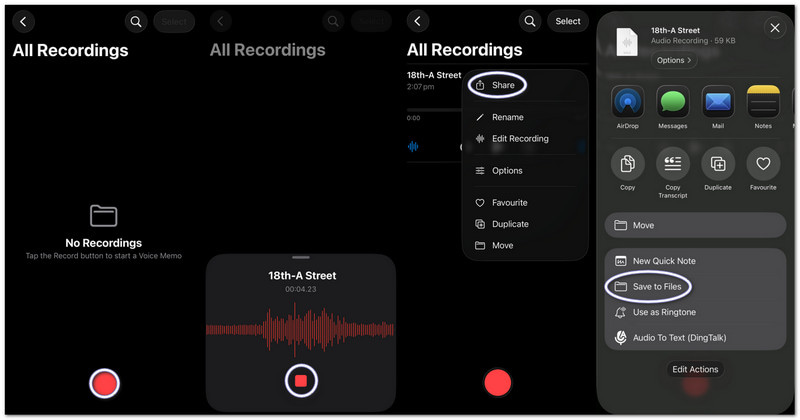
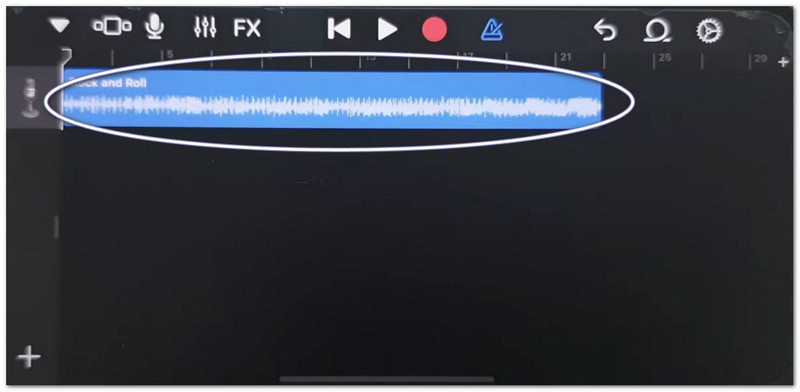
Schritt 1Öffne die Sprachmemos-App auf deinem iPhone.
Schritt 2Tippe auf den roten Button Schallplatte Drücken Sie die Taste und sprechen Sie oder spielen Sie Ihre Audiodatei ab.
Schritt 3Zapfhahn Stoppen wenn Sie fertig sind.
Schritt 4Tippen Sie auf die drei Punkte (...) auf Ihrer Aufnahme.
Schritt 5Wählen In Dateien speichern um Ihre Audiodateien zu speichern und später als Klingelton zu verwenden.
2. Beliebige Audiodatei (MP3/M4A) als Klingelton
Auf einem iPhone können gespeicherte MP3- oder M4A-Audiodateien aus Downloads oder Musik-Apps ausgewählt und als Klingelton festgelegt werden.
Schritt 1Laden Sie Ihre MP3- oder M4A-Datei herunter und speichern Sie sie im Dateien App.
Schritt 2Laufen Garage Band und auswählen Audiorecorder.
Schritt 3Suchen Sie Ihre Audiodatei DateienZiehen Sie es anschließend in die Zeitleiste.
Schritt 4Gehe zu DateienSuchen Sie Ihre Audiodatei und ziehen Sie sie in die Zeitleiste.
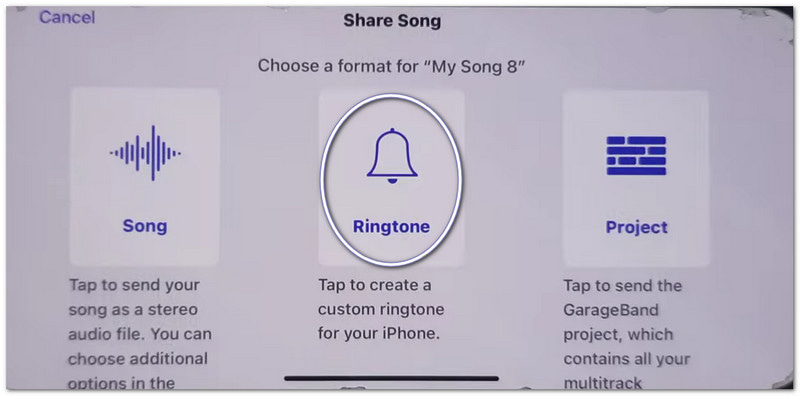
Schritt 5Kürzen Sie es auf unter 30 Sekunden und tippen Sie dann. Teilen > Klingelton > Export.
3. Verwendung von GarageBand (für ältere iOS-Versionen)
GarageBand ermöglicht das Bearbeiten von Audioclips mit präzisen Steuerelementen, sodass Benutzer benutzerdefinierte Klingeltöne einfach schneiden, anordnen und exportieren können. Dadurch ist es leicht verständlich, wie man eine Sprachaufnahme als Klingelton auf einem iPhone einstellt.
Schritt 1Offen Garage Band und auswählen Audiorecorder.
Schritt 2Tippen Sie auf die StreckenansichtÖffnen Sie dann die Loop-Browser.
Schritt 3Importieren Sie Ihre gespeicherte Sprachnotiz oder Audiodatei.
Schritt 4Ziehen Sie es in die Zeitleiste und kürzen Sie es auf 30 Sekunden oder weniger.
Schritt 5Zapfhahn Meine Songs, dann Teilen > Klingelton > Export.
Fehlerbehebung bei „Notizen auf dem iPhone teilen funktioniert nicht“
Falls das Teilen-Menü einfriert, abstürzt oder beim Teilen von Sprachmemos oder GarageBand-Dateien keine Apps anzeigt, versuchen Sie diese Lösungsansätze.
Schnelle Lösungen:
- Neustart erzwingen: Drücken Sie Lautstärke erhöhen und Lautstärke verringernHalten Sie anschließend den Ein-/Ausschalter gedrückt, bis das Apple-Symbol erscheint.
- iOS aktualisieren: Gehen Sie zu Einstellungen > Allgemein > Software-AktualisierungInstallieren Sie alle Updates. Dadurch werden Systemfehler behoben.
- AirDrop umschalten: Öffnen Kontrollzentrum Um AirDrop zu deaktivieren, schalten Sie AirDrop aus und wieder ein. Die Freigabe wird aktualisiert.
Systemkorrekturen
- Speicherplatz freigeben: Halten Sie mindestens 2 Gigabyte freien Speicherplatz bereit. Löschen Sie nicht benötigte Dateien oder Videos. Zu wenig Speicherplatz kann die Funktion der Teilen-Funktion beeinträchtigen.
Endgültige Korrektur
- Alle Einstellungen zurücksetzen: Gehen Sie zu Einstellungen > Allgemein > Überweisen oder iPhone zurücksetzen > Alle Einstellungen zurücksetzenIhre Daten werden dabei nicht gelöscht. Es werden lediglich die Systemeinstellungen zurückgesetzt und Probleme mit dem Teilen-Menü können behoben werden.
Teil 2. So nehmen Sie einen Klingelton auf Android auf
1. Verwendung einer Klingelton-App (am meisten empfohlen)
Wenn du lernen möchtest, wie du deinen eigenen Klingelton aufnimmst, kannst du Maker: Music Cutter aus dem Google Play Store verwenden. Mit dieser App kannst du Songs kürzen, exakte Audioabschnitte herausschneiden und diese sofort als individuelle Klingeltöne auf Android-Smartphones festlegen.
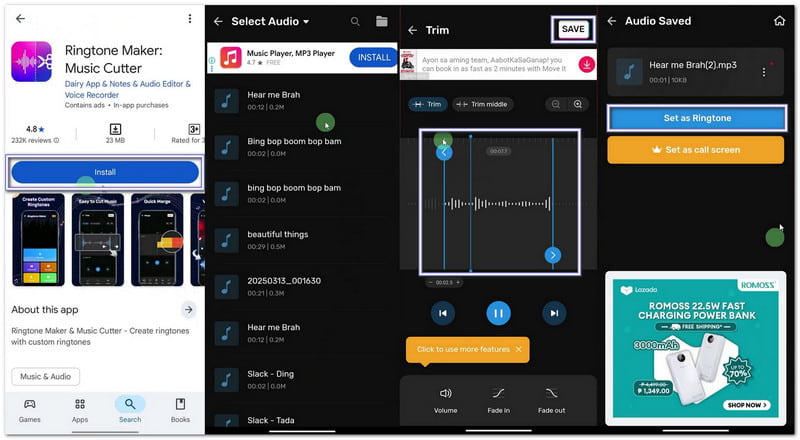
Schritt 1Öffne den Google Play Store. Suche nach Klingelton-Ersteller: Musik-CutterInstallieren Sie es. Drücken Sie dann Offen.
Schritt 2Zapfhahn Loslegen. Wählen Trim AudioErteilen Sie der App die erforderlichen Berechtigungen, damit sie auf Ihre Dateien zugreifen kann.
Schritt 3Wählen Sie ein Lied oder eine Audiodatei von Ihrem Telefon aus. Bewegen Sie die Schieberegler, um Anfang und Ende Ihres Klingeltons festzulegen.
Schritt 4 Zapfhahn Schneiden oder SpeichernWählen Sie bei Bedarf die Klarheit. Drücken Sie Bestätigen. Dann klick Als Klingelton festlegenErlauben Sie den Zugriff auf die Systemeinstellungen und wählen Sie den Standardklingelton aus.
2. Integrierte Einstellungen (für heruntergeladene Audiodateien)
Die Android-Einstellungen ermöglichen die direkte Auswahl gespeicherter Audiodateien und deren Zuweisung als Klingeltöne, ohne dass zusätzliche Apps oder Tools erforderlich sind.
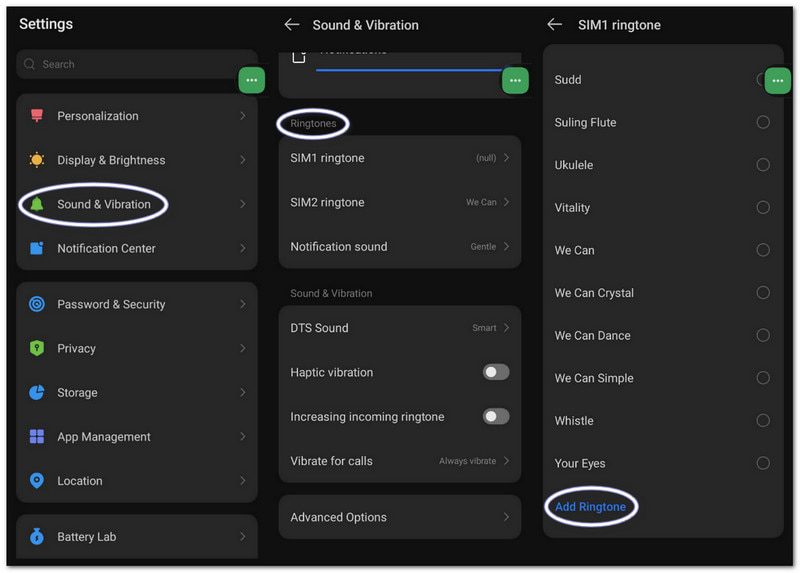
Schritt 1Öffne die Einstellungen deines Telefons. Tippe auf Schall und Vibration oder Klang.
Schritt 2Zapfhahn Telefonklingelton um die verfügbaren Optionen anzuzeigen.
Schritt 3Tippen Sie auf die Plus Taste oder die Klingelton hinzufügen Schaltfläche oben.
Schritt 4Durchsuchen Sie Ihren Speicher. Wählen Sie Ihre Audiodatei aus. Tippen Sie auf FertigBestätigen Sie anschließend, dass Sie es als Standardklingelton festlegen möchten.
Teil 3. So wandeln Sie eine Bildschirmaufnahme in einen Klingelton um.
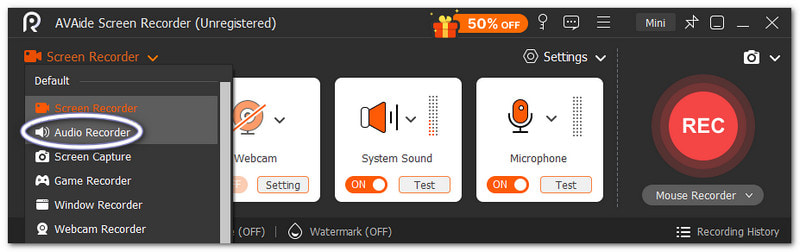
Sie können auch eine Bildschirmaufnahme auf einem Windows- oder Mac-Computer in einen Klingelton umwandeln. AVAide Screen RecorderEs verfügt über einen Audioaufnahmemodus, der den Ton Ihres Systems und Ihre Stimme aufnimmt, wodurch das Aufnehmen eines Klingeltons vereinfacht wird.
Die App bietet außerdem Soundeinstellungen, mit denen Sie die Lautstärke anpassen, die Geräuschunterdrückung aktivieren und eine Warnung anzeigen lassen können, wenn kein Audiosignal erkannt wird. Selbstverständlich können Sie Ihren Klingelton in unterstützten Formaten wie MP3 und M4A exportieren, die sich gut für Mobilgeräte eignen.
Schritt 1Laden Sie AVAide Screen Recorder herunter und installieren Sie es auf Ihrem Windows- oder Mac-Computer.

KOSTENLOSER DOWNLOAD Für Windows 7 oder höher
 Sicherer Download
KOSTENLOSER DOWNLOAD Für Mac OS X 10.13 oder höher
Sicherer DownloadSchritt 2Es startet im Bildschirmaufzeichnungsmodus. Klicken Sie auf das Dropdown-Menü. Wählen Sie aus Audiorecorder für eine bessere Tonaufnahme.
Schritt 3Schalte ein Systemton Um interne Audioaufnahmen zu erstellen, schalten Sie die Funktion ein. Mikrofon Wenn Sie Ihre Stimme hinzufügen möchten, können Sie dies tun. Die Lautstärke lässt sich bei Bedarf auch feinjustieren.
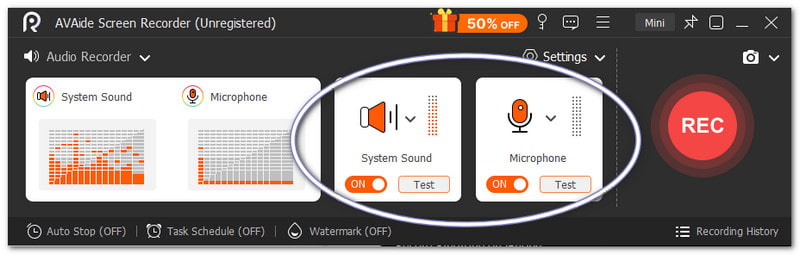
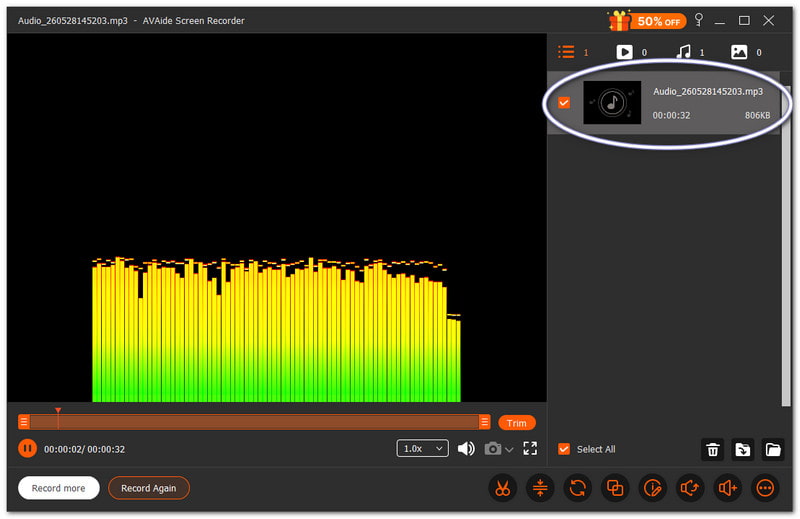
Schritt 4Getroffen haben AUFN Zum Starten bitte den Countdown abwarten. Sobald der Countdown gestartet ist, spielen Sie den gewünschten Ton ab. Drücken Sie die Taste Stoppen Klicken Sie auf die Schaltfläche, sobald Sie fertig sind. Danach wird die Datei automatisch gespeichert. Sie können sie aber auch vor der Verwendung als Klingelton kürzen oder bearbeiten.
Es besteht kein Zweifel daran, dass dieser Mac und Windows-Audiorecorder kann Ihnen dabei helfen, einen Klingelton zu erstellen, den Sie persönlich für Ihr Gerät wünschen und mögen.
Teil 4. Samsung-spezifische Schritte
1. Verwendung des integrierten Bildschirmrekorders
Samsung Screen Recorder zeichnet Audio aus Videos auf und hilft dabei, die aufgenommenen Töne in verwendbare Klingeltöne umzuwandeln.
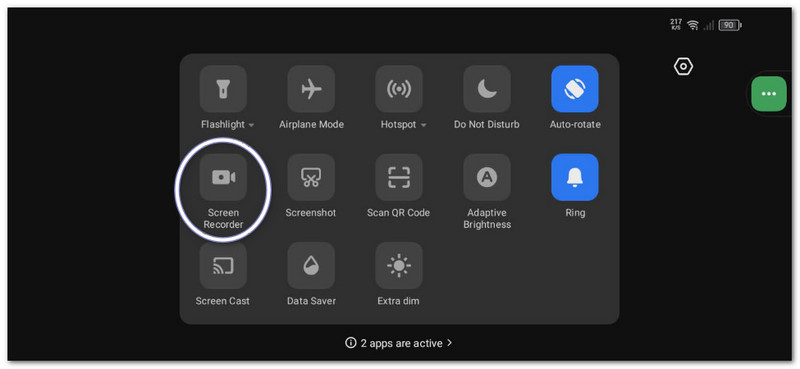
Schritt 1Im SchnellmenüWischen Sie nach unten. Drücken Sie die Bildschirm recorder Schaltfläche. Wählen Sie vor Beginn die Schaltfläche aus. Medienklänge.
Schritt 2Spielen Sie das Video oder die Musik ab, die Sie aufnehmen möchten. Lassen Sie den Bildschirmrekorder die Aufnahme mit Ton starten.
Schritt 3Beenden Sie die Aufnahme, sobald sie abgeschlossen ist. Die Datei wird in Ihrer Galerie gespeichert. Verwenden Sie eine Video-zu-MP3-App, um die Audiospur zu extrahieren.
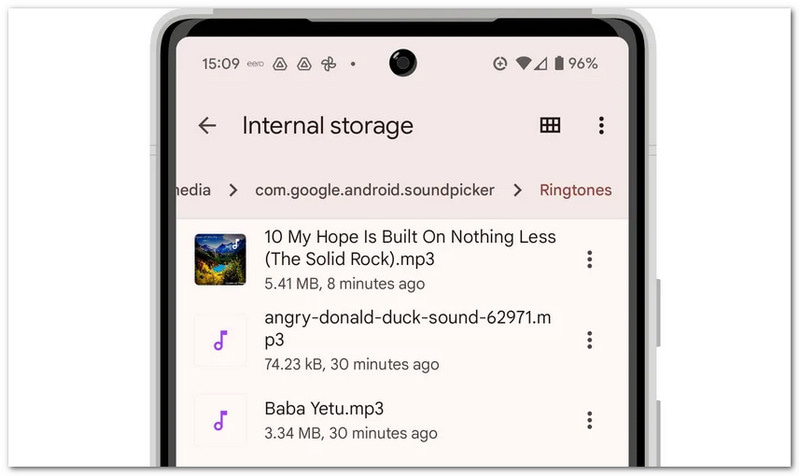
Schritt 4Verschieben Sie die MP3-Datei in Ihren Interner Speicher > Klingeltöne-Ordner damit es später verwendet werden kann.
Diese Methode zeigt Bildschirmaufnahme mit SamsungBitte stellen Sie daher sicher, dass Sie das aufgenommene Video in eine reine Audiodatei umwandeln, damit es als Klingelton verwendet werden kann.
2. Integrierter Klingeltongenerator
Mit den Samsung-Klingeltoneinstellungen können Benutzer Lieder auswählen, bestimmte Textstellen herausschneiden und sie sofort als Standardklingelton festlegen.
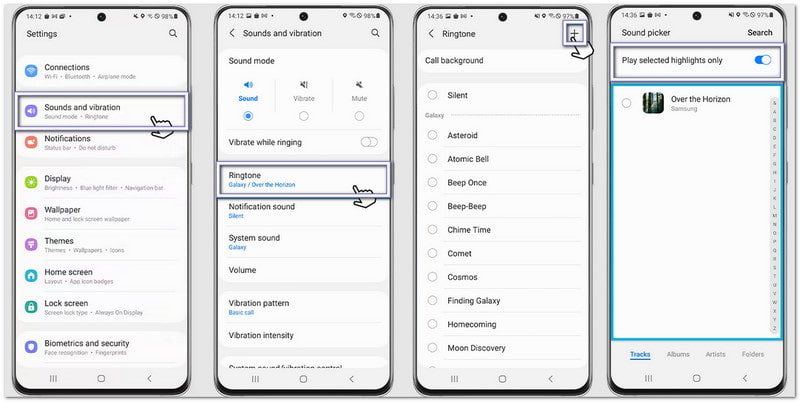
Schritt 1Öffne dein Telefon und gehe zu Einstellungen. Klopfen Geräusche und VibrationenWählen Sie dann Klingelton.
Schritt 2Tippen Sie auf die Hinzufügen Drücken Sie diese Taste und wählen Sie einen gespeicherten Song oder eine Aufnahme von Ihrem Telefon aus.
Schritt 3Aktivieren Nur ausgewählte Highlights abspielen Sofern verfügbar, schneidet Samsung automatisch den besten Teil des Audiosignals heraus.
Schritt 4Bestätigen Sie Ihre Auswahl, und der Ton wird nun als Ihr Standardklingelton festgelegt.
3. Dateimanager-Methode
Der Samsung Dateimanager organisiert Audiodateien und ermöglicht das direkte Kopieren in den Ordner „Klingeltöne“ zur automatischen Klingeltonerkennung.
Schritt 1Starte den Meine Dateien App auf Ihrem Samsung-Telefon.
Schritt 2Gehe zu Downloads oder Audio Ordner. Suchen Sie Ihre aufgenommene oder heruntergeladene Audiodatei.
Schritt 3Datei gedrückt halten. Tippen KopierenDann geh zu Interner Speicher > Klingeltöne.
Schritt 4Fügen Sie die Datei in den Ordner „Klingeltöne“ ein. Gehen Sie anschließend zurück zu den Toneinstellungen. Ihre Datei wird nun in der Klingeltonliste angezeigt.
Teil 5. Profi-Tipps für beste Ergebnisse
Bevor Sie Ihren Klingelton einstellen, sollten Sie ein paar einfache Tipps beachten. Dadurch klingt Ihr Klingelton klarer und funktioniert besser auf Ihrem Handy.
Tipp #1: Kurz und bündig.
Stellen Sie Ihren Klingelton auf 30 bis 40 Sekunden ein. Dadurch bleibt er flüssig und ist vollständig mit Android-Handys kompatibel.
Tipp #2: Verwenden Sie das richtige Format.
Verwenden Sie nach Möglichkeit MP3- oder M4A-Dateien. Diese Formate funktionieren auf den meisten Android-Geräten einwandfrei.
Tipp #3: Überprüfen Sie zuerst die Lautstärke.
Spielen Sie Ihren Klingelton ab, bevor Sie ihn einstellen. Achten Sie darauf, dass er weder zu laut noch zu leise ist. So vermeiden Sie unangenehme Überraschungen bei Anrufen.
Du hast gelernt Wie man einen Klingelton auf einem iPhone aufnimmtAndroid und Desktop-Computer. Egal welches Gerät Sie verwenden, Sie können jederzeit Ihren eigenen Klingelton erstellen.
Für Windows- und Mac-Nutzer AVAide Screen Recorder Das macht den Vorgang einfach. Sie können Ihre eigene Stimme aufnehmen oder Audio von Ihrem System erfassen. Die Datei lässt sich nach der Aufnahme auch zuschneiden. So behalten Sie nur den besten Teil für Ihren Klingelton.
ÜBER DEN AUTOR

Erfassen Sie Bildschirmaktivitäten mit Audio, Online-Meetings, Gameplay-Videos, Musik, Webcam usw.
Audio Aufnahme