Hvordan rediger en stemmeoptagelseRedigering af dine stemmeoptagelser er en effektiv måde at forbedre forskellige aspekter af lydfilen. Du kan forbedre klarheden, trimme sektioner, øge og sænke lydstyrken, tilføje effekter og mere, hvilket resulterer i bedre lydafspilning. Uanset om det er til interviews, personlige noter eller podcasts, er det nødvendigt at lære de bedste redigeringspraksisser for at opnå dit ønskede output. I denne guide lærer vi dig, hvordan du redigerer din stemmeoptagelse ved hjælp af de bedste lydredigeringsværktøjer. Kom her og lær mere om processen.
Del 1. Rediger stemmeoptagelse på iPhone
Vil du lære at redigere en stemmeoptagelse på en iPhone? iPhone tilbyder en app, du kan bruge til at redigere din stemmeoptagelse, især til beskæring, lagdeling og fjernelse af en sektion. For at starte processen kan du tjekke alle trinene i dette afsnit.
Trim optagelse på stemmememoer
Stemmememoer er ikke bare en af de bedste stemmeoptager-appsDen tilbyder også redigeringsværktøjer, som du kan bruge til at redigere din lyd. Med denne optagelses-/redigeringsapp kan du trimme din lyd for at fjerne unødvendige dele. Derudover har appen et simpelt layout, hvilket gør den mere ideel og nem at tilgå, især for ikke-professionelle brugere.
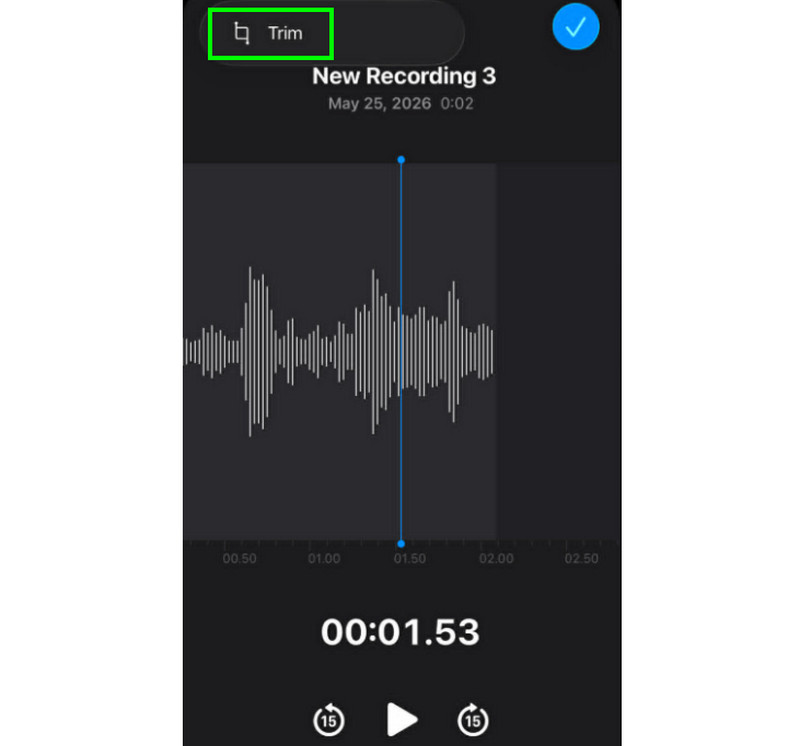
Trin 1Start Stemmememoer appen, og søg efter den stemmeoptagelse, du vil redigere. Klik derefter på Trimme fungere.
Trin 2Derefter kan du begynde at beskære lyden. Tryk derefter på Trimme knappen nedenfor for at begynde at fjerne de uønskede dele fra lyden.
Trin 3Efter beskæring kan du trykke på ansøge knappen ovenfor for at gemme ændringerne.
Sådan fjerner du en sektion i midten
Under beskæringsprocessen tænker du måske, at du bare kan beskære den første eller sidste del af sporet. Det gode ved Voice Memos-appen er, at du også kan fjerne en sektion i midten. Med denne funktion kan du sikre, at det er nemt at fjerne unødvendige dele fra lydsporet.
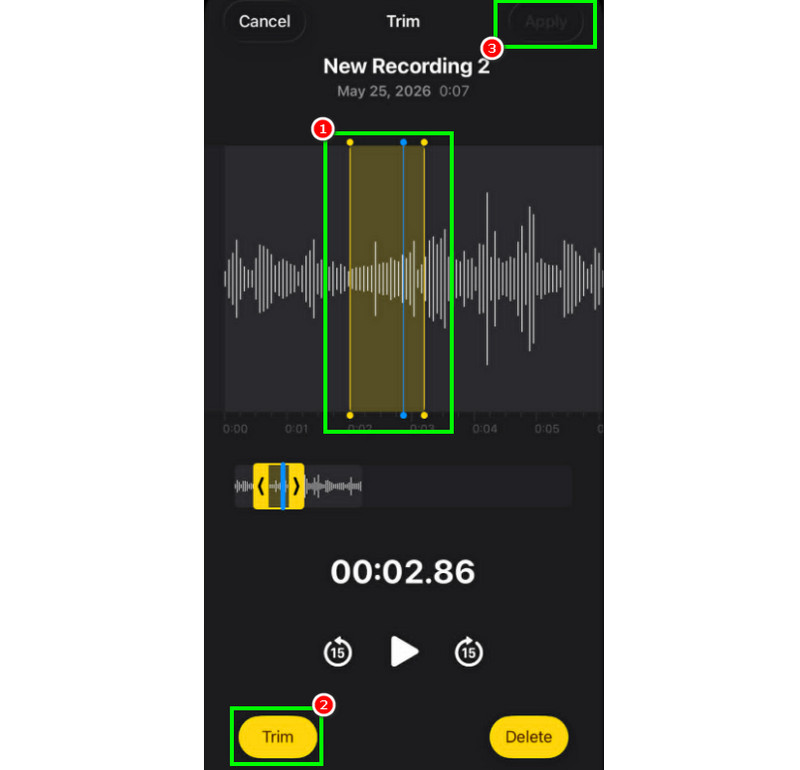
Trin 1Efter at have valgt Trimme funktionen kan du berøre og styre den justerbare linje fra sporet.
Trin 2Indsæt eller juster linjen i den midterste del, hvor du vil fjerne sporet. Tryk derefter på Trimme knappen nedenfor.
Trin 3Tryk på ansøge for at gemme den redigerede stemmeoptagelse.
Sådan lagdeler du spor i stemmememoer
Voice Memos er et ideelt værktøj til at optage stemme og alt lydindhold. Det kan endda redigere en optagelse, f.eks. beskære eller fjerne en bestemt sektion. Men hvis du vil lægge spor i lag, er det trist at sige, at værktøjet ikke er i stand til at gøre det. For bedre lagdeling ville det være bedre at bruge en mere avanceret lydredigeringsapp, som f.eks. GarageBand. Denne app sikrer, at du kan lægge dine spor i lag og oprette en enkelt fil.
Sådan deler og eksporterer du redigerede stemmememoer
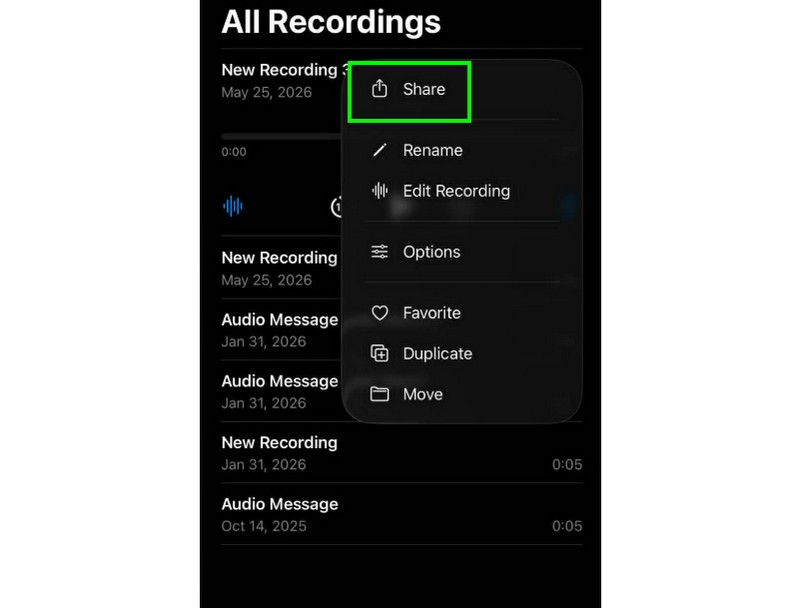
Det er nemt at dele og eksportere en redigeret stemmeoptagelse. Alt du skal gøre er at finde optagelserne i Voice Memos-appen og trykke på knappen med tre prikker. Derefter skal du trykke på funktionen Del. Med det kan du begynde at dele optagelserne på forskellige platforme. Du kan endda gemme dem i din ønskede mappe.
Anbefalede iPhone-redigeringsapps
Ønsker du et andet program til stemmeoptagelse og -redigering? Da Voice Memos-appen har begrænsninger, når det kommer til redigering af dine stemmeoptagelser, er der tidspunkter, hvor du har brug for at bruge et andet redigeringsværktøj. I så fald kan du prøve at bruge GarageBand, Ferrite Recording Studio og Hokusai Audio Editor for bedre redigering.
Del 2. Rediger stemmeoptagelse på Android
Er du Android-bruger og vil redigere dine stemmeoptagelser? Så kan du bruge Samsung StemmeoptagerDet er en gratis app, som du kan bruge til at redigere dine stemmeoptagelser. Den kan hjælpe dig med at trimme dine optagelser baseret på dine præferencer. Appen har en simpel brugergrænseflade, der gør den nem at navigere i.
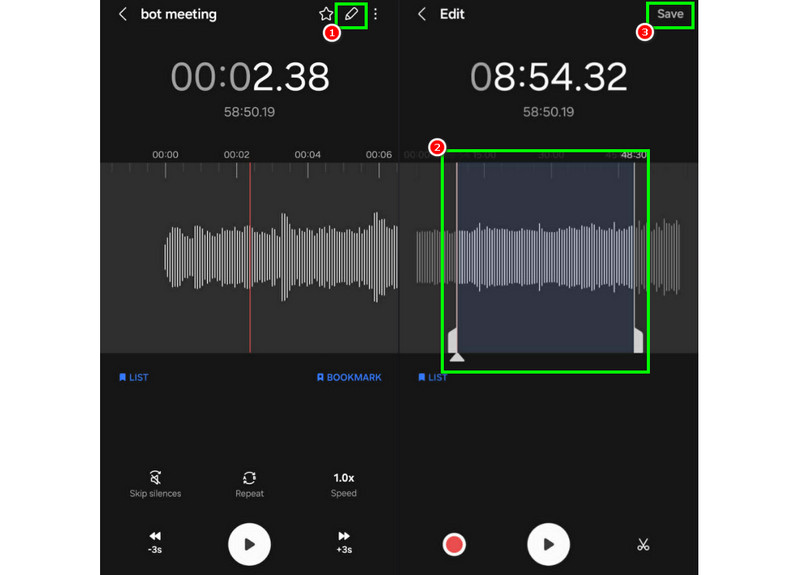
Trin 1Start Samsung StemmeoptagerFortsæt derefter til de optagelser, du vil redigere.
Trin 2Åbn derefter optagelserne, og tryk på Redigere funktionen ovenfor.
Trin 3Du kan starte beskæringsprocessen ved at justere linjerne fra sporene. Når det er gjort, kan du markere Gemme knappen ovenfor.
Del 3. Sådan redigerer du en stemmeoptagelse på skrivebordet
Vil du have din redigerbare stemmeoptager på en computer? Så læs med her, hvor vi tilbyder de bedste metoder, du kan bruge til en effektiv redigeringsproces af stemmeoptagelser.
Metode 1. Rediger stemmeoptagelser ved hjælp af Audacity
Audacity er blandt de gratis desktop-baserede editorer, du kan bruge til at redigere dine optagelser. Du kan trimme lyden, tilføje effekter og tilføje andre spor. Du kan endda optag computerlyd i Audacity og rediger det baseret på dine præferencer. Det eneste problem her er, at layoutet ikke er tiltalende nok.
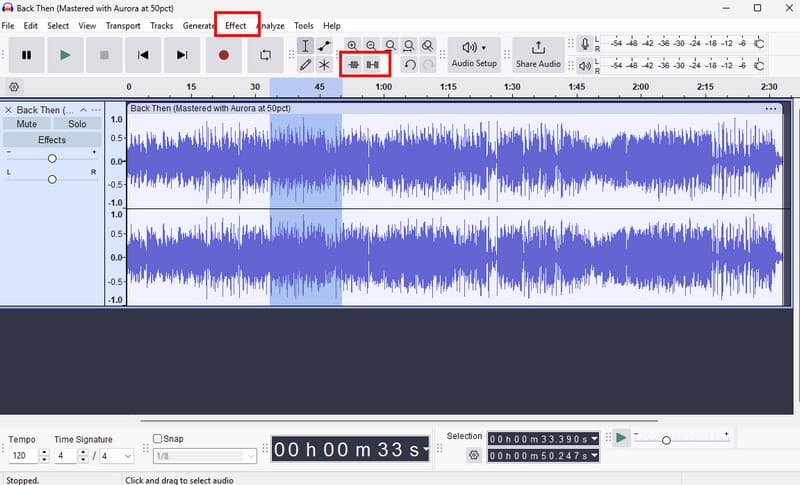
Trin 1Hent Audacity på din computer. Fortsæt derefter til Fil > Åben muligheder for at tilføje dine optagelser.
Trin 2Du kan begynde at redigere din fil. Du kan beskære sporet, tilføje effekter, justere tempoet og meget mere.
Trin 3Når du er færdig, skal du trykke på Fil > Gem projekt for at gemme den på din enhed.
Metode 2. Rediger stemmeoptagelser ved hjælp af AVAide Video Converter
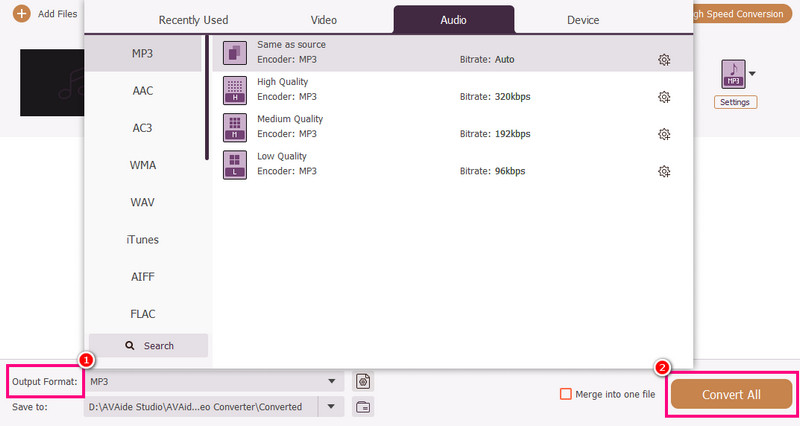
Hvis du ønsker en professionel editor, kan du prøve at få adgang AVAide Video ConverterDette program giver dig mulighed for at redigere din lyd på mange måder. Du kan klippe eller trimme et bestemt spor fra optagelserne, opdele dem og flette dem sammen. Det gode ved dette er, at du endda kan indsætte en fade-in og out-effekt på din lyd. Derudover kan du konvertere dine optagelser til ethvert lydformat, såsom MP3, AAC, ALAC, M4A, WAV og mere. Det sikrer, at du ikke oplever kompatibilitetsproblemer under afspilningen. Du kan endda gemme optagelserne i den bedste kvalitet på op til 320 kbps, hvilket gør programmet ideelt for alle lydentusiaster.
Trin 1Hent AVAide Video Converter på din Mac eller Windows. Installer og start det derefter for at starte redigeringsprocessen.

GRATIS DOWNLOAD Til Windows 7 eller nyere
 Sikker download
GRATIS DOWNLOAD Til Mac OS X 10.13 eller nyere
Sikker downloadTrin 2Fra Konverter funktionen, tilføj stemmeoptagelserne ved at trykke på Tilføj filer mulighed. Du kan endda tilføje flere filer, hvis du vil.
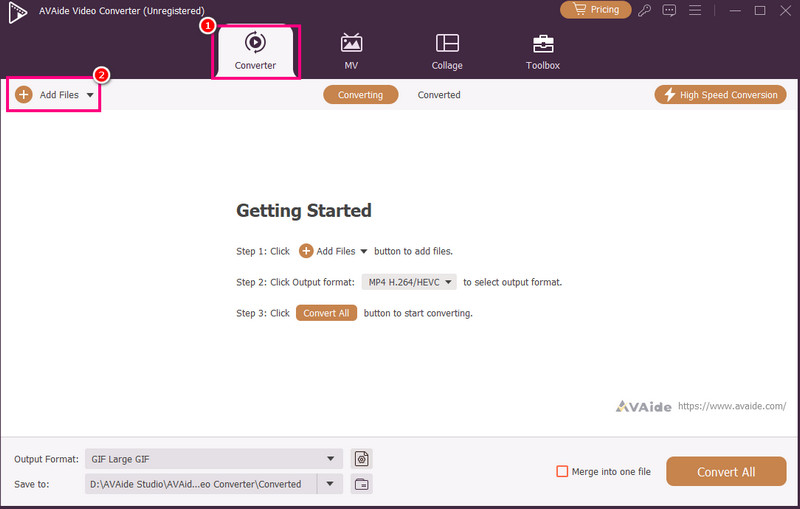
Trin 3Klik derefter på Skære muligheden for at starte redigeringsprocessen. Du kan klippe og fjerne en bestemt del fra sporet. Du kan også bruge Dele funktion til at adskille sporene.
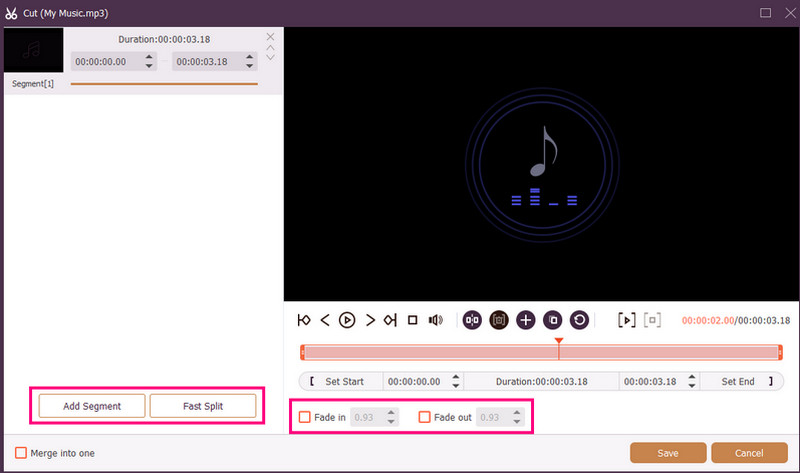
Du kan også vedhæfte Fade ind og Fade ud effekter til dine optagelser. Når du er færdig, skal du trykke på Gemme.
Trin 4Du kan også gå til Outputformat sektionen for at vælge det ønskede lydformat. Til sidst skal du markere Konverter alle for at starte lagringsprocessen.
Metode 3. Rediger stemmeoptagelser ved hjælp af Adobe Audition
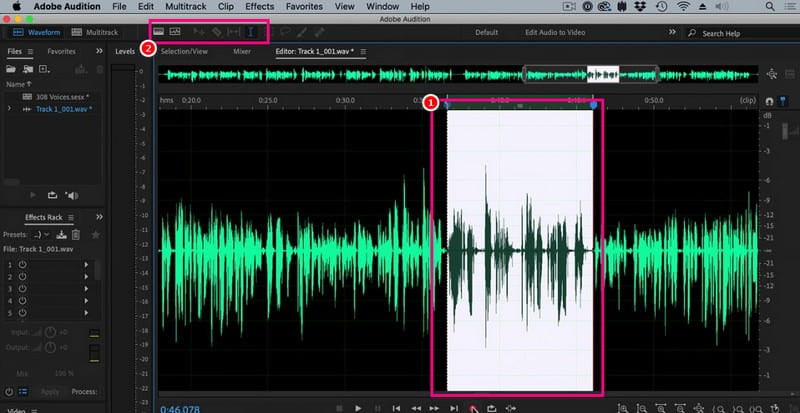
Adobe Audition er et pålideligt værktøj, du kan bruge til at redigere dine stemmeoptagelser. Det tilbyder endda både grundlæggende og avancerede redigeringsværktøjer, hvilket gør det ideelt for alle brugere, især professionelle. Du kan beskære optagelserne, anvende effekter, lægge lag på spor og meget mere. Du skal dog være dygtig nok til at bruge dette værktøj, da dets brugergrænseflade har en stejl indlæringskurve.
Trin 1Hent Adobe Audition på din computer. Begynd derefter at tilføje den stemmeoptagelse, du vil redigere.
Trin 2Du kan bruge din mus/markør til at markere en bestemt del af sporet og redigere den. Du kan trimme, tilføje effekter og opdele lyden ved hjælp af alle redigeringsværktøjerne fra den øverste brugerflade.
Trin 3Efter redigering af lyden kan du gå til Fil > Gemme ovenstående muligheder for at starte lagringsprocessen.
Del 4. Rediger stemmeoptagelse online
Det er også muligt at redigere dine stemmeoptagelser online. Læs detaljerne nedenfor, og lær, hvordan du redigerer din lydfil i din browser.
Metode 1. Rediger stemmeoptagelser ved hjælp af 123APPS
Dette værktøj er perfekt, hvis du vil redigere din lyd gratis. Det giver dig mulighed for at trimme din lyd, fjerne baggrundsstøj, tilføje en fade-effekt og meget mere. Det er også nemt at bruge, hvilket gør det ideelt for begyndere.
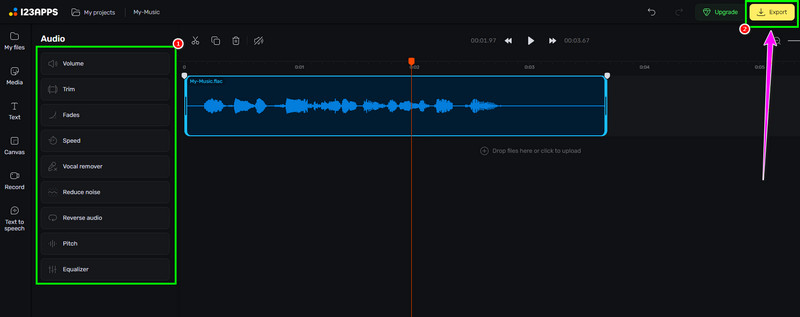
Trin 1Besøg hjemmesiden for 123APPS og fortsæt til dens Audio Editor funktionen. Tryk derefter på Vælg Filer for at uploade din optagelse.
Trin 2Begynd derefter at redigere din lyd. Du kan trimme optagelsen, tilføje effekter, fjerne støj og meget mere.
Trin 3Efter redigeringsprocessen skal du klikke på Eksport ovenfor for at gemme den på din enhed.
Metode 2. Rediger stemmeoptagelser ved hjælp af online lydredigeringsprogram
Hvis du ønsker et fremragende onlinebaseret lydredigeringsprogram, der kan redigere dine stemmeoptagelser, kan du prøve at bruge Lydredigeringsprogram onlineDette værktøj tilbyder forskellige værktøjer, du kan bruge. Nogle af dem er trimmer, skærer, støjfjerner, hurtigoplader og mere. Tjek nedenstående trin, og lær, hvordan du redigerer en stemmeoptagelse.
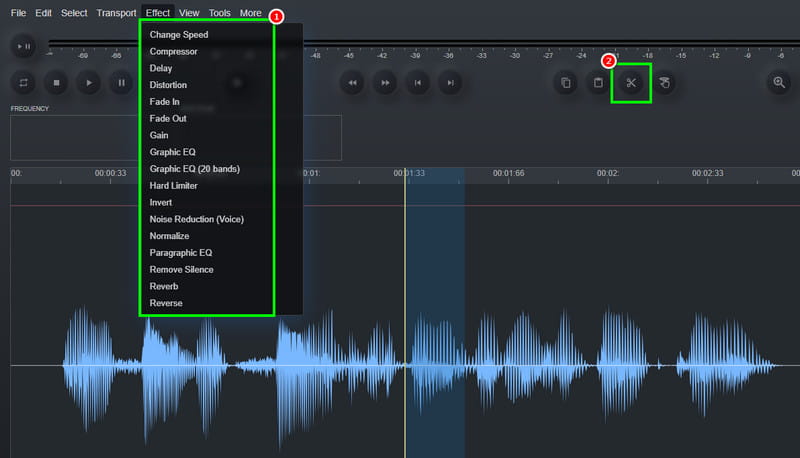
Trin 1Efter at have adgang til Lydredigeringsprogram online værktøj, klik på Fil > Åben mulighed for at uploade stemmeoptagelsen.
Trin 2Du kan starte med redigeringsprocessen. Gå til Effekt sektionen til at ændre lydens hastighed, tilføje en effekt, justere forsinkelsen og mere. Du kan også bruge Skære værktøj til at fjerne den unødvendige del fra sporet.
Trin 3For den sidste proces skal du trykke på Fil > Gemme knappen for at gemme den redigerede optagelse på din computer.
Del 5. Hvilken metode skal du vælge
Er du i tvivl om, hvilken metode du skal vælge? Hvis det er tilfældet, anbefaler vi kraftigt at bruge AVAide Video ConverterNår det kommer til redigering, kan du sikre dig, at du får det ønskede resultat. Du kan trimme lyden, opdele og tilføje flere segmenter for at oprette en enkelt fil. Du kan endda få adgang til programmets lydkompressorfunktion for at afbalancere filstørrelsen og kvaliteten af din optagelse. Det kan endda lade dig konvertere din lyd til andre formater, hvilket forhindrer dig i at støde på kompatibilitetsproblemer. Stol derfor på dette program og opnå din foretrukne lydoutput.
Takket være denne tutorial har du lært hvordan man redigerer lydoptagelserSå tjek de metoder, vi tilbyder, og håndter dine stemmeoptagelser baseret på dine præferencer. Derudover, hvis du ønsker en problemfri lydredigeringsproces, foreslår vi at bruge AVAide Video ConverterDenne software sikrer, at du kan redigere og gemme videoen i den bedste kvalitet, hvilket gør den til et førsteklasses redigeringsprogram for brugerne.
OM FORFATTEREN

Din komplette videoværktøjskasse, der understøtter 350+ formater til konvertering i tabsfri kvalitet.