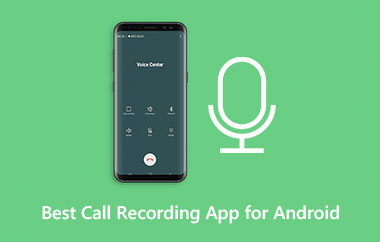
Android-brugere, der ønsker at lære hvordan man optager lyd på Android er på det rette sted, da denne beskrivelse dækker alle de simple metoder, du har brug for.
Vi vil gennemgå, hvordan man optager ekstern lyd, såsom stemme og omgivelseslyde, samt hvordan man optager intern lyd fra dit telefonsystem. Vi vil også inkludere en grundlæggende fejlfindingsvejledning, der kan hjælpe dig med at løse almindelige optagelsesproblemer.
Del 1. Optagelse af ekstern lyd (stemme og omgivelseslyde)
1. Brug af den indbyggede stemmeoptagerapp
Denne metode giver en nem måde at mestre, hvordan man optager lyd på en Android-telefon, ved hjælp af en grundlæggende funktion, der allerede findes på de fleste Android-telefoner, til at optage stemme og lyd.
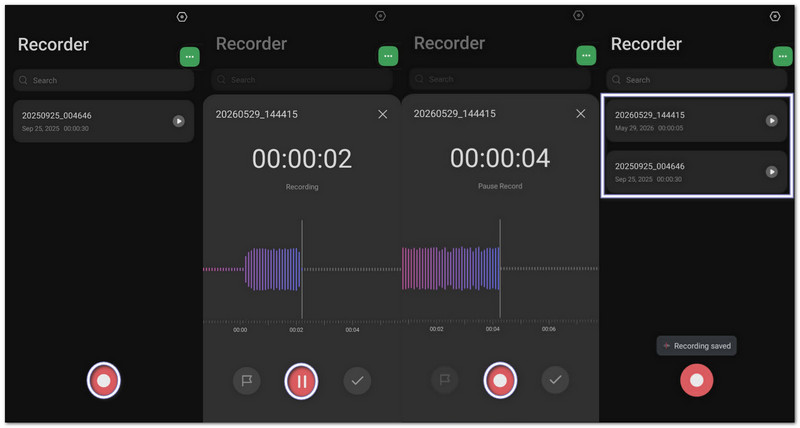
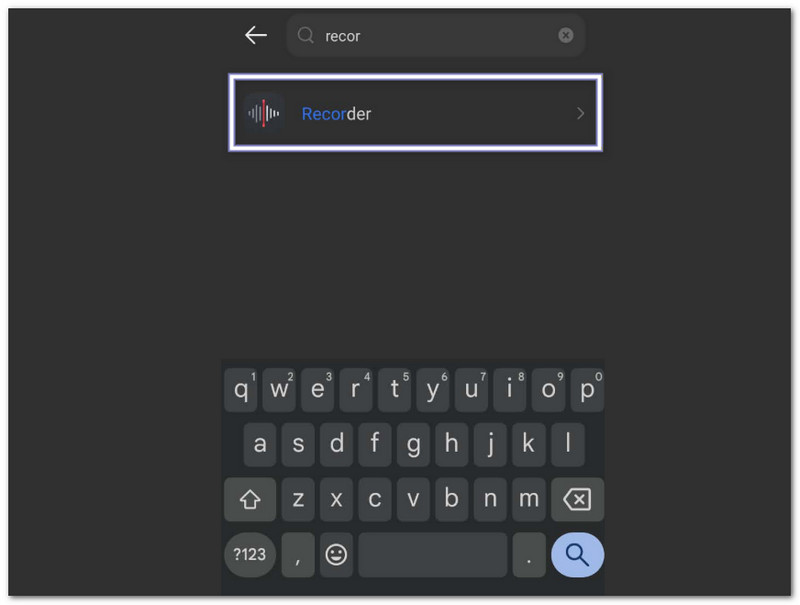
Trin 1Åbn din appskuffe og kig efter Stemme optager.
Trin 2Tryk på den røde Optage knappen for at starte optagelsen af din stemme eller lyde i nærheden.
Trin 3Tryk på Pause hvis du har brug for en kort pause. Tryk på Genoptage at fortsætte.
Trin 4Tryk på Gemme når du er færdig. Din lydfil gemmes i appen Filer eller Mine filer. De fleste optagelser gemmes som MP3- eller M4A-filer.
2. Optagelse af ekstern lyd uden nogen app
Denne tilgang muliggør stemmeoptagelse på Android til øjeblikkelig lydoptagelse ved hjælp af indbyggede telefonfunktioner uden at åbne en installeret optagelsesapp.
A. Google Recorder-widget
Trin 1Tryk og hold nede på et tomt område på din startskærm.
Trin 2Tryk på Widgets og find Google Optager widget.
Trin 3Træk den til din startskærm.
Trin 4Tryk på widgetten når som helst for at starte optagelsen med et enkelt tryk.
B. Google Assistent
Trin 1Sig "Hej Google"eller hold Strøm knap.
Trin 2Sig "Optag min stemme" eller "Start en lydoptagelse."
Trin 3Google Assistant åbner optageren og begynder at optage lyd.

C. Felt for hurtige indstillinger
Trin 1Stryg nedad fra toppen af din skærm.
Trin 2Se efter Lydoptager eller Skærmoptager i Hurtige indstillinger.
Trin 3Tryk på den for at starte optagelsen med det samme.
Trin 4Stop optagelsen, når den er færdig, og gem filen.
3. Optagelse med tredjepartsapp (for bedre kvalitet og funktioner)
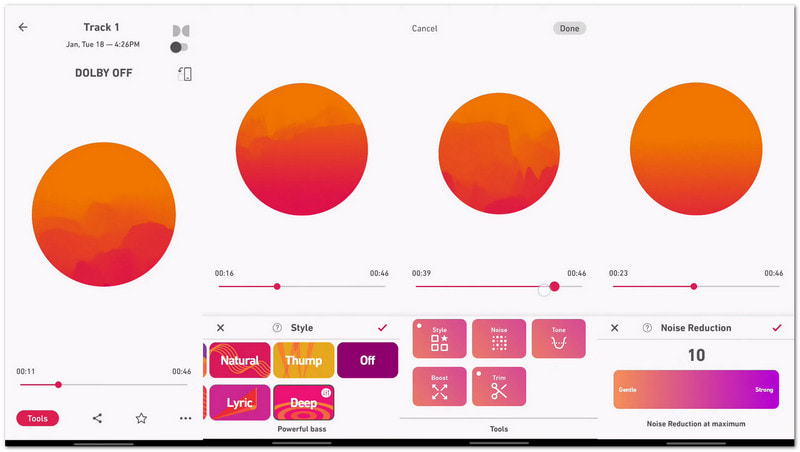
Optagelse med en tredjepartsapp, som f.eks. Dolby On, giver bedre lydklarhed og mere kontrol til alle typer lydbehov. Det forvandler din telefon til et simpelt optagestudie til stemme, musik og videoer.
Den forbedrer lyden med støjreduktion, EQ og studieeffekter for renere og mere professionel lyd. Det er virkelig nyttigt, hvis du har brug for at lære at optage lyd på Samsung og andre Android-mærker.
Trin 1Installere Dolby Til fra Google Play Butik.
Trin 2Åbn appen, og tryk på Optage knap.
Trin 3Optag din stemme, musik eller baggrundslyde. Appen dæmper automatisk støj og forbedrer lydens klarhed.
Trin 4Gem eller del optagelsen efter redigering med indbyggede lydværktøjer.
Del 2. Optagelse af intern lyd (fra din telefons system)
1. Brug af den indbyggede skærmoptager
Det er den officielle Android-funktion at lære hvordan man optager intern lyd på Android, og den optager systemlyd sammen med skærmaktivitet på en stabil måde.
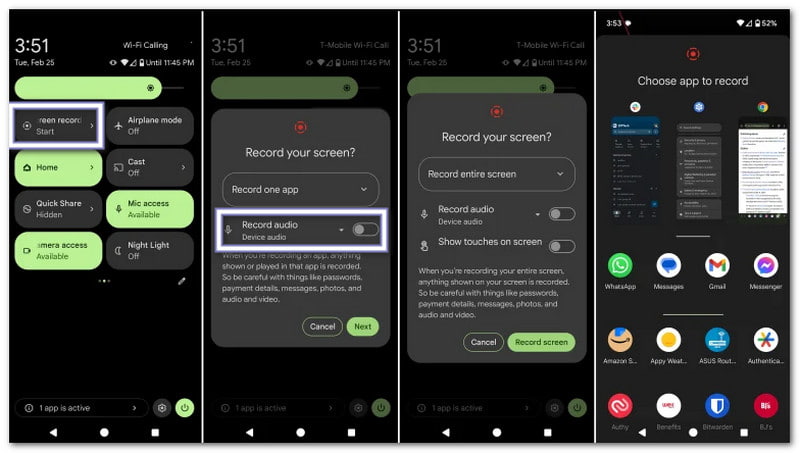
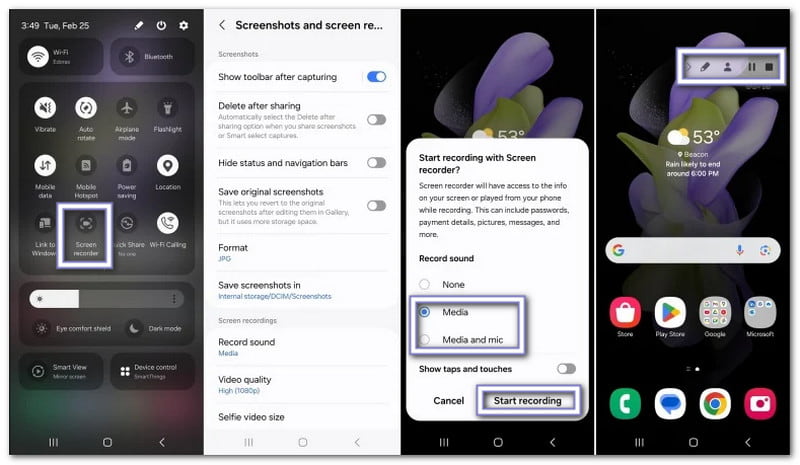
Trin 1Stryg nedad fra toppen af skærmen to gange for at åbne Hurtige indstillinger.
Trin 2Finde SkærmoptagerHvis den mangler, skal du trykke på Blyant eller Redigere knappen og tilføj den først.
Trin 3Tryk på Skærmoptager og vælg Enhedslyd eller Medier og Mikrofon som lydkilde.
Trin 4Start optagelsen, og åbn den app, det spil eller den video, du vil optage. Stop optagelsen, når den er færdig.
2. Optagelse af ren intern lyd (ingen video) ved hjælp af en tredjepartsapp
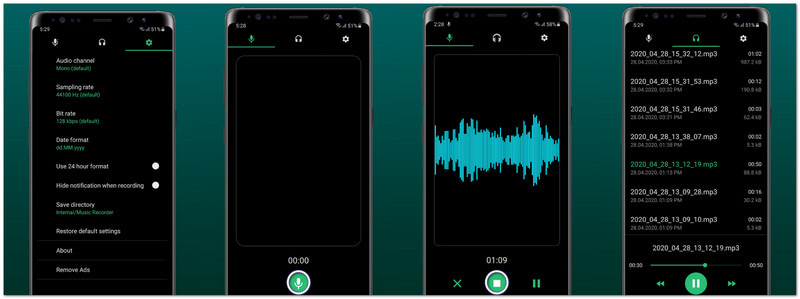
Hvis du leder efter, hvordan du optager lyd på Android, er Music Recorder - Song Recorder, udviklet af Jaya Zone Tech, en simpel løsning.
Dette stemmeoptager-app optager lyd i høj kvalitet fra apps, spil og musikafspillere. Du kan også konfigurere bitrate, samplerate og vælge mono eller stereo for bedre output. Den understøtter pause, genoptagelse, redigering, deling og endda en skjult optagetilstand for fleksibel brug.
Trin 1Installere Musikoptager - Sangoptager fra Google Play Butik og åbn appen.
Trin 2Tillad de nødvendige tilladelser for Mikrofon og Adgang til lagerplads.
Trin 3Åben Indstillinger og ændre Optagelseskilde fra Mic til Intern lydDu kan også vælge MP3 eller WAV format.
Trin 4Tryk på Optage og afspil den lyd, det spil eller den video, du vil optage. Appen optager kun den interne lyd.
Del 3. Hvis du har brug for at bruge eksterne mikrofoner med Android
Din telefonmikrofon fungerer fint til simple optagelser. Men hvis du ønsker klarere lyd, mindre støj eller højere stemmeoptagelse, kan en ekstern mikrofon være en stor hjælp.
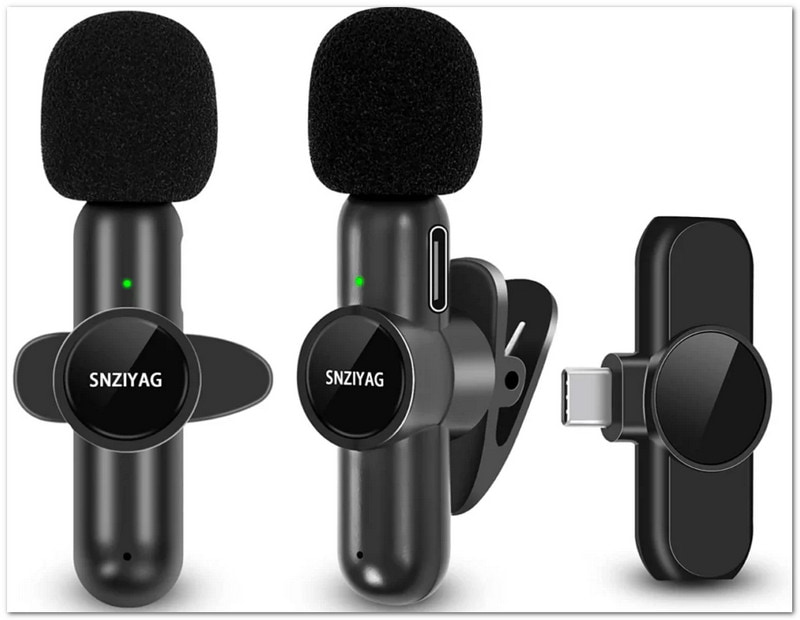
Mulighed A: USB-C-mikrofoner
USB-C-mikrofoner er enkle og hurtige at bruge. Du skal blot tilslutte dem til din telefons USB-C-port og begynde at optage. De fleste Android-telefoner registrerer dem automatisk. De giver ofte en renere lyd og bedre stemmeklarhed end den indbyggede telefonmikrofon. De er fantastiske til indholdsskabere, studerende og mobil videooptagelse.
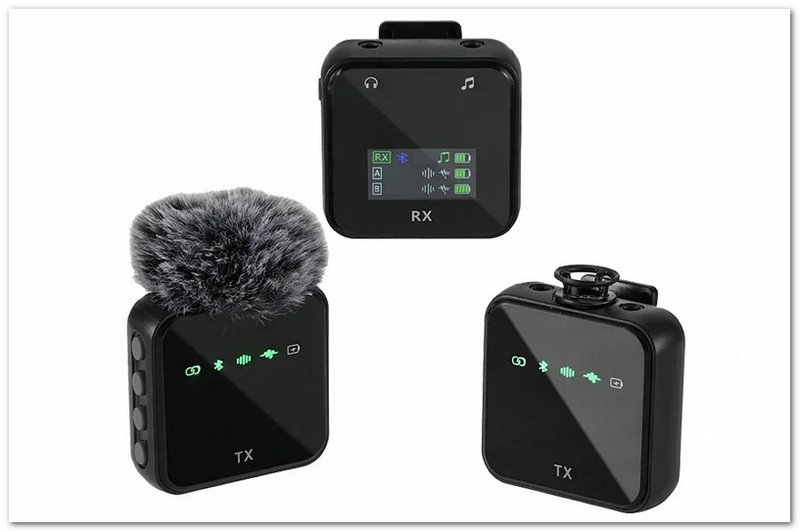
Mulighed B: Trådløse Bluetooth-mikrofoner
Bluetooth-mikrofoner giver dig mulighed for at optage uden ledninger. Du tilslutter dem via din telefons Bluetooth-indstillinger og begynder at optage normalt. De er nyttige, hvis du bevæger dig rundt, mens du filmer eller taler. Mange bruger dem til vlogs, præsentationer, udendørsvideoer og interviews, fordi de er bærbare og nemme at have med.
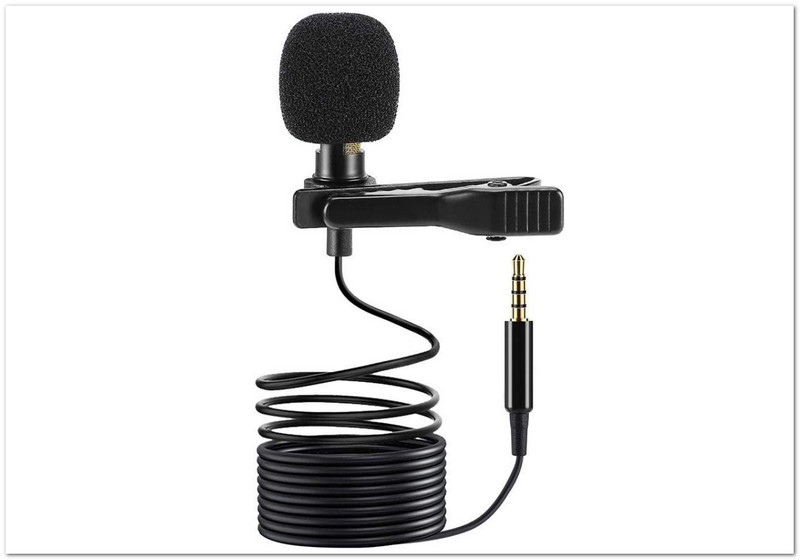
Mulighed C: 3,5 mm mikrofoner
3,5 mm mikrofoner tilsluttes via hovedtelefonstikket på din Android-telefon. Hvis din enhed ikke har et hovedtelefonstik, kan du bruge en USB-C til 3,5 mm adapter. Disse mikrofoner er overkommelige i pris og nemme at bruge til stemmenotater, skoleprojekter, opkald og simple optagelser. De er også et godt valg for begyndere, der ønsker bedre lyd uden at bruge for mange penge.
Del 4. Fejlfinding af almindelige problemer
Du er færdig med at lære lydoptagelse på Android. Men hvad nu hvis du støder på uventede problemer? Ved du, hvad du skal gøre?
Det kan føles svært, især hvis du er nybegynder. Men bare rolig. Vi lader dig ikke sidde fast. Vi giver også enkle løsninger, du kan stole på, hvis du nogensinde støder på problemer som dem nedenfor.
1. Intern lydindstilling er nedtonet
Android blokerer intern lyd i nogle apps. Det kan også være begrænset af ophavsretsregler. Brug den indbyggede Skærmoptager fra Hurtige indstillingerDet fungerer bedre til systemlyd. Indstil lyden til, hvis det er muligt. Enhedslyd eller Medier og Mic.
2. Ekstern mikrofon genkendes ikke
Det sker, når telefonen ikke kan registrere mikrofonen. Tænd OTG i Indstillinger til USB-C-mikrofonerTjek Kabler og Adaptere for støtte og en DAC-chipTilslut mikrofonen først, før du åbner appen. Prøv Åbn kamera hvis det er nødvendigt.
3. Stemmeoptageren vises ikke
Appen er muligvis skjult eller deaktiveret. Åbn App-skuffe og søg Optager. Gå til Indstillinger > Apps og aktiver den, hvis den er deaktiveret.
4. Optagelse i baggrunden stopper
Android lukker muligvis apps for at spare på batteriet. Batterioptimering til UbegrænsetLås appen inde Seneste apps så den forbliver åben.
5. Optagelser gemmes ikke
Det er ofte et problem med lagring eller tilladelser. Tillad Opbevaring eller Filtilladelse. Kontroller om lagerpladsen er fuld. Ryd cachen og prøv igen.
Bonus: Bedste skærmoptager til Android med bedre outputkvalitet
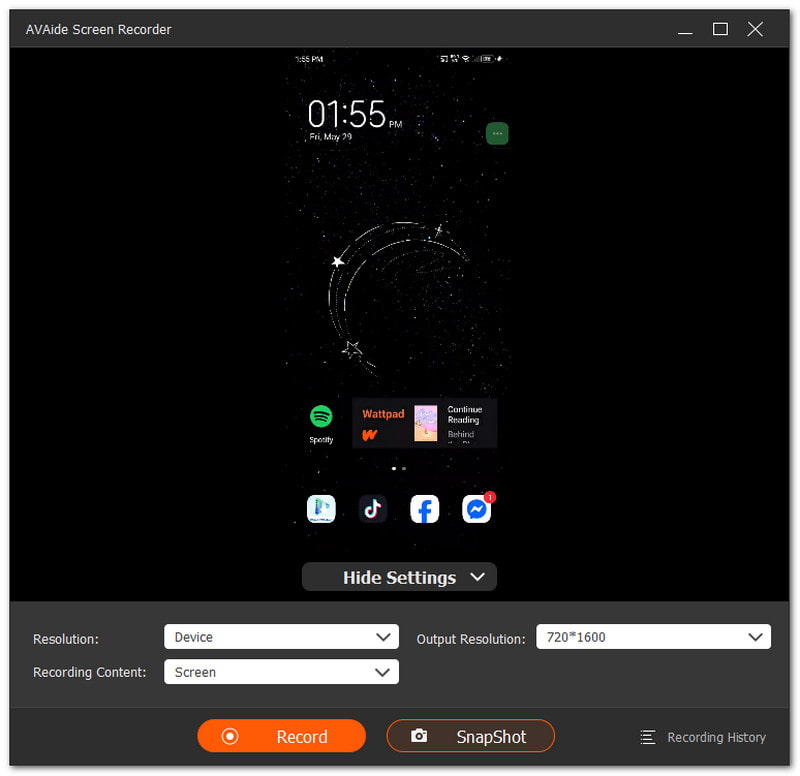
AVAide skærmoptager tilbyder en telefonoptagerfunktion, der fungerer til Android-enheder. Den understøtter op til 4K-opløsning for klar og skarp video. Den giver dig også mulighed for at optage lyden fra din telefons mikrofon, din computerhøjttaler eller begge dele på samme tid. Derudover kan du tage et snapshot, mens du optager, så du kan optage det med det samme. Den er virkelig velegnet til mobilspil, app-tutorials og videoopkald.
- Optager lyd på iPhone, Android, Windows og Mac.
- Optager telefonskærmen i høj opløsning.
- Tillader redigering som trimning, fletning, konvertering og lydforstærkning.
- Understøtter formater som MP4, WMV, AVI, GIF og MP3.

 Sikker download
Nu ved du det hvordan man optager lyd på Android og hvad du skal gøre, når du oplever problemer. Hvis der opstår problemer, skal du blot tjekke dine indstillinger, tilladelser og optageværktøjer.
For bedre resultater kan du også bruge et effektivt værktøj som f. AVAide skærmoptagerDen giver jævn optagelse og et klart output for Android-brugere og endda Windows- og Mac-brugere.
OM FORFATTEREN

Optag skærmaktiviteter med lyd, onlinemøder, gameplay-videoer, musik, webcam osv.