Mac users can easily capture anything on their screen. Whether it is work, school, or personal use, there is a simple way for it.
In this guide on كيفية التقاط لقطة شاشة على نظام ماك, you will learn everything you need. From basic screenshot shortcuts to scrolling and full page captures. You will also learn how to print, save, and manage your screenshots. There are even ways to edit and delete them when needed.
So, if you want to master screenshots on Mac, you will find all the essential steps here.
- Part 1. Basic Screenshot Shortcuts on Mac
- Part 2. Where Do Screenshots Go on Mac
- Part 3. How to Take Scrolling & Full-Page Screenshots on Mac
- Part 4. How to Edit, Crop, and Annotate Screenshots
- Part 5. How to Print a Screenshot on Mac
- Part 6. How to Manage & Delete Screenshots
- Part 7. Troubleshooting
Part 1. Basic Screenshot Shortcuts on Mac
Mac comes with built-in Mac screenshot shortcut tools. You can use simple keyboard shortcuts to capture your whole screen, a selected area, a display, or even the Touch Bar. Most screenshots are saved to your desktop automatically, so you can find them immediately after taking them.
Method 1: Capture the Entire Screen
This method lets you take a full screenshot of everything visible on your Mac screen in one quick action.
الخطوة 1Open the screen that you want to capture.
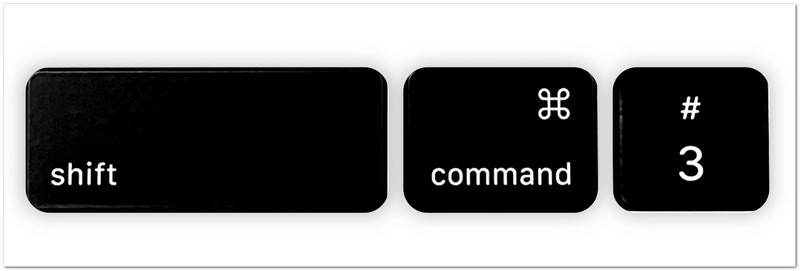
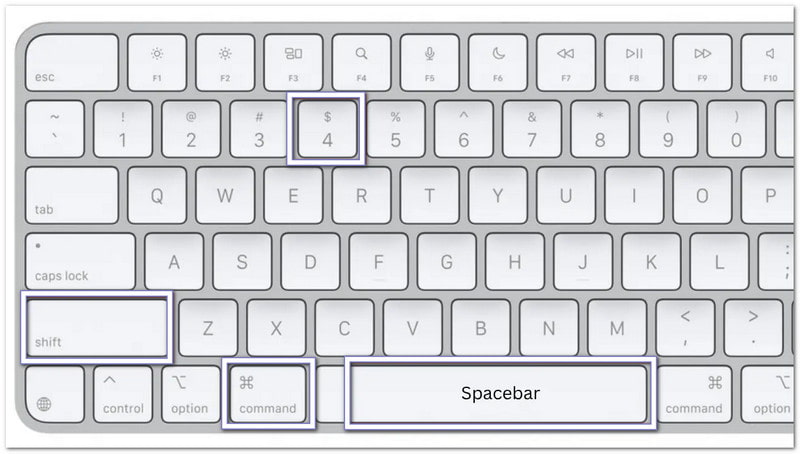
الخطوة 2يضعط يحول + يأمر + 3 on your keyboard at the same time.
الخطوه 3Your Mac will instantly take a screenshot of everything shown on your screen.
الخطوة 4A small thumbnail may appear in the corner of the screen. Click it if you want to make quick edits.
الخطوة الخامسةIf you do not click the thumbnail, the screenshot will save automatically as an image file on your desktop.
Method 2: Capture a Selected Portion (Partial Screenshot)
This option allows you to use a Mac partial screenshot to choose and capture only a specific part of your screen by dragging your cursor.
الخطوة 1Go to the page, app, or content you want to capture.
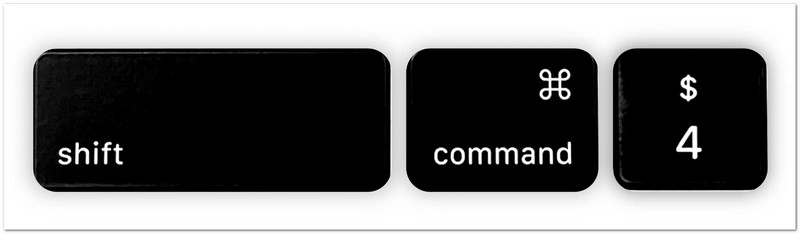
الخطوة 2يضعط يحول + يأمر + 4 together.
الخطوه 3Your mouse pointer will switch into a crosshair shape. Click and drag it over the area you want to screenshot.
الخطوة 4Adjust the selection until it covers the exact part you need.
الخطوة الخامسةUnclick the الفأر زر أو Trackpad to take the screenshot. The image will then save automatically.
نصيحة إضافية: اضغط مع الاستمرار على مفتاح المسافة while dragging if you need to move the selected area. Press خروج if you want to cancel and start again.
Method 3: Capture a Specific Window
This method focuses on one open window and captures only that app or window clearly without extra screen parts.
الخطوة 1Open the display that you want to capture.
الخطوة 2يضعط يحول + يأمر + 4 على لوحة المفاتيح الخاصة بك.
الخطوه 3اضغط على مفتاح المسافة. Your cursor will change into a camera symbol.
الخطوة 4Move the camera symbol over the display, menu, or Dock you want to capture. It will highlight when ready.
الخطوة الخامسةClick once to take the screenshot. The captured window will then be saved as an image file.
نصيحة إضافية: امسك خيار key while clicking if you want to remove the shadow that appears around the window.
Method 4: Capture the Touch Bar (If your Mac has one)
This feature captures what is shown on the MacBook Touch Bar for saving or sharing its current display.
الخطوة 1Make sure your MacBook Pro has a Touch Bar.
الخطوة 2Display the buttons, controls, or content you want to capture on the Touch Bar.
الخطوه 3يضعط يحول + يأمر + 6 at the same time.
الخطوة 4Your Mac will instantly take a screenshot of everything currently shown on the Touch Bar.
الخطوة الخامسةThe screenshot will save automatically to your desktop so you can view or share it later.

These keyboard shortcuts are the fastest way to take screenshots on a Mac. They work without installing an extra program and help you capture exactly what you need in just a few seconds.
Part 2. Where Do Screenshots Go on Mac
After taking a screenshot on your Mac, you may wonder where screenshots go on Mac. Mac saves screenshots automatically, and it also gives you several ways to find them faster or change where they are stored. Follow the methods below to manage your screenshots with ease!
1. Default Save Location
Screenshots are automatically saved in a default location on your Mac for quick access after each capture.
الخطوة 1Take a screenshot using any screenshot shortcut on your Mac.
الخطوة 2Go to your Desktop and look for the new image file that was just created.
الخطوه 3Find a file named "Screen Shot [Date] at [Time]". Mac saves screenshots as PNG files by default.
الخطوة 4Double-click the file if you want to open, view, edit, or share your screenshot.
الخطوة الخامسةRepeat this process whenever you need to find screenshots saved in the default location.

2. How to Change Where Screenshots Are Saved on Mac
You can adjust settings to change where screenshots are saved on Mac and choose a new folder where all screenshots will be stored automatically.
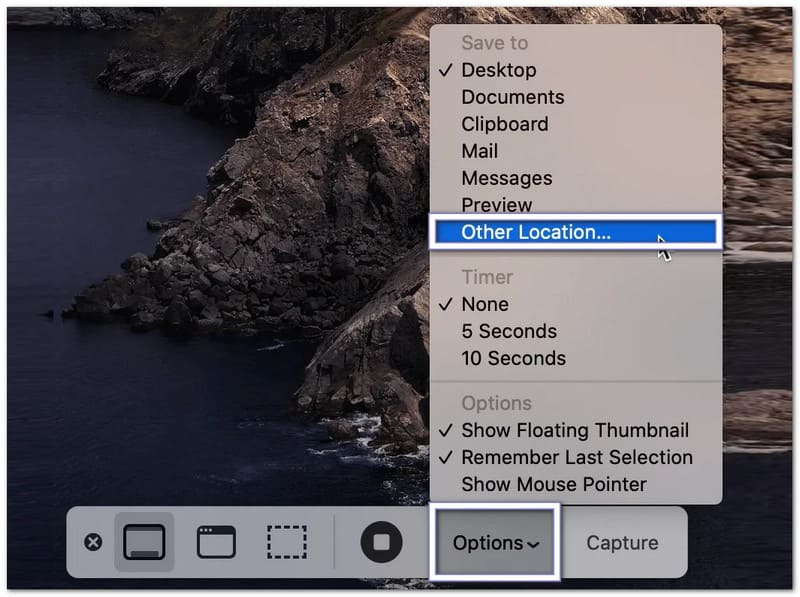
الخطوة 1يضعط يأمر + يحول + 5 on your keyboard to open the Screenshot toolbar.
الخطوة 2انقر خيارات at the bottom of the toolbar to open the screenshot settings.
الخطوه 3يختار موقع آخر from the menu. Then, choose a folder such as Documents or Downloads. You can also create a new folder for your screenshots.
الخطوة 4Confirm your selected folder and return to the Screenshot toolbar.
الخطوة الخامسةTake a new screenshot of a window or selected area. Your Mac will now save future screenshots to the folder you selected.
3. How to Find Recent Screenshots Quickly
It helps when learning how to find screenshots on Mac, as it guides you to locate your latest screenshots fast using Finder tools or recent file sorting options.
الخطوة 1فتح مكتشف from your Dock.
الخطوة 2انقر Recents in the left sidebar to view your latest files.
الخطوه 3Sort the files by Date Created if needed. It helps place your newest screenshots near the top.
الخطوة 4Look through the list and find the screenshot you want to open.
الخطوة الخامسةDouble-click the file to view it or move it to another folder for better organization.
Part 3. How to Take Scrolling & Full-Page Screenshots on Mac
A regular screenshot only captures what you can see on the screen. If you want to save an entire webpage, a long article, a chat conversation, or a document, you need a scrolling or full-page screenshot on a Mac. Mac offers built-in ways to do this in web browsers, and you can also use third-party tools for other apps.
Method 1: Screenshot Entire Webpage in Safari
Safari has a built-in feature that lets you save a complete webpage without taking multiple screenshots.
الخطوة 1Run Safari and go to the website you wish to capture.
الخطوة 2يضرب ملف from the menu bar at the top of the screen.
الخطوه 3يختار Export as PDF من القائمة المنسدلة.
الخطوة 4Choose where you want to save the file and give it a name if needed.
الخطوة الخامسةيضرب يحفظ. Safari will create a PDF that contains the entire webpage from top to bottom.

Method 2: Screenshot Entire Webpage in Chrome/Firefox
1. Screenshot an Entire Webpage in Google Chrome
Google Chrome includes a hidden feature screenshot entire webpage Mac that can capture a complete webpage in one image.
الخطوة 1Open the webpage you want to capture in Chrome.
الخطوة 2يضعط يأمر + خيار + I to open Developer Tools.
الخطوه 3يضعط يأمر + يحول + P to open the Command Menu.
الخطوة 4Type screenshot into the search box that appears.
الخطوة الخامسةيختار Capture full-size screenshot. Chrome will automatically create and download a full-page image of the webpage.

2. Screenshot an Entire Webpage in Firefox
Firefox makes full-page screenshots easy because the feature is built into the browser menu.
الخطوة 1Open the webpage you want to capture.
الخطوة 2Right-click an empty area of the page. If you use a trackpad, you can also Control-click.
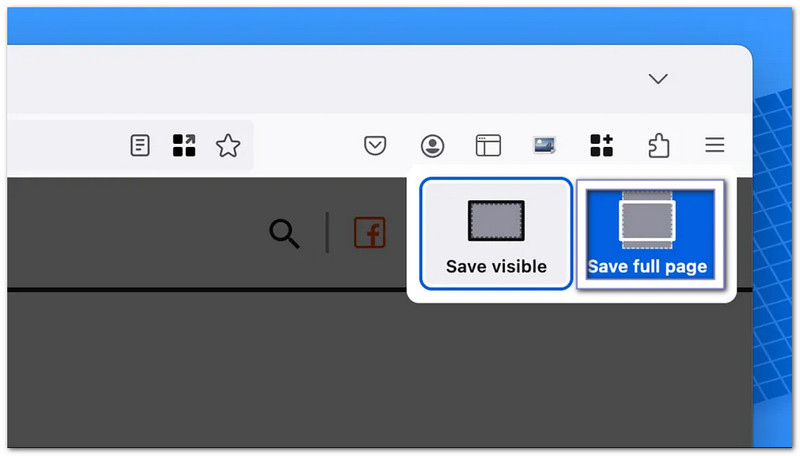
الخطوه 3يختار خد لقطة للشاشة من القائمة.
الخطوة 4انقر Save Full Page to capture everything on the webpage.
الخطوة الخامسةDownload and save the image to your Mac.
Method 3: Scrolling Capture in Any App
مع AVAide مسجل الشاشة, you are not limited to scrolling screenshots on Mac in browsers only. You can use it in any app on your Mac. It works for chats, emails, documents, notes, and long app pages.
It has a built-in screen capture mode that allows scrolling screenshots in one clean image. After capturing, you can copy it for quick paste in apps like Word or Notes. You can also save it directly to your local folder for easy access later.
الخطوة 1Download and install AVAide Screen Recorder on your Mac. Open the program after installation, so it is ready to use.

تنزيل مجاني لنظام التشغيل Windows 7 أو أحدث
 تحميل آمن
تنزيل مجاني لنظام التشغيل Mac OS X 10.13 أو الإصدارات الأحدث
تحميل آمنالخطوة 2Open the app, webpage, chat, or document that you want to capture. Make sure the full content is loaded on the screen before you start.
الخطوه 3From the main interface, choose تصوير الشاشة. ثم حدد لقطة شاشة متمررة as the capture mode.
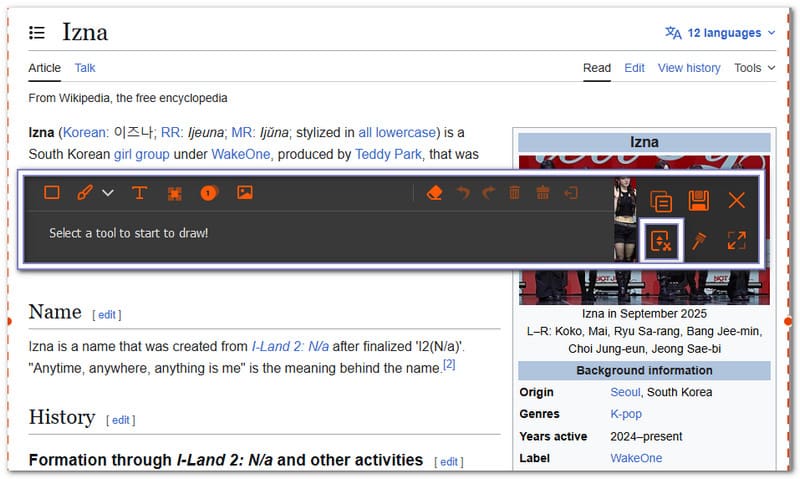
الخطوة 4Select the window you want to capture. Use your mouse wheel, space bar, or scroll to move through the page. AVAide Screen Recorder will follow the scrolling and capture everything. Press خروج if you want to stop
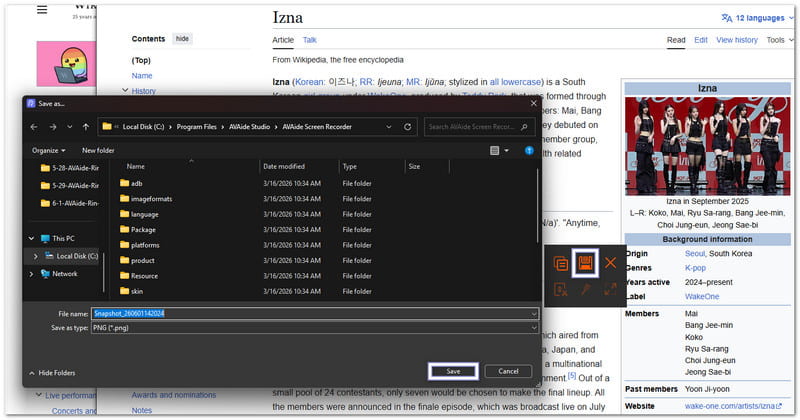
الخطوة الخامسةAfter the capture is complete, click the يحفظ button. Choose your folder location, then save the final scrolling screenshot on your Mac.
Part 4. How to Edit, Crop, and Annotate Screenshots
Learning how to screenshot on a Mac desktop is only the first step. But what if you need to crop unwanted parts, add notes, draw arrows, or highlight important details?
The good news is that Macs have built-in tools that make editing screenshots quick and simple. If you require more sophisticated features, you can also utilize third-party apps.
1. Instant Editing After Capture
Mac lets you edit a screenshot the moment you capture it. It is one of the fastest ways to make changes without opening another app.
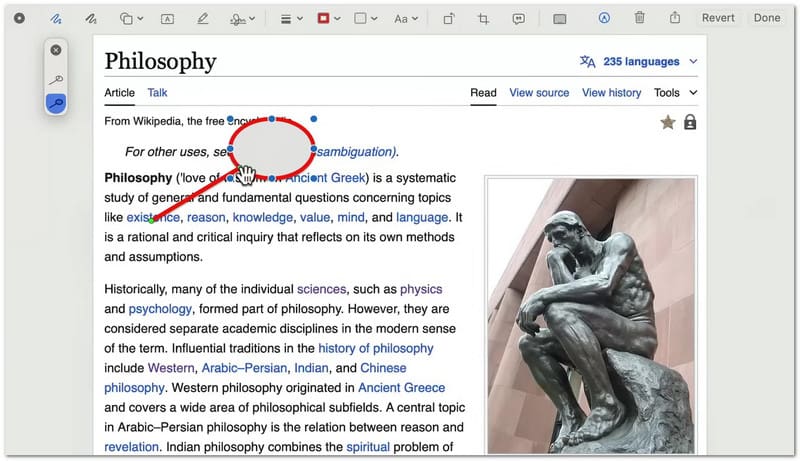
الخطوة 1 Take a screenshot using يحول + يأمر + 4 أو يحول + يأمر + 5.
الخطوة 2Look for the floating thumbnail that appears in the bottom-right corner of your screen.
الخطوه 3Click the thumbnail before it disappears. It opens the screenshot in the Markup editing window.
الخطوة 4Use the toolbar at the top to add text, arrows, shapes, lines, or highlights. You can also use the crop tool to remove unwanted parts of the image.
الخطوة الخامسةانقر منجز to save your changes. You can also click the شارك button if you want to send the screenshot by email, Messages, or another app.
2. Using Preview to Crop Existing Screenshots
If the screenshot is already saved on your Mac, you can crop it later using the built-in Preview app; besides the fact that you can also use it to قص الفيديو.
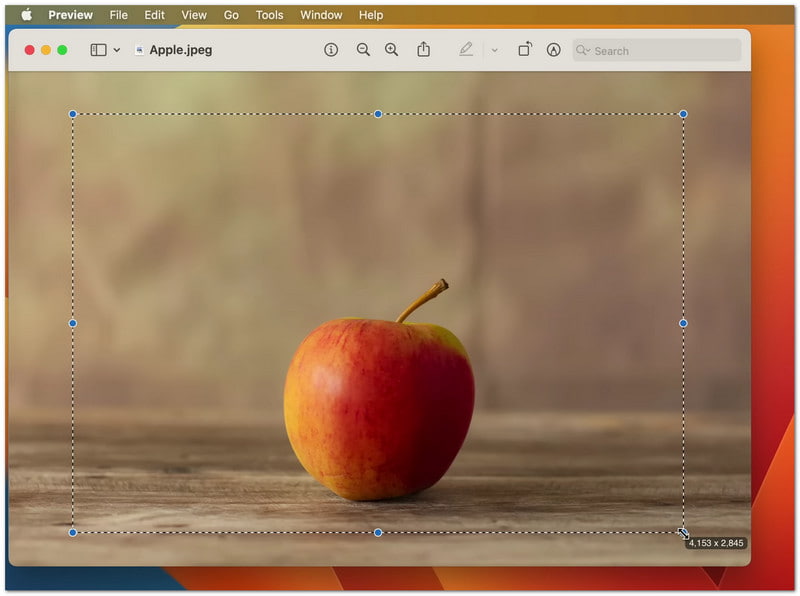
الخطوة 1Locate the screenshot file and double-click it to open it in Preview.
الخطوة 2Check if the Markup Toolbar is visible. If you do not see it, click View and then select إظهار شريط أدوات العلامات.
الخطوه 3Click and drag your mouse over the area you want to keep. It creates a selection around the important part of the image.
الخطوة 4انقر على ا & قتصاص button on the toolbar. Preview will remove everything outside the selected area.
الخطوة الخامسةيضعط يأمر + س to save the edited screenshot.
3. Third-Party Photo Editors
When Mac's built-in tools are not enough, third-party محرري الصور help you do more with your screenshots. They are used for editing, improving, and organizing images after you capture them on your Mac. Each tool has a different strength depending on your needs!
1. Skitch
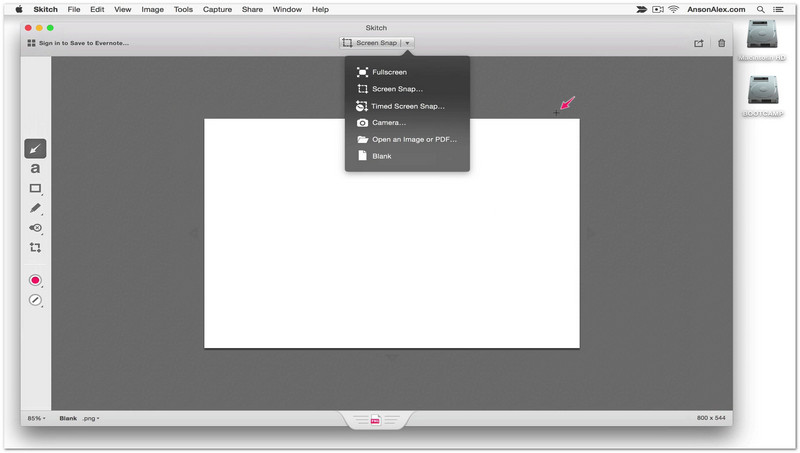
Skitch is made for quick screenshot editing with simple tools. You can open a screenshot and instantly mark it with arrows, stamps, or short text notes. It is super useful when you only need to highlight important parts fast. It keeps editing simple and does not overload you with complex features.
2. كانفا
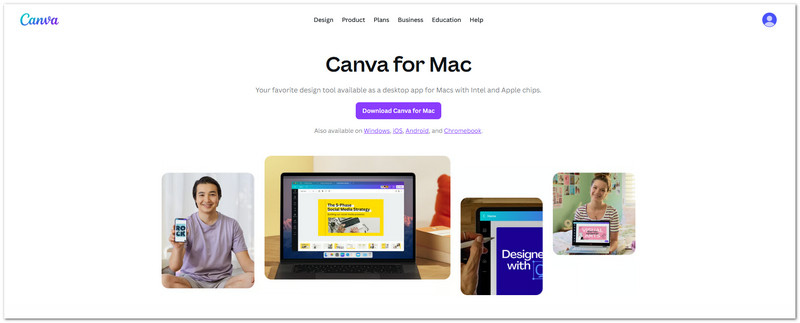
When you want to create simple visual designs from screenshots, you can use Canva. Screenshots can be added to templates, mixed with other shapes or images, and given titles. It is beneficial for creating social media posts, slides, and school reports. Additionally, it makes it simple to resize screenshots for various layouts.
3. فوتوشوب
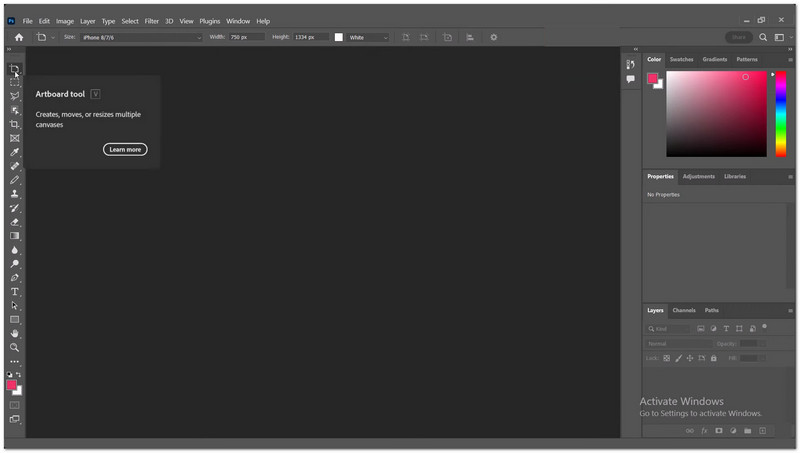
Complete control over editing screenshots is provided by Adobe Photoshop. You can work with multiple layers, remove unwanted objects, adjust lighting, and crop precisely. For professional work, where screenshots need to be clear and detailed, it is helpful. It provides the most editing control, but it requires practice.
Part 5. How to Print a Screenshot on Mac
You can use the steps on how to print a screenshot on a Mac to print it straight from a saved image. You can also copy it first and paste it into a document before printing. Both methods are simple and work well for school, work, or personal use.
Method 1: Print a Saved Screenshot Using Preview
Using the built-in Mac printing features, you can open a saved screenshot in Preview and print it right away.
الخطوة 1Find your screenshot on the Desktop or in the folder where it was saved. It is usually a PNG file named "Screen Shot [Date] at [Time]."
الخطوة 2Double-click the screenshot file. It will open in the Preview app. It is the default image viewer on Mac.
الخطوه 3Check the image carefully. Make sure it is the correct screenshot you want to print.
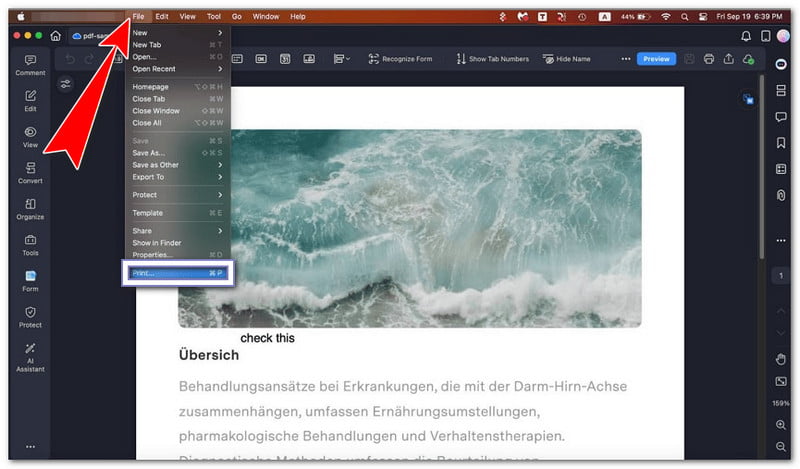
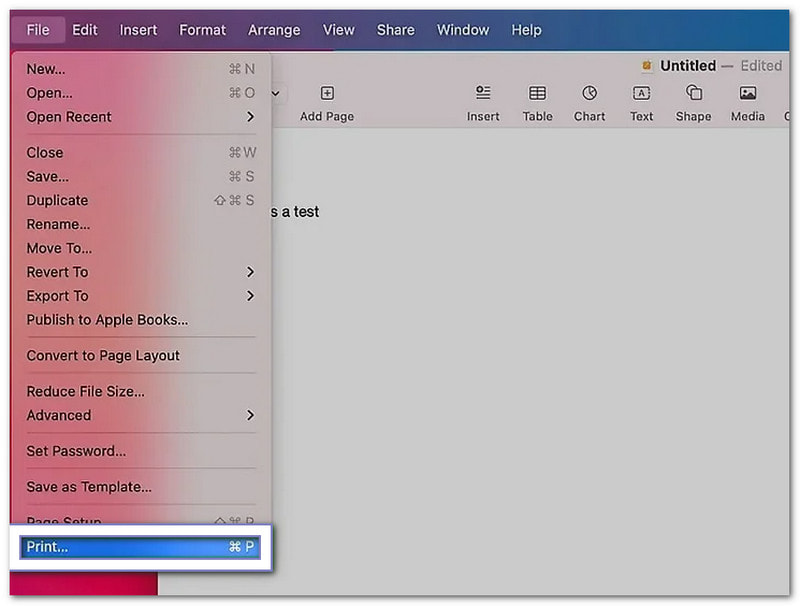
الخطوة 4يضعط يأمر + P on your keyboard. You can also click ملف at the top menu, then choose مطبعة.
الخطوة الخامسةSelect your printer from the list. Adjust settings if needed. Then, click Print to start printing.
Method 2: Paste a Screenshot into a Document Before Printing
This method lets you learn how to paste a screenshot on a Mac by placing a screenshot into a document first, then printing it with added content if needed.
الخطوة 1يضعط مراقبة + يحول + يأمر + 3 to take a screenshot and copy it directly to the clipboard.
الخطوة 2Open a document app like Pages, Word, or Notes. Go to a blank page or section.
الخطوه 3يضعط يأمر + الخامس to paste the screenshot into the document.
الخطوة 4Move or resize the image if needed so it fits well on the page.
الخطوة الخامسةيضعط يأمر + P to open the print window. Choose your printer, then click مطبعة.
Part 6. How to Manage & Delete Screenshots
Screenshots can build up fast on your Mac. That is why it helps to manage them. You can change file size, switch file format, and delete unwanted screenshots to keep your desktop clean and organized.
1. Screenshot Size & File Format Settings
These settings help control how big your screenshots are and what file type they are saved as.
Reduce Screenshot File Size
This option helps make screenshots smaller so they take up less storage space on your Mac.
الخطوة 1Take screenshots only of what you need. Press يأمر + يحول + 4 and drag to select a small area. It helps avoid large full-screen images.
الخطوة 2After saving, right-click the screenshot file on your Mac.
الخطوه 3أختر إجراءات سريعة > Convert Image. You can change it to JPG or HEIF. These formats make the file smaller.
الخطوة 4Save the new version. It helps you save space on your Mac.
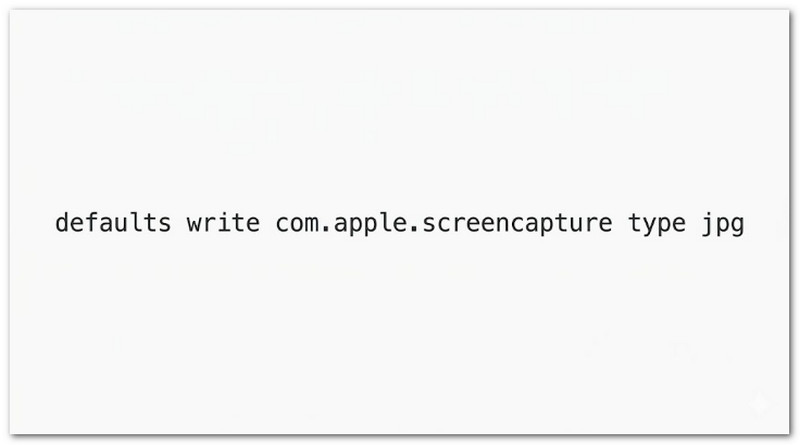
Change Screenshot File Format Using Terminal
You can use Terminal to switch screenshot formats like PNG, JPG, or other supported file types.
الخطوة 1فتح صالة on your Mac. Press يأمر + فضاء, type "Terminal", then press يعود.
الخطوة 2Type this command exactly: الإعدادات الافتراضية: كتابة com.apple.screencapture من النوع jpg.
الخطوه 3يضعط يدخل to apply the command. It changes your screenshot format to JPG.
الخطوة 4Restart your Mac. Or type killall SystemUIServer و اضغط يدخل to activate the change right away.
الخطوة الخامسةTake a new screenshot. It will now save in the new format you selected.
2. How to Delete Screenshots
This section explains how to delete screenshots on Mac using different methods to remove unwanted images and keep your Mac storage clean.
Delete Screenshots from the Thumbnail.
You can quickly delete a screenshot right after capturing it using the floating preview window.
الخطوة 1Take a screenshot using any shortcut on Mac.
الخطوة 2Look at the floating thumbnail that appears in the corner of your screen.
الخطوه 3Click the thumbnail before it disappears. It opens the editing window.
الخطوة 4انقر على نفاية button inside the window to delete the screenshot instantly.
الخطوة الخامسةClose the window when you are done.
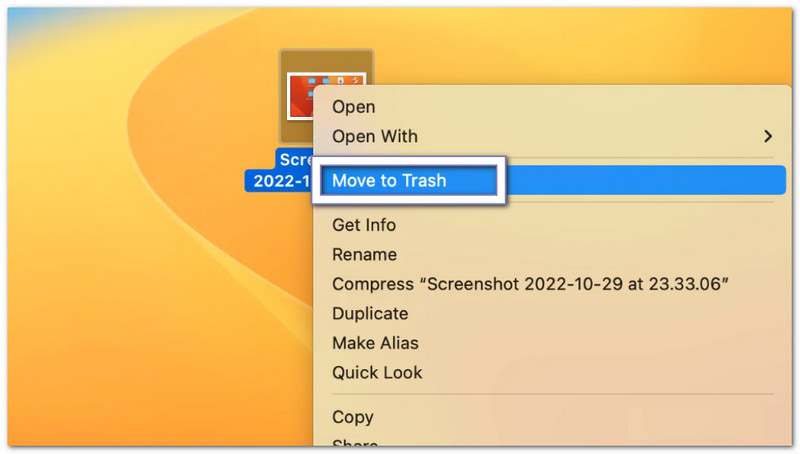
Delete Screenshots from the Desktop or Finder.
This method removes screenshots manually from your Desktop or Finder by moving them to the Trash.
الخطوة 1Go to your Desktop or open Finder and find your screenshot file.
الخطوة 2Click the screenshot once to select it.
الخطوه 3Drag the file to the نفاية in the Dock.
الخطوة 4Or press يأمر + يمسح to move it to Trash quickly.
الخطوة الخامسةEmpty the Trash if you want to remove it permanently.
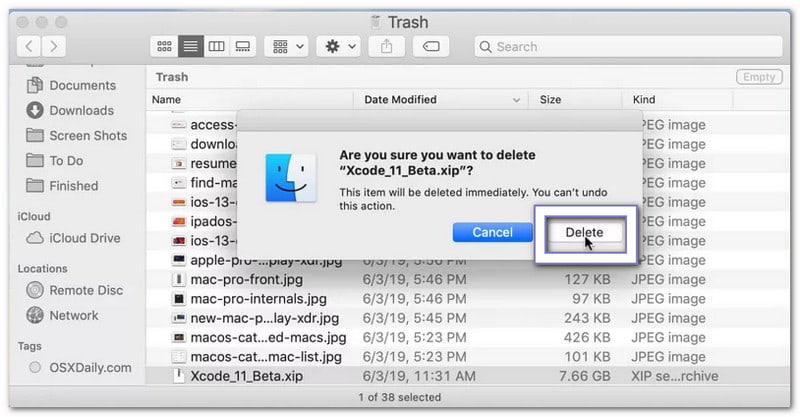
Delete a Screenshot Permanently.
This option removes screenshots immediately without sending them to Trash for recovery.
الخطوة 1Select the screenshot file on your Mac.
الخطوة 2يضعط خيار + يأمر + يمسح على لوحة المفاتيح الخاصة بك.
الخطوه 3A warning will appear asking for confirmation.
الخطوة 4Confirm the action to delete the file immediately.
الخطوة الخامسةThe screenshot will be removed without going to the Trash.
Part 7. Troubleshooting
Sometimes, screenshots on a Mac do not work as expected. You may not be able to drag them, they may not save, or they may show as black. These issues are common and can be fixed with simple checks.
1. Can't Drag Screenshots Anymore
If you are dealing with a "can't drag screenshots anymore on Mac", go to اعدادات النظام > Trackpad أو الفأر and make sure click and drag is enabled, because if it is off, dragging will not work. Then, open مكتشف, hold the Shift key، انقر على تفاح القائمة واختيار Force Quit Finder، ثم اضغط Relaunch. If it still fails, open the screenshot thumbnail and use the شارك button instead, or save it first and move it from the Desktop.
2. Screenshots Not Saving
If screenshots do not appear on your Desktop, press يأمر + يحول + 5, click Options, and check the save location because it may be set incorrectly. Make sure سطح المكتب أو وثائق is selected. If you use بصندوق الإسقاط أو وان درايف, check their settings since they may be saving your files to the cloud. If it still does not work, restart مكتشف or restart your Mac to fix the issue.
3. Screenshots Are Blank/Black
The app might block your screenshot if it is black. Screenshots won't work with streaming apps like Netflix or Apple TV because they use DRM protection. Turn off تسريع الأجهزة in the browser's settings if it occurs. Additionally, confirm that screenshot permissions are permitted by going to اعدادات النظام > Privacy & Security > تسجيل الشاشة.
Hope this guide helps you take a screenshot on a Mac simply. Now, you can capture your screen anytime without confusion.
If you ever need to capture long pages or chats, do not hesitate to use AVAide مسجل الشاشة. It makes scrolling screenshots easier in different apps. You can also save your captures directly to your local folder.
نبذة عن المؤلف

التقط أفضل لحظة باستخدام AVAide Screen Recorder. تسجيل الشاشة وتخصيصها ومشاركتها في ثوانٍ.
تسجيل الشاشة